7.2. Web Parts Basics
In this section, you learn the basics of working with Web Parts — operations common to most Web Parts. As mentioned earlier, you add Web Parts, stored in a site's Web Part gallery, to a Web Part page. Users with appropriate permissions can access this gallery by entering the Edit mode for a Web Part page where they can add Web Parts to a Web Part page in one of the clearly marked Web Part zones. You can enter Edit mode by selecting Edit Page from the Site Actions menu. Figure 7-4 shows an example of a page in Edit mode.
Figure 7-4. Figure 7-4
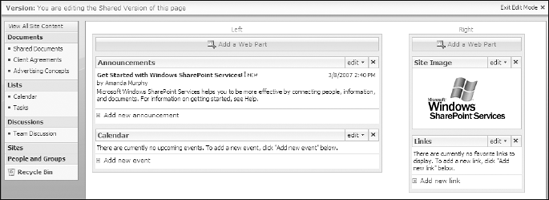
From this mode, you can do the following:
Add Web Parts to a Web Part zone: Web Parts can be added to the page by clicking an Add a Web Part button available at the top of each Web Part zone. Doing so opens a Web Part selection window displaying a categorized listing of Web Parts.
Drag Web Parts from zone to zone: Web Parts can be moved from one Web Part zone to another by simply selecting the title bar of a Web Part and dragging it to the desired zone.
Change properties of a Web Part: When a Web Part page is in Edit mode, an Edit button appears on the right-hand side of each Web Part title bar. By selecting this button, the Web Parts property pane appears. From this pane, you can make changes to the configuration, appearance, or behavior of the Web Part. You may also change the location of the Web Part using this pane. ...
Get Beginning SharePoint® 2007: Building Team Solutions with MOSS 2007 now with the O’Reilly learning platform.
O’Reilly members experience books, live events, courses curated by job role, and more from O’Reilly and nearly 200 top publishers.

