A.2. Convert It to AIR
If you haven't already done so, please download the original Weather Flex project from the Wrox download site, and import it into Flex Builder 3.
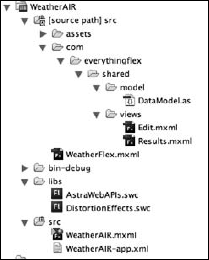
Now create a new project within Flex Builder 3 named WeatherAIR. Make sure you choose "Desktop Application" for the "Application Type." Click Next, and then leave the "Output Folder" as bin-debug and click Next again. Now click "Add Folder," and add the src folder from the WeatherFlex project as a source folder and click Finish. Finally, copy the DistortionEffects.swc file and AstraWebAPIs.swc from the libs folder of the WeatherFlex project to the libs folder of the WeatherAIR project. Your project should now look like the image shown in Figure A-3.
Figure A-3. The Navigation view of the new AIR project.
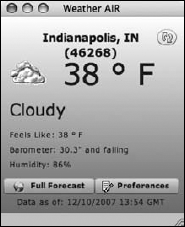
Now simply copy the contents of the WeatherFlex.mxml file into the WeatherAIR.mxml File. Next change the base tag from <mx:Application> to <mx:WindowedApplication>. You should now be able to test the AIR application. After running the new application, you should see something similar to Figure A-4.
Figure A-4. The newly created AIR application.
Get Beginning Adobe® AIR™: Building Applications for the Adobe Integrated Runtime now with the O’Reilly learning platform.
O’Reilly members experience books, live events, courses curated by job role, and more from O’Reilly and nearly 200 top publishers.

