Your app is nothing more than a pet project until it’s in Apple’s App Store. So, once you are confident about turning that pet project into an app that people around the world can download, you are going to fire up your browser and head over to Apple’s iTunes Connect (http://itunesconnect.apple.com) to submit your application. Before that can happen, though, there are some final development tasks to complete as well as a checklist you’ll want to cover to make submitting to the App Store a painless process.
In this chapter, you’ll explore:
Finishing up development items before submitting your app
A checklist of what you’ll need to submit to Apple in iTunes Connect
Understanding the approval process and checking on the status of the app
Dealing with app rejections and resubmission
If you are familiar with website management or online marketing, chances are you’ve heard the word “analytics” before. As is the case with websites, user activities within apps can be tracked.
Why is this important? Although Apple will provide you with some basic information about your application (mostly sales-focused), it won’t be able to help you understand what your users are doing with your app. Analytics will enable you to see what features your users find most useful, and can help influence what you add or remove from the app later.
A handful of analytics packages are available. Choosing the right one will largely depend on what best fits your needs. For example, you may want to track custom events, such as when a customer touches a particular button in your app. You may also want to have the analytics from your app integrate with your existing web analytics. The last major differentiator that I’ll mention is that some of the analytics platforms offer you the ability to view analytics, sales, and diagnostics information such as crash reports, all in one location. The following list includes some of the more popular options for you to evaluate based on what’s most important for your app:
Flurry, http://www.flurry.com/
Heartbeat, http://www.heartbeatapp.com (a service of Mobclix)
TapMetrics, http://tapmetrics.com/ (a service of Millennial Media)
Google Analytics, http://code.google.com/apis/analytics/docs/tracking/mobileAppsTracking.html
Omniture, http://www.omniture.com/ (through SiteCatalyst)
Note
Apple’s latest policies indicate that analytics are to be used solely for the purposes of measuring advertising. Although Apple does not appear to be strictly enforcing this policy, note that what the analytics providers are able to collect and how they operate depends exclusively on Apple and is subject to change. Additionally, with the release of iOS 4, Apple has suggested that developers begin notifying customers if analytics data is collected and how it is used. Review Section 3.3.9 of the iOS Developer Program License Agreement to learn more about Apple’s restrictions and requirements in this area.
You’ll likely want to discuss these packages with your developer. Be sure to work with him to set up any particular events you want tracked in the application. Of course, it’s critical to verify that the analytics are tracking properly before submitting the app. Even if your developer installed analytics during your QA and testing, have him double-check that they are installed when preparing the App Store version of the app.
Chris Brown, the founder of TapMetrics (now a service of Millennial Media), is interviewed at the end of this chapter. He discusses some details about properly launching an app and testing and installing analytics. Chapter 9 covers how to leverage analytics and events to inform you how customers are using your app.
Other tools are available that let you gain insight into your app. You can also integrate these tools in some of your team’s final development tasks.
- In App Support
In the Finishing touches section in Chapter 5, I discussed providing a guided user experience for your customers. Sometimes, despite all your best efforts, customers will still have questions. To help with this situation, you might consider having a dedicated help or support area in your app. Many developers typically place this in a More tab or Settings area.
Some items to list in this area can include a help manual (much less interactive and fun than what we covered in Finishing touches), in-app email for customers to send support questions or feature requests, and even surveys (e.g., http://haveasec.com). The emails will be more explicit in communicating what your customers want. However, the help manual can also give you insight into what customers want. The manual is usually served through a web view (i.e., HTML that gets loaded into the app), and if you add web analytics to those pages, you can see what customers are looking at the most (see Figure 7-1). This should clue you in to areas you need to improve or make clearer in your app.
- Prompt for ratings and reviews
Although you will reach out to your most engaged customers to ask for some initial ratings and reviews (detailed in Chapter 8) when your app launches, it’s also a smart strategy to prompt customers to rate your app. Customers who may like your app often will not take the time to give feedback in the App Store simply because they are too busy.
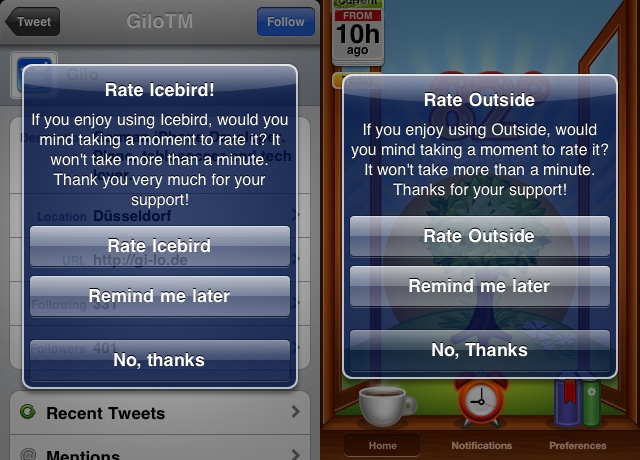
It’s especially easy to include this functionality in your app and prompt customers for ratings, thanks to some handiwork from Arash Payan, who created the open source project Appirater (http://github.com/arashpayan/appirater/, shown in Figure 7-2). By default, Appirater will see if a customer has used your app for 30 days and launched it at least 15 times, and if so, it will ask the customer to rate the app. Using these criteria will ensure that satisfied customers are rating your app. If you want to be a little less conservative and get ratings more quickly, you can change these values (e.g., drop the number of days down to five).
Recall that the app you’ve been using to refine and fix features is not an App Store version of your app; it’s a development version. The final task for your developer to perform before the app can be submitted to the App Store is to prepare an App Store version of it.
An explanation of how to create an App Store build of your app will put you to sleep. It’s unlikely that your developer got you this far and doesn’t know how to create the app for App Store distribution. To be fair, though, many developers struggle with creating the App Store version of their app the first time they try it. Whether your developer is a newbie or a seasoned pro, a good resource for help in this task is Learning iPhone Programming (http://oreilly.com/catalog/9780596806446/) by Alasdair Allan (O’Reilly).
Once the developer has the App Store version of the app ready, you’ll receive either a .zip or an .ipa file (e.g., <AppName>.zip or <AppName>.ipa). These are the only two formats that Apple accepts, and each must be 2 GB or less. This file—what Apple calls the binary—will contain everything Apple needs for someone to install your application on a device, including the actual app and the app icons required for your app. Recall from earlier discussions (see App type in Chapter 1 and Devices and resolutions in Chapter 5) that various sizes of the creative assets are required depending on the devices targeted.
Note
Your next marketing checkup, for the Phase 4 section of Chapter 8, will begin prepping you for the launch of your app. With the approval of your app by the end of this chapter, you’ll move into the final phase of the marketing crescendo. If you have been diligent with your marketing checkups throughout the book, you will have already consumed the majority of Chapter 8.
Get App Savvy now with the O’Reilly learning platform.
O’Reilly members experience books, live events, courses curated by job role, and more from O’Reilly and nearly 200 top publishers.

