Chapter 1. Introduction
It’s an interesting time to be working in the IT industry. We don’t deliver software to our customers by installing a program on a single machine and calling it a day.1 Instead, we are all slowly turning into system engineers.
We now deploy software applications by stringing together services that run on a distributed set of computing resources and communicate over different networking protocols. A typical application can include web servers, application servers, memory-based caching systems, task queues, message queues, SQL databases, NoSQL datastores, and load balancers.
We also need to make sure we have the appropriate redundancies in place, so that when failures happen (and they will), our software systems will handle these failures gracefully. Then there are the secondary services that we also need to deploy and maintain, such as logging, monitoring, and analytics, as well as third-party services we need to interact with, such as infrastructure-as-a-service (IaaS) endpoints for managing virtual machine instances.2
You can wire up these services by hand: spinning up the servers you need, SSHing to each one, installing packages, editing config files, and so forth, but it’s a pain. It’s time-consuming, error-prone, and just plain dull to do this kind of work manually, especially around the third or fourth time. And for more complex tasks, like standing up an OpenStack cloud inside your application, doing it by hand is madness. There’s a better way.
If you’re reading this, you’re probably already sold on the idea of configuration management and considering adopting Ansible as your configuration management tool. Whether you’re a developer deploying your code to production, or you’re a systems administrator looking for a better way to automate, I think you’ll find Ansible to be an excellent solution to your problem.
Ansible: What Is It Good For?
Ansible is often described as a configuration management tool, and is typically mentioned in the same breath as Chef, Puppet, and Salt. When we talk about configuration management, we are typically talking about writing some kind of state description for our servers, and then using a tool to enforce that the servers are, indeed, in that state: the right packages are installed, configuration files contain the expected values and have the expected permissions, the right services are running, and so on. Like other configuration management tools, Ansible exposes a domain-specific language (DSL) that you use to describe the state of your servers.
These tools can be used for deployment as well. When people talk about deployment, they are usually referring to the process of taking software that was written in-house, generating binaries or static assets (if necessary), copying the required files to the server(s), and then starting up the services. Capistrano and Fabric are two examples of open source deployment tools. Ansible is a great tool for deployment as well as configuration management. Using a single tool for both configuration management and deployment makes life simpler for the folks responsible for operations.
Some people talk about the need for orchestration of deployment. This is where multiple remote servers are involved, and things have to happen in a specific order. For example, you need to bring up the database before bringing up the web servers, or you need to take web servers out of the load balancer one at a time in order to upgrade them without downtime. Ansible is good at this as well, and is designed from the ground up for performing actions on multiple servers. Ansible has a refreshingly simple model for controlling the order in which actions happen.
Finally, you’ll hear people talk about provisioning new servers. In the context of public clouds such as Amazon EC2, this refers to spinning up a new virtual machine instance. Ansible has got you covered here, with a number of modules for talking to clouds, including EC2, Azure, Digital Ocean, Google Compute Engine, Linode, and Rackspace, as well as any clouds that support the OpenStack APIs.
Note
Confusingly, the Vagrant tool, covered later in this chapter, uses the term provisioner to refer to a tool that does the configuration management. So, Vagrant refers to Ansible as a kind of provisioner, whereas I think of Vagrant as a provisioner, since Vagrant is responsible for starting up virtual machines.
How Ansible Works
Figure 1-1 shows a sample use case of Ansible in action. A user we’ll call Stacy is using Ansible to configure three Ubuntu-based web servers to run Nginx. She has written an Ansible script called webservers.yml. In Ansible, a script is called a playbook. A playbook describes which hosts (what Ansible calls remote servers) to configure, and an ordered list of tasks to perform on those hosts. In this example, the hosts are web1, web2, and web3, and the tasks are things such as these:
-
Install Nginx
-
Generate an Nginx configuration file
-
Copy over the security certificate
-
Start the Nginx service
In the next chapter, we’ll discuss what’s in this playbook. Stacy executes the playbook by using the ansible-playbook command. In the example, the playbook is named webservers.yml, and is executed by typing the following:
$ ansible-playbook webservers.yml
Ansible will make SSH connections in parallel to web1, web2, and web3. It will execute the first task on the list on all three hosts simultaneously. In this example, the first task is installing the Nginx apt package (since Ubuntu uses the apt package manager), so the task in the playbook would look something like this:
-name:Install nginxapt:name=nginx
Ansible will do the following:
-
Generate a Python script that installs the Nginx package
-
Copy the script to web1, web2, and web3
-
Execute the script on web1, web2, and web3
-
Wait for the script to complete execution on all hosts
Ansible will then move to the next task in the list, and go through these same four steps. It’s important to note the following:
-
Ansible runs each task in parallel across all hosts.
-
Ansible waits until all hosts have completed a task before moving to the next task.
-
Ansible runs the tasks in the order that you specify them.
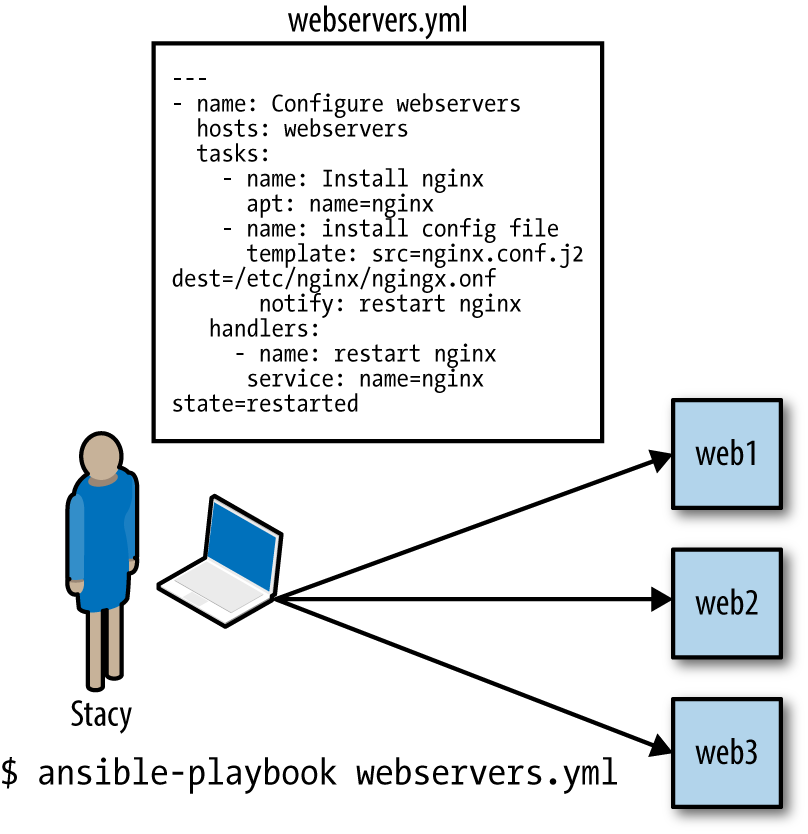
Figure 1-1. Running an Ansible playbook to configure three web servers
What’s So Great About Ansible?
There are several open source configuration management tools out there to choose from. Here are some of the things that drew me to Ansible.
Easy-to-Read Syntax
Recall that Ansible configuration management scripts are called playbooks. Ansible’s playbook syntax is built on top of YAML, which is a data format language that was designed to be easy for humans to read and write. In a way, YAML is to JSON what Markdown is to HTML.
I like to think of Ansible playbooks as executable documentation. It’s like the README file that describes the commands you had to type out to deploy your software, except that the instructions will never go out-of-date because they are also the code that gets executed directly.
Nothing to Install on the Remote Hosts
To manage a server with Ansible, the server needs to have SSH and Python 2.5 or later installed, or Python 2.4 with the Python simplejson library installed. There’s no need to preinstall an agent or any other software on the host.
The control machine (the one that you use to control remote machines) needs to have Python 2.6 or later installed.
Tip
Some modules might require Python 2.5 or later, and some might have additional prerequisites. Check the documentation for each module to see whether it has specific requirements.
Push Based
Some configuration management systems that use agents, such as Chef and Puppet, are pull based by default. Agents installed on the servers periodically check in with a central service and pull down configuration information from the service. Making configuration management changes to servers goes something like this:
-
You: make a change to a configuration management script.
-
You: push the change up to a configuration management central service.
-
Agent on server: wakes up after periodic timer fires.
-
Agent on server: connects to configuration management central service.
-
Agent on server: downloads new configuration management scripts.
-
Agent on server: executes configuration management scripts locally that change server state.
In contrast, Ansible is push based by default. Making a change looks like this:
-
You: make a change to a playbook.
-
You: run the new playbook.
-
Ansible: connects to servers and executes modules, which changes server state.
As soon as you run the ansible-playbook command, Ansible connects to the
remote server and does its thing.
The push-based approach has a significant advantage: you control when the changes happen to the servers. You don’t need to wait around for a timer to expire. Advocates of the pull-based approach claim that pull is superior for scaling to large numbers of servers and for dealing with new servers that can come online anytime. However, as we’ll discuss later in the book, Ansible has been used successfully in production with thousands of nodes, and has excellent support for environments where servers are dynamically added and removed.
If you really prefer using a pull-based model, Ansible has official support for pull mode, using a tool it ships with called ansible-pull. I don’t cover pull mode in this book, but you can read more about it in the official documentation.
Ansible Scales Down
Yes, Ansible can be used to manage hundreds or even thousands of nodes. But what got me hooked is how it scales down. Using Ansible to configure a single node is easy; you simply write a single playbook. Ansible obeys Alan Kay’s maxim: “Simple things should be simple; complex things should be possible.”
Built-in Modules
You can use Ansible to execute arbitrary shell commands on your remote servers, but Ansible’s real power comes from the collection of modules it ships with. You use modules to perform tasks such as installing a package, restarting a service, or copying a configuration file.
As you’ll see later, Ansible modules are declarative; you use them to describe
the state you want the server to be in. For example, you would invoke the user
module like this to ensure there was an account named deploy in the web
group:
user: name=deploy group=web
Modules are also idempotent. If the deploy user doesn’t exist, Ansible will
create it. If it does exist, Ansible won’t do anything. Idempotence is a
nice property because it means that it’s safe to run an Ansible playbook
multiple times against a server. This is a big improvement over the homegrown
shell script approach, where running the shell script a second time might have a different
(and likely unintended) effect.
Very Thin Layer of Abstraction
Some configuration management tools provide a layer of abstraction so that you can use the same configuration management scripts to manage servers running different operating systems. For example, instead of having to deal with a specific package manager like yum or apt, the configuration management tool exposes a “package” abstraction that you use instead.
Ansible isn’t like that. You have to use the apt module to install packages on apt-based systems and the yum module to install packages on yum-based systems.
Although this might sound like a disadvantage, in practice I’ve found that it makes Ansible easier to work with. Ansible doesn’t require that I learn a new set of abstractions that hide the differences between operating systems. This makes Ansible’s surface area smaller; there’s less you need to know before you can start writing playbooks.
If you really want to, you can write your Ansible playbooks to take different actions, depending on the operating system of the remote server. But I try to avoid that when I can, and instead I focus on writing playbooks that are designed to run on a specific operating system, such as Ubuntu.
The primary unit of reuse in the Ansible community is the module. Because the scope of a module is small and can be operating-system specific, it’s straightforward to implement well-defined, shareable modules. The Ansible project is very open to accepting modules contributed by the community. I know because I’ve contributed a few.
Ansible playbooks aren’t really intended to be reused across different contexts. In Chapter 7, we’ll discuss roles, which is a way of collecting playbooks together so they are more reusable, as well as Ansible Galaxy, which is an online repository of these roles.
In practice, though, every organization sets up its servers a little bit differently, and you’re best off writing playbooks for your organization rather than trying to reuse generic playbooks. I believe the primary value of looking at other people’s playbooks is for examples to see how things are done.
Is Ansible Too Simple?
When I was working on this book, my editor mentioned to me that “some folks who use the XYZ configuration management tool call Ansible a for-loop over SSH scripts.” If you’re considering switching over from another config management tool, you might be concerned at this point about whether Ansible is powerful enough to meet your needs.
As you’ll soon learn, Ansible provides a lot more functionality than shell scripts. As I mentioned, Ansible’s modules provide idempotence, and Ansible has excellent support for templating, as well as defining variables at different scopes. Anybody who thinks Ansible is equivalent to working with shell scripts has never had to maintain a nontrivial program written in shell. I’ll always choose Ansible over shell scripts for config management tasks if given a choice.
And if you’re worried about the scalability of SSH? As we’ll discuss in Chapter 12, Ansible uses SSH multiplexing to optimize performance, and there are folks out there who are managing thousands of nodes with Ansible.3
Note
I’m not familiar enough with the other tools to describe their differences in detail. If you’re looking for a head-to-head comparison of config management tools, check out Taste Test: Puppet, Chef, Salt, Ansible by Matt Jaynes. As it happens, Matt prefers Ansible.
What Do I Need to Know?
To be productive with Ansible, you need to be familiar with basic Linux system administration tasks. Ansible makes it easy to automate your tasks, but it’s not the kind of tool that “automagically” does things that you otherwise wouldn’t know how to do.
For this book, I assumed my readers would be familiar with at least one Linux distribution (e.g., Ubuntu, RHEL/CentOS, SUSE), and that they would know how to
-
Connect to a remote machine using SSH
-
Interact with the Bash command-line shell (pipes and redirection)
-
Install packages
-
Use the
sudocommand -
Check and set file permissions
-
Start and stop services
-
Set environment variables
-
Write scripts (any language)
If these concepts are all familiar to you, you’re good to go with Ansible.
I won’t assume you have knowledge of any particular programming language. For instance, you don’t need to know Python to use Ansible unless you want to write your own module.
Ansible uses the YAML file format and the Jinja2 templating languages, so you’ll need to learn some YAML and Jinja2 to use Ansible, but both technologies are easy to pick up.
What Isn’t Covered
This book isn’t an exhaustive treatment of Ansible. It’s designed to get you productive in Ansible as quickly as possible and describes how to perform certain tasks that aren’t obvious from glancing over the official documentation.
I don’t cover the official Ansible modules in detail. There are over 200 of these, and the official Ansible reference documentation on the modules is quite good.
I cover only the basic features of the templating engine that Ansible uses, Jinja2, primarily because I find that I generally need to use only those basic features when I use Ansible. If you need to use more advanced Jinja2 features in your templates, I recommend you check out the official Jinja2 documentation.
I don’t go into detail about some features of Ansible that are mainly useful when you are running Ansible on an older version of Linux. This includes features such as the Paramiko SSH client and accelerated mode.
Finally, there are several features of Ansible I don’t cover simply to keep the book a manageable length. These features include pull mode, logging, connecting to hosts using protocols other than SSH, and prompting the user for passwords or input. I encourage you to check out the official docs to find out more about these features.
Installing Ansible
If you’re running on a Linux machine, all of the major Linux distributions package Ansible these days, so you should be able to install it using your native package manager, although this might be an older version of Ansible. If you’re running on macOS, I recommend you use the excellent Homebrew package manager to install Ansible.
If all else fails, you can install it using pip, Python’s package manager. You can install it as root by running the following:
$ sudo pip install ansible
If you don’t want to install Ansible as root, you can safely install it into a Python virtualenv. If you’re not familiar with virtualenvs, you can use a newer tool called pipsi that will automatically install Ansible into a virtualenv for you:
$ wget https://raw.githubusercontent.com/mitsuhiko/pipsi/master/get-pipsi.py
$ python get-pipsi.py
$ pipsi install ansible
If you go the pipsi route, you need to update your PATH environment variable to include ~/.local/bin. Some Ansible plugins and modules might require additional Python libraries. If you’ve installed with pipsi, and you want to install docker-py (needed by the Ansible Docker modules) and boto (needed by the Ansible EC2 modules), you do it like this:
$ cd ~/.local/venvs/ansible
$ source bin/activate
$ pip install docker-py boto
If you’re feeling adventurous and want to use the bleeding-edge version of Ansible, you can grab the development branch from GitHub:
$ git clone https://github.com/ansible/ansible.git --recursive
If you’re running Ansible from the development branch, you need to run these commands each time to set up your environment variables, including your PATH variable so that your shell knows where the ansible and ansible-playbooks programs are:
$ cd ./ansible
$ source ./hacking/env-setup
For more details on installation see these resources:
Setting Up a Server for Testing
You need to have SSH access and root privileges on a Linux server to follow along with the examples in this book. Fortunately, these days it’s easy to get low-cost access to a Linux virtual machine through a public cloud service such as Amazon EC2, Google Compute Engine, Microsoft Azure,4 Digital Ocean, Linode…you get the idea.
Using Vagrant to Set Up a Test Server
If you prefer not to spend the money on a public cloud, I recommend you install Vagrant on your machine. Vagrant is an excellent open source tool for managing virtual machines. You can use Vagrant to boot a Linux virtual machine inside your laptop, and you can use that as a test server.
Vagrant has built-in support for provisioning virtual machines with Ansible, but we’ll talk about that in detail in Chapter 3. For now, we’ll just manage a Vagrant virtual machine as if it were a regular Linux server.
Vagrant needs the VirtualBox virtualizer to be installed on your machine. Download VirtualBox and then download Vagrant.
I recommend you create a directory for your Ansible playbooks and related files. In the following example, I’ve named mine playbooks.
Run the following commands to create a Vagrant configuration file (Vagrantfile) for an Ubuntu 14.04 (Trusty Tahr) 64-bit virtual machine image,5 and boot it:
$mkdir playbooks$cdplaybooks$vagrant init ubuntu/trusty64$vagrant up
Note
The first time you use vagrant up, it will download the virtual machine image file, which might take a while, depending on your internet connection.
If all goes well, the output should look like this:
Bringing machine 'default' up with 'virtualbox' provider...
==> default: Importing base box 'ubuntu/trusty64'...
==> default: Matching MAC address for NAT networking...
==> default: Checking if box 'ubuntu/trusty64' is up to date...
==> default: Setting the name of the VM: playbooks_default_1474348723697_56934
==> default: Clearing any previously set forwarded ports...
==> default: Clearing any previously set network interfaces...
==> default: Preparing network interfaces based on configuration...
    default: Adapter 1: nat
==> default: Forwarding ports...
    default: 22 (guest) => 2222 (host) (adapter 1)
==> default: Booting VM...
==> default: Waiting for machine to boot. This may take a few minutes...
    default: SSH address: 127.0.0.1:2222
    default: SSH username: vagrant
    default: SSH auth method: private key
    default: Warning: Remote connection disconnect. Retrying...
    default: Warning: Remote connection disconnect. Retrying...
    default:
    default: Vagrant insecure key detected. Vagrant will automatically replace
    default: this with a newly generated keypair for better security.
    default:
    default: Inserting generated public key within guest...
    default: Removing insecure key from the guest if it's present...
    default: Key inserted! Disconnecting and reconnecting using new SSH key...
==> default: Machine booted and ready!
==> default: Checking for guest additions in VM...
    default: The guest additions on this VM do not match the installed version
    default: of VirtualBox! In most cases this is fine, but in rare cases it can
    default: prevent things such as shared folders from working properly. If you
    default: see shared folder errors, please make sure the guest additions
    default: within the virtual machine match the version of VirtualBox you have
    default: installed on your host and reload your VM.
    default:
    default: Guest Additions Version: 4.3.36
    default: VirtualBox Version: 5.0
==> default: Mounting shared folders...
    default: /vagrant => /Users/lorin/dev/ansiblebook/ch01/playbooks
You should be able to SSH into your new Ubuntu 14.04 virtual machine by running the following:
$ vagrant sshIf this works, you should see a login screen like this:
Welcome to Ubuntu 14.04.5 LTS (GNU/Linux 3.13.0-96-generic x86_64)

 * Documentation:  https://help.ubuntu.com/

  System information as of Fri Sep 23 05:13:05 UTC 2016

  System load:  0.76              Processes:           80
  Usage of /:   3.5% of 39.34GB   Users logged in:     0
  Memory usage: 25%               IP address for eth0: 10.0.2.15
  Swap usage:   0%

  Graph this data and manage this system at:
    https://landscape.canonical.com/

  Get cloud support with Ubuntu Advantage Cloud Guest:
    http://www.ubuntu.com/business/services/cloud

0 packages can be updated.
0 updates are security updates.

New release '16.04.1 LTS' available.
Run 'do-release-upgrade' to upgrade to it.
Type exit to quit the SSH session.
This approach lets us interact with the shell, but Ansible needs to connect to the virtual machine by using the regular SSH client, not the vagrant ssh command.
Tell Vagrant to output the SSH connection details by typing the following:
$ vagrant ssh-configOn my machine, the output looks like this:
Host default
  HostName 127.0.0.1
  User vagrant
  Port 2222
  UserKnownHostsFile /dev/null
  StrictHostKeyChecking no
  PasswordAuthentication no
  IdentityFile /Users/lorin/dev/ansiblebook/ch01/playbooks/.vagrant/
  machines/default/virtualbox/private_key
  IdentitiesOnly yes
  LogLevel FATAL
The important lines are shown here:
  HostName 127.0.0.1
  User vagrant
  Port 2222
  IdentityFile /Users/lorin/dev/ansiblebook/ch01/playbooks/.vagrant/
  machines/default/virtualbox/private_key
Note
Vagrant 1.7 changed how it handled private SSH keys. Starting with 1.7, Vagrant generates a new private key for each machine. Earlier versions used the same key, which was in the default location of ~/.vagrant.d/insecure_private_key. The examples in this book use Vagrant 1.7.
In your case, every field should likely be the same except for the path of the identity file.
Confirm that you can start an SSH session from the command line by using this information. In my case, the SSH command is as follows:
$ssh vagrant@127.0.0.1 -p2222-i /Users/lorin/dev/ansiblebook/ch01/playbooks/.vagrant/machines/default/virtualbox/private_key
You should see the Ubuntu login screen. Type exit to quit the SSH session.
Telling Ansible About Your Test Server
Ansible can manage only the servers it explicitly knows about. You provide Ansible with information about servers by specifying them in an inventory file.
Each server needs a name that Ansible will use to identify it. You can use the
hostname of the server, or you can give it an alias and pass additional
arguments to tell Ansible how to connect to it. We’ll give our Vagrant server the alias of testserver.
Create a file called hosts in the playbooks directory. This file will serve as the inventory file. If you’re using a Vagrant machine as your test server, your hosts file should look like Example 1-1. I’ve broken up the file content across multiple lines so that it fits on the page, but it should be all on one line in your file, without any backslashes.
Example 1-1. playbooks/hosts
testserver ansible_host=127.0.0.1 ansible_port=2222 \
 ansible_user=vagrant \
 ansible_private_key_file=.vagrant/machines/default/virtualbox/private_key
Here we see one of the drawbacks of using Vagrant: we have to explicitly pass in extra arguments to tell Ansible how to connect. In most cases, we won’t need this extra data.
Later in this chapter, you’ll see how to use the ansible.cfg file to avoid having to be so verbose in the inventory file. In later chapters, you’ll see how to use Ansible variables to similar effect.
If you have an Ubuntu machine on Amazon EC2 with a hostname like
ec2-203-0-113-120.compute-1.amazonaws.com, then your inventory file will look
something like this (all on one line):
testserver ansible_host=ec2-203-0-113-120.compute-1.amazonaws.com \
 ansible_user=ubuntu ansible_private_key_file=/path/to/keyfile.pem
Tip
Ansible supports the ssh-agent program, so you don’t need to explicitly specify SSH key files in your inventory files. See “SSH Agent” for more details if you haven’t used ssh-agent before.
We’ll use the ansible command-line tool to verify that we can use Ansible to connect to the server. You won’t use the ansible command often; it’s mostly used for ad hoc, one-off things.
Let’s tell Ansible to connect to the server named testserver described in the inventory file named hosts and invoke the ping module:
$ ansible testserver -i hosts -m ping
If your local SSH client has host-key verification enabled, you might see something that looks like this the first time Ansible tries to connect to the server:
The authenticity of host '[127.0.0.1]:2222 ([127.0.0.1]:2222)' \
can't be established.
RSA key fingerprint is e8:0d:7d:ef:57:07:81:98:40:31:19:53:a8:d0:76:21.
Are you sure you want to continue connecting (yes/no)?
You can just type yes.
If it succeeded, output will look like this:
testserver | success >> {
    "changed": false,
    "ping": "pong"
}
Tip
If Ansible did not succeed, add the -vvvv flag to see more details about the error:
$ ansible testserver -i hosts -m ping -vvvvWe can see that the module succeeded. The "changed": false part of the
output tells us that executing the module did not change the state of the server. The "ping": "pong" text is output that is specific to the ping module.
The ping module doesn’t do anything other than check that Ansible can
start an SSH session with the servers. It’s a useful tool for testing that Ansible
can connect to the server.
Simplifying with the ansible.cfg File
We had to type a lot of text in the inventory file to tell Ansible about our test server. Fortunately, Ansible has ways to specify these sorts of variables so we don’t have to put them all in one place. Right now, we’ll use one such mechanism, the ansible.cfg file, to set some defaults so we don’t need to type as much.
Example 1-2 shows an ansible.cfg file that specifies the location of
the inventory file (inventory), the user to SSH (remote_user), and the SSH
private key (private_key_file). This assumes you’re using Vagrant. If you’re using your own server, you’ll need to set the remote_user and private_key_file
values accordingly.
Our example configuration also disables SSH host-key checking. This is convenient when dealing with Vagrant machines; otherwise, we need to edit our ~/.ssh/known_hosts file every time we destroy and re-create a Vagrant machine. However, disabling host-key checking can be a security risk when connecting to other servers over the network. If you’re not familiar with host keys, they are covered in detail in Appendix A.
Example 1-2. ansible.cfg
[defaults]inventory=hostsremote_user=vagrantprivate_key_file=.vagrant/machines/default/virtualbox/private_keyhost_key_checking=False
With our default values set, we no longer need to specify the SSH user or key file in our hosts file. Instead, it simplifies to the following:
testserver ansible_host=127.0.0.1 ansible_port=2222
We can also invoke Ansible without passing the -i hostname arguments, like so:
$ ansible testserver -m pingI like to use the ansible command-line tool to run arbitrary commands on remote machines, like parallel SSH. You can execute arbitrary commands with the
command module. When invoking this module, you also need to pass an argument
to the module with the -a flag, which is the command to run.
For example, to check the uptime of our server, we can use this:
$ansible testserver -mcommand-a uptime
Output should look like this:
testserver | success | rc=0 >>
 17:14:07 up  1:16,  1 user,  load average: 0.16, 0.05, 0.04
The command module is so commonly used that it’s the default module, so we can
omit it:
$ ansible testserver -a uptimeIf our command contains spaces, we need to quote it so that the shell passes the entire string as a single argument to Ansible. For example, to view the last several lines of the /var/log/dmesg logfile:
$ansible testserver -a"tail /var/log/dmesg"
The output from my Vagrant machine looks like this:
testserver | success | rc=0 >>
[    5.170544] type=1400 audit(1409500641.335:9): apparmor="STATUS" operation=
"profile_replace" profile="unconfined" name="/usr/lib/NetworkManager/nm-dhcp-c
lient.act on" pid=888 comm="apparmor_parser"
[    5.170547] type=1400 audit(1409500641.335:10): apparmor="STATUS" operation=
"profile_replace" profile="unconfined" name="/usr/lib/connman/scripts/dhclient-
script" pid=888 comm="apparmor_parser"
[    5.222366] vboxvideo: Unknown symbol drm_open (err 0)
[    5.222370] vboxvideo: Unknown symbol drm_poll (err 0)
[    5.222372] vboxvideo: Unknown symbol drm_pci_init (err 0)
[    5.222375] vboxvideo: Unknown symbol drm_ioctl (err 0)
[    5.222376] vboxvideo: Unknown symbol drm_vblank_init (err 0)
[    5.222378] vboxvideo: Unknown symbol drm_mmap (err 0)
[    5.222380] vboxvideo: Unknown symbol drm_pci_exit (err 0)
[    5.222381] vboxvideo: Unknown symbol drm_release (err 0)
If we need root access, we pass in the -b flag to tell Ansible to become the root user. For example, accessing /var/log/syslog requires root access:
$ansible testserver -b -a"tail /var/log/syslog"
The output looks something like this:
testserver | success | rc=0 >>
Aug 31 15:57:49 vagrant-ubuntu-trusty-64 ntpdate[1465]: /
adjust time server 91.189
94.4 offset -0.003191 sec
Aug 31 16:17:01 vagrant-ubuntu-trusty-64 CRON[1480]: (root) CMD (   cd /
&& run-p
rts --report /etc/cron.hourly)
Aug 31 17:04:18 vagrant-ubuntu-trusty-64 ansible-ping: Invoked with data=None
Aug 31 17:12:33 vagrant-ubuntu-trusty-64 ansible-ping: Invoked with data=None
Aug 31 17:14:07 vagrant-ubuntu-trusty-64 ansible-command: Invoked with executable
None shell=False args=uptime removes=None creates=None chdir=None
Aug 31 17:16:01 vagrant-ubuntu-trusty-64 ansible-command: Invoked with executable
None shell=False args=tail /var/log/messages removes=None creates=None chdir=None
Aug 31 17:17:01 vagrant-ubuntu-trusty-64 CRON[2091]: (root) CMD (   cd /
&& run-pa
rts --report /etc/cron.hourly)
Aug 31 17:17:09 vagrant-ubuntu-trusty-64 ansible-command: Invoked with /
executable=
N one shell=False args=tail /var/log/dmesg removes=None creates=None chdir=None
Aug 31 17:19:01 vagrant-ubuntu-trusty-64 ansible-command: Invoked with /
executable=
None shell=False args=tail /var/log/messages removes=None creates=None chdir=None
Aug 31 17:22:32 vagrant-ubuntu-trusty-64 ansible-command: Invoked with /
executable=
one shell=False args=tail /var/log/syslog removes=None creates=None chdir=None
We can see from this output that Ansible writes to the syslog as it runs.
You aren’t just restricted to the ping and command modules when using the
ansible command-line tool: you can use any module that you like. For example,
you can install Nginx on Ubuntu by using the following command:
$ansible testserver -b -m apt -aname=nginx
Tip
If installing Nginx fails for you, you might need to update the package lists. To
tell Ansible to do the equivalent of apt-get update before installing the
package, change the argument from name=nginx to "name=nginx update_cache=yes".
You can restart Nginx as follows:
$ansible testserver -b -m service -a"name=nginx \state=restarted"
We need the -b argument to become the root user because only root can install the Nginx package and restart services.
Moving Forward
To recap, this introductory chapter covered the basic concepts of Ansible at a high level, including how it communicates with remote servers and how it
differs from other configuration management tools. You’ve also seen how to use
the ansible command-line tool to perform simple tasks on a single host.
However, using ansible to run commands against single hosts isn’t terribly interesting.
The next chapter covers playbooks, where the real action is.
1 OK, nobody ever really delivered software like that.
2 Check out The Practice of Cloud System Administration and Designing Data-Intensive Applications for excellent books on building and maintaining these types of distributed systems.
3 For example, see “Using Ansible at Scale to Manage a Public Cloud” by Jesse Keating, formerly of Rackspace.
4 Yes, Azure supports Linux servers.
5 Vagrant uses the term machine to refer to a virtual machine and box to refer to a virtual machine image.
Get Ansible: Up and Running, 2nd Edition now with the O’Reilly learning platform.
O’Reilly members experience books, live events, courses curated by job role, and more from O’Reilly and nearly 200 top publishers.

