Chapter 4. Inter-/Intra-Process Communication
4.1. Introduction: Inter-/Intra-Process Communication
Discussion
Android offers a unique collection of mechanisms for inter- (and intra-) application communication. This chapter discusses the following:
- Intents
Specify what you intend to do next: either to invoke a particular class within your application, or to invoke whatever application the user has configured to process a particular request on a particular type of data
- Broadcast receivers
In conjunction with intent filters, allow you to define an application as able to process a particular request on a particular type of data (i.e., the target of an intent)
AsyncTaskAllows you to specify long-running code that should not be on the “GUI thread” or “main event thread” to avoid slowing the app to the point that it gets ANR (“Application Not Responding”) errors
- Handlers
Allow you to queue up messages from a background thread to be handled by another thread such as the main activity thread, usually to cause information to update the screen safely
4.2. Opening a Web Page, Phone Number, or Anything Else with an Intent
Problem
You want one application to have some entity processed by another application without knowing or caring what that application is.
Solution
Invoke the Intent constructor;
then invoke startActivity on the
constructed Intent.
Discussion
The Intent constructor takes
two arguments: the action to take and the entity to act
on. Think of the first as the verb and the second as the object of the
verb. The most common action is Intent.ACTION_VIEW,
for which the string representation is android.intent.action.VIEW. The second will
typically be a URL or, as Android likes it less precisely (more
generally), a URI. URIs can be created using the static
parse() method in the URI class.
Assuming that the string variable data contains the location we want to view,
the code to create an Intent for it might be
something like the following:
Intent intent = new Intent(Intent.ACTION_VIEW, Uri.parse(data));
That’s all! The beauty of Android is shown here—we don’t know or
care if data contains a web page URL
with http:, a phone number with tel:, or even something we’ve never seen. As
long as there is an application registered to process this type of
intent, Android will find it for us, after we invoke it. How do we
invoke the intent? Remember that Android will start a new activity to
run the intent. Assuming the code is in an activity, just call the
inherited startIntent method, for
example:
startActivity(intent);
If all goes well, the user will see the web browser, phone dialer, maps application, or whatever.
Google defines many other actions, such as
ACTION_OPEN (which tries to open the named object).
In some cases VIEW and OPEN will
have the same effect, but in other cases the former may display data and
the latter may allow the user to edit or update the data.
However, if things fail, the user will not see anything. Why not?
We basically told Android that we don’t care whether the intent succeeds
or fails. To get feedback, we have to call startActivityForResult:
startActivityForResult(intent, requestCode);
The requestCode is an arbitrary number used to
keep track of multiple Intent requests; you should
generally pick a unique number for each Intent you
start, and keep track of these numbers to track the results later (if
you only have one Intent whose results you care
about, just use the number 1).
Just making this change will have no effect, however, unless we
also override an important method in Activity, that is:
@Override
public void onActivityResult(int requestCode, int resultCode, Intent data) {
    // do something with the results...
}
It may be obvious, but it is important to note that you cannot
know the result of an Intent until the entire
application that was processing it is finished, which may be an
arbitrary time later. However, the onActivityResult will eventually be
called.
The resultCode is, of course, used to indicate
success or failure. There are defined constants for these, notably
Activity.RESULT_OK and
Activity.RESULT_CANCELED. Some Intents provide their own, more
specific result codes; for one example, see Recipe 10.9.
For information on use of the passed intent, please refer to recipes on passing extra data, such as Recipe 4.5.
Source Download URL
The source code for this example is in the Android Cookbook repository at http://github.com/AndroidCook/Android-Cookbook-Examples, in the subdirectory IntentsDemo (see Getting and Using the Code Examples).
4.3. Emailing Text from a View
Solution
Pass the data to be emailed to the mail app as a parameter using an intent.
Discussion
The steps for emailing text from a view are pretty straightforward:
Modify the AndroidManifest.xml file to allow for an Internet connection so that email can be sent. This is shown in Example 4-1.
Create the visual presentation layer with an Email button that the user clicks. The layout is shown in Example 4-2, and the strings used to populate it are shown in Example 4-3.
Attach an
OnClickListenerto allow the email to be sent when the user clicks the Email button. The code for this is shown in Example 4-4.
<?xml version="1.0" encoding="utf-8"?>
<manifest
    xmlns:android="http://schemas.android.com/apk/res/android"
    package="com.examples"
    android:versionCode="1"
    android:versionName="1.0">
    <application
        android:icon="@drawable/icon"
        android:label="@string/app_name">
        <activity
            android:name=".Main"
            android:label="@string/app_name">
            <intent-filter>
                <action
                    android:name="android.intent.action.MAIN" />
                <category
                    android:name="android.intent.category.LAUNCHER" />
            </intent-filter>
        </activity>

        <!-- Required Permission  -->
        <uses-permission
            android:name="android.permission.INTERNET" />
        <uses-permission
            android:name="android.permission.ACCESS_NETWORK_STATE" />
        <uses-permission
            android:name="android.permission.ACCESS_COARSE_LOCATION"></uses-permission>
        <uses-permission
            android:name="android.permission.ACCESS_FINE_LOCATION"></uses-permission>
    </application>
</manifest><?xml version="1.0" encoding="utf-8"?>
<LinearLayout
xmlns:android="http://schemas.android.com/apk/res/android"
android:orientation="vertical"
android:layout_width="fill_parent"
android:layout_height="fill_parent">
<Button
android:id="@+id/emailButton"
android:text="Email Text!"
android:layout_width="fill_parent"
android:layout_height="wrap_content">
</Button>
<TextView
android:id="@+id/text_to_email"
android:layout_width="fill_parent"
android:layout_height="wrap_content"
android:text="@string/my_text" />
</LinearLayout><?xml version="1.0" encoding="utf-8"?>
<resources>
<string
name="hello">Hello World, Main!</string>
<string
name="app_name">EmailAndroid</string>
<string
name="my_text">
Lorem Ipsum is simply dummy text of the printing and typesetting industry. Lorem
Ipsum has been the industry's standard dummy text ever since the 1500s, when
an unknown printer took a galley of type and scrambled it to make a type
specimen book. It has survived not only five centuries, but also the leap into
electronic typesetting, remaining essentially unchanged. It was popularised in
the 1960s with the release of Letraset sheets containing Lorem Ipsum passages,
and more recently with desktop publishing software like Aldus PageMaker
including versions of Lorem Ipsum.
</string>
</resources>import android.app.Activity;
import android.content.Intent;
import android.os.Bundle;
import android.view.View;
import android.view.View.OnClickListener;
import android.widget.Button;
public class Main extends Activity implements OnClickListener
{
private static final String tag = "Main";
private Button emailButton;
/** Called when the activity is first created. */
@Override
public void onCreate(Bundle savedInstanceState)
{
super.onCreate(savedInstanceState);
// Set the View Layer
setContentView(R.layout.main);
// Get reference to Email Button
this.emailButton = (Button) this.findViewById(R.id.emailButton);
// Sets the Event Listener onClick
this.emailButton.setOnClickListener(this);
}
@Override
public void onClick(View view) {
if (view == this.emailButton) {
Intent emailIntent = new Intent(android.content.Intent.ACTION_SEND);
emailIntent.setType("text/html");
emailIntent.putExtra(android.content.Intent.EXTRA_TITLE, "My Title");
emailIntent.putExtra(android.content.Intent.EXTRA_SUBJECT, "My Subject");
// Obtain reference to String and pass it to Intent
emailIntent.putExtra(android.content.Intent.EXTRA_TEXT,
getString(R.string.my_text));
startActivity(emailIntent);
}
}
}Source Download URL
The source code for this example is in the Android Cookbook repository at http://github.com/AndroidCook/Android-Cookbook-Examples, in the subdirectory EmailAndroid (see Getting and Using the Code Examples).
4.4. Sending an Email with Attachments
Solution
Create an Intent, add extended data to specify
the file you want to include, and start a new activity to allow the user
to send the email.
Discussion
The easiest way to send an email is to create an Intent of type
ACTION_SEND:
Intent intent = new Intent(Intent.ACTION_SEND);
intent.putExtra(Intent.EXTRA_SUBJECT, "Test single attachment");
intent.putExtra(Intent.EXTRA_EMAIL, new String[]{recipient_address});
intent.putExtra(Intent.EXTRA_TEXT, "Mail with an attachment");
To attach a single file, we add some extended data to our
Intent:
intent.putExtra(Intent.EXTRA_STREAM, Uri.fromFile(new File("/path/to/file")));
intent.setType("text/plain");
The MIME type can always be set as text/plain, but you may want to be more
specific so that applications parsing your message will work properly.
For instance, if you’re including a JPEG image you should write image/jpeg.
To send an email with multiple attachments, the procedure is slightly different, as shown in Example 4-5.
Intent intent = new Intent(Intent.ACTION_SEND_MULTIPLE);
intent.setType("text/plain");
intent.putExtra(Intent.EXTRA_SUBJECT, "Test multiple attachments");
intent.putExtra(Intent.EXTRA_TEXT, "Mail with multiple attachments");
intent.putExtra(Intent.EXTRA_EMAIL, new String[]{recipient_address});

ArrayList<Uri> uris = new ArrayList<Uri>();
uris.add(Uri.fromFile(new File("/path/to/first/file")));
uris.add(Uri.fromFile(new File("/path/to/second/file")));

intent.putParcelableArrayListExtra(Intent.EXTRA_STREAM, uris);
First, you need to use Intent.ACTION_SEND_MULTIPLE, which has been available since Android 1.6. Second, you need to
create an ArrayList with the URIs of
the files you want to attach to the mail and call putParcelableArrayListExtra.
If you are sending different types of files you may want to use
multipart/mixed as the MIME
type.
Finally, in both cases, you can start a new Activity with the following code:
startActivity(Intent.createChooser(intent, "Send mail"));
Using Intent.createChooser is
optional, but it will allow the user to select his
favorite application to send the email.
4.5. Pushing String Values Using Intent.putExtra()
Solution
A quick solution is to use Intent.putExtra() to
push the data. Then use getIntent().getExtras().getString() to
retrieve it.
Discussion
Example 4-6 shows the code to push the data.
import android.content.Intent;
    ...

    Intent intent =
        new Intent(
            this,
            MyActivity.class );
    intent.putExtra( "paramName", "paramValue" );
    startActivity( intent );
This code might be inside the main activity.
MyActivity.class is the second activity we want to
launch; it must be explicitly included in your
AndroidManifest.xml file.
<activity android:name=".MyActivity" />
Example 4-7 shows the code to pull the data.
import android.os.Bundle;

    ...

    Bundle extras = getIntent().getExtras();
    if (extras != null)
    {
        String myParam = extras.getString("paramName");
    }
    else
    {
        //..oops!
    }
In this example, the code would be inside your main Activity.java file.
There are a few limitations to this method. For example, it can
only pass strings. Therefore, if, for example, you need to pass an
ArrayList to your ListActivity, a
possible workaround is to pass a comma-separated string
and then split it on the other side.
4.6. Retrieving Data from a Subactivity Back to Your Main Activity
Solution
Use startActivityForResult(),
onActivityResult() in the main activity, and setResult() in the subactivity.
Discussion
In this example, we return a string from a subactivity
(MySubActivity) back to the main activity
(MyMainActivity).
The first step is to “push” data from
MyMainActivity via the Intent
mechanism (see Example 4-8).
public class MyMainActivity extends Activity
{
    //..for logging..
    private static final String TAG = "MainActivity";

    //..The request code is supposed to be unique?..
    public static final int MY_REQUEST_CODE = 123;

    @Override
    public void onCreate( Bundle savedInstanceState )
    {
        ...
    }

    private void pushFxn()
    {
        Intent intent =
            new Intent(
                this,
                MySubActivity.class );

        startActivityForResult( intent, MY_REQUEST_CODE );
    }

    protected void onActivityResult(
            int requestCode,
            int resultCode,
            Intent pData)
    {
         if ( requestCode == MY_REQUEST_CODE )
         {
             if (resultCode == Activity.RESULT_OK )
             {
                 final String zData = pData.getExtras().getString
                     ( MySubActivity.EXTRA_STRING_NAME );

                 //..do something with our retrieved value..

                 Log.v( TAG, "Retrieved Value zData is "+zData );
                 //..logcats "Retrieved Value zData is returnValueAsString"

             }
         }

     }
}
In Example 4-8, the following occurs:
The main activity’s
onActivityResult()gets called afterMySubActivity.finish().The retrieved value is technically an
Intent, and so we could use it for more complex data (such as a URI to a Google contact or something). However, in Example 4-8, we are only interested in a string value viaIntent.getExtras().The
requestCode(MY_REQUEST_CODE) is supposed to be unique, and might be useful later—for example,Activity.finishActivity( MY_REQUEST_CODE).
The second major step is to “pull” data back from
MySubActivity to MyMainActivity
(see Example 4-9).
public class MySubActivity extends Activity
{
    public static final String EXTRA_STRING_NAME = "extraStringName";

    @Override
    public void onCreate( Bundle savedInstanceState )
    {
        ...
    }


    private void pullFxn()
    {
        Intent iData = new Intent();
        iData.putExtra(
            EXTRA_STRING_NAME,
            "returnValueAsString" );

        setResult(
            android.app.Activity.RESULT_OK,
            iData );

        //..returns us to the parent "MyMainActivity"..
        finish();
    }
}
In Example 4-9, the following occurs:
In addition, note the following:
Technically, the data from
MySubActivitydoesn’t get “pull”-ed until we’re back on the other side withMyMainActivity. So arguably it is more similar to a second “push.”We don’t have to use a public static final
Stringvariable for our “extra” field name, but I thought it was a good style.
Use case (informal)
In my app, I have a ListActivity with a
ContextMenu (the user long-presses a selection to do something), and I
wanted to let the MainActivity know which row the
user had selected for the ContextMenu action (my
app only has one action). I ended up using intent extras to pass the
selected row’s index as a string back to the parent activity; from
there I could just convert the index back to an int
and use it to identify the user row selection via ArrayList.get(index). This worked
for me; however, I am sure there is another/better way.
See Also
Recipe 4.5; ResultCode
“gotcha”;
startActivityForResultExample (under “Returning a
Result from a Screen”); Activity.startActivityForResult()
4.7. Keeping a Service Running While Other Apps Are on Display
Problem
You want part of your application to continue running in the background while the user switches to interact with other apps.
Solution
Create a Service class to do the background work; start the service from your main
application. Optionally provide a Notification icon to allow the user
either to stop the running service or to resume the main
application.
Discussion
A Service class
(android.app.Service) runs as part of the same
process as your main application, but has a property that allows it to
keep running even if the user switches to another app or goes to the
Home screen and starts up a new app.
As you know by now, Activity classes can be
started either by an intent that matches their content provider, or by an
intent that mentions them by class name. The same is true for services.
This recipe focuses on starting a service directly; Recipe 4.2 covers starting a service implicitly. The example is
taken from JPSTrack, a GPS tracking program for Android. Once you
start tracking, you don’t want the tracking to stop if you answer the
phone or have to look at a map(!), so we made it into a service. As
shown in Example 4-10, the service is started by
the main activity when you click the Start Tracking button, and is
stopped by the Stop button. Note that this is so common that startService() and
stopService() are built into the
Activity class.
    @Override
    public void onCreate(Bundle savedInstanceState) {
        ...
        Intent theIntent = new Intent(this, TrackService.class);
        Button startButton = (Button) findViewById(R.id.startButton);
        startButton.setOnClickListener(new OnClickListener() {
                @Override
                public void onClick(View v) {
                        startService(theIntent);
                        Toast.makeText(Main.this, "Starting", Toast.LENGTH_LONG).show();
                }
        });
        Button stopButton = (Button) findViewById(R.id.stopButton);
        stopButton.setOnClickListener(new OnClickListener() {
                @Override
                public void onClick(View v) {
                        stopService(theIntent);
                        Toast.makeText(Main.this, "Stopped", Toast.LENGTH_LONG).show();
                }
        });
        ...
    }
The TrackService class directly extends
Service, so it has to implement the abstract onBind() method. This is not
used when the class is started directly, so it can be a stub method. You
will typically override at least the onStartCommand()
and onUnbind() methods, to begin and
end some activity. Example 4-11 starts the GPS
service sending us notifications that we save to disk, and we do want
that to keep running, hence this Service
class.
public class TrackService extends Service {
        private LocationManager mgr;
        private String preferredProvider;

        @Override
        public IBinder onBind(Intent intent) {
                return null;
        }

        @Override
        public int onStartCommand(Intent intent, int flags, int startId) {
                initGPS();      // sets up the LocationManager mgr

                if (preferredProvider != null) {
                        mgr.requestLocationUpdates(preferredProvider, MIN_SECONDS * 1000,
                                        MIN_METRES, this);
                        return START_STICKY;
                }
                return START_NOT_STICKY;
        }

        @Override
        public boolean onUnbind(Intent intent) {
                mgr.removeUpdates(this);
                return super.onUnbind(intent);
        }
You may have noticed the different return values from
onStartCommand(). If you return START_STICKY, Android will restart
your service if it gets terminated. If you return START_NOT_STICKY, the service
will not be restarted automatically. These values are discussed in more
detail in the online documentation for the Service class
(see http://developer.android.com/reference/android/app/Service.html).
Remember to declare the Service subclass in the Application part of your AndroidManifest.xml:
<service android:enabled="true" android:name=".TrackService">
4.8. Sending/Receiving a Broadcast Message
Problem
You want to create an activity that receives a simple broadcast message sent by another activity.
Solution
Set up a broadcast receiver, instantiate the message receiver
object, and create an IntentFilter. Then register
your receiver with an activity that must receive the broadcast
message.
Discussion
The code in Example 4-12
sets up the broadcast receiver, instantiates the message receiver
object, and creates the IntentFilter.
// Instantiate message receiver object. You should
// create this class by extending android.content.BroadcastReceiver
// The method onReceive() of this class will be called when broadcast is sent
MyBroadcastMessageReceiver _bcReceiver = new MyBroadcastMessageReceiver();

// Create IntentFilter
IntentFilter filter = new IntentFilter(
MyBroadcastMessageReceiver.class.getName());

// And register your receiver with your activity which must receive broadcast message
// Now whenever this type of message is generated somewhere in the system -
// _bcReceiver.onReceive() method will be called within main thread of myActivity
myActivity.registerReceiver(_bcReceiver, filter);
The code in Example 4-13 shows how to publish the broadcast event.
4.9. Starting a Service After Device Reboot
Solution
Listen to the intent for boot events and start the service when the event occurs.
Discussion
Whenever a platform boot is completed, an intent is broadcast with
the android.intent.action.BOOT_COMPLETED action
. You need to register your application to receive this
intent. To do so, add the following code to your AndroidManifest.xml file:
<receiver android:name="ServiceManager">
            <intent-filter>
                <action android:name="android.intent.action.BOOT_COMPLETED" />
            </intent-filter>
</receiver>
For ServiceManager to be the broadcast receiver
that receives the intent for the boot event, the
ServiceManager class would have to be coded as shown
in Example 4-14.
public class ServiceManager extends BroadcastReceiver {

    Context mContext;
    private final String BOOT_ACTION = "android.intent.action.BOOT_COMPLETED";

    @Override
    public void onReceive(Context context, Intent intent) {
               //All registered broadcasts are received by this
        mContext = context;
        String action = intent.getAction();
        if (action.equalsIgnoreCase(BOOT_ACTION)) {
                        //check for boot complete event & start your service
            startService();
        }

    }


    private void startService() {
                //here, you will start your service
        Intent mServiceIntent = new Intent();
        mServiceIntent.setAction("com.bootservice.test.DataService");
        mContext.startService(mServiceIntent);
    }
}
4.10. Creating a Responsive Application Using Threads
Problem
You have an application that performs long tasks, and you don’t want your application to appear nonresponsive while these are ongoing.
Solution
By using threads, you can create an application that is responsive even when it is handling time-consuming operations.
Discussion
To make your application responsive while time-consuming
operations are running on the Android OS you have a few options. If you
already know Java, you know you can create a class that extends
the Thread class and overrides the
public void run() method and then call start() method on that object to
run the time-consuming process. If your class already extends another
class, you can implement the Runnable interface. Another
approach is to create your own class that extends Android’s AsyncTask class, but we will
talk about AsyncTask in Recipe 4.11.
First we will discuss usage of the Thread
class. Example 4-15 shows the
networked activity implementation of this class.
public class NetworkConnection extends Activity {
    /** Called when the activity is first created. */
    @Override
    public void onCreate(Bundle savedInstanceState) {
        super.onCreate(savedInstanceState);
        setContentView(R.layout.main);

        Thread thread = new Thread(new Runnable(){
        public void run() {
            getServerData();
        }
         });
        thread.start();
   }
}
As you can see, when we start our activity in the
onCreate() method we create a
thread object that is constructed with a
Runnable object. The Runnable
method run() will be executed after we call the
start() method on the thread
object. From here you can call another method or a few other methods and
operations that are time-consuming and that would otherwise block the
main thread and make your application look unresponsive.
Often when we are done with the thread we get results that we want to present to the application user. If you try to update the GUI from the thread that you started (not the main thread) your application will crash. You can read error messages and see that the problem is in fact a thread other than the main UI thread you tried to change UI on the main thread.
It is possible to change the UI with such data, with the help of
a Handler class. If you need to do so,
please refer to Recipe 4.12.
Threads created and started in this way will continue to run even
if the user leaves your application. You can keep track of the threads
and tell them to stop, typically by setting a “done” boolean. More
simply, to be sure that your thread(s) stop when the user leaves your
application, before you call the start() method on
the thread object set the thread as a daemon
thread:
thread.setDaemon(true);
In addition, sometimes it can be useful to name the
thread.
You can give a name to your thread(s) when you create the
thread object:
Thread thread = new Thread();
Thread thread = new Thread(runnable, "ThreadName1");
Or you can call the setName() method on the thread
object:
thread.setName("ThreadName2");These names will not be visible to the user, but will show up in various diagnostic logs, to help you find which thread is causing problems.
4.11. Using AsyncTask to Do Background Processing
Problem
You have to do some heavy processing, or load resources from the network, and you want to show the progress and results in the UI.
Solution
Use AsyncTask and ProgressDialog.
Discussion
Introduction
As explained in the Processes and Threads section of the Android Dev Guide, you should never block the UI thread, or access the Android UI toolkit from outside the UI thread. Bad things will happen if you do.
You can run processes in the background and update the UI inside
the UI thread (a.k.a. the main thread) in several ways, but using the
AsyncTask class is very convenient and in every
Android developer should know how to do it.
The steps boil down to creating a class that extends
AsyncTask. AsyncTask itself is
abstract and has one abstract method, Result
doInBackground(Params... params);. The
AsyncTask simply creates a callable working thread in which your
implementation of doInBackground
runs. Result and Params are two of the types we need to
define in our class definition. The third is the Progress type which we will talk about
later.
In Recipe 11.15, we will
examine a potentially long-running document-parsing task, processing
the content of a web page, which is an XML document, and returning the
result as a list of Datum objects.
Typically, this is something we want to do outside the UI
thread.
Our first implementation will do everything in the background,
showing the user a spinner in the title bar and updating the ListView once the processing is done. This
is the typical use case, not interfering with the user’s task at hand
and updating the UI when you have retrieved the result.
The second implementation will use a modal dialog to show the processing progressing in the background. In some cases we want to prevent the user from doing anything else when some processing takes place, and this is a good way to do just that.
We will create a UI that contains three Buttons and a Listview. The first button is to start our
first refresh process. The second is for the other refresh process and
the third is to clear the results in the ListView (see Example 4-16).
<?xml version="1.0" encoding="utf-8"?>
<LinearLayout xmlns:android="http://schemas.android.com/apk/res/android"
    android:orientation="vertical" android:layout_width="fill_parent"
    android:layout_height="fill_parent">
    <LinearLayout xmlns:android="http://schemas.android.com/apk/res/android"
        android:orientation="horizontal" android:layout_width="fill_parent"
        android:layout_height="wrap_content">
        <Button android:text="Refresh 1" android:id="@+id/button1"
            android:layout_width="fill_parent" android:layout_height="wrap_content"
            android:layout_weight="1"></Button>
        <Button android:text="Refresh 2" android:id="@+id/button2"
            android:layout_width="fill_parent" android:layout_height="wrap_content"
            android:layout_weight="1"></Button>
        <Button android:text="Clear" android:id="@+id/button3"
            android:layout_width="fill_parent" android:layout_height="wrap_content"
            android:layout_weight="1"></Button>
    </LinearLayout>
    <ListView android:id="@+id/listView1" android:layout_height="fill_parent"
        android:layout_width="fill_parent"></ListView>
</LinearLayout>
We assign these UI elements to various fields in onCreate and add some click listeners (see
Example 4-17).
    ListView mListView;
    Button mClear;
    Button mRefresh1;
    Button mRefresh2;

    @Override
    public void onCreate(Bundle savedInstanceState) {
        super.onCreate(savedInstanceState);
        setContentView(R.layout.main);

        mListView = (ListView) findViewById(R.id.listView1);
        mListView.setTextFilterEnabled(true);
        mListView.setOnItemClickListener(this);

        mRefresh1 = (Button) findViewById(R.id.button1);

        mClear = (Button) findViewById(R.id.button3);
        mClear.setOnClickListener(new OnClickListener() {
            @Override
            public void onClick(View v) {
                mListView.setAdapter(null);
            }
        });

    }

    public void onItemClick(AdapterView<?> parent, View view, int position, long id) {
        Datum datum = (Datum) mListView.getItemAtPosition(position);
        Uri uri = Uri.parse("http://androidcookbook.com/Recipe.seam?recipeId=" +
            datum.getId());
        Intent intent = new Intent(Intent.ACTION_VIEW, uri);
        this.startActivity(intent);
    }
The following two subsections describe two use cases: processing in the background and processing in the foreground.
Use case 1: Processing in the background
First we create an inner class that extends AsyncTask:
protected class LoadRecipesTask1 extends AsyncTask<String, Void, ArrayList<Datum>> {
...
}
As you can see, we must supply three types to the class
definition. The first is the type of the parameter we will provide
when starting this background task, in our case a
String, containing a URL. The second type is used
for progress updates (we will use this later). The third type is the
type returned by our implementation of the doInBackground method, and typically is
something with which you can update a specific UI element (a ListView in our case).
Let’s implement the doInBackground
method:
        @Override
        protected ArrayList<Datum> doInBackground(String... urls) {
            ArrayList<Datum> datumList = new ArrayList<Datum>();
            try {
                datumList = parse(urls[0]);
            } catch (IOException e) {
                e.printStackTrace();
            } catch (XmlPullParserException e) {
                e.printStackTrace();
            }
            return datumList;
        }
As you can see, this is pretty simple. The parse method—which
creates a list of Datum objects—is
described in Recipe 11.15. The
result of the doInBackground method
is then passed as an argument to the onPostExecute
method in the same (inner) class. In this method we are allowed to
update the UI elements in our layout, so we set the adapter of the
ListView to show our result.
        @Override
        protected void onPostExecute(ArrayList<Datum> result) {
            mListView.setAdapter(new ArrayAdapter<Datum>(MainActivity.this,
                R.layout.list_item, result));
        }
Now we need a way to start this task. We do this in the mRefresh1’s onClickListener by calling the execute(Params... params) method of AsyncTask (execute(String... urls) in our case).
mRefresh1.setOnClickListener(new OnClickListener() {
@Override
public void onClick(View v) {
LoadRecipesTask1 mLoadRecipesTask = new LoadRecipesTask1();
mLoadRecipesTask.execute(
"http://androidcookbook.com/seam/resource/rest/recipe/list");
}
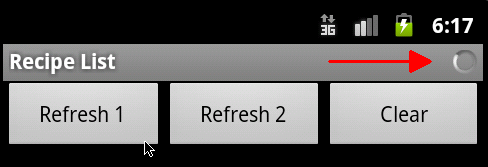
});Now, when you start the app it indeed retrieves the recipes and
fills the ListView, but the user
has no idea that something is happening in the background. We can set
the progress bar indeterminate window feature in this case, which
displays a small progress animation in the top right of our app title
bar.
To do this, we request this feature by calling the following method in onCreate: requestWindowFeature(Window.FEATURE_INDETERMINATE_PROGRESS);.
Then we can start the progress animation by calling the setProgressBarIndeterminateVisibility(Boolean
visibility) method from within a new method in our inner
class, the onPreExecute
method.
        protected void onPreExecute() {
            MainActivity.this.setProgressBarIndeterminateVisibility(true);
        }
We stop the spinning progress bar in our window title by calling
the same method from within our onPostExecute
method, which will become:
        protected void onPostExecute(ArrayList<Datum> result) {
            mListView.setAdapter(new ArrayAdapter<Datum>(MainActivity.this,
                R.layout.list_item, result));
            MainActivity.this.setProgressBarIndeterminateVisibility(false);
        }
We’re done! Take your app for a spin (pun intended).
As you can see, this is a nifty feature for creating a better user experience!
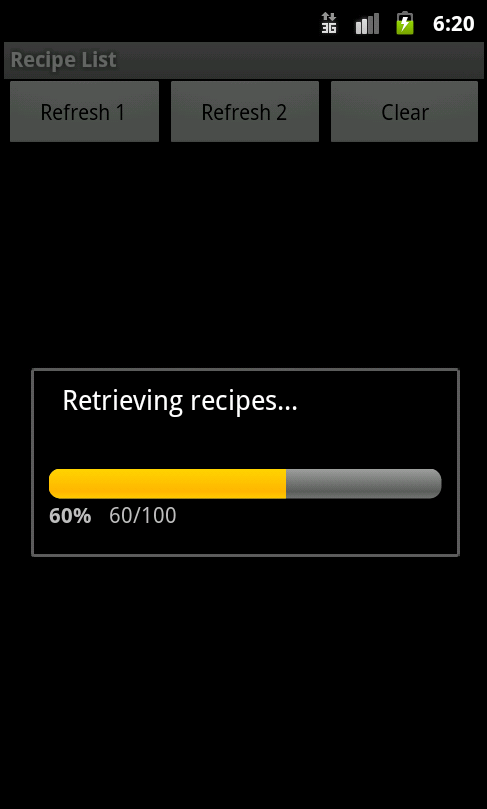
Use case 2: Processing in the foreground
In this example, we show a modal dialog to the user that
displays the progress of loading the recipes in the background. Such a
dialog is called a ProgressDialog.
First we add it as a field to our activity.
ProgressDialog mProgressDialog;
Then we add the onCreateDialog method to be able to answer
showDialog calls and create our
dialog.
protected Dialog onCreateDialog(int id) {
switch (id) {
case DIALOG_KEY:  mProgressDialog = new ProgressDialog(this);
mProgressDialog.setProgressStyle(ProgressDialog.STYLE_HORIZONTAL);
mProgressDialog = new ProgressDialog(this);
mProgressDialog.setProgressStyle(ProgressDialog.STYLE_HORIZONTAL);  mProgressDialog.setMessage("Retrieving recipes...");
  mProgressDialog.setCancelable(false);
  return mProgressDialog;
}
return null;
}
return mProgressDialog;
}
return null;
}-
We should handle the request and creation of all dialogs here. The
DIALOG_KEYis anintconstant with an arbitrary value (we used0) to identify this dialog.-
We set the progress style to
STYLE_HORIZONTAL, which shows a horizontal progress bar. The default isSTYLE_SPINNER.-
We set our custom message, which is displayed above the progress bar.
-
By calling
setCancelablewith argumentfalsewe simply disable the Back button, making this dialog modal.
Our new implementation of AsyncTask is as
shown in Example 4-18.
protected class LoadRecipesTask2 extends AsyncTask<String, Integer, ArrayList<Datum>>{
@Override
protected void onPreExecute() {
mProgressDialog.show();
}
@Override
protected ArrayList<Datum> doInBackground(String... urls) {
ArrayList<Datum> datumList = new ArrayList<Datum>();
for (int i = 0; i < urls.length; i++) {
try {
datumList = parse(urls[i]);
publishProgress((int) (((i+1) / (float) urls.length) * 100));
} catch (IOException e) {
e.printStackTrace();
} catch (XmlPullParserException e) {
e.printStackTrace();
}
}
return datumList;
}
@Override
protected void onProgressUpdate(Integer... values) {
mProgressDialog.setProgress(values[0]);  }
@Override
protected void onPostExecute(ArrayList<Datum> result) {
mListView.setAdapter(new ArrayAdapter<Datum>(
MainActivity.this, R.layout.list_item, result));
mProgressDialog.dismiss();
}
@Override
protected void onPostExecute(ArrayList<Datum> result) {
mListView.setAdapter(new ArrayAdapter<Datum>(
MainActivity.this, R.layout.list_item, result));
mProgressDialog.dismiss();  }
}
}
}We see a couple of new things here.
-
Before we start our background process we show the modal dialog.
-
In our background process we loop through all the URLs, expecting to receive more than one. This will give us a good indication of our progress.
-
We can update the progress by calling
publishProgress. Notice that the argument is of typeint, which will be auto-boxed to the second type defined in our class definition,Integer.-
The call to
publishProgresswill result in a call toonProgressUpdatewhich again has arguments of typeInteger. You could, of course, useStringor something else as the argument type by simply changing the second type in the inner class definition toStringand, of course, in the call topublishProgress.-
We use the first
Integerto set the new progress value in ourProgressDialog.-
We dismiss the dialog, which removes it.
Now we can bind this all together by implementing our onClickListener
for our second refresh button.
        mRefresh2.setOnClickListener(new OnClickListener() {

            @Override
            public void onClick(View v) {
                LoadRecipesTask2 mLoadRecipesTask = new LoadRecipesTask2();
                String url =
                    "http://androidcookbook.com/seam/resource/rest/recipe/list";
                showDialog(DIALOG_KEY);
                mLoadRecipesTask.execute(url, url, url, url, url);
            }
});It will look something like Figure 4-1.
Conclusion
Implementing background tasks with AsyncTask is very simple and should be done
for all long-running processes that also need to update your user
interface.
See Also
Recipe 11.15; http://developer.android.com/guide/topics/fundamentals/processes-and-threads.html
Source Download URL
You can download the source code for this example from https://github.com/downloads/jpelgrim/androidcookbook/RecipeList.zip.

4.12. Sending Messages Between Threads Using an Activity Thread Queue and Handler
Problem
You need to pass information or data from a service or other
background task to an activity. Because activities run on the UI thread,
it is not safe to call them from a background thread. This will cause
the Activity to be called at the handleMessage()
method, but on the event thread so you can safely update the GUI.
Solution
You can write a nested class that extends Android’s
Handler class; then override the handleMessage()
method that will read messages from the thread queue. Pass this
Handler to the worker thread, usually via the worker
class’s constructor; in the worker thread, post messages using the
various obtainMessage() and
sendMessage() methods. This will cause the activity
to be called at the handleMessage() method, but on
the event thread so that you can safely update the GUI.
Discussion
There are many situations in which you must have a thread running in the background, and send information to the main activity’s UI thread. At the architectural level, you can take one of the following two approaches:
Use Android’s
AsyncTaskclass.Start a new thread.
Though using AsyncTask is very convenient,
sometimes you really need to construct a worker thread by yourself. In
such situations, you likely will need to send some information back to
the activity thread. Keep in mind that Android doesn’t allow other
threads to modify any content of the main UI thread. Instead, you must
wrap the data into messages and send the messages through the message
queue.
To do this, you must first add an instance of the
Handler class to, for example, your
MapActivity instance (see Example 4-19).
    public class MyMap extends MapActivity {
        . . .
        public Handler _handler = new Handler() {
            @Override
            public void handleMessage(Message msg) {
                Log.d(TAG, String.format("Handler.handleMessage(): msg=%s", msg));
                // This is where the main activity thread receives messages
                // Put your handling of incoming messages posted by other threads here
                super.handleMessage(msg);
            }

        };
    . . .
    }
Now, in the worker thread, post a message to the activity’s main
queue whenever you need to add the handler class instance to your main Activity instance (see
Example 4-20).
        /**
         * Performs background job
         */
         class MyThreadRunner implements Runnable {
            // @Override
            public void run() {
                while (!Thread.currentThread().isInterrupted()) {
                    // Dummy message -- real implementation
                    // will put some meaningful data in it
                    Message msg = Message.obtain();
                    msg.what = 999;
                    MyMap.this._handler.sendMessage(msg);
                    // Dummy code to simulate delay while working with remote server
                    try {
                        Thread.sleep(5000);
                    } catch (InterruptedException e) {
                        Thread.currentThread().interrupt();
                    }
                }
            }
         }
4.13. Creating an Android Epoch HTML/JavaScript Calendar
Problem
You need a custom calendar written in JavaScript, and you want it to understand how to interact between JavaScript and Java.
Solution
Use a WebView component to load an HTML file
containing the Epoch calendar JavaScript component. Briefly, here are
the steps involved:
Download the Epoch DHTML/JavaScript calendar from http://www.javascriptkit.com/script/script2/epoch/index.shtml.
Create an assets directory under your Android Project folder (e.g., TestCalendar/assets/).
Code your main HTML file for referencing the Epoch calendar.
Create an Android activity for launching the Epoch calendar.
Files placed in the Android assets directory are referenced as file:///android_asset/ (note the triple leading slash and the singular spelling of asset).
Discussion
To enable interaction between the JavaScript-based view layer and
the Java-based logic layer, a Java‒JavaScript bridge interface is
required: the MyJavaScriptInterface inner class.
The onDayClick() function, shown in Example 4-21, shows how to call a JavaScript function
from an Android activity—for example, webview.loadUrl("javascript:
popup();");. The HTML/JavaScript component is shown in Example 4-21.
<html>
<head>
<title>My Epoch DHTML JavaScript Calendar</title>
<style type="text/css">
dateheader {
-background-color: #3399FF;
-webkit-border-radius: 10px;
-moz-border-radius: 10px;
-border-radius: 10px;
-padding: 5px;
}
</style>
<style type="text/css">
html {height:100%;}
body {height:100%; margin:0; padding:0;}
#bg {position:fixed; top:0; left:0; width:100%; height:100%;}
#content {position:relative; z-index:1;}
</style>
<!--[if IE 6]>
<style type="text/css">
html {overflow-y:hidden;}
body {overflow-y:auto;}
#page-background {position:absolute; z-index:-1;}
#content {position:static;padding:10px;}
</style>
<![endif]-->
<link rel="stylesheet" type="text/css" href="epoch_v106/epoch_styles.css" />
<script type="text/javascript" src="epoch_v106/epoch_classes.js"></script>
<script type="text/javascript">
/*You can also place this code in a separate
file and link to it like epoch_classes.js*/
var my_cal;
window.onload = function () {
my_cal = new Epoch('epoch_basic','flat',
document.getElementById('basic_container'));
};
function popup()
{
var weekday=new Array("Sun","Mon","Tue","Wed","Thur","Fri","Sat");
var monthname=new Array("Jan","Feb","Mar","Apr","May","Jun",
"Jul","Aug","Sep","Oct","Nov","Dec");
var date = my_cal.selectedDates.length > 0 ?
my_cal.selectedDates[0] :
null;
if ( date != null )
{
var day = date.getDate();
var dayOfWeek= date.getDay();
var month = date.getMonth();
var yy = date.getYear();
var year = (yy < 1000) ? yy + 1900 : yy;
/* Set the User selected date in HTML form */
var dateStr= weekday[dayOfWeek] + ", " + day + " " +
monthname[month] + " " + year;
document.getElementById("selected_date").value= dateStr;
/* IMPORTANT:
* Call Android JavaScript->Java bridge setting a
* Java-field variable
*/
window.android.setSelectedDate( date );
window.android.setCalendarButton( date );
}
}
</script>
</head>
<body>
<div id="bg"><img src="bg.png" width="100%" height="100%" alt=""></div>
<div id="content">
<div class="dateheader" align="center">
<form name="form_selected_date">
<span style="color:white">Selected day:</span>
<input id="selected_date" name="selected_date" type="text"
readonly="true">
</form>
</div>
<div id="basic_container" onClick="popup()"></div>
</div>
</body>
</head>>import java.util.Date;
import android.app.Activity;
import android.content.Intent;
import android.os.Bundle;
import android.os.Handler;
import android.util.Log;
import android.view.View;
import android.view.View.OnClickListener;
import android.webkit.JsResult;
import android.webkit.WebChromeClient;
import android.webkit.WebSettings;
import android.webkit.WebView;
import android.widget.Button;
import android.widget.ImageView;
import android.widget.Toast;
import com.pfizer.android.R;
import com.pfizer.android.utils.DateUtils;
import com.pfizer.android.view.screens.journal.CreateEntryScreen;
public class CalendarViewActivity extends Activity
{
private static final String tag = "CalendarViewActivity";
private ImageView calendarToJournalButton;
private Button calendarDateButton;
private WebView webview;
private Date selectedCalDate;
private final Handler jsHandler = new Handler();
/** Called when the activity is first created. */
@Override
public void onCreate(Bundle savedInstanceState)
{
Log.d(tag, "Creating View ...");
super.onCreate(savedInstanceState);
// Set the View Layer
Log.d(tag, "Setting-up the View Layer");
setContentView(R.layout.calendar_view);
// Go to CreateJournalEntry
calendarToJournalButton = (ImageView) this.findViewById
(R.id.calendarToJournalButton);
calendarToJournalButton.setOnClickListener(new OnClickListener()
{
@Override
public void onClick(View v)
{
Log.d(tag, "Re-directing -> CreateEntryScreen ...");
Intent intent = intent =
new Intent(getApplicationContext(),
CreateEntryScreen.class);
startActivity(intent);
}
});
// User-Selected Calendar Date
calendarDateButton = (Button) this.findViewById(R.id.calendarDateButton);
// Get access to the WebView holder
webview = (WebView) this.findViewById(R.id.webview);
// Get the settings
WebSettings settings = webview.getSettings();
// Enable JavaScript
settings.setJavaScriptEnabled(true);
// Enable ZoomControls visibility
settings.setSupportZoom(true);
// Add JavaScript Interface
webview.addJavaScriptInterface(new MyJavaScriptInterface(), "android");
// Set the Chrome Client
webview.setWebChromeClient(new MyWebChromeClient());
// Load the URL of the HTML file
webview.loadUrl("file:///android_asset/calendarview.html");
}
public void setCalendarButton(Date selectedCalDate)
{
Log.d(tag, jsHandler.obtainMessage().toString());
calendarDateButton.setText(
DateUtils.convertDateToSectionHeaderFormat(
selectedCalDate.getTime()));
}
/**
*
* @param selectedCalDate
*/
public void setSelectedCalDate(Date selectedCalDate)
{
this.selectedCalDate = selectedCalDate;
}
/**
*
* @return
*/
public Date getSelectedCalDate()
{
return selectedCalDate;
}
/**
* JAVA->JAVASCRIPT INTERFACE
*
* @author wagied
*
*/
final class MyJavaScriptInterface
{
private Date jsSelectedDate;
MyJavaScriptInterface()
{
// EMPTY;
}
public void onDayClick()
{
jsHandler.post(new Runnable()
{
public void run()
{
// Java telling JavaScript to do things
webview.loadUrl("javascript:
      popup();");
}
});
}
/**
* NOTE: THIS FUNCTION IS BEING SET IN JAVASCRIPT User-selected Date in
* WebView
*
* @param dateStr
*/
public void setSelectedDate(String dateStr)
{
Toast.makeText(getApplicationContext(), dateStr,
Toast.LENGTH_SHORT).show();
Log.d(tag, "User Selected Date: JavaScript -> Java : " + dateStr);
// Set the User Selected Calendar date
setJsSelectedDate(new Date(Date.parse(dateStr)));
Log.d(tag, "java.util.Date Object: " +
Date.parse(dateStr).toString());
}
private void setJsSelectedDate(Date userSelectedDate)
{
jsSelectedDate = userSelectedDate;
}
public Date getJsSelectedDate()
{
return jsSelectedDate;
}
}
/**
* Alert pop-up for debugging purposes
*
* @author wdavid01
*
*/
final class MyWebChromeClient extends WebChromeClient
{
@Override
public boolean onJsAlert(WebView view, String url,
String message, JsResult result)
{
Log.d(tag, message);
result.confirm();
return true;
}
}
@Override
public void onDestroy()
{
Log.d(tag, "Destroying View!");
super.onDestroy();
}
}For debugging purposes, a MyWebChromeClient is
created—this is the final inner class extending WebChromeClient defined
near the end of the main class—and in particular the
onJsAlert() method is overridden.
Get Android Cookbook now with the O’Reilly learning platform.
O’Reilly members experience books, live events, courses curated by job role, and more from O’Reilly and nearly 200 top publishers.

