Chapter 4. Power Hacks for Web Developers
Web development these days increasingly involves making connections with cool and useful web APIs, such as Google Maps, Yahoo! Maps, and Weather.com. The first five hacks in this chapter cover some uses of these APIs; “Use Ajax with a Yahoo! Maps and GeoURL Mash-up” [Hack #32] integrates data from the GeoURL service. The growth of Ajax techniques also makes it necessary to take some applications off-line (for example, when moving from the terminal to an airliner with a laptop), and thus requires persistent storage of data on the client side. To this end, this chapter includes a hack describing the new open source client storage tool called AMASS. It also delves into the typical tasks that inhabit a web developer’s calendar, such as adding email capabilities to Ajax applications, accessing and creating HTTP cookies, debugging the DOM objects in Ajax software, and finding out the browser’s locale information. Finally, this chapter’s last hack creates an “Ajaxy” RSS feed reader. (RSS—Really Simple Syndication, in one of its flavors—is an XML file format that plays an important role at a number of news- and issue-oriented web sites.)
Get Access to the Google Maps API
Create applications that combine Google Maps and your own server components.
For map lovers and developers, perhaps the only thing cooler than Google Maps is the Google Maps API. The API allows developers to invent new Ajax-style applications with Google Maps. It is made up of JavaScript objects and methods that let you control the appearance of maps on web pages, add controls to them, and create new clickable behaviors.
To use the API, you have to first obtain a developer’s key from Google. This is very easy. Simply go to http://www.google.com/apis/maps/, specify the web site that will use Google Maps (such as http://www.parkerriver.com), and click on a form button, and Google generates a key for you. This is a long bunch of alphanumeric characters, such as:
CDROAAAANJd_PEMs2vnU_f04htHhZhSa_9HZXsWbc66iRLah8f17kmN8QRSryZ54UMgeX7XabY zm82xuubmjRb
Google Objects
You specify the key in your web page when your script tag imports Google’s JavaScript
library for Google Maps. Here is what the top part of an HTML page
looks like when enabling the Google Maps API, including the key
specification:
<!DOCTYPE html PUBLIC "-//W3C//DTD XHTML 1.0 Strict//EN"
"http://www.w3.org/TR/xhtml1/DTD/xhtml1-strict.dtd">
<html xmlns="http://www.w3.org/1999/xhtml">
<head>
<script src="http://maps.google.com/maps?file=api&v=1&key=ABQIAAAANJd_
PEMs2vnU_f0RhwHhZhSa_9HZXsWbc66iRLah8f17kmN8QRSryZ54UMgeX8GjfYzm82xuubmjRw"
type="text/javascript"></script>
The result of importing this script with a proper key is that your own JavaScript code can now access the objects that are part of the Google Maps API. These include the following:
GMap, an object that allows you to embed a digital map with zooming controls inside of a block-type HTML element, such as adivGMarker, an icon that points to a specific place on the mapGPolyline, which can overlay shapes onto a mapGPoint, representing a map coordinateGXmlHttp, a “wrapper object” for our familiarXMLHttpRequestobject
All these objects except for GPolyline are used in the next two hacks. In
addition, the API includes GXml and
GXslt objects for parsing XML and
using XSLT technology.
Tip
As mentioned in Chapter 1, XSLT is a templating language for transforming the information embedded in XML files.
The API also includes a general-purpose function, GBrowserIsCompatible(), which returns
true if the user’s browser supports
Google Maps. As of November 2005, according to the Google
documentation, Google Maps supported recent versions of
Firefox/Mozilla, IE 5.5+, and Safari 1.2+, and “sort of” supported
Opera. It did not support IE 5.0.
“Use the Google Maps API Request Object” [Hack #29] and “Use Ajax with a Google Maps and Yahoo! Maps Mash-up” [Hack #30] show how to use the Google Maps API. Visit the above-mentioned URL to obtain an API key, take a look at the developer’s documentation at http://www.google.com/apis/maps/documentation/, and start cracking!
Use the Google Maps API Request Object
The Google Maps API comes with its own request object for making HTTP requests from JavaScript code.
This hack initially displays a Google Map based on a user’s preferences. These include the latitude/longitude at which the map should be centered, and the zoom level or magnification of the map when it is first displayed on the web page. An application typically obtains user-specific properties by reading a cookie, a small piece of data saved on a user’s hard drive, or having a user sign in. This hack skips this opening step in order to focus on the gist of the hack’s technology: obtaining user preferences from a server component to control a Google Map display.
Tip
“Send Cookie Values to a Server Program” [Hack #38] discusses reading cookies in an Ajax application.
Personal Googling
This hack displays a 500-by-300-pixel U.S. map on a web page, which also shows the user’s preferred coordinates for centering the map and preferred zoom level (a two-digit number from the highest zoom level of 1 to around 18). A zoom level of 18, for instance, shows the continents and oceans, whereas a zoom level of 1 displays a town’s streets.
As mentioned previously, when the user requests this web page, the application can either obtain the user’s username from a previously generated cookie, or ask the user to sign in and fetch the preferences from a database. However, we are not going to show that step (even though it is important in a real-world application) because we surmise that the reader is more interested in the API’s Ajax-related objects and the map-display code.
Here is the HTML for the hack:
<!DOCTYPE html PUBLIC "-//W3C//DTD XHTML 1.0 Strict//EN"
"http://www.w3.org/TR/xhtml1/DTD/xhtml1-strict.dtd">
<html xmlns="http://www.w3.org/1999/xhtml" xmlns:v=
"urn:schemas-microsoft-com:vml">
<head>
<script src="http://maps.google.com/maps?file=api&v=1&key=ABQIAAAANJd_
PEMs2vnU_f0RhwHhZhQ6pfwiB1eVXKVVHswEcdvw4p5NixS195EO7O7VmH483DMz0QiZbIlbIf"
type="text/javascript"></script>
<script src="js/hacks4_1a.js" type="text/javascript"></script>
<title>View Map</title>
</head>
<body>
<h3>Your Google Map</h3>
<div id="map" style="width: 500px; height: 300px"></div>
<h4>Your specifications</h4>
<form action="javascript:void%200">
<p>
Latitude: <input type="text" name="_latitude" size="20" maxlength="20" />
</p>
<p>
Longitude: <input type="text" name="_longitude" size="20" maxlength="20" />
</p>
<p>
Zoom level: <input type="text" name="_zoomLevel" size="2" maxlength="2" />
</p>
</form>
</body>
</html>
This code imports the Google API library with the first script tag. This tag allows the application
to use Google Maps API objects such as GMap and
GXmlHttp (which represents the request
object). The script src attribute
includes the developer key, as described in “Get Access to the Google Maps API”
[Hack #28]. Another script
tag imports into the page a hacks4_1a.js JavaScript code file, which
contains the custom code for our application.
Tip
Google Maps requires a separate developer key for every URL directory containing Google Maps–related web pages. For example, I have a developer key that covers every web page in the http://www.parkerriver.com/ajaxhacks/ directory. It is extremely easy to generate a developer key at http://www.google.com/apis/maps/signup.html.
The map itself is displayed within a div tag that has an id of map. When the browser loads the page, the
code first checks the compatibility of the browser using a Google
global function, GBrowserIsCompatible(). If this function
returns true, the application calls
a function named googleAjax(). The window.onload event handler and googleAjax() appear inside the hacks4_1a.js file. googleAjax() queries a server for the
user’s specific preferences of a user by passing along the username
(“bwperry,” in this case). The application then uses the properties
fetched by googleAjax() to
display and zoom in on a map. Here is the code from hacks4_1a.js:
var map = null;
window.onload = function(){
    if(GBrowserIsCompatible()){
        googleAjax('http://www.parkerriver.com/s/gmap?user=bwperry');
    } else { alert('Your browser is not compatible with Google Maps!');}
};
function createMap(lat,lng,zoomLevel){
    map = new GMap(document.getElementById("map"));
    GEvent.addListener(map, 'click', function(overlay, point) {
        document.forms[0]._longitude.value=point.x;
        document.forms[0]._latitude.value=point.y;
        map.addOverlay(new GMarker(point));

    });
    map.addControl(new GLargeMapControl());
    map.addControl(new GMapTypeControl());
    if(lat != null && lat.length != 0 && lng != null && lng.
            length != 0 && zoomLevel != null && zoomLevel.length != 0){
        map.centerAndZoom(new GPoint(lng, lat), zoomLevel);
    } else {
        //center on roughly middle of USA
        map.centerAndZoom(new GPoint(-97.20703, 40.580584), 14);
    }
}

function googleAjax(url){

    var request = GXmlHttp.create();
    request.open("GET", url, true);
    request.onreadystatechange = function() {
        if (request.readyState == 4) {
            if (request.status == 200) {
                var resp = request.responseXML;
                var rootNode = resp.documentElement;
                var zoom = rootNode.getElementsByTagName("zoomLevel")[0];
                var latLng = rootNode.
                getElementsByTagName("centerCoords")[0];
                var coordArr = latLng.firstChild.nodeValue.split(" ");
                var zoomLevel=zoom.firstChild.nodeValue;
                createMap(coordArr[0],coordArr[1],zoomLevel);
                alert(coordArr[0]+" "+coordArr[1]+" "+zoomLevel);
                document.forms[0]._latitude.value=coordArr[0];
                document.forms[0]._longitude.value=coordArr[1];
                document.forms[0]._zoomLevel.value=zoomLevel;
            } else {
                alert(
                        "The application had a problem communicating with "+
                        "the server. Please try again.");
            }//inner if
        }//outer if
    }//end function
    request.send(null);

}
It will probably help you visualize the application’s purpose if I show you the map inside a browser window, before digging into the code. The page loads the map and displays the user’s preferred coordinates and zoom level in text fields beneath it. Figure 4-1 shows the page displayed in a browser.

Map Objects
Take a gander at the
googleAjax() function and its creation of an
object that makes HTTP requests:
function googleAjax(url){
    var request = GXmlHttp.create();
    request.open("GET", url, true);
    request.onreadystatechange = function() {
        if (request.readyState == 4) {
            if (request.status == 200) {
                var resp = request.responseXML;
                var rootNode = resp.documentElement;
                var zoom = rootNode.getElementsByTagName("zoomLevel")[0];
                var latLng = rootNode.
                getElementsByTagName("centerCoords")[0];
                var coordArr = latLng.firstChild.nodeValue.split(" ");
                var zoomLevel=zoom.firstChild.nodeValue;
                createMap(coordArr[0],coordArr[1],zoomLevel);
                document.forms[0]._latitude.value=coordArr[0];
                document.forms[0]._longitude.value=coordArr[1];
                document.forms[0]._zoomLevel.value=zoomLevel;
            } else {
                alert(
                        "The application had a problem communicating with "+
                        "the server. Please try again.");
            }//inner if
        }//outer if
    }//end function
    request.send(null);
}
Remember all the code that created a request object in “Detect Browser Compatibility with the
Request Object” [Hack #1] and “Use Your Own Library for
XMLHttpRequest” [Hack #3]? All that’s necessary with the Google
Maps API is var request =
GXmlHttp.create(). You then call
the open() and send() methods and point to a function
that will be your onreadystatechange event handler, just as you
would with a request object that you created with your own
code.
Tip
The onreadystatechange event handler specifies a
JavaScript function that the code uses to handle an HTTP response.
In Ajax, the request object queries a server, which typically sends
back a response. You can have the event handler refer to a function
literal (as in this code) or to the name of a function (without the
() characters) that you have
defined elsewhere in the code (see “Detect Browser Compatibility with
the Request Object” [Hack #1]).
This code fetches an XML document from the server that contains the user’s map preferences:
var resp = request.responseXML;
The returned XML data might look like this:
<mapSetup>
<centerCoords>42.057450220246 -71.64184570312</centerCoords>
<zoomLevel>10</zoomLevel>
</mapSetup>
Remember that you are getting this XML information from the server. The data is specific to each user and can be stored in a database. This information represents the user’s preferred latitude and longitude for the center point of the map, as well as the preferred zoom level.
Tip
In Google Maps, latitude is measured in the range 90 degrees north of the equator to –90 degrees south of the equator. Longitude is measured in a range of 180 degrees east of the Greenwich Meridian to –180 degrees west of the Greenwich Meridian.
The code then uses Document Object Model programming to pull the text values out of the XML document and use them for map display:
var rootNode = resp.documentElement;
var zoom = rootNode.getElementsByTagName("zoomLevel")[0];
var latLng = rootNode.getElementsByTagName("centerCoords")[0];
var coordArr = latLng.firstChild.nodeValue.split(" ");
var zoomLevel = zoom.firstChild.nodeValue;
createMap(coordArr[0],coordArr[1],zoomLevel);
document.forms[0]._latitude.value=coordArr[0];
document.forms[0]._longitude.value=coordArr[1];
document.forms[0]._zoomLevel.value=zoomLevel;
The root node is the top-level XML element, such as mapSetup. The DOM Document object has a documentElement property that returns a
reference to this element. The code then stores references to the
elements that hold the data on the coordinates for the center point of
the map and the zoom level in variables named latlng and
zoom, respectively.
How do you get the values of elements using DOM? The latlng
variable, for instance, is of a Node type. The Node has a property named firstChild, which (phew!) returns the text
node contained by the XML element. The code gets the text value of
this Node using the Node’s nodeValue property.
The centerCoords element contains both latitude
and longitude values, separated by a space character. Thus, calling
the string split() method returns an array that contains the latitude as the
first array member and the
longitude as the second member.
Tip
You can redesign the server component to return the latitude and longitude in separate XML elements.
Creating Your Own Map
The createMap() function uses Google Maps
objects to generate a map for the web page. The code calls this
function with the user’s preferred latitude, longitude, and zoom level
as parameters, as in:
createMap(coordArr[0],coordArr[1],zoomLevel)
Tip
The first two parameters are array members, which is why the code uses,
for example, the coordArr[0]
syntax.
Unlike in other Ajax libraries, when using the Google Maps API,
the developer does not have to deal with the basics of XMLHttpRequest. However, if your application
requires more control over the request object, you can initiate a
setup like the one described in [Hack #3], which imports its
own JavaScript file that handles HTTP requests.
Use Ajax with a Google Maps and Yahoo! Maps Mash-up
Use Google Maps in a web application with Yahoo! Maps and driving directions.
Both Google and Yahoo! provide developers with power tools for manipulating maps within their own web applications. “Get Access to the Google Maps API” [Hack #28] introduced readers to the Google Maps API; Yahoo! in turn provides the Yahoo! Maps API, which includes a specific API for Ajax developers (see http://developer.yahoo.net/maps/ajax/index.html).
Yahoo! Maps is very easy to get started with; just acquire an application ID from the above URL, then begin embedding Yahoo! Maps and controls inside your web pages. You have to include the application ID in the URL that embeds a map inside your web page, which you’ll learn how to do in the upcoming hack description.
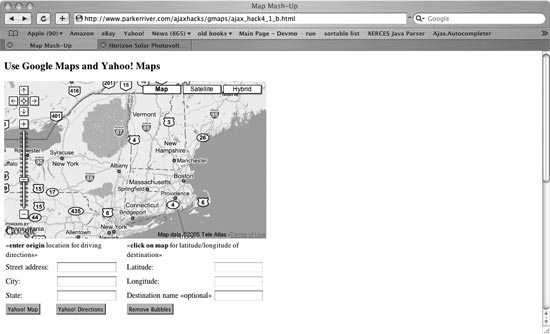
This hack uses both the Yahoo! Maps and Google Maps APIs. Combining two technologies in a web application is sometimes referred to as a mash-up, an expression that derives partly from the music industry. This way we can view a Google Map on the left side of the screen, perhaps in satellite view, and the same geographical region in a Yahoo! Map on the screen’s right side. The mash-up also allows the user to click on a destination on a Google Map and access Yahoo’s driving directions.
How It Works
This hack first sets up a Google Map on a web page using the Google Maps API. The application asks the user to click on the map to specify a map coordinate, and optionally, type in an origin address for driving directions. Users can zoom in on different map coordinates and areas prior to clicking a destination point.
The destination is specified in terms of latitude and longitude. A little balloon icon pops up on the Google Map wherever the mouse is clicked. When the user clicks the Yahoo! Map button, a Yahoo! Map appears on the screen’s right side, centered on the specified latitude and longitude. The user can then optionally put the Google Map into satellite view, while manipulating the Yahoo! Map with its sophisticated controls.
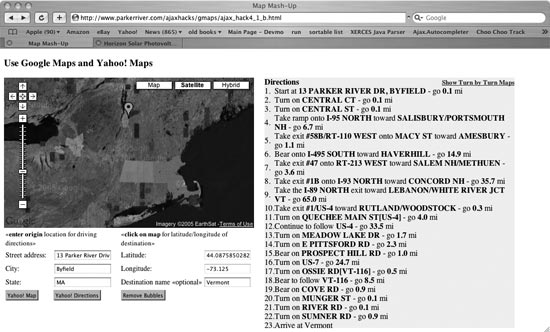
To obtain driving directions, the user can enter an origin address in the left side text fields and then click the Yahoo! Directions button. The application uses the indicated latitude/longitude coordinates to scrape the driving directions off of a Yahoo! HTTP response. The hack then replaces the Yahoo! Map with the step-by-step driving directions.
Figure 4-2 shows what the application looks like in a web browser before the user clicks the Yahoo! Map button.
The HTML page divides the application into two regions using
div tags and CSS styles. The Google
Map sits on the left side. Figure 4-3 shows the
mash-up after the user clicks on the Google Map to specify a
coordinate, then clicks the Yahoo! Map button. The Yahoo! Map is shown
on the right side of the screen.
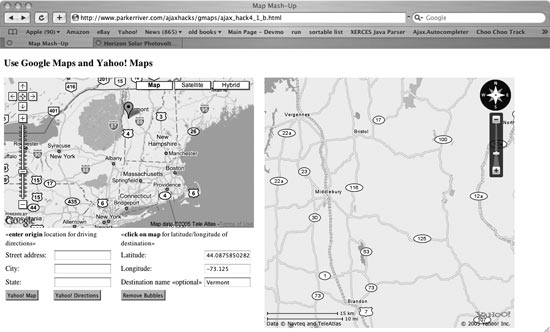
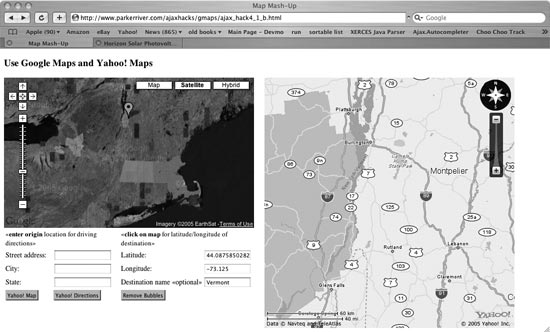
Figure 4-4 shows the application when the user has changed to satellite mode in the Google Map and zoomed out a bit in the Yahoo! Map.
If the user requests driving directions, they appear in the right part of the screen, as in Figure 4-5.
Tip
Google Maps provides latitude/longitude coordinates for anywhere on earth, but Yahoo!’s driving directions cannot presently provide directions between places that are separated by bodies of water such as oceans or bays. If you click on an island in a Google Map, for example, you will get the latitude/longitude point. However, the directions will be blank because Yahoo! driving directions, as of this writing, do not connect mainland origins with island destinations.
Fall Harvest
A good chunk of the work for the driving-directions mechanism is done by the server component, which harvests the directions from a Yahoo! page. Specifically, the Google request object sends along a Yahoo!-related URL that includes the user’s chosen latitude and longitude coordinates. The server component then:
Makes a request to Yahoo! using the URL
Receives all the code for the Yahoo! page
Scrapes the driving directions from the page
Sends just this chunk of data back to the application, which displays the directions in the right frame
This chunk of data in the response is a div element containing a numbered list of
driving directions, as in:
Take a right on Main Street and go 1.2 miles.
Go on the highway for another 680 miles....
HTML
Let’s look at some of the HTML code for the page that’s loaded into the mash-up user’s browser. I’ll just show the top part of the HTML code that sets this application in motion:
<!DOCTYPE html PUBLIC "-//W3C//DTD XHTML 1.0 Strict//EN"
        "http://www.w3.org/TR/xhtml1/DTD/xhtml1-strict.dtd">
<html xmlns="http://www.w3.org/1999/xhtml">
<head>
    <style type="text/css">
        .cont { float: left; height: 500px;
                width: 500px; }
        .instructions { font-size: 0.8em; }
        .label { font-size: 0.9em;}
    </style>
    <script src=
    "http://maps.google.com/maps?file=api&v=1&key=ABQIAAAANJd_PEMs2vnU_
    f0RhwHhZhSkdb7FxCoFqdzTrRB9tjTtDcnrVRSo66iNyUFvtz5XXXXXXXXXXX"
    type="text/javascript"></script>
    <script src="/ajaxhacks/js/http_request.js" type=
    "text/javascript"></script>
    <script src="/ajaxhacks/js/hacks4_1_b.js" type=
    "text/javascript"></script>
    <script type="text/javascript" src=
    "http://api.maps.yahoo.com/ajaxymap?v=2.0&appid=YRXXXXXXXXXXX"></script>
    <title>Map Mash-Up</title>
</head>
<body>
<h3>Use Google Maps and Yahoo! Maps</h3>
<div id="gmap_container" class="cont">
<div id="map" style="width: 500px; height: 300px"></div>
...
The first script tag imports
the Google Maps objects that we can use as official Google hackers.
These are JavaScript objects such as GMap that allow the code to add and control
maps on a web page. The src
attribute of the script tag
includes the long, involved URL for importing Google’s special code,
as well as the developer-specific key [Hack #28]. (The XXXs have
been added because we shouldn’t publish the exact keys we are
using.)
The JavaScript code appears in the file hacks4_1_b.js. script tags import that code, which you’ll
see in an upcoming section, as well as the code that uses
XMLHttpRequest [Hack #3].
Finally, the HTML code imports the Yahoo! Maps–related code with
another script tag. This code base
is necessary for web pages that embed Yahoo! Maps. The URL for this
purpose includes an appid parameter
specifying your own application ID for Yahoo! Maps:
<script type="text/javascript" src=
"http://api.maps.yahoo.com/ajaxymap?v=2.0&appid=YRXXXXXXXXXXX"></script>
Google and Yahoo!, Toe to Toe
Here is the JavaScript code in the
hacks4_1_b.js file. The createMap() function does not need further
explanation because we discussed it in the last hack. Let’s focus on
the code that embeds a Yahoo! Map and provides driving
directions:
var map = null;
window.onload=function(){
    createMap();
    document.getElementById("submit").onclick=function(){
        getDirections(document.forms[0]._street.value,
                document.forms[0]._city.value,
                document.forms[0]._state.value,
                document.forms[0]._dname.value,
                document.forms[0]._latitude.value,
                document.forms[0]._longitude.value);
    };
    document.getElementById("rem_bubbles").onclick=function(){
        clearOverlays();
    };

    document.getElementById("yah_maps").onclick=function(){
        createYMap();
    };
};
function createYMap(){
    writeMap(document.forms[0]._latitude.value,
            document.forms[0]._longitude.value);
}
function createMap(){
    map = new GMap(document.getElementById("map"));
    GEvent.addListener(map, 'click', function(overlay, point) {
        document.forms[0]._longitude.value=point.x;
        document.forms[0]._latitude.value=point.y;
        map.addOverlay(new GMarker(point));

    });
    map.addControl(new GLargeMapControl());
    map.addControl(new GMapTypeControl());
    //center on roughly middle of USA
    map.centerAndZoom(new GPoint(-97.20703, 40.580584), 14);
}
function clearOverlays(){
    if(map != null){
        map.clearOverlays();
    }
}

function getDirections(street,city,state,
        destName,lat,lng){

    var _str = encodeURIComponent(street);
    var _cit = encodeURIComponent(city);
    var url = "http://www.parkerriver.com/s/dd?"+_str+"&tlt="+
              lat+"&tln="+lng+"&csz="+
              _cit+"%2C"+state+"&country=us&tname="+destName;
    httpRequest("GET",url,true,handleResponse);
}

//event handler for XMLHttpRequest
function handleResponse(){
    try{
        if(request.readyState == 4){
            if(request.status == 200){
                var _dirs = request.responseText;
                var targDiv = document.getElementById("ymap_container");
                targDiv.innerHTML=_dirs+
                '<p><form><button type=\\"button\\" onclick=\\
                "window.print()\\">Print Directions</button></form></p>';
            } else {
                //request.status is not 200; ommitted for brevity
            }
        }//end outer if
    } catch (err)   {
        //ommitted for brevity

    }
}

function writeMap(lat,lng){
    var _point = new YGeoPoint(parseInt(lat), parseInt(lng));
    var _map = new YMap(document.getElementById('ymap_container'));
    _map.drawZoomAndCenter(_point, 8);
    _map.addPanControl();
    _map.addZoomLong();
    document.getElementById('yah_maps').disabled=true;
}
A good place to start explaining this program is with the
writeMap() function. This code shows how
easy it is to embed a Yahoo! Map. The code passes the latitude and
longitude coordinates into the constructor for a YGeoPoint object (an object provided by
Yahoo! Maps). The code then creates a YMap object, specifying the div element that will contain the Yahoo!
Map. The next three method calls center the map on the specified
coordinates at a certain zoom level (here, 8 in a range of 1 to 16),
then add a couple of Yahoo! controls to the map.
The last bit of code disables the Yahoo! Map button, because one embedded map is enough; after loading the map, the user can manipulate it to show any other location.
Driving Directions
The code also contains a function for displaying driving directions:
function getDirections(street,city,state,
        destName,lat,lng){

    var _str = encodeURIComponent(street);
    var _cit = encodeURIComponent(city);
    var url = "http://www.parkerriver.com/s/dd?"+_str+"&tlt="+
              lat+"&tln="+lng+"&csz="+
              _cit+"%2C"+state+"&country=us&tname="+destName;
    httpRequest("GET",url,true);
}
This function is launched when the user clicks the Yahoo! Directions button. (See Figure 4-5 for a view of what this screen and button look like.) The function takes the street, city, and state where the user wants to start the trip, as well as the latitude, longitude, and (optionally) the preferred name for the destination, then sends this information to the server component that actually talks to the Yahoo! application.
The function uses the global JavaScript encodeURIComponent() function to make sure
that the street and city, which may encompass more than one word (as
in “New Orleans”), are properly encoded for an Internet address. In
encoding phrases for URLs, New
Orleans becomes New%20Orleans, for example.
How Do I Get to Latitude...?
I won’t go into great detail about how the server component is programmed, except to say that the address of the component is a Java servlet at http://www.parkerriver.com/s/dd/. The servlet sends an HTTP request to the Yahoo! component, then sifts through the return value for the chunk of HTML representing driving directions. The servlet then sends these directions back to our Ajax application.
Tip
Developers can use their API of choice to harvest information
from web pages. The servlet in this hack uses APIs from the Java
software development kit (SDK), including javax.swing.text.html.parser.ParserDelegator
and javax.swing.text.html.HTMLEditorKit.ParserCallback.
getDirections() appends a
querystring to the end of the URL following a
question mark (?). An example URL is:
| http://www.parkerriver.com/s/dd?1%20Main%20St.&tlt=43.96119 0638920&tln=-70.13671875&csz=Smithtown%2CNE&country= us&tname=Main |
In other words, the parameters in the querystring represent the origin address and the latitude/longitude of the destination. The server component attaches the Yahoo! application URL (http://api.maps.yahoo.com/dd_result?newaddr=) to the querystring. The servlet then sends an HTTP request to this address, asking Yahoo! for driving directions. This is how the servlet obtains the driving directions for a particular address and map coordinate.
What’s Next?
The request object enters the request/response cycle in the way
described in “Use Your Own
Library for XMLHttpRequest” [Hack #3], using the simple
XMLHttpRequest library http_request.js specifies.
The server component scrapes just the chunk of Yahoo!’s response
that we plan to use—the driving directions that appear within a
div element—and returns this to our
JavaScript code. Here’s the method that handles the response:
//event handler for XMLHttpRequest
function handleResponse(){
    try{
        if(request.readyState == 4){
            if(request.status == 200){
                var _dirs = request.responseText;
                var targDiv = document.getElementById("ymap_container");
                targDiv.innerHTML=_dirs+
                    '<p><form><button type=\\"button\\" onclick=\\
                    "window.print()\\">Print Directions</button></form></p>';
//continued...
The request object returns the div element, itself containing a subset of
HTML, in its responseText property.
The code then adds this div
dynamically to the right side of the browser screen, adding a little
code at the end to allow the user to print out the directions.
That’s all there is to it! The user can print out the directions
by clicking the Print Directions button. The script in handleResponse() writes out the code for
this button, which just calls window.print():
<button type=\\"button\\" onclick=\\"window.print()\\">
In the spirit of mash-ups, this hack makes the case that two map APIs are better than one.
Display a Weather.com XML Data Feed
Display weather information on a web page and search a different location without a page submission.
This hack displays detailed weather information for a location, and allows the user to search another U.S. location for its temperature, humidity, and other weather-related data. The web page displays the new weather report without a complete page refresh. The information is derived from The Weather Channel Interactive, Inc. (http://www.weather.com).
Prepping
To use the Weather Channel’s XML data feed in a hack, you have to sign up at Weather.com and download the software development kit. The SDK contains some logos and a couple of PDF guides explaining the requirements for usage of the data. If you want to implement this data feed, the signup begins at http://www.weather.com/services/xmloap.html (the URL is not a typo!).
This hack sends the name of a U.S. city and state to a Weather.com URL that implements a web service. As part of the usage requirements, a registered developer must send along a partner ID and license ID as parameters in the URL. Weather.com responds with an XML file containing detailed weather information for the specified location.
Figure 4-6 shows what the page looks like in Firefox 1.5.
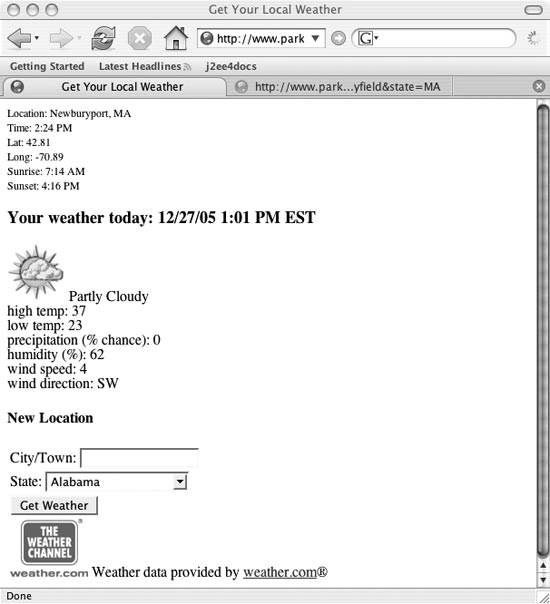
Tip
Weather.com requires developers to display their logo and link back to their site.
When the browser loads the web page, the weather report for a default location is loaded into it. The user can then enter a city name, select a state, and then request the weather data for a new location. Here are highlights of the web page, which imports a couple of JavaScript libraries:
<!DOCTYPE html PUBLIC "-//W3C//DTD XHTML 1.0 Strict//EN"
        "http://www.w3.org/TR/2000/REC-xhtml1-20000126/DTD/xhtml1-strict.dtd">
<html xmlns="http://www.w3.org/1999/xhtml" xml:lang="en" lang="en">
<head>
    <meta http-equiv="content-type" content="text/html; charset=utf-8" />
    <script type="text/javascript" src="js/http_request.js" />
    <script type="text/javascript" src="js/hacks_4_4.js" />
    <link rel="stylesheet" type="text/css" href="/css/hacks.css" />
    <title>Get Your Local Weather</title>
</head>
<body>
<div id="top_level">
    <span id="city_state" class="message"></span><br />
    <span id="time" class="message"></span><br />
    <span id="_lat" class="message"></span><br />
    <span id="_lng" class="message"></span><br />
    <span id="sunrise" class="message"></span><br />
    <span id="sunset" class="message"></span>
</div>

<h3>Your weather today: <span id="_date"></span></h3>
<div id="d_weather">
    <img id="w_icon" src="" width="64" height="64" align="left"/>
    <span id="_desc"></span><br />
    <span id="_high"></span><br />
    <span id="_low"></span><br />
    <span id="_precip"></span><br />
    <span id="_humid"></span><br />
    <span id="spd_wind"></span><br />
    <span id="dir_wind"></span>
</div>

<h4>New Location</h4>
<div id="_location">
    <form action="javascript:void%200" >
        <table border="0"><tr>
        <td>City/Town: <input type="text" name=
                "_city" size="15" maxlength="15" /></td></tr>
            <tr><td>State:  <select name="_state">
                <option value="al">Alabama</option>
                <option value="ak">Alaska</option>
                <option value="az">Arizona</option>
                <option value="ar">Arkansas</option>
                <option value="ca">California</option>
                <!-- SNIPPED -->
            </select></td></tr>
            <tr><td><button type="button" id="getWeather" name=
                    "go" value="Go">Get Weather</button> </td></tr>
            <!—SNIPPED -->
</html>
Two div elements contain the
weather data that you load in from an XML file. The bottom of the page
contains a form for entering in the new location and requesting more
weather info. The real guts of the application are represented by the
JavaScript in hacks_4_4.js.
http_request.js “Use Your Own Library for
XMLHttpRequest” [Hack #3] handles the XMLHttpRequest object.
Here’s the code in hacks_4_4.js. A window.onload event handler gets things
going once the browser has finished loading the XHTML code:
var defaultLocationId="USMA0279";
var partId="101xxxxxxx";
var licId="67f74axxxxxxxxxx";
var _host="www.parkerriver.com"
//city and state of location user searched for
var _cit = "";
var _stat = "";
window.onload = function(){
    document.getElementById("getWeather").onclick=function(){
        getNewLocation();
    }
    getWeather(defaultLocationId);
}
/* Get the weather XML data for a certain location */
function getWeather(locationId){
    if (locationId == null || locationId.length=="") { return; }

    var url = "http://"+_host+"/s/weathxml/weatherSearch?&locId="+
              locationId+"&cc=*&dayf=2&prod=xoap&par="+
              partId+"&key="+licId;
    httpRequest("GET",url,true,handleResponse);
}

function getNewLocation(){
    var val = document.forms[0]._city.value;
    if(val.length != 0){
        _cit = val;
    }  else {
        //we need at least a city to do a search
        return;
    }
    var sval = document.forms[0]._state.value;
    if(sval.length != 0){
        _stat = sval;
        getLocation(_cit+","+_stat);
    }   else {
        getLocation(_cit);    //We can do a search with only a city name
    }
}
/* The parameter can be a city alone or a city,state combo
as in Boston,MA */
function getLocation(_lcity){
    if (_lcity == null || _lcity.length=="") {alert("returning"); return; }
    //server component URL; the component connects with Weather.com
    var url = "http://"+_host+"/s/weathxml/addressSearch?city="+_lcity;
    httpRequest("GET",url,true,handleResponse);

}

//event handler for XMLHttpRequest
function handleResponse(){
    try{
        if(request.readyState == 4){
            if(request.status == 200){
                var _xml = request.responseXML;
                if(_xml != null){
                    var _root = _xml.documentElement;
                    switch(_root.tagName){
                        case "weather":
                            displayWeather(_root); break;
                        case  "search":
                            handleSearchResult(_root); break;
                        case "error" :
                            alert("Your weather or location search "+
                                  "generated an error. "+
                                  "Please try again."); break;
                        default: alert("Your search generated an "+
                                       "unspecified problem. “+
                                       “Please try again.");
                    }
                } else {
                    alert("The server returned a null value "+
                          "for the XML. Please try again in a few seconds.");
                }

            } else {
                //See Hack #3...
            }
        }//end outer if
    } catch (err)   {
        //See Hack #3...

    }
}
/* Display the weather based on XML data derived from
the Weather.com API */
function displayWeather(rootElement){
    if(rootElement != null){
        var loc= rootElement.getElementsByTagName("loc")[0];
        setupToplevel(loc);
        var  dayf = rootElement.getElementsByTagName("dayf")[0];
        setupWeather(dayf);
    }
}

function handleSearchResult(rootEl){
    var locArray = rootEl.getElementsByTagName("loc");
    var elVal = null;
    for(var i = 0; i < locArray.length; i++){
        elVal = locArray[i].firstChild.nodeValue;
        //if a state was specified in the search, include in
        //the search here
        if(_stat.length != 0){
            if (elVal == _cit+", "+_stat.toUpperCase()) {
                getWeather(locArray[i].getAttribute("id")); }
        }  else {
            alert("No state in search.");
            //just return the first result if no state is provided
            getWeather(locArray[i].getAttribute("id"));
            break;
        }
    }

}
/* Pull data from the XML and plug it into the proper span
tag in the XHTML */

function setupToplevel(_element){
    if(_element != null){
        setupElement( _element.getElementsByTagName("dnam")[0],
                document.getElementById("city_state"),"Location");
        setupElement( _element.getElementsByTagName("tm")[0],
                document.getElementById("time"),"Time");
        setupElement( _element.getElementsByTagName("lat")[0],
                document.getElementById("lat"),"Lat");
        setupElement( _element.getElementsByTagName("lon")[0],
                document.getElementById("lng"),"Long");
        setupElement( _element.getElementsByTagName("sunr")[0],
                document.getElementById("sunrise"),"Sunrise");
        setupElement( _element.getElementsByTagName("suns")[0],
                document.getElementById("sunset"),"Sunset");
    }
}

function setupElement(_node,_span,txtMsg)  {
    if(arguments.length == 3){
        _span.innerHTML= txtMsg+": "+_node.firstChild.nodeValue;
    } else {
        _span.innerHTML= _node.firstChild.nodeValue;
    }
}
//embed the weather image
function setupImgElement(_node,_imgElement)  {
    _imgElement.src="http://"+_host+"/ajaxhacks/img/"+
            _node.firstChild.nodeValue+".png";
}

function setupWeather(_element){
    if(_element != null){
        var parts =  _element.getElementsByTagName("part");
        /* Contains sub-elements describing day/night weather */
        var dpart = null;
        setupElement( _element.getElementsByTagName("lsup")[0],
                document.getElementById("date"));
        setupElement( _element.getElementsByTagName("hi")[0],
                document.getElementById("high"),"high temp");
        setupElement( _element.getElementsByTagName("low")[0],
                document.getElementById("low"),"low temp");
        for(var i = 0; i < parts.length; i++)   {
            if(parts[i].getAttribute("p") == "d") { dpart=parts[i];}
        }
        setupImgElement( dpart.getElementsByTagName("icon")[0],
                document.getElementById("w_icon"));
        setupElement(dpart.getElementsByTagName("ppcp")[0],
                document.getElementById("precip"),"precipitation (% chance)");
        setupElement( dpart.getElementsByTagName("hmid")[0],
                document.getElementById("humid"),"humidity (%)");
        setupElement(dpart.getElementsByTagName("t")[0],
                document.getElementById("desc"));
        var _wind = dpart.getElementsByTagName("wind")[0];
        setupElement( _wind.getElementsByTagName("s")[0],
                document.getElementById("spd_wind"),"wind speed");
        setupElement( _wind.getElementsByTagName("t")[0],
                document.getElementById("dir_wind"),"wind direction");
    }

}
Most of this code involves pulling the content out of the returned XML and displaying it on the web page. Two functions request weather data for a location and search for a “location ID” associated with a city/state combination, such as Oakland, CA. To access this weather XML feed, the requestor has to provide a location ID in the URL, representing a city or city/state combination. If the user provides a city and/or state for weather information, our application has to request the location ID first (we already know the location ID for our default location), then use this ID to fetch its weather data:
/* Get the weather XML data for a certain location */
function getWeather(locationId){
    if (locationId == null || locationId.length=="") { return; }

    var url = "http://"+_host+"/s/weathxml/weatherSearch?&locId="+
              locationId+"&cc=*&dayf=2&prod=xoap&par="+
              partId+"&key="+licId;
    httpRequest("GET",url,true,handleResponse);
}

function getNewLocation(){
    var val = document.forms[0]._city.value;
    if(val.length != 0){
        _cit = val;
    }  else {
        //we need at least a city to do a search
        return;
    }
    var sval = document.forms[0]._state.value;
    if(sval.length != 0){
        _stat = sval;
        getLocation(_cit+","+_stat);
    }   else {
        getLocation(_cit);    //we can do a search with only a city name
    }
}
/* The parameter can be a city alone or a city,state combo
as in Boston,MA */
function getLocation(_lcity){
    if (_lcity == null || _lcity.length=="") {alert("returning"); return; }
    //server component URL; the component connects with Weather.com
    var url = "http://"+_host+"/s/weathxml/addressSearch?city="+_lcity;
    httpRequest("GET",url,true,handleResponse);

}
The URL points to a server component you use to connect with Weather.com’s web service.
Tip
Using XMLHttpRequest, you
cannot connect directly to a web site that is different than the one
from which you downloaded the Ajax application. Therefore,
developers must use a server component or intermediary to connect
with other services. This intermediary can be written in the
language of your choice, such as Java Servlets, PHP, Ruby, or
ASP.NET.
This hack uses a Java servlet that implements a different Weather.com request based on the path info of the request that the servlet receives. The path info comprises the characters in a URL following the path to the server component, but preceding the querystring, as in addressSearch in the following URL:
| http://www.parkerriver.com/s/weathxml/addressSearch?city=Boston,MA |
The servlet, if its handshake with Weather.com is successful, grabs and returns to our application a pretty big XML file representing the weather information. Here is an example of the XML returned from Weather.com:
<!-- top-level: time. lat-long,sunrise, sunset-->
<loc id="30066">
    <dnam>Marietta, GA (30066)</dnam>
    <tm>10:40 AM</tm>
    <lat>34.04</lat>
    <lon>-84.51</lon>
    <sunr>7:02 AM</sunr>
    <suns>6:37 PM</suns>  <zone>-5</zone>
</loc>
<!--  daily forecast: -->
<dayf>
    <lsup>3/5/03 9:50 AM EST</lsup>
    <day d="0" t="Wednesday" dt="Mar 5">
        <hi>64</hi>
        <low>54</low>
        <sunr>7:02 AM</sunr>
        <suns>6:37 PM</suns>
        <part p="d">
            <icon>26</icon>
            <t>Sprinkles</t>
            <wind>
                <s>10</s>
                <gust>N/A</gust>
                <d>0</d>
                <t>W</t>
            </wind>
            <ppcp>20</ppcp>
            <hmid>77</hmid>
        </part>
        <part p="n">
            <icon>47</icon>
            <t>Scattered T-Storms</t>
            <wind>
                <s>13</s>
                <d>0</d>
                <t>SW</t>
            </wind>
            <ppcp>60</ppcp>
            <hmid>77</hmid>
        </part>
    </day>
</dayf>
This is the type of XML content that the servlet returns to your
application when you already know the location ID for a certain city
and state. The XML even includes an icon element so that your page can display a
Weather.com image representing the weather conditions.
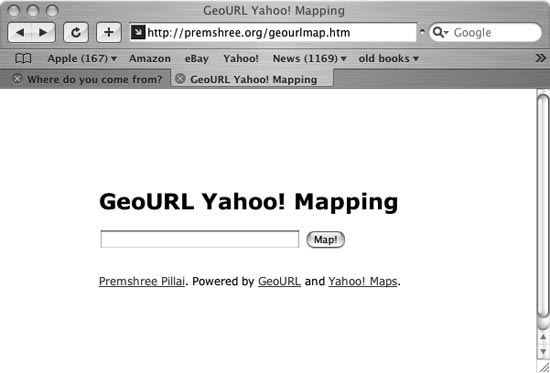
Use Ajax with a Yahoo! Maps and GeoURL Mash-up
Display the location of a cluster of bloggers on a Yahoo! Map.
This hack describes the GeoURL Yahoo! mapping application. You can access this mash-up of the GeoURL service and Yahoo! Maps at http://www.premshree.org/geourlmap.htm. This application uses the Yahoo! Maps API and data from GeoURL (http://geourl.org). When given a weblog address (http://jeremy.zawodny.com/blog/, for example), this hack displays a map of the weblogger’s neighbors—bloggers who are geographically close to the blogger associated with the URL. It asks for a URL, then uses the Ajax request object to connect with GeoURL and download some necessary XML data for sending along to the Yahoo! Maps site.
Tip
Registering sites with GeoURL involves adding tags to web pages that associate longitude/latitude coordinates with URLs. An example set of HTML tags for this purpose is:
<meta name="ICBM" content="XXX.XXXXX, XXX.XXXXX"><meta name="DC.title" content="THE NAME OF YOUR SITE">
Figure 4-7 shows what the GeoURL Yahoo! mapping application looks like in a browser.
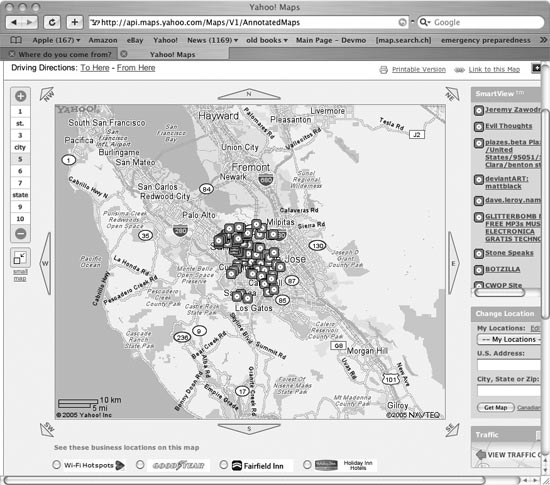
When you enter a weblog address that is stored at GeoURL, the application displays a map with icons indicating the locations of nearby bloggers or mapped URLs. Figure 4-8 shows one of these maps.
How It Works
The GeoURL service maps weblog addresses, as well as other kinds of URLs, to geographical latitude/longitude locations. The service can also plot neighboring or clustered locations of URLs.
Tip
Geographical locations can be plotted for any URLs with web page source code that contains tags indicating longitude/latitude coordinates.
The GeoURL service provides an RSS feed in XML format that can specify a weblogger’s neighbors, and the Yahoo! Maps API accepts latitude/longitude values so that it can display markers in a map. Therefore, these two web services are all we need for this application.
To generate the map, we need to pass a chunk of XML data originating from GeoURL to the Yahoo! Maps API. A typical application for this purpose involves an HTTP request to a server-side script, which in turn makes HTTP requests to the GeoURL service, constructs the required XML, and then sends the XML in a request to the Yahoo! Maps web service.
Mashed-up Requests
However, do we really need to make a traditional server-side
call to construct the XML, and have the user experience a complete
page rebuild? We can avoid a page refresh by using Ajax and the
request object! To this end, simply add a DIV element to the web page (to give the
user feedback about sending the requests and map loading). Here’s a
snapshot of the code for the web page:
<H1>GeoURL Yahoo! Mapping</H1>
<FORM METHOD="POST" ACTION=
"http://api.maps.yahoo.com/Maps/V1/AnnotatedMaps" onSubmit=
"loadMapData(); return false;">
<INPUT TYPE="TEXT" NAME="url" size="30" />
<INPUT TYPE="HIDDEN" NAME="appid" value="geourlmap" />
<INPUT TYPE="HIDDEN" NAME="xmlsrc" value="" />
<INPUT TYPE="SUBMIT" VALUE="Map!" />
<BR /><BR /><DIV ID="load" STYLE="display: none"></DIV>
</FORM>
When the user clicks the Map! button, the application calls the
loadMapData() function, which
sends the user’s entered URL to a server component. The component
fetches the GeoURL XML data and returns it to our application. The
JavaScript in our application then receives the XML response and
submits it to the Yahoo! Maps URL, http://api.maps.yahoo.com/Maps/V1/AnnotatedMaps/.
Here is the mash-up application’s code, which the web page
includes in a script tag:
<SCRIPT LANGUAGE="JavaScript">
    function getXmlHttpObject(){
        if (window.XMLHttpRequest)
            return new XMLHttpRequest();
        else if (window.ActiveXObject)
            return new ActiveXObject("Microsoft.XMLHTTP");
        else {
            alert("XMLHttpRequest not supported!");
            return null;
        }
    }

    function handleHttpResponse() {
        if (http.readyState == 4) {
            document.getElementById('load').
                innerHTML += ' [done]<br />Generating map...';
            results = http.responseText;
            if (!results.match('rss')) {
                document.getElementById('load').
                innerHTML = '[ERROR] This URL is probably '+
                    'not listed at GeoURL.';
            } else {
                document.forms[0].xmlsrc.value = results;
                document.forms[0].submit();
            }
        }
    }

    function loadMapData() {
        resetLoadDiv();
        showLoadDiv();
        var url = document.forms[0].url.value;
        var post_url = '/cgi-bin/geourlmap.cgi'
            post_data = 'url=' + url;
        http.open("POST", post_url);
        http.setRequestHeader('Content-Type',
            'application/x-www-form-urlencoded; charset=UTF-8');
        http.send(post_data);
        http.onreadystatechange = handleHttpResponse;
        return false;
    }

    function resetLoadDiv() {
        document.getElementById('load').
            innerHTML = 'Loading map data ...';
    }

    function showLoadDiv() {
        document.getElementById('load').
        style.display = 'block';
    }

var http = getXmlHttpObject();
</SCRIPT>
Anyone who wants their site included in a mash-up like this can add their URL to the GeoURL service. Simply go to http://geourl.org/add.html and follow the instructions!
Premshree Pillai
Debug Ajax-Generated Tags in Firefox
Look at the new tags in a tree structure using Firefox’s DOM Inspector.
View→Page Source has always been a popular (if primitive) programmer tool for inspecting a web page’s code, but the HTML generated by this menu command will not show the newly generated widgets that your Ajax applications might produce. It shows only the original HTML source code. Firefox, however, includes a DOM Inspector tool that shows these newly generated tags in a detailed hierarchical tree-type widget. Let’s look at the web page http://www.parkerriver.com/ajaxhacks/ajax_hack2_5.html.
The page, from “Submit Checkbox Values to the Server Without a Round Trip” [Hack #17], shows two sets of checkboxes representing team sports and individual sports. The application asks users to participate in a poll, choosing their favorite sports by checking the appropriate checkboxes. It then gets the latest results of the poll from a server program and displays them on the page. The checkboxes exist in the HTML source code; however, the text that eventually displays the poll results is dynamically generated on the page, without any visual submission or page refresh. To view the relevant code using Firefox, choose the menu command Tools→DOM Inspector. Figure 4-9 shows the Inspector window that pops up.
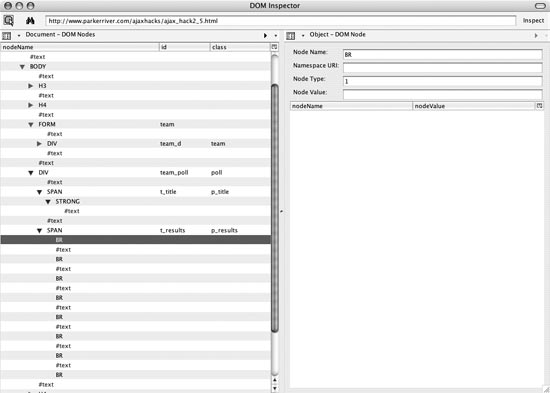
The left side of the window shows the entire hierarchical
structure of the page’s Document Object Model, with all the parent and
child tags available for inspection—simply click the little triangle
widget next to a tag’s name, then select an element or Node. These are the DOM nodes for the entire
web page.
Viewing the HTML page as a tree structure beginning from the
top-level or root element, html, the
nodes are the tree branches. Nodes contain parent nodes and child nodes,
such as the body element containing
p or div elements. In the DOM, Node objects represent the web page
nodes.
Click on an individual Node,
such as the DIV tag in Figure 4-7, and the
right side of the DOM Inspector shows all the Node object’s properties and methods.
Tip
The pop-up menu at the top-right of the Inspector window
includes the view “Object - Javascript Object,” which specifically
indicates the properties and methods for the selected Node.
The provided information is highly valuable for programmers who write dynamic HTML (DHTML), which involves altering web pages on the fly. Despite all of this “DOM speak,” believe me, this is heaven for a web developer who is working on a page with Ajax techniques!
Inspecting Dynamic Creations
What if your page does not display as expected, and you want to look at the underlying code to see what’s going on? View→Page Source just shows the page’s original HTML or XML. However, open up a new Inspector window, and you can look at the new structure that your DOM programming created, as shown in Figure 4-10.

Tip
Choosing the Firefox menu command Tools→DOM Inspector will open up a new Inspector window alongside any existing ones.
Figure
4-10 shows that an existing span element has new content in the form of
BR tags and text nodes. If you
click on a text node in the Inspector, the right side of the Inspector
window shows the value of the node. This information can be invaluable
for DOM programmers who are encountering a lot of text nodes, for
example, that are empty strings.
These empty nodes sprinkled throughout a page often pose difficulties
for any code that iterates through the document nodes looking for
specific nodes or structures.
The DOM Inspector is a great tool for debugging Ajax applications, not to mention a handy way to examine the DOM structure of any web page and to learn about the available object properties and methods.
Fetch a Postal Code
Type in a city and choose a state name; this hack quickly generates the U.S. postal code.
This hack asks the user for the name of a city and state, then generates the associated postal code in a text field (using a web service accessible at http://www.webservicex.net/uszip.asmx?op=GetInfoByState). Nothing else about the web page changes. Cool, and useful, too. How many people remember postal codes other than their own?
The hack gets the city and state values, then uses the request object to fetch the ZIP Code from a server-side component, which interacts with the web service. The server-side component pulls the ZIP Code out of an XML file it gets from the service and sends the code to our Ajax application.
Tip
We started out using the U.S. Postal Service’s Web Tools API, which likely contains the most up-to-date ZIP Codes, as well as the four-digit codes that extend some of the five-digit codes. However, the USPS was very restrictive in terms of allowing us to write about the use of its web tools in our hacks—fairly bureaucratic and not very cooperative—so we were not able to use a full implementation of its ZIP Code service for this hack.
Figure 4-11 shows what the page looks like in the browser.
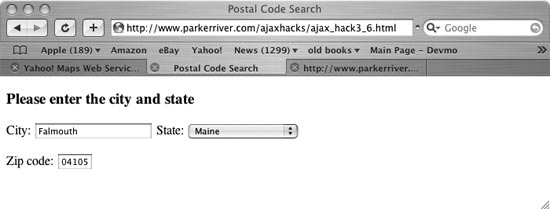
When the user chooses a state from the pop-up list, the application code sends the city and state to the server component, but only if the city field contains content (the user could leave it empty by mistake). Here is what the web page’s code looks like:
<!DOCTYPE html PUBLIC "-//W3C//DTD XHTML 1.0 Strict//EN"
        "http://www.w3.org/TR/2000/REC-xhtml1-20000126/DTD/xhtml1-strict.dtd">
<html xmlns="http://www.w3.org/1999/xhtml" xml:lang="en" lang="en">
<head>
    <script type="text/javascript" src="js/http_request.js"></script>
    <script type="text/javascript" src="js/hacks3_6b.js"></script>
    <meta http-equiv="content-type" content="text/html; charset=utf-8" />
    <title>Postal Code Search</title>
</head>
<body>
<h3>Please enter the city and state</h3>
<form action="javascript:void%200" method="get">
<p>
City: <input type="text" id="city" size="20" maxlength="20" />
State: <select id="sts">
            <option value="al">Alabama</option>
            <option value="ak">Alaska</option>
            <option value="az">Arizona</option>
            <option value="ar">Arkansas</option>
            <option value="ca">California</option>
            <option value="co">Colorado</option>
            <!—etc. -->
       </select>
</p><p>
Zip code: <input type="text" id="zip5" size="5" maxlength="5" />
</p>
<div id="message"></div>
</form>
</body>
</html>
The web page imports two JavaScript files, http_request.js and hacks3_6b.js. http_request.js (see “Use Your Own Library for
XMLHttpRequest” [Hack #3]) is responsible for setting up and
using XMLHttpRequest. This file
contains the httpRequest() function
that hacks3_6b.js uses. The code in hacks3_6b.js handles the user’s clicks on the
pop-up list, sends a request with the city and state values, and then
displays the returned ZIP Code in the zip5 text field. Here is the code in hacks3_6b.js:
window.onload=function(){
    var sts = document.getElementById("sts");
    sts.onclick=function(){
        var cit = document.getElementById("city");
        //Only make a request if the city text field
        //has a value
        if(cit.value) {getZipcode(cit.value,sts.value.toUpperCase());}

    };
};

function getZipcode(_ct,_st){
    if(_ct.length > 0 && _st.length > 0){
        httpRequest("GET","http://www.parkerriver.com/s/zip?city="+
                encodeURIComponent(_ct)+"&state="+
                encodeURIComponent(_st),
                true,handleResponse);
    } else {
        document.getElementById("zip5").value="";
    }
}

function handleResponse(){
    var xmlReturnVal;
    try{
        if(request.readyState == 4){
            if(request.status == 200){
                xmlReturnVal=request.responseXML;
                if(xmlReturnVal != null)  {
                    var zip5=xmlReturnVal.getElementsByTagName("zip")[0];
                    if(zip5 && zip5.childNodes.length > 0) {
                        document.getElementById("zip5").
                            value=zip5.childNodes[0].data;
                    }
                }
            } else {
                //request.status is 503
                //if the application isn't available;
                //500 if the application has a bug
                alert(
                        "A problem occurred with communicating between"+
                        " the XMLHttpRequest object and the server program.");
            }
        }//end outer if
    } catch (err)   {
        alert("It does not appear that the server "+
              "is available for this application. Please"+
              " try again very soon. \\nError: "+err.message);

    }
}
You’ve probably encountered this
window.onload event handler in other hacks. It’s
an “event handler that sets up another event handler.” When the browser
completes loading the web page, window.onload specifies what happens when the
user makes a selection from the pop-up list displaying the U.S.
states:
window.onload=function(){
    var sts = document.getElementById("sts");
    sts.onclick=function(){
        var cit = document.getElementById("city");
        //Only make a request if the city text field
        //has a value
        if(cit.value) {getZipcode(cit.value,sts.value.toUpperCase());}

    };
};
The code gets the value of the city text field and the U.S. states pop-up,
then calls getZipCode(). This function puts together the
URL that will connects this application to the server component. The
code then calls the httpRequest()
function to fetch the ZIP Code:
httpRequest("GET","http://localhost:8080/parkerriver/s/zip?city="+
encodeURIComponent(_ct)+"&state="+
encodeURIComponent(_st),
true,handleResponse);
Again, httpRequest() is
defined in http_request.js.
Server, Take Over
The server component has to connect with the web service, which
sends back a large XML file containing all the ZIP Codes for a
specific state. You have to use your own server intermediary because
of the XMLHttpRequest restriction
on connecting with a host that is different from the host from which
the user downloaded the web page.
Tip
This particular web service, which is generously made available to our code, does not have an operation that returns just a ZIP Code in response to a city and state name. Therefore, you have to take this extra step to glean the ZIP Code from the XML file.
The web service returns an XML file that looks like this:
<NewDataSet>
    <Table>
        <CITY>Abington</CITY>
        <STATE>MA</STATE>
        <ZIP>02351</ZIP>
        <AREA_CODE>781</AREA_CODE>
        <TIME_ZONE>E</TIME_ZONE>
    </Table>
    <Table>
        <CITY>Accord</CITY>
        <STATE>MA</STATE>
        <ZIP>02018</ZIP>
        <AREA_CODE>781</AREA_CODE>
        <TIME_ZONE>E</TIME_ZONE>
    </Table>
...
</NewDataSet>
The server component uses the Simple API for XML (SAX) to parse this return value.
When the Java component finds the city name the user provided, it
pulls out the associated ZIP Code and sends it to our Ajax application
in the form <zip>02351</zip>. The handleResponse() function then makes sure
this value is placed in the ZIP Code–related text field. It all
happens quite fast, considering the complexity involved!
Here is a snippet from handleResponse():
if(request.status == 200){
    xmlReturnVal=request.responseXML;
    if(xmlReturnVal != null)  {
        var zip5=xmlReturnVal.getElementsByTagName("zip")[0];
        if(zip5 && zip5.childNodes.length > 0) {
            document.getElementById("zip5").
                value=zip5.childNodes[0].data;
        }
    }
A property of the request object called responseXML stores the returned ZIP Code,
which is encapsulated in a <zip> tag. The code xmlReturnVal.getElementsByTagName("zip")[0]
returns the tag holding the ZIP Code. The last line of the code sample
then stores the ZIP Code in the text field with id zip5.
The Servlet
As mentioned earlier, the application cannot connect
directly with the web service using XMLHttpRequest because our web page has a
different host than the web service’s host. As a final step, let’s
look at the Java servlet that acts as the intermediary between the web
service and the Ajax code. It sifts through all the ZIP Codes for a
certain state and returns the first ZIP Code it finds that is
associated with the specified city (this is a potential flaw in the
application, as some cities can have multiple ZIP Codes):
package com.parkerriver;

import java.net.*;
import java.io.*;
import javax.servlet.*;
import javax.servlet.http.*;
import javax.xml.parsers.*;
import org.apache.log4j.*;
import org.xml.sax.helpers.DefaultHandler;
import org.xml.sax.*;

public class ZipServlet2 extends HttpServlet {
    private Logger log = null;
    private String zipCode = null;

    public String getZipCode() {
        return zipCode;
    }

    public void setZipCode(String zipCode) {
        this.zipCode = zipCode;
    }

    private static String wsUrl=
            "http://www.webservicex.net/uszip.asmx/GetInfoByState?USState=";

    public void init() throws ServletException {
        log = Logger.getLogger(ZipServlet2.class);
    }

    protected void doGet(HttpServletRequest httpServletRequest,
                         HttpServletResponse httpServletResponse) throws
                         ServletException, IOException {
        String stte = httpServletRequest.getParameter("state");
        String _city = httpServletRequest.getParameter("city");
        String resp = null;
        if(stte != null && _city != null){
            URL usps = new URL(wsUrl+stte);
            HttpURLConnection usp = (HttpURLConnection) usps.
                    openConnection();
            usp.setRequestMethod("GET");
            usp.setDoInput(true);
            usp.connect();

            BufferedReader in = new BufferedReader(
                    new InputStreamReader(
                            usp.getInputStream()));
            StringBuffer buf = new StringBuffer("");
            String inputLine;
            while ((inputLine = in.readLine()) != null) {
                buf.append(inputLine);   }
            in.close();
            resp = buf.toString();
            try {
                getZipSax(resp,_city);
                resp="<zip>"+this.getZipCode()+"</zip>";
            } catch (ParserConfigurationException e) {
                e.printStackTrace();
            }
        }  else {
            resp="<error />";
        }
        httpServletResponse.setContentType("text/xml; charset=UTF-8");
        //Convey to the user agent or browser that it should
        //not cache the responses
        httpServletResponse.setHeader("Cache-Control", "no-cache");
        httpServletResponse.getWriter().write(resp);
    }

    protected void doPost(HttpServletRequest httpServletRequest,
                          HttpServletResponse httpServletResponse) throws
                          ServletException, IOException {
        doGet(httpServletRequest, httpServletResponse);
    }
/* Parse the XML file of zip codes using our own DefaultHandler. Give
the ContentHandler the name of the city the user provided. */
    private void getZipSax(String zipXML,String _city)
            throws ParserConfigurationException, IOException {
        try {
            SAXParser parser =  SAXParserFactory.            newInstance().newSAXParser();
            parser.parse(new InputSource(new StringReader(zipXML)),
                    new MyHandler(_city));
        } catch (SAXException sxe) {
            log.info("Caught SAXException: "+sxe.getMessage());
        }

    }
    /* A SAX ContentHandler that parses an XML file; it sets the
    parent class's zipCode property when it finds the correct zip
    code in the XML, then throws a SAXException to halt the parsing. */
    class MyHandler extends DefaultHandler{
        private String city;
        private boolean foundCityFlag,foundCityVal,foundZipFlag;
        public MyHandler() {
            super();
        }
        public MyHandler(String _city) {
            this();
            this.city=_city;
        }
        public void startElement(String string, String string1,
          String string2,
          Attributes attributes) throws SAXException {
          if(string2.equalsIgnoreCase("city")){
             foundCityFlag=true;
          }
          if(foundCityVal){
              if(string2.equalsIgnoreCase("zip")){
                 foundZipFlag=true;
              }
           }
        }

        public void characters(char[] chars, int i,
        int i1) throws SAXException {

            if(foundCityFlag){
                if(new String(chars,i,i1).equalsIgnoreCase(city)){
                    foundCityVal=true;
                }  else {
                    foundCityFlag=false;
                }
            }
            if(foundZipFlag){
                setZipCode(new String(chars,i,i1));
                throw new SAXException("We found the zip code.");
            }
        }

    }
}
The SAX technique uses a
callback object—in this case, a class called
MyHandler—to look for city tags that contain the user’s specified
city. The MyHandler object
implements an interface that is part of the SAX API called ContentHandler. A ContentHandler lets the programmer decide
what should happen as the parser sifts through the XML stream at
different stages: when the handler finds the beginning of an XML
element, the content of an element, the end of an element, and so
on.
If the ContentHandler finds a
city tag whose content matches the
user’s chosen city, it looks for an associated zip tag and grabs the value of that tag. It
then throws a SAXException—the Java
way of signaling that the XML parsing can stop—because the code has
found the ZIP Code value.
Tip
See http://www.saxproject.org for more information on SAX.
This is a nifty way to display ZIP Codes to the user because they generally appear in the text field very quickly, without the page refreshing or changing in any other way. The user just has to correctly spell the city, choose a state in the pop-up, and presto, there’s the ZIP Code.
Create Large, Maintainable Bookmarklets
Create easy-to-maintain bookmarklets of arbitrary size.
A bookmarklet is a special piece of JavaScript code that can be dragged into a user’s Links toolbar and later clicked on to implement cross-site behavior. Bookmarklets have size limitations, which differ based on browser and platform, since they must fit into a certain number of characters. They can also be difficult to maintain for more sophisticated scripts, since every line of JavaScript code has to be jammed into one line.
This hack presents a mechanism to create arbitrarily sized bookmarklets, where most of the code resides outside of the bookmarklet link. It has been tested in IE 6 and Firefox.
Bookmarklet Code
Let’s begin by viewing the full bookmarklet source code:
<p>Drag the following link to your toolbar to
install this bookmarklet:</p>
<a href=
"javascript:function loadScript(scriptURL) { var scriptElem =
document.createElement('SCRIPT'); scriptElem.setAttribute('language',
'JavaScript'); scriptElem.setAttribute(
'src', scriptURL); document.body.appendChild(scriptElem); }
loadScript('helloworld.js');">Say Hello World</a>
The essential idea in this code is that we dynamically insert a
new script element into the DOM
through our bookmarklet. Here is the code within the bookmarklet URL,
formatted to be more readable:
function loadScript(scriptURL) {
    var scriptElem = document.createElement('SCRIPT');
    scriptElem.setAttribute('language', 'JavaScript');
    scriptElem.setAttribute('src', scriptURL);
    document.body.appendChild(scriptElem);
}
loadScript('http://216.203.40.101/projects/tutorials/'
           + 'creating_huge_bookmarklets/helloworld.js');
The previous code sample created a new script element and set it to the new URL. We
then append the new script block to
the document. The script we append,
helloworld.js, is very simple:
alert("Hello World!");When this script is loaded, the “Hello World!” message appears immediately.
The loadScript() function definition and
function call are rolled into a single JavaScript URL to turn it into
a bookmarklet.
You can enter the script yourself by dragging the link to your toolbar. Then navigate to another site and click the bookmarklet link. You will see the message “Hello World!” appear, loaded from an external script.
The external script loaded through the bookmarklet can come from a different domain than the web site itself, opening the door to sophisticated bookmarklets that aggregate data from different web sites. See http://www.bookmarklets.com for some of the interesting work people have done with bookmarklets.
Brad Neuberg
Use Permanent Client-Side Storage for Ajax Applications
Use an open source framework that allows applications to store large amounts of data persistently on the client side.
This hack describes the Ajax Massive Storage System (AMASS). AMASS is an open source library that uses a hidden Flash applet to allow JavaScript Ajax applications to store an arbitrary amount of sophisticated information on the client side. This information is permanent and persistent; if the user closes the browser or navigates away from the web site, the information is still present and can be retrieved later by the web page. Information stored by web pages is private and locked to a single domain, so other web sites cannot access this information.
AMASS makes it possible to store an arbitrary amount of sophisticated data, past the 4K limit of cookies or the 64K limit of Internet Explorer’s proprietary client-side storage system.
Tip
See the site http://codinginparadise.org/weblog/2005/08/ajax-internet-explorer-has-native.html for details on Internet Explorer’s 64K storage system.
An AMASS-enabled web site can store up to 100K of data without user permission. Above that limit, the web site must prompt users for permission to store the requested amount of information. The AMASS system informs the client-side application whether the storage request was allowed or denied. In tests, AMASS has been able to store up to 10 MB of user data with good performance.
AMASS works on Internet Explorer 6+ and Gecko-based browsers such as Firefox. Users must have Version 6+ of the Flash plug-in installed to use AMASS, but according to Macromedia’s statistics (http://www.macromedia.com/software/player_census/flashplayer/), Flash 6+ is already installed on 95% of machines.
The latest release of AMASS can be found at http://codinginparadise.org/projects/storage/latest.zip; at the time of publication the latest release of AMASS was Version 0.02 and was in alpha development. AMASS is under a BSD license.
Using AMASS
Working with AMASS is simple. The AMASS framework creates the abstraction of a permanent hash table that persists even after the user has left the page or closed the browser.
The first step in working with AMASS is to load the AMASS script:
<!-- Load the Permanent Storage framework -->
<script src="storage.js"></script>
In order to use AMASS, you must wait for its internal machinery
to finish loading. To find out when this happens, add a listener:
storage.onLoad(initialize);
function initialize() {
}
Once AMASS is loaded, you can begin to work with it by using its
hash table methods, such as put(), get(), and hasKey():
var keyName = "message";
var keyValue = new Object();
keyValue.message = "hello world";
keyValue.testArray = ["test1", "test2", "test3"];
keyValue.testObject = {someProperty: "someValue"};

if (storage.hasKey(keyName) == false) {
    storage.put(keyName, keyValue, statusHandler);
}
else {
    var results = storage.get(keyName);
}
The AMASS framework makes it possible to serialize entire
JavaScript objects into the storage system, such as the keyValue object we serialized earlier. Note
that DOM nodes and browser objects such as the XMLHttpRequest object will not be
serialized.
As mentioned earlier, applications can store up to 100K of data
without user permission. After this, a pop-up is generated by the
underlying Flash system that prompts the user for permission. The
AMASS framework knows when the pop-up appears, generating a div and bringing the Flash file to the
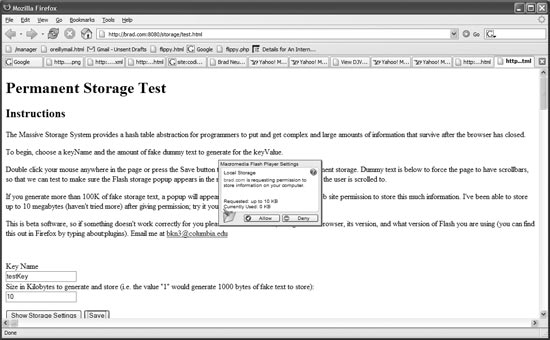
forefront of the application. Figure 4-12 shows
the application centering the pop-up on the screen.
Users can either approve or deny a storage request, so you must
create your application so that it’s ready if its storage request is
denied. The put() method takes as its third argument a
status handler that informs your code whether the storage request was
successful or not. In the following code,
statusHandler() is a callback function that
receives the outcome of whether the request succeeded or
failed:
function statusHandler(status) {
    if (status == Storage.SUCCESS) {
        var results = storage.get(keyName);
        alert("Results from statusHandler="+results);
    }
    else if (status == Storage.PENDING) {
        alert("Results pending approval of storage space from user");
    }
    else if (status == Storage.FAILED) {
        alert("Storage request denied");
    }
};
status can be one of three
values: Storage.SUCCESS, Storage.PENDING, or Storage.FAILED. If the pop-up appears, you
will get a callback of Storage.PENDING. Later, if the user approves
the request, you will receive Storage.SUCCESS; if the request is denied,
you will receive Storage.FAILED.
Upon approving the request, users can also indicate whether they give
permission to future requests to automatically store information
without the application popping up the permission dialog again.
How AMASS Works Internally
Internally, AMASS uses a hidden Flash file and Flash’s SharedObject functionality to permanently store the information. AMASS scripts the Flash applet using the Flash plug-in’s ActiveX methods on Internet Explorer and its LiveConnect methods on Firefox. AMASS then uses the Flash SharedObject’s callbacks to detect when the request storage dialog is on the screen and pass these back to the JavaScript application.
Brad Neuberg
Control Browser History with iframes
Learn the black art of iframes and browser history.
An iframe is an internal frame that can point to
and load an arbitrary URL within your HTML page. Here is an example
small iframe showing Google:
<iframe src="http://www.google.com" style=
  "width: 320px; height: 300px;">
</iframe>
Your browser history is the list of pages you have visited. When you press the back and forward buttons in your browser, you are jumping through your browser history.
Sometimes, for various reasons, programmers want to control what
is placed into the browser’s history. Think of this as a primitive
mechanism that can be used in more elaborate Ajax and DHTML hacks; it’s
a building block useful in all kinds of crazy Ajax kung-fu. It’s good to
know about tricks such as this one when you’re confronted with Ajax
design issues or when you stumble across very strange bugs that might be
caused by the different kinds of iframe we will discuss here.
There are two kinds of iframe. The first kind are located right within
your HTML and are loaded in the page:
<html>
<body>
<iframe id="testFrame"
  src="http://www.google.com">
</iframe>
</body>
</html>
Code can also create iframes
dynamically, through the DOM and JavaScript, after the page is finished
loading:
<html>
<head>
<script language="JavaScript">
function initialize() {
    var testFrame = document.createElement("IFRAME");
    testFrame.id = "testFrame";
    testFrame.src = "http://www.google.com";
    document.body.appendChild(testFrame);
}
</script>
</head>

<body onload="initialize()">
</body>
</html>
Okay, so there are two kinds of iframe. Who cares? Well, it turns out these
two kinds of iframe have completely
different behaviors when it comes to history in different
browsers!
Browser Lowdown
Here’s the lowdown for each kind of browser:
In Firefox, if the
iframeis inside the HTML and was loaded in the page, any location changes to it are stored in the browser’s history. If theiframewas written into the DOM through JavaScript after the page finished loading, no location changes are stored in the browser’s history.In Internet Explorer, location changes are stored in the browser’s history for both kinds of
iframe.In Safari, location changes are not stored in the browser’s history for either kind of
iframe.
You can see this for yourself in the demos discussed in the next section.
Browser Demos
Two demos have been provided to illustrate how Firefox and
Internet Explorer handle the different kinds of iframe. In both demos, we dynamically change
the iframe’s location between four
different web sites.
In the first demo, viewable at http://codinginparadise.org/projects/tutorials/tale_of_two_iframes/static_iframe.html,
we are dealing with an iframe that
is in the HTML on page load. In this case, you will find that all of
these sites are in the browser’s history in both Firefox and IE. Press
the back and forward buttons when the pop-up saying “Finished”
appears, and you will see the iframe’s contents change between each
site.
In the second demo, viewable at http://codinginparadise.org/projects/tutorials/tale_of_two_iframes/dynamic_iframe.html,
we are dealing with a dynamically created iframe. Here, you will find that only the
initial page load is in the browser’s history in Firefox, while all
sites are in the history in IE.
One small footnote is that if you have a static iframe that is loaded in the HTML, and that
iframe has a src value initially (as in <iframe
src="http://www.google.com"></iframe>, this initial
value is not placed in the browser’s history. In this case, only
successive changes to that static iframe are placed in the history.
You can use the special behavior of these two kinds of iframe for some real trickery. First, make
them invisible using CSS. You can then decide whether you want
something to enter the history or not, choosing the appropriate kind
of iframe. If you are working with
a DHTML application that uses iframes for remote communication (detailed
at http://developer.apple.com/internet/webcontent/iframe.html)
instead of XMLHttpRequest, for old
browser compatibility, knowing the difference between these two kinds
of iframe can be very useful,
because you can choose whether remote iframe communication is placed in the
browser’s history or not.
Tip
For a discussion of how you can use iframes to make the browser back button
work normally with Ajax applications, check out “Fix the Browser Back Button in
Ajax Applications” [Hack #68].
Brad Neuberg
Send Cookie Values to a Server Program
Create cookies within the web application and send cookie values to a server without refreshing the page.
A cookie is a small piece of data that a web application
can store on a user’s machine. A web site can set one or more cookies
using a Set-Cookie header in the server response. The
number of cookies that a server can set and their individual sizes are
restricted based on the standards used by the first browser makers, such
as Netscape.
Tip
A web server may set no more than 20 cookies for one browser, and each cookie’s size is limited to 4K. (Very few cookies reach that size.) If you want to view the cookies in your Firefox installation, go to Preferences→Privacy→Cookies→View Cookies. Most browsers, including Firefox, allow the user to remove cookies.
If Google or Yahoo!, for instance, has set a cookie on your machine, that business’s web applications will be able to read the cookie name and value the next time you go to its site. For example, Google may set a unique ID on your machine so that it can identify you and display your preferential news headlines when you visit the Google News site. The upcoming sections will explain how code sets the accessibility of the information the cookies store.
Bake Your Own Cookie
This hack allows a user to enter the name and value of a cookie. The application then uses this information to generate a new cookie. Figure 4-13 shows the interactions that take place in this hack between the browser and the server.
The simplest cookie comprises a name and value, as in mycookie=uniqueADDAA. Most cookies are set
by the server using a short string of data that includes the web
server path that is linked to the cookie, as well as the date on which
the cookie expires and can be deleted by the web server:
mycookie=uniqueADDAA; expires=Thu, 01 Dec 2005 20:35:16 GMT;
path=/ajaxhacks; domain=parkerriver.com
In this hack, the user also has the option to view existing cookies by clicking a button, as well as to send the existing cookie collection, including their own cookies, to a server component.
Figure 4-14 shows the web page for this application.
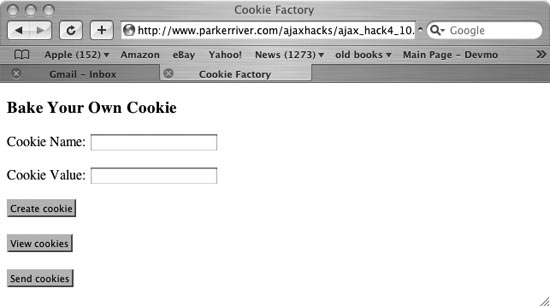
Here’s what the underlying HTML looks like—nothing earth
shattering here. The script tags
import the JavaScript that does the application’s work, including
initializing and using XMLHttpRequest. The HTML includes a span element for displaying a user message
after the application creates a cookie:
<!DOCTYPE html PUBLIC "-//W3C//DTD XHTML 1.0 Strict//EN"
        "http://www.w3.org/TR/2000/REC-xhtml1-20000126/DTD/xhtml1-strict.dtd">
<html xmlns="http://www.w3.org/1999/xhtml" xml:lang="en" lang="en">
<head>
    <meta http-equiv="content-type" content="text/html; charset=utf-8" />
    <script type="text/javascript" src="js/hacks4_10.js"></script>
    <script type="text/javascript" src="js/http_request.js"></script>
    <link rel="stylesheet" type="text/css" href="/css/hacks.css" />
    <title>Cookie Factory</title>
</head>
<body>
<h3>Bake Your Own Cookie</h3>
<form action="javascript:void%200">
<p>
Cookie Name: <input type="text" id="ck_nm" name=
        "ck_name" size="20" maxlength="20" />
</p>
<p>
Cookie Value: <input type="text" id="ck_val" name=
        "ck_value" size="20" maxlength="20" />
</p>
<p>
<span id="msg" class="message" style="color:green"></span>
</p>
<p>
<button id="ckCreate" type="button">Create cookie</button>
</p>
<p>
<button id="ckView" type="button">View cookies</button>
</p>
<p>
<button id="ckSend" type="button">Send cookies</button>
</p>
</form>
</body>
</html>
When the user types a cookie name and value into the text fields and clicks the “Create cookie” button, the application generates a new cookie with a default path, domain, and expiration attribute (see the upcoming explanation). Figure 4-15 shows the browser after the user has created a new cookie.
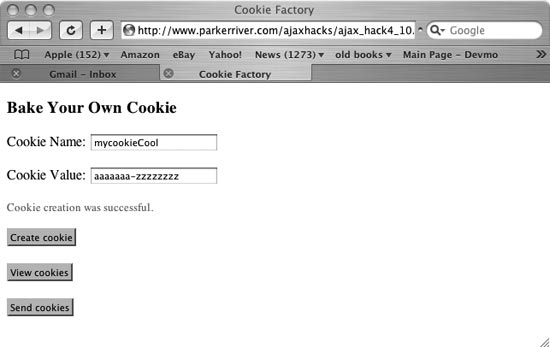
Figure 4-16 shows the view resulting from clicking the “View cookies” button, which shows the cookies that are accessible from responses originating from a certain domain (e.g., http://www.parkerriver.com). You can see that the cookie added in Figure 4-15 was identified by this cookie-reading servlet.
JavaScript
By now you are probably interested in the hacks4-10.js code, which provides the
Ajax-related functionality for this application. “Use Your Own Library for
XMLHttpRequest” [Hack #3] describes http_request.js, which sets up and uses
XMLHttpRequest. Here’s the code
from hacks4-10.js:
var _host="www.parkerriver.com";
var _fpath="";
var _path="/";
//Cookie object definition
function MyCookie(name,val,domain,path) {
    this.name=name;
    this.value=val;
    this.domain=domain;
    this.path=path;
    //The cookie lives for three days by default
    var dtsec=new Date();
    dtsec.setSeconds(dtsec.getSeconds()+(60*60*24*3));
    this.expires=dtsec.toGMTString();
    this.toString=function(){
        return this.name+"="+this.value+"; expires="+this.expires+
               "; path="+this.path+"; domain="+this.domain;
    }
}//End of Cookie object definition
//This event handler is called when the web page
//is first loaded.
window.onload=function(){
    var b1 = document.getElementById("ckCreate");
    var b2 = document.getElementById("ckView");
    var b3 = document.getElementById("ckSend");
    var _url="";
    if(b1 && b2 && b3){
        b1.onclick=function(){
            //The new Cookie's name/value
            var nm = document.getElementById("ck_nm");
            var v=document.getElementById("ck_val");
            try{
                if(nm && nm.value && v && v.value){
                    var cook=new MyCookie(encodeURIComponent(nm.value),
                            v.value,_host,_path);
                    //Add the cookie to the current cookie collection
                    document.cookie=cook.toString();
                    //Display a user message
                    showMsg(document.getElementById("msg"),
                            "Cookie creation was successful.");
                }
            } catch(errv) {
                alert("Sorry, but we failed to create a cookie because "+
                      "of this error: "+errv.message);
            }

        }
        //Display the cookies visible from a specific host
        b2.onclick=function(){
            location.href="http://"+_host+_fpath+"/s/ckreader";
        }
        //POST all available cookies to a server component
        b3.onclick=function(){
            _url="http://"+_host+_fpath+"/s/ckserv";
            httpRequest("POST",_url,true,function(){},
                    "allCookies="+encodeURIComponent(document.cookie));
        }
    }
    //Create initial cookie when the application starts up
    _url="http://"+_host+_fpath+"/s/ckserv";
    httpRequest("GET",_url,true,handleInit);
}
function showMsg(_id,txt){
    if(_id && txt){_id.innerHTML=txt;}
}
//Response handler that XMLHttpRequest will use;
//see Hack #3
function handleInit(){
    try{
        if(request.readyState == 4){
            if(request.status == 200){
                var resp =  request.responseXML;
                if(resp != null){
                    var outcome=resp.getElementsByTagName("outcome")[0];
                    var msg = document.getElementById("msg");
                    if(outcome != null){
                        if(outcome.childNodes[0].nodeValue != "success")  {
                            showMsg(msg,
                          "Initial Cookie creation was not successful.");
                        }
                    }
                }
            } else {
                //request.status is 503
                // if the application isn't available;
                //500 if the application has a bug
                alert(
                "A problem occurred with communicating between "+
                "the XMLHttpRequest object and the server program.");
            }
        }//end outer if
    } catch (err)   {
        alert("It does not appear that the server "+
              "is available for this application. Please"+
              " try again very soon. \\nError: "+err.message);

    }
}
The Cookie Object
This code defines a MyCookie object, then uses that object to
create the new cookie for the user. This is a small example of
object-oriented JavaScript. The code declares a constructor function
that sets the typical properties of a cookie:
//Cookie object definition
function MyCookie(name,val,domain,path) {
    this.name=name;
    this.value=val;
    this.domain=domain;
    this.path=path;
    //The cookie lives for three days by default
    var dtsec=new Date();
    dtsec.setSeconds(dtsec.getSeconds()+(60*60*24*3));
    this.expires=dtsec.toGMTString();
    this.toString=function(){
        return this.name+"="+this.value+"; expires="+this.expires+
               "; path="+this.path+"; domain="+this.domain;
    }
}
These properties include:
The cookie name
The cookie value
The domain connected to the cookie, as in http://www.parkerriver.com
Tip
Only subsequent requests that involve the same domain will
include this cookie. In other words, the browser will include a
Cookie request header that
includes any cookie name/value pairs associated with this domain and
path.
The path, which further differentiates whether an HTTP request will include a particular cookie in its
CookieheaderThe
expiresproperty, a date string in Greenwich mean time (GMT) format specifying when the cookie will expire and thereafter be unavailable on this browser
Here’s the code can create the cookier:
var new_cookie = new MyCookie("mycookie","myvalue","www.parkerriver.com","/ajaxhacks")The object generates a default expiry date of three days in the future, but code can change that later. For example:
var ndate=new Date();
//1 year from now
ndate.setSeconds(ndate.getSeconds()+(60*60*24*365));
new_cookie.expires= ndate.toGMTString();
document.cookie=new_cookie.toString();
The MyCookie object’s
toString() method conveniently generates a
string that represents the cookie, and allows it to be set using
client-side JavaScript. The previous code sample shows how this is
done using the document.cookie property.
Tip
Oddly, setting document.cookie to a properly formatted
cookie string has the effect of adding a new cookie to the browser’s
existing collection for that domain. If the code then displays the
value of document.cookie, it
shows not only the new cookie, but all other existing cookies as
well, put together in one string.
Figure
4-17 shows an alert box displaying the value of the MyCookie object’s toString() method.
Another task initiated by this application is to send the values
of all current cookies in a POST HTTP request. As mentioned in the
earlier note, the values of all the cookies are available lumped
together in a string returned by
the document.cookie property. This
string can easily be POSTed to an
application, which can do whatever it wants with these cookie values,
using the following code:
_url="http://www.parkerriver.com/s/ckserv";
httpRequest("POST",_url,true,function(){},
       "allcookies="+encodeURIComponent(document.cookie));
This call of httpRequest()
assumes that the application does not yet have any plans for a return
value; consequently, it passes an empty function literal value to the
function.
Use XMLHttpRequest to Scrape an Energy Price from a Web Page
Allow the user to choose an energy fuel type and generate the current price without refreshing the page.
The Web includes lots of different places for getting the
latest energy prices, such as for a barrel of crude oil or the average
cost of U.S. residential propane. These web sources usually involve
loading into the browser a particular business-oriented page over and
over again (such as from cnnfn.com) or visiting
multiple web sites in search of various prices. This hack offers an
alternative: it automatically grabs an energy price based on the user’s
choice in a select list element. The
hack doesn’t involve any page rebuilding, so the feature can be built
into a broader application for handling energy prices.
Getting in a Scrape
The source of the energy price is a public-domain site managed by the U.S. Energy Information Agency (U.S. EIA). You can also use a commercial web service to access instantaneous energy prices, which avoids having to scrape or harvest the price from the HTML—a better solution from an application-design standpoint but not free of charge. The EIA site suits our purpose, however, because it illustrates how to the access multiple data pieces from third-party sources, then displays of the data value without rebuilding the entire page. The sequence for this hack’s behavior goes like this:
The user chooses a fuel type in the select list.
This choice triggers the
select’sonchangeevent handler.The event handler uses
XMLHttpRequestto send a request to a Java JSP page.The JSP uses a predefined component to scrape the energy price from the U.S. EIA page, then sends the price as text back to the web page.
The web page shows a “Fetching energy price...” message, then displays the latest price in a colorful font.
Figure 4-18 shows the hack’s web page.

When the user makes a select-list choice, Figure 4-19 shows what the result looks like.
The JavaScript code the page uses is rather simple:
window.onload=function(){
    var _url=
    "http://www.parkerriver.com/energy.jsp?priceTyp=";
    if($("fuelType")){
        $("fuelType").onchange=function(){
            try{
                showQuote($("msg"),
                 "Fetching energy price...");
                httpRequest("GET",_url+$F("fuelType"),
                true,handlePrice);
            } catch(errv) {
                alert("Sorry, but we failed to get the energy price "+
                      "because "+
                      "of this error: "+errv.message);
            }

        };
    }

}
function showQuote(_id,txt){
    if(_id && txt){_id.innerHTML=txt;}
}
function handlePrice(){
    try{
        if(request.readyState == 4){
            if(request.status == 200){
                var resp =  request.responseText;
                if(resp != null && resp.length > 0){
                    showQuote($("msg"),
                    "The requested price is: "+resp);
                }   else {
                    showQuote($("msg"),
                    "The price is not available at this time.");
                }
            } else {
                //request.status is 503 if the application
                // isn’t available;
                //500 if the application has a bug
                alert(
                "A problem occurred with communicating between"+
                " the XMLHttpRequest object and the server program.");
            }
        }//end outer if
    } catch (err)   {
        alert("It does not appear that the server "+
              "is available for this application. Please"+
              " try again very soon. \\nError: "+err.message);

    }
}
window.onload sets up the
onchange event handler for our lone
select element containing the
choices of fuel types. onchange
points to a function that the browser will call each time the user
chooses a different option in the select list. The hack then takes the fuel
choice and sends it to the JavaServer Pages component using the
request object.
Tip
See “Use Your Own
Library for XMLHttpRequest” [Hack #3] for an explanation of
the http_request.js library this hack uses for
handling XMLHttpRequest.
The JavaScript uses a couple of handy shortcuts from the
Prototype library (see Chapter 6). The
select element’s id value is "fuelType", as in <select id="fuelType"/>. $("fuelType") is the equivalent of document.getEle-mentById("fuelType"), and
$F("fuelType") provides the current
value of the select element.
The hack finally inserts the return value, an energy price that
the EIA refreshes about once per week, inside a span element on the web page. This final
step occurs inside handlePrice(),
which is the readystate handler for
the request object.
var resp =  request.responseText;
if(resp != null && resp.length > 0){
  showQuote($("msg"),
  "The latest price is: "+resp);}
For Java Jocks
In case you’re interested in the “scraping” code, here’s the
OilpriceCallback Java class that fetches a
crude-oil price:
package com.eeviewpoint;

import java.io.BufferedReader;
import java.io.IOException;
import java.io.InputStreamReader;
import java.net.URL;
import javax.swing.text.html.HTMLEditorKit.ParserCallback;
import javax.swing.text.MutableAttributeSet;
import javax.swing.text.html.parser.ParserDelegator;
import javax.swing.text.html.HTML;

public class OilpriceCallback extends ParserCallback
     implements Scraper{
    private boolean crudeOilCrumb=false;
    private boolean foundCurrPrice=false;
    private String urlSource=
    "http://tonto.eia.doe.gov/dnav/pet/pet_pri_fut_s1_d.htm";
    private String result = "";

    public String getUrlSource() {
        return urlSource;
    }

    public void setUrlSource(String urlSource) {
        this.urlSource = urlSource;
    }

    public String getResult() {
        return result;
    }

    public void setResult(String result) {
        this.result = result;
    }

    public void handleText(char[] chars, int i) {
        String str = new String(chars);
        if(str.indexOf("Crude Oil") != -1){
            crudeOilCrumb=true;
        }
        if(this.crudeOilCrumb && this.foundCurrPrice &&
                getResult().length() == 0){
            setResult(str.trim());
        }
    }

    public void handleStartTag(HTML.Tag tag,
        MutableAttributeSet mutableAttributeSet, int i) {
        if((crudeOilCrumb) && tag ==  javax.swing.
            text.html.HTML.Tag.TD){
            String val = (String) mutableAttributeSet.
            getAttribute(HTML.Attribute.CLASS);
            if(val != null && val.equalsIgnoreCase("Current")){
                foundCurrPrice=true;
            }
        }
    }

    public String toString() {
        return getResult();
    }
}
A class named EnergyHarvester
contains a list (in an object called scraperMap) of various callback classes
(such as OilpriceCallback) that
scrape prices for the different fuel types. Here is the code from
EnergyHarvester for returning the
requested price.
public String getNugget() throws ClassNotFoundException,
    IllegalAccessException, InstantiationException, IOException {
    String nm = ((String)scraperMap.get(priceType));
    ParserCallback callback = (ParserCallback) Class.forName(nm).
    newInstance();
    URL eia = new URL(((Scraper) callback).getUrlSource());
    BufferedReader webPagestream = new BufferedReader(
      new InputStreamReader(eia.
      openStream()));
    super.parse(webPagestream,callback,true);
    return callback.toString();
}
Here’s the JSP component our web page calls. The code uses an
instance of EnergyHarvester, which
in turn uses different implementations of the HTML-parsing code to
fetch the various energy prices.
<%@taglib uri="http://java.sun.com/jsp/jstl/core" prefix="c" %>
<% response.addHeader("Content-Type","text/plain");
    response.addHeader("Cache-Control","no-cache"); %>
<jsp:useBean id="parser" class="com.eeviewpoint.EnergyHarvester"/>
<jsp:setProperty name="parser" property=
     "priceType" value="${param.priceTyp}"/>
<c:out value="${parser.nugget}"/>
Send an Email with XMLHttpRequest
Allow the user to enter the email properties in text fields and then send an email without a page round trip.
This hack not only sends an email without a page round trip, but also validates the syntax of the entered email addresses and provides useful messages in the event of invalid entries. Figure 4-20 shows what the hack’s web page looks like in the Safari browser.
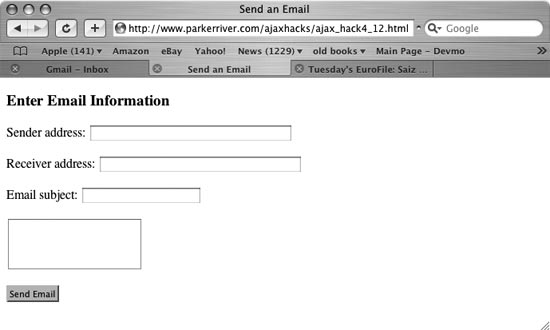
It looks pretty basic, but a lot happens behind the scenes. A server component awaits a request to receive the data and send it as an email. The web page itself imports three JavaScript libraries:
<script type="text/javascript" src="js/email_lib.js"></script>
<script type="text/javascript" src="js/hacks4_12.js"></script>
<script type="text/javascript" src="js/http_request.js"></script>
email_lib.js contains a bit
of object-oriented JavaScript that is designed to validate an email
address [Hack #23] and
provide a useful message in the event of any invalid syntax. http_request.js (see “Use Your Own Library for
XMLHttpRequest” [Hack #3]) initializes XMLHttpRequest and uses it to send the email
information. hacks4_12.js contains
this Ajax application’s code, which is reproduced in the next
section.
Figure 4-21 shows a message that is dynamically generated when the user enters an address with improper syntax in either of the first two text fields.
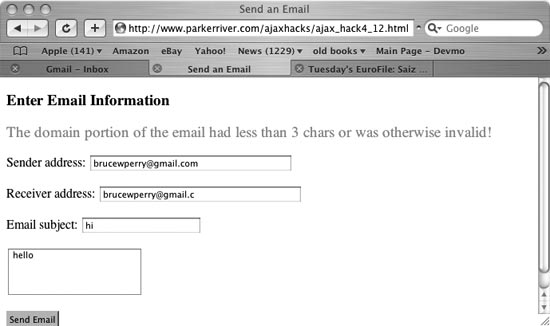
In this case, the user left a couple of letters off of the email suffix (the domain) in the second field. Our email-syntax checker in email_lib.js ensures that, among other things, email addresses end with a period followed by two to three characters. (For more validation rules, check out [Hack #23].)
If the user’s entries are valid, the Java servlet responds with an
<outcome>true</outcome>
message so that the application can notify the user that the email is on
its way, as in Figure
4-22.
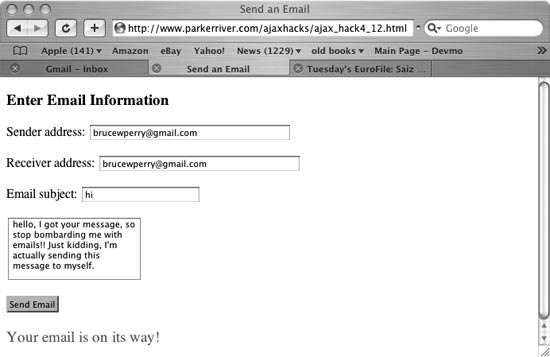
How It Works
First we’ll look at the code in hacks4_12.js, which uses elements of the other two imported libraries to check the email address syntax and then send the email, all without a page rebuild. Then we’ll look at the Java servlet that receives the email data. Here is the page’s underlying code:
var queryString="";
window.onload=function(){
    var _url="http://www.parkerriver.com/s/em";
    var b1 = document.getElementById("b1");
    if(b1){
        b1.onclick=function(){
            //clear any existing messages
            clearMsg(document.getElementById("err"),"");
            clearMsg(document.getElementById("msg"),"");
            var isValidEmail=validate(document.getElementById("sender").
                    value,
                    document.getElementById("receiver").value);
            if(isValidEmail){
                try{
                  showMsg(document.getElementById("msg"),
                  "Sending email...");
                  setQueryString();
                  httpRequest("POST",_url,true,
                  handleResponse,queryString);
                } catch(errv) {
                    alert("Sorry, but we failed to send the email because "+
                          "of this error: "+errv.message);
                }
            }

        }; //end function
    }

}
//Validate however many email addresses have been
//passed in as arguments using the Arguments array.
//Break and return false if one of them is invalid
function validate(em1) {
    var bool = false;
    var eml = null;
    for(var i = 0; i < arguments.length; i++)  {
        eml = new Email(arguments[i]);
        eml.validate();
        bool=eml.valid;
        if(! bool) {  showMsg(document.getElementById("err"),
                eml.message);break;}
    }
    return bool;
}
function showMsg(_id,txt){
    if(_id && txt){_id.innerHTML=txt;}
}
function clearMsg(_id){
    if(_id){_id.innerHTML="";}
}
function handleResponse(){
    try{
        if(request.readyState == 4){
            if(request.status == 200){
                var resp =  request.responseXML;
                if(resp != null){
                    var outc=resp.getElementsByTagName("outcome")[0];
                    if(outc.childNodes[0].nodeValue == "true") {
                        showMsg(document.getElementById("msg"),
                                "Your email is on its way!");
                    } else {
                        showMsg(document.getElementById("msg"),
                        "The email could not be sent at this time.");
                    }
                } else {
                    showMsg(document.getElementById("msg"),
                            "The email could not be sent at this time.");
                }
            } else {
                //snipped...
            }
        }//end outer if
    } catch (err)   {
        alert("It does not appear that the server "+
              "is available for this application. Please"+
              " try again very soon. \\nError: "+err.message);

    }
}
function setQueryString(){
    queryString="";
    var frm = document.forms[0];
    var numberElements =  frm.elements.length;
    for(var i = 0; i < numberElements; i++)  {
        if(i < numberElements-1)  {
            queryString += frm.elements[i].name+"="+
                           encodeURIComponent(frm.elements[i].value)+"&";
        } else {
            queryString += frm.elements[i].name+"="+
                           encodeURIComponent(frm.elements[i].value);
        }

    }
}
When the browser loads the web page, it sets up the Send Email
button’s onclick event
handler.
Tip
window.onload is triggered
when the browser completes loading the web page. This is a good
place in the code to set up the event-handling attributes, such as
onclick, for the other tags on
the page. window.onload is an
alternative to using event handlers as tag attributes embedded in
the HTML.
When the user clicks this button, the application validates the
syntax of the values entered into the email address text fields. If
the values represent valid email addresses, setQueryString() assembles a querystring
of all the email information suitable for sending in a POST
request:
b1.onclick=function(){
     //clear any existing messages
     clearMsg(document.getElementById("err"),"");
     clearMsg(document.getElementById("msg"),"");
     var isValidEmail=validate(document.getElementById("sender").
             value,
             document.getElementById("receiver").value);
     if(isValidEmail){
         try {
             showMsg(document.getElementById("msg"),"Sending email...");
             setQueryString();
             httpRequest("POST",_url,true,handleResponse,queryString);
           } catch(errv) {
                 alert("Sorry, but we failed to send the email because "+
                       "of this error: "+errv.message);
           }
      }

}; //end function
Here is a sample of a querystring from this application encoded for transferal over the Web:
//encodeURIComponent() function converts '@' to '%40'
fromAddr=brucewperry%40gmail.com&toAddr=brucewperry%40gmail.com&subj=
hello&emessage=hello%20there!
Finally, httpRequest()
sends the POST request to our server component, which ultimately sends
the email. See “Use Your Own
Library for XMLHttpRequest” [Hack #3] for an explanation of
this method.
Server Snippet
What does our server component look like? Here is a snippet from the Java servlet class that sends the email:
package com.parkerriver;

import javax.servlet.*;
import javax.servlet.http.*;
import java.io.IOException;

public class NewEmailServlet extends HttpServlet{
    protected void doGet(HttpServletRequest httpServletRequest,
                         HttpServletResponse httpServletResponse) throws
                         ServletException, IOException {
        doPost(httpServletRequest,httpServletResponse);
    }

    protected void doPost(HttpServletRequest httpServletRequest,
                          HttpServletResponse httpServletResponse) throws
                          ServletException, IOException {
        String fromAddr = httpServletRequest.getParameter("fromAddr");
        String toAddr = httpServletRequest.getParameter("toAddr");
        String eMsg = httpServletRequest.getParameter("emessage");
        String subj = httpServletRequest.getParameter("subj");
        boolean outcome = false;
        if(check(fromAddr) && check(toAddr) && check(eMsg)){
            EmailBean bean = new  EmailBean();
            bean.setFrom(fromAddr);
            bean.setTo(toAddr);
            bean.setSubject(subj);
            bean.setContent(eMsg);
            outcome = bean.sendMessage();
        }
        AjaxUtil.sendXML(httpServletResponse,"<outcome>"+
                outcome+"</outcome>");

    }
    private boolean check(String content) {
        if(content != null && content.length() > 0) {return true;}
        return false;
    }
}
This servlet uses an EmailBean object with various setter or
“mutater” methods that build an email. EmailBean has a
sendMessage() method that sends the email
and returns true if everything goes
okay (in Java terms, if the method call does not result in a thrown
exception). The servlet returns this value to the Ajax application as
a bit of XML in an outcome
element.
Find the Browser’s Locale Information
Use XMLHttpRequest to find out more specific locale information about a user.
When a user requests a web page, the browser typically sends
along some extra data as part of a request header that indicates the
user’s preferred language. This information is the value of the
Accept-Language request header—for example, en_us for the English language as spoken in
the United States, or ko_kr for
Korean as spoken in South Korea.
In JavaScript, you can use the
navigator.language (or, for Internet Explorer,
navigator.userLanguage) property
value to pick up this internationalization data. This hack grabs this
information for display to the user, then gives the user the option of
displaying a more specific translation of the [language code]_[country code] term, as in English_United States.
Tip
This hack uses the following sources: http://www.unicode.org/unicode/onlinedat/languages.html for the language codes, and http://www.iso.org/iso/en/prods-services/iso3166ma/02iso-3166-code-lists/index.html for country codes.
Figure 4-23 shows the hack in the Safari browser.
When a user loads the page into the browser, it displays the value
of that user’s language preference in the form [two-letter language code] or [two-letter language code]_[two-letter country
code]. The user then clicks the “Define preference” button,
and a translation of the code(s) appears, without a page refresh.
XMLHttpRequest provides a country
and/or language code to a server component, which checks the sources
referenced in the previous note and returns a translation of the code or
codes (e.g., Korean instead of ko).
Tip
I found that changing my language preferences in the browser
(from, say, en_us to es_es) did not cause the value of navigator.language or navigator.userLanguage to change. This
property value appears to be a rather static value associated with the
browser. To get around this, applications can use a server component
that reads the Accept-Language request header directly.
Accept-Language typically contains a list of any language codes that
the user has set in the browser.
Here is a subset of the web page code for this hack:
<head>
    <meta http-equiv="content-type" content="text/html; charset=utf-8" />
    <script type="text/javascript" src="js/hacks4_13.js"></script>
    <script type="text/javascript" src="js/http_request.js"></script>
    <link rel="stylesheet" type="text/css" href="/css/hacks.css" />
    <title>Where do you come from?</title>
</head>
<body>
<h3>Welcome</h3>
<p>
    Your language preferences have been identified as:
    <span id="_country"></span>
</p>
<form action="javascript:void%200">
    <p>
        <button id="b1" type="button">Define preference</button>
    </p>
</form>
<p>
    <span id="msg"></span>
</p>
hacks4_13.js contains the JavaScript for this hack. The request object is powered by http_request.js (see “Use Your Own Library for XMLHttpRequest” [Hack #3]).
The Interpreter
Here is the code in hacks4_13.js. It reads the navigator.language/navigator.userLanguage value and, after
parsing the value, sends it to a server component:
var lgn="";
window.onload=function(){
    if(navigator.language) {
        lgn=navigator.language;
    }  else if(navigator.userLanguage) {
        lgn=navigator.userLanguage;
    }
    if(lgn.length >= 2){
        displayLanguage(lgn);
    } else {
        showMsg(document.getElementById("msg"),
                "Sorry, no language information is available "+
                "from your browser.");
    }
    var b1 = document.getElementById("b1");
    if(b1) {
        //Extract the language and country codes
        //The value may be a language code only
        //as in "es" for Spanish
        b1.onclick=function(){
            var lg = lgn.substring(0,2);
            var ct = lgn.length > 2 ? lgn.substring(3) : "";
            var _url="http://www.parkerriver.com/s/lang?lang="+
                     lg+"&country="+ct;
            httpRequest("GET",_url,true,handleResponse);
        }
    }
}
function showMsg(_id,txt){
    if(_id && txt){_id.innerHTML=txt;}
}
function clearMsg(_id){
    if(_id){_id.innerHTML="";}
}
function displayLanguage(_code){
    showMsg(document.getElementById("_country"),
            "<strong>"+_code+"</strong>");
}
function handleResponse(){
    try{
        if(request.readyState == 4){
            if(request.status == 200){
                var resp =  request.responseXML;
                //Pull out the content of the country
                //and language elements and display them
                //to the user
                if(resp != null){
                    var intl=resp.getElementsByTagName("intl")[0];
                    var c= intl.getElementsByTagName("country")[0];
                    var l= intl.getElementsByTagName("language")[0];
                    var lval="";
                    var cval="";

                    if(l.hasChildNodes()){lval=l.childNodes[0].nodeValue;}
                    if(c.hasChildNodes()){cval=c.childNodes[0].nodeValue;}

                    if(lval && cval) {
                        showMsg(document.getElementById("msg"),
                                "<strong>"+lval+
                                "_"+cval+"</strong>");
                    } else if (lval && ! cval) {
                        showMsg(document.getElementById("msg"),
                                "<strong>"+lval+"</strong>");
                    } else if (! lval && cval){
                        showMsg(document.getElementById("msg"),
                                "<strong>"+cval+"</strong>");
                    }
                } else {
                    showMsg(document.
                     getElementById("msg"),
                     "The language info could not be accessed "+
                     "at this time.");
                }
            } else {
                //snipped...See Hack #3
}
When the application uses the request object to connect with the server component, the component sends back some XML. Here is a sample XML return value:
<intl>
<country>KOREA, REPUBLIC OF</country>
<language>Korean</language>
</intl>
The handleResponse()
function acquires the XML with var resp =
request.responseXML. The function then parses the XML,
displaying these values to the user.
Hacking the Hack
As mentioned earlier, a most likely improved iteration of this
hack would use a server component to read the Accept-Language header
directly, rather than depend on the navigator.language property in JavaScript.
For example, you can use a JavaServer Pages (JSP) file that reads the
Accept-Language header, then uses the embedded Ajax code to display
the translation as done here.
Create an RSS Feed Reader
Grab and display XML-based RSS news feeds.
Really Simple Syndication (RSS) is an XML-based format for publishing news, blog entries, and other fast-changing information. Thousands of web sites now provide RSS news feeds as an alternative to visiting the actual sites in a browser. An RSS feed reader lets you subscribe to various feeds. The reader periodically (usually not more than once per half hour) grabs the latest RSS file from each subscribed site, then lets you view those feeds. Some RSS feed readers are built into browsers (Firefox), others are integrated into mail clients (Opera), and others are entirely web-based.
Because RSS feeds are simply XML files, they’re easy for an Ajax application to digest. This hack will show you how to read an RSS feed from your server, parse the XML data, and format it for the browser.
Handling RSS feeds is not limited to standalone feed readers. You may want to incorporate RSS data into other applications, such as web portals. RSS feeds are now used for a variety of data beyond just news. For example, the U.S. National Weather Service has weather forecasts and warnings available as RSS feeds (go to http://www.weather.gov/data/current_obs/ for a listing of available weather feeds).
The following abridged RSS file illustrates the basic structure of an RSS feed:
<?xml version='1.0' encoding='utf-8'?>
<rss version='2.0'
xmlns:dc='http://purl.org/dc/elements/1.1/'
xmlns:itunes='http://www.itunes.com/dtds/podcast-1.0.dtd'>
<channel>
<title>O'Reilly Media, Inc. New Books</title>
<link>http://www.oreilly.com/</link>
<description>O'Reilly's New Books</description>
<copyright>Copyright 2005, O'Reilly Media, Inc.</copyright>
<itunes:author>O'Reilly Media, Inc.</itunes:author>
<itunes:category text='Technology' />
<itunes:explicit>no</itunes:explicit>
<language>en-US</language>
<docs>http://blogs.law.harvard.edu/tech/rss</docs>
<item>
<title>C in a Nutshell</title>
<link>http://www.oreilly.com/catalog/cinanut</link>
<description><![CDATA[Covering the C programming language and C
runtime library, this book. . .]]>
</description>
<author>webmaster@oreillynet.com (Tony Crawford, Peter Prinz)</author>
<dc:date>2005-12-16T22:51:09-08:00</dc:date>
</item>
<item>
<title>Run Your Own Web Server Using Linux & Apache</title>
<link>http://www.oreilly.com/catalog/0975240226</link>
<description><![CDATA[Learn to install Linux and Apache 2.0 on a
home or office computer for testing and development, and . . .]]>
</description>
<author>webmaster@oreillynet.com (Tony Steidler-Dennison)</author>
<dc:date>2005-12-15T22:52:17-08:00</dc:date>
</item>
</channel>
</rss>Most RSS feeds contain a single channel element. In RSS files for news and
blogs, the channel usually contains
multiple items (one for each
article).
Tip
The RSS files our Ajax application reads must reside on the same server, or within the same domain, as our application itself. For security reasons, most browsers don’t let an application from one domain grab data from another domain. This makes browsing safer but limits functionality a bit.
A Simple RSS Reader
For our RSS reader, let’s assume you’ve set up some mechanism to grab fresh RSS files periodically and store them on your server. This can be as simple as setting up a crontab entry on your Linux server:
0/30 * * * * wget –q –O /var/www/html/feeds/oreilly_new_titles.rss.xml \\
             http://www.oreillynet.com/pub/feed/29?format=rss2
Figure 4-24 shows the simple user interface of our RSS reader: a pull-down list to select the RSS feed, and a checkbox to let users select more details for each article displayed.
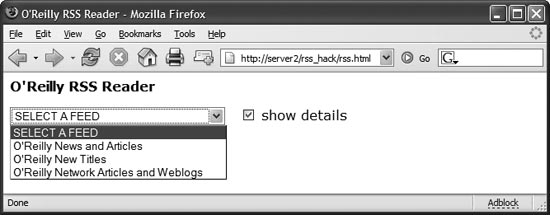
Select a news feed, and the matching RSS file is grabbed from the server. The RSS reader extracts information from the file and builds the HTML for the web page, as shown in Figure 4-25.
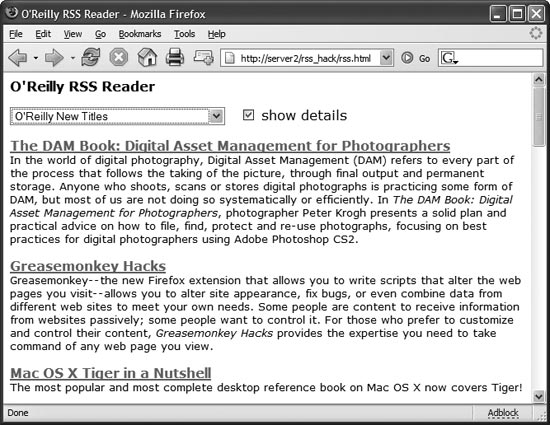
Our RSS feed reader is contained in the files rss.html and
rss_parse.js (and the ubiquitous JavaScript
file xhr.js, which provides a
browser-neutral XMLHttpRequest
object). The first file, shown here, defines the web page
itself:
<HTML>
<HEAD>
<TITLE>O'Reilly RSS Reader</TITLE>
<script language="javascript" src="xhr.js"></script>
<script language="javascript" src="rss_parse.js"></script>
</HEAD>
<BODY>
<b>O'Reilly RSS Reader</b><p>
<form id="frmRSSParse">
<select id="lbFeeds" onChange="get_rss_feed();">
<option value="">SELECT A FEED</option>
<option value="oreilly_news_articles.rss.xml">
O'Reilly News and Articles
</option>
<option value="oreilly_new_titles.rss.xml">
O'Reilly New Titles
</option>
<option value="oreillynet_articles_blogs.rss.xml">
O'Reilly Network Articles and Weblogs
</option>
</select>
<input id="cbDetails"
type=checkbox
onClick='format_rss_data ("content", last_xml_response);'
>
show details
</form>
<div id="content">
</div>
</BODY>
</HTML>The web page references rss_parse.js, which defines the three JavaScript functions needed to implement the RSS reader.
How It Works
A handler is attached to the listbox’s onChange event. When the user selects an
item from the list, the get_rss_feed() JavaScript function is
called:
<select id="lbFeeds" onChange="get_rss_feed();">This function grabs the URL of the selected RSS file from the
listbox and passes it to the get_xml_file() function. The second function
does the work of retrieving the XML file from the server. This code
shows these functions:
function get_xml_file (url) {
    var httpreq = getHTTPObject();

    //Precondition: must have a URL
    if (url == "") return;

    httpreq.open("GET", url, true);

    httpreq.onreadystatechange = function () {
        if (httpreq.readyState == 4) {
            var content = document.getElementById("content");
            content.innerHTML = "Parsing XML...<br>";

            last_xml_response = httpreq.responseXML;
            format_rss_data ("content", last_xml_response);
        }
    }

    var content = document.getElementById("content");
    content.innerHTML = "Retrieving XML...<br>";
    httpreq.send (null);
}

function get_rss_feed () {

    //Get selected RSS feed
    var lbFeeds = document.getElementById("lbFeeds");
    if (lbFeeds.value != "") {
        get_xml_file (lbFeeds.value);
    }

}
Tip
The Document object has its
own methods for loading an XML file, using the createDocument and load methods. However, let’s use XMLHttpRequest in our example because this
is more “Ajaxy.” Either technique works fine, and both can be made
to work (with a little effort) in most of the popular
browsers.
The retrieved XML file is stored as a Document object. We pass this object to our
third and final function, format_rss_data(). This is where the
Document object is examined and we
pull out the items we need. Each news snippet is enclosed in an
item element. For our RSS reader,
we want to extract three pieces of information from each item: the title, the
link to the full article, and a brief
description of the article. Here’s how it
works:
function format_rss_data (divname, response) {
    var html = "";
    var doc = response.documentElement;
    var items = doc.getElementsByTagName('item');

    for (var i=0; i < items.length; i++) {

        var title = items[i].getElementsByTagName('title')[0];
        var link = items[i].getElementsByTagName('link')[0];

        html += "<b><a href='"
             + link.firstChild.data
             + "'>"
             + title.firstChild.data
             + "</a></b><br>";

        var cbDetails = document.getElementById("cbDetails");
        if (cbDetails.checked) {
            var desc = items[i].getElementsByTagName('description')[0];
            html += "<font size='-1'>"
                    + desc.firstChild.data
                    + "</font><p>";
        }
    }

    var target_div = document.getElementById(divname);
    target_div.innerHTML = html;
}
The format_rss_data()
function uses a for loop to iterate
over each item element in the RSS
Document object. Using the getElementsByTagName() method, extract the
title, link, and description information, and build the HTML displayed
on the web page.
Now save the most recent Document object in the last_xml_response variable. If the user
checks (or unchecks) the “show details” checkbox, you can reformat the
current RSS data with another call to format_rss_data(), and without
another request to the server. Figure 4-26 shows
the page with “show details” unchecked. In this view, the descriptions
are hidden, and the user is presented with a simple list of article
links.
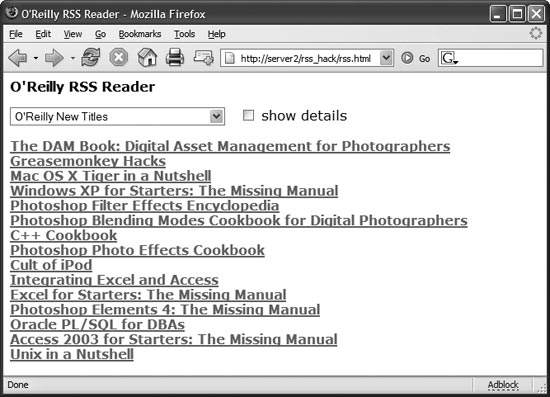
Hacking the Hack
This hack doesn’t display all the information for each
article—author and date information is omitted, and no general channel
information is displayed. If you want to use this hack as a generic
way to include feed information in web pages, you need to expand
format_rss_data() to (at least)
display the channel title.
Having the RSS feeds hardcoded into the listbox isn’t very flexible, either. You can maintain a list of RSS feeds on your server (as an XML file, perhaps), but even this may be unwieldy if you monitor hundreds of feeds. You might consider using a “categories” listbox that populates the “feeds” listbox instead.
Mark Pruett
Get Ajax Hacks now with the O’Reilly learning platform.
O’Reilly members experience books, live events, courses curated by job role, and more from O’Reilly and nearly 200 top publishers.

