
I say “outside chance” because, these days, it’s unlikely. Transpar-
ency fi rst appeared in Illustrator 9, which was six versions and
more than a decade ago. This coincided with the introduction of
transparency to version 1.4 of Adobe’s Portable Document Format
(PDF), which has largely supplanted the limited confi nes of Post-
Script. By default, every AI fi le includes a PDF description. Which
means that, if your translucent objects fail to print properly to a
PostScript printer (again, unlikely), you can rasterize the AI fi le in
a PDF-savvy program such as Photoshop, and the work of your
printer will be done.
I bring this up because I want you to look upon transparency in
Illustrator as your extremely powerful friend. You can use it—you
should use it—without fear of it interfering with the viability of your
artwork. And if printing somehow presents a problem, you can al-
ways export your artwork for use in Photoshop, which (based on
my experience with thousands of fi les) always produces accurate
results, as I’ll document in Lesson 12, “Printing and Exporting.”
In any event, rest assured: Illustrator’s brand of transparency is
practical, it’s adaptable, and it works.
Opacity and Knockout Group
This lesson features one elaborate project fi le, in which we’ll build
on a base image (Figure 8-3 on the facing page) to create a multi-
layered photo illustration (Figure 8-4). I’ve drawn all the paths for
you; your job is to apply the transparency effects.
In this fi rst exercise, I’ll show you how to change the Opacity value
for a single attribute assigned to a path outline. Then you’ll set a
group of paths so that translucent attributes cancel each other out,
resulting in a uniform and highly desirable effect.
1.
Open a piece of layered artwork. Open the fi le called
Base image with gloves.ai in the Lesson 08 folder inside
Lesson Files-AIcs5 1on1. Pictured in Figure 8-3, this
seven-layer illustration features a low-quality, two-megapixel
photograph that I shot years ago of my youngest son, Sam, as
a bald, eyebrowless toddler banging on a tragically tuneless
piano. Thus far, the illustration sports two vector-based gloves
with inset eyes. (Clearly, I was inspired. By what, not so clear.)
Many more paths, groups, layers, and sublayers lay in wait.
2. Inspect the Layers panel. In the Layers panel, you’ll see seven
layers, four turned on (with
s visible) and three off. The Vec-
tors layer should appear twirled open; if it isn’t, click its to
246
Lesson 8: Working with Transparency
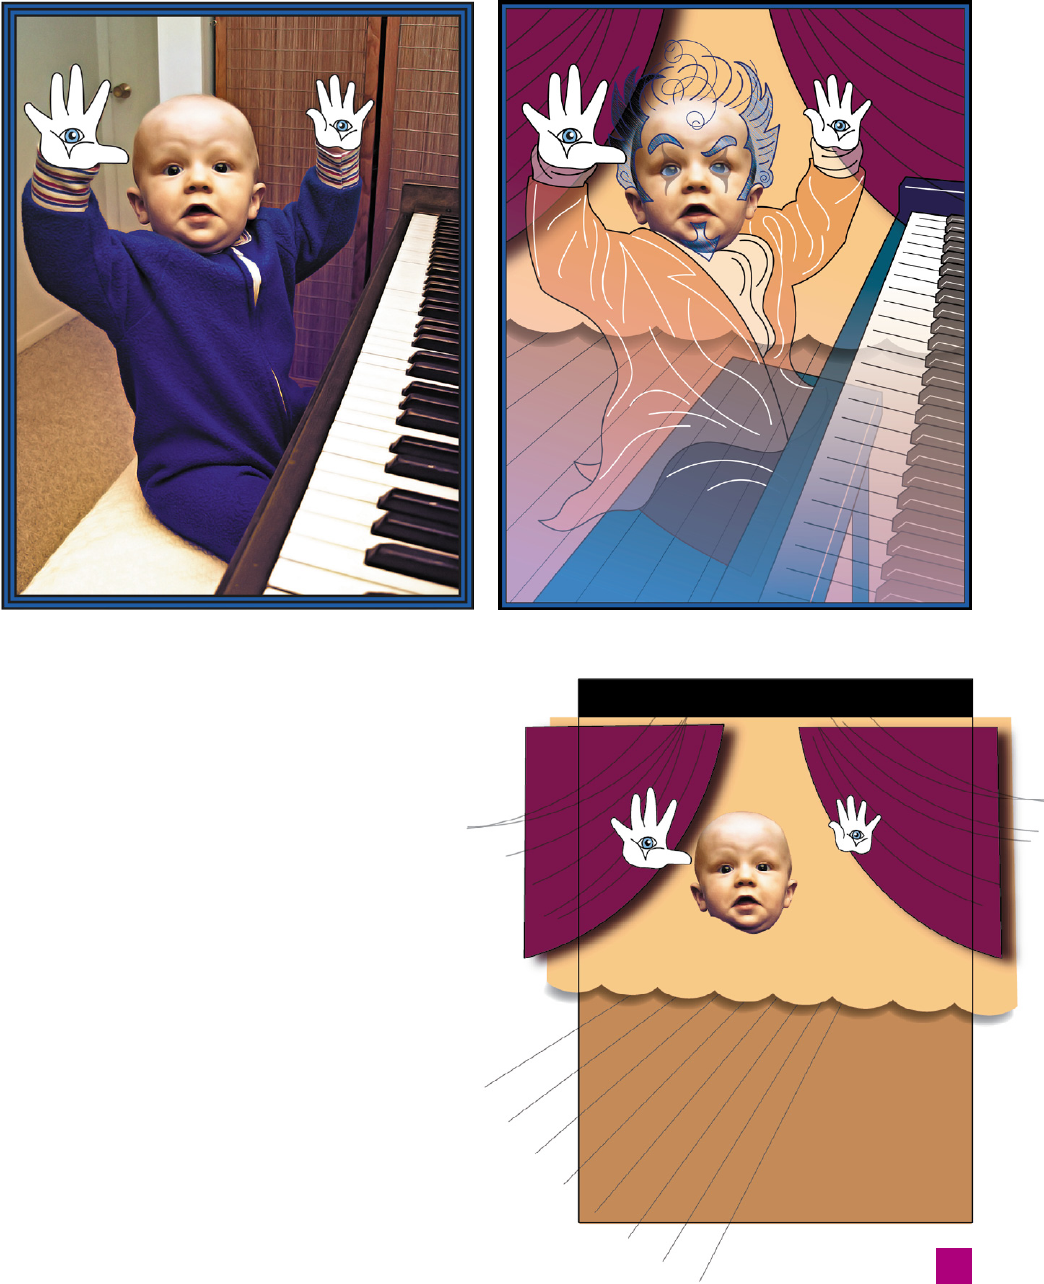
Figure 8-3 . Figure 8-4 .
Figure 8-5 .
make it so. Inside the Vectors layer, you’ll fi nd a total
of eight objects, two paths and six sublayers. (The
paths appear as white, the sublayers—like the layer
that contains them—are gray.)
3. Turn on the Backdrop layer. Scroll down to the bot-
tom of the Layers panel and click in the fi rst column in
front of the Backdrop layer to turn it on. As pictured
in Figure 8-5, this layer adds a collection of fl oor and
curtain paths that cover up all but Sam’s head. (We also
see the gloves, but that’s because they’re on a higher
layer.) The head is not a transparency effect, not in
the context of this lesson at any rate. Rather, I used a
head-shaped path to carve a hole in the beige curtain
and fl oor with the help of the Pathfi nder panel, as we
explored in Lesson 6, “Pathfi nder Operations.”
4.
Turn on and expand the Jacket sublayer. Scroll up to
the expanded Vectors layer and turn on the sublayer
called Jacket, which features various elements of a
Liberace-like orange jacket with fl ouncy cravat and
247
Opacity and Knockout Group
Get Adobe Illustrator CS5 One-on-One now with the O’Reilly learning platform.
O’Reilly members experience books, live events, courses curated by job role, and more from O’Reilly and nearly 200 top publishers.

