
Step 14 documents just one of many ways to use the path-of-the-blend
to adjust the appearance of a trail or other shape-morphing effect. Here
are a few other tricks to try out: Using the white arrow tool, drag ei-
ther endpoint in the path-of-the-blend to change the location of one
blended path or the other. If you need more control, use the pen tool
to add or subtract anchor points along the path-of-the-blend. With
the white arrow tool, you can also drag a control handle to adjust the
speed of the blend. Dragging a short control handle results in a fast
blend; dragging a long control handle results in a slow one. Stay tuned:
I explain how to use control handles for this very purpose in Lesson 8.
Making the Most of Clipping Masks
In the last exercise, I showed you how to create blends that don’t re-
quire masks. In this exercise, I demonstrate uses for masks that may
or may not involve blends. (And the blends that you will encounter
are anything but conventional.) Topics include restoring the fi ll and
stroke of a mask, creating compound masks, and nesting one mask
inside another. This is masking at its best.
1.
Open a fi le with paths to be masked. If you’re happy
with the fi le that you saved in Step 16 of the preceding
exercise, open it. If not, open my fi le, Shooting star.ai
found in the Lesson 07 folder.
Figure 7-24 .
219
Making the Most of Clipping Masks
2.
Lock and unlock the requisite layers. Choose
Object→Unlock All to unlock the blended paths on the
Shoot Star layer. In the Layers panel, twirl the Shoot Star
layer closed (if it’s open) and click in the second column
to the left of that layer to lock it. Then scroll to the top of
the panel, and click the icon to the left of the Ball layer
to unlock it so you can modify the ball attached to the
robot’s feet without harming the rest of the illustration.
3.
Twirl open the Ball layer. Click the in front of the Ball
layer to reveal its four groups—Tacks, Front Thing, Edges,
and Back Things—along with the ball outline, called
Ball. This last layer needs to crop the elements above it.
In Lesson 6, we achieved this effect using the Crop Path-
fi nder operation. This time, we’ll employ masking, which
is slightly more complex but several times more fl exible.
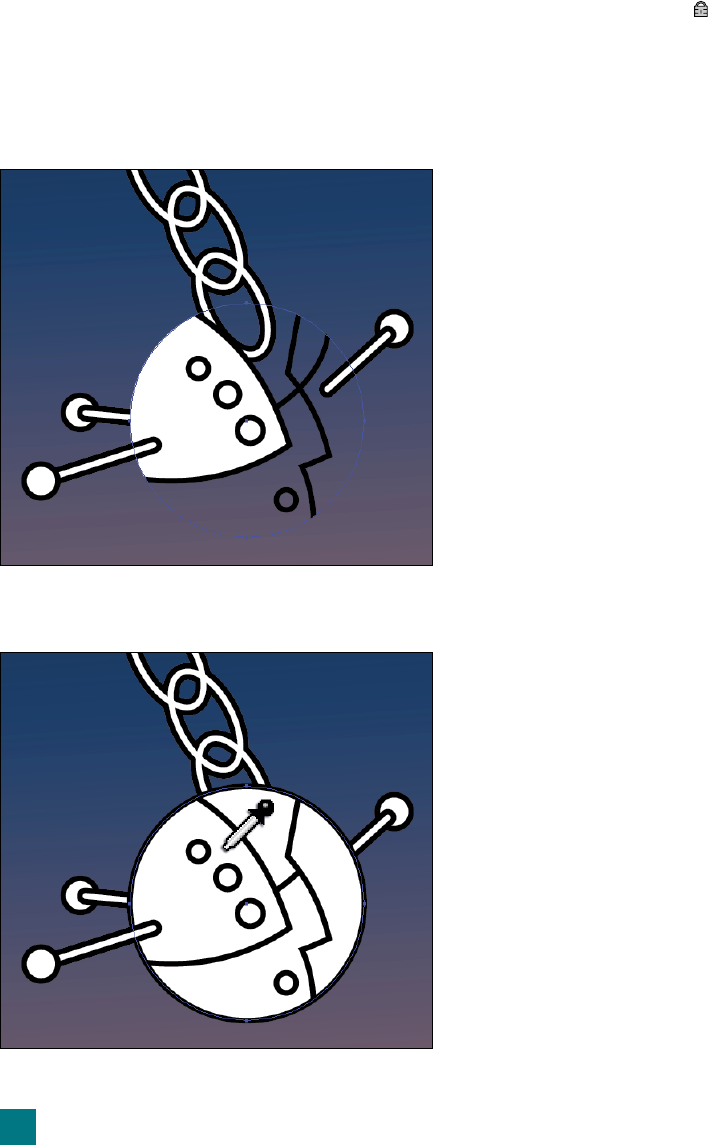
4.
Mask the Edges inside the Ball. Zoom in on the ball
below the robot’s feet. In the Layers panel, drag the
Ball path above the Edges group. (As you may recall,
Illustrator requires that the mask be stacked in front
of the objects it will contain.) Meatball both the Ball
and Edges objects in the Layers panel. And then choose
Object→Clipping Mask→Make or press Ctrl+7 (-7). As
shown in Figure 7-25, the white fi ll and the black stroke
of the Ball path disappear. It’s not that a clipping mask
can’t have fi ll and stroke attributes; it can. It’s just that
Illustrator strangely chooses to dispose of them as a mat-
ter of course. Our job now is to reinstate them.
5.
Restore the fi ll and stroke of the Ball. With the circular
Ball outline selected, press the I key to select the eyedrop-
per tool. Then click the top-left “plate” of the ball—the
one that includes a white fi ll and a black stroke—to copy
the fi ll and stroke to the ball itself, as demonstrated in
Figure 7-26.
6. Move the right plate to the back. The plate along the
right side of the ball should be in back of the others. Un-
fortunately, now that it’s housed inside a clipping mask,
it’s diffi cult to select it in the document window. Better
to exploit Illustrator’s group isolation mode:
• Press the V key to get the black arrow tool.
•
Double-click along the outline of the outer ball to iso-
late the clipping mask from the rest of the illustration.
Figure 7-25 .
Figure 7-26 .
220
Lesson 7: Blends, Masks, and Gradient Mesh
Get Adobe Illustrator CS5 One-on-One now with the O’Reilly learning platform.
O’Reilly members experience books, live events, courses curated by job role, and more from O’Reilly and nearly 200 top publishers.

