
29. Repeat for the bottom inside edge. Referring to Figure 6-39,
delete the extraneous points to clean up the inside edge as well.
Save your work—you’ll be returning to the robot for the fi nal ex-
ercise. But as you’ve learned over the course of this exercise, the
Divide command, when put to work with its companion Unite,
gives you quite a bit of control of the shapes you can create from a
whole host of overlapping primitives. My best pathfi nder advice:
When in doubt, divide!
Crop, Exclude, and Intersect
In this, the last of our ghost robot exercises, I’ll walk you through
the fi nal, most advanced pathfi nder operations—crop, exclude, and
intersect. In this exercise, we’ll focus entirely on the robot’s body,
and fi nish with some transparency effects to give our robot friend
an appropriate other-worldliness.
1. Open the last of the ghost artwork. If you still have
the fi le open from the last exercise, you’re ready to go.
If not, open the fi le you saved at the end of the last
exercise, or navigate your way to the Lesson 06 subfolder, in-
side the Lesson Files-AIcs5 1on1 folder, and open Final robot.ai.
2. Convert the grill lines to paths. As with the other pathfi nder
operations, the Crop operation requires fi lled closed paths. With
the black arrow tool, select a grill line, as shown in Figure 6-40.
(They are grouped, so selecting one selects all.) Choose Object→
Path→Outline Stroke to convert all the strokes to closed paths.
3. Select and copy the smock path. Select the robot’s smock (the
upside-down V shape in the center of the robot’s body) and
press Ctrl+C (-C) to copy it to the clipboard.
4.
Swap the fi ll and stroke attributes. Again, we need a fi ll for the
pathfi nder to work properly; press Shift+X to swap the smock’s
stroke and fi ll attributes.
5.
Bring the smock to the front. We want to crop the ribbing lines
to the smock shape, so the smock needs to be on top of the other
shapes. Bring the smock to the front by pressing Ctrl+Shift+
(-Shift- ).
6.
Crop the ribbing lines to the new smock fi ll. Shift-click the
ribbing lines to add them to the selection, and then press the
icon in the Pathfi nder panel to crop the shapes.
Figure 6-40 .
193
Crop, Exclude, and Intersect
7. Paste the original smock outline in front. The smock outline
is now missing, but thankfully it’s still on the clipboard. Press
Ctrl+F (-F) to paste the cape outline at the top of the stack.
Your results should look like Figure 6-41.
8.
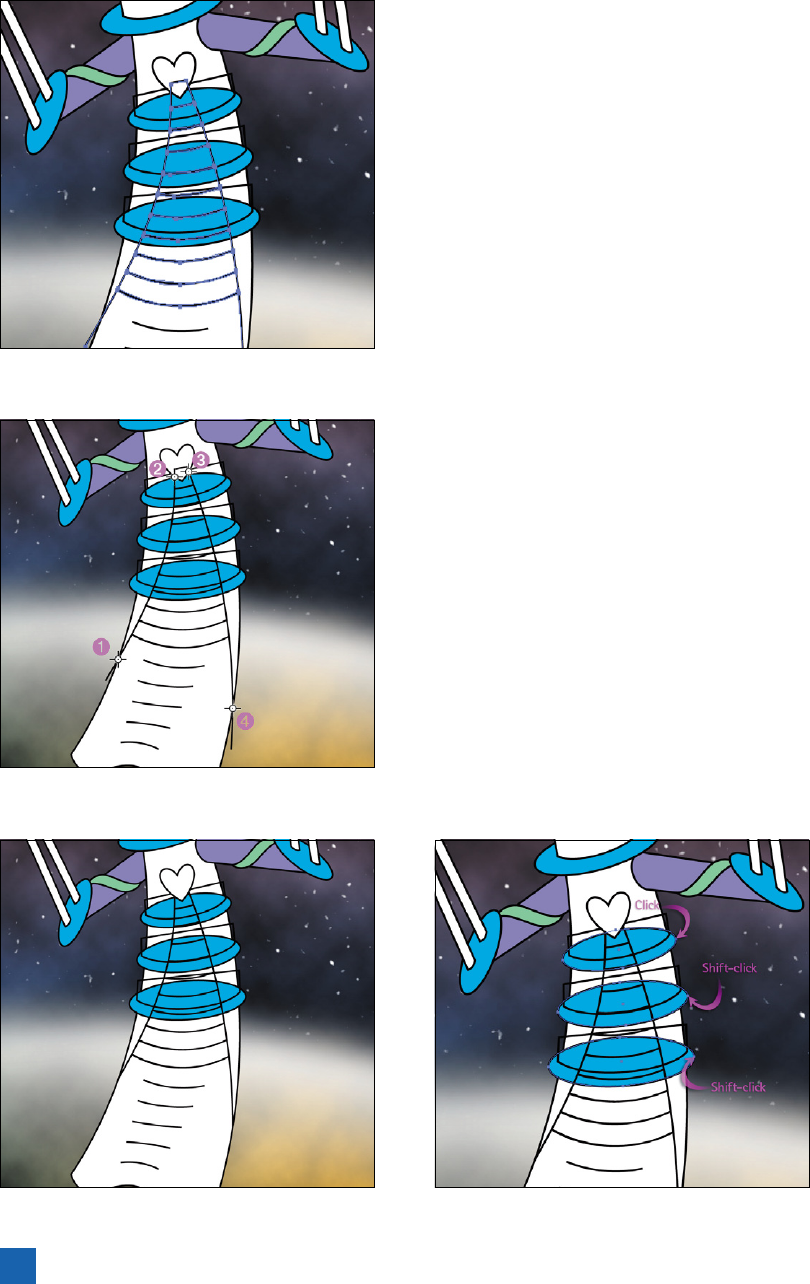
Use the scissors tool to cut off extra segments of the path. The
smock is looking pretty good, but some bits need to go—namely,
the two tails off either side and the segment that pass through
the robot’s heart. Here’s how to separate them:
• Switch to the scissors tool by pressing the C key.
•
Change to outline mode by pressing Ctrl+Y (-Y). This will
allow you to see the precise point of the paths intersecting.
•
Using Figure 6-42 as a guide, click the four points marked.
(With smart guides turned on, you’ll see a green intersect
whenever you hover over the path intersection.)
• Press Ctrl+Y (-Y) again to return to preview mode.
9.
Delete the extra segments. Switch back to the black arrow tool
by pressing the V key, click the fi rst segment, and Shift-click the
remaining two to select them all. Press the Backspace or Delete
key to get rid of the segments. Afterward, your robot should
match that in Figure 6-43.
10. Select and copy the three discs. Next we’ll focus on the rings
around the robot’s body. See the three large blue discs that seg-
ment the robot’s body, shown in Figure 6-44? Select them by
clicking the fi rst, and Shift-clicking the next two. Press Ctrl+C
(-C) to copy the discs to the clipboard.
Figure 6-41 .
Figure 6-42 .
Figure 6-43 . Figure 6-44 .
194
Lesson 6: Pathfi nder Operations
Get Adobe Illustrator CS5 One-on-One now with the O’Reilly learning platform.
O’Reilly members experience books, live events, courses curated by job role, and more from O’Reilly and nearly 200 top publishers.

