path. Then, using the arrow keys, nudge the spiral
into alignment.
24.
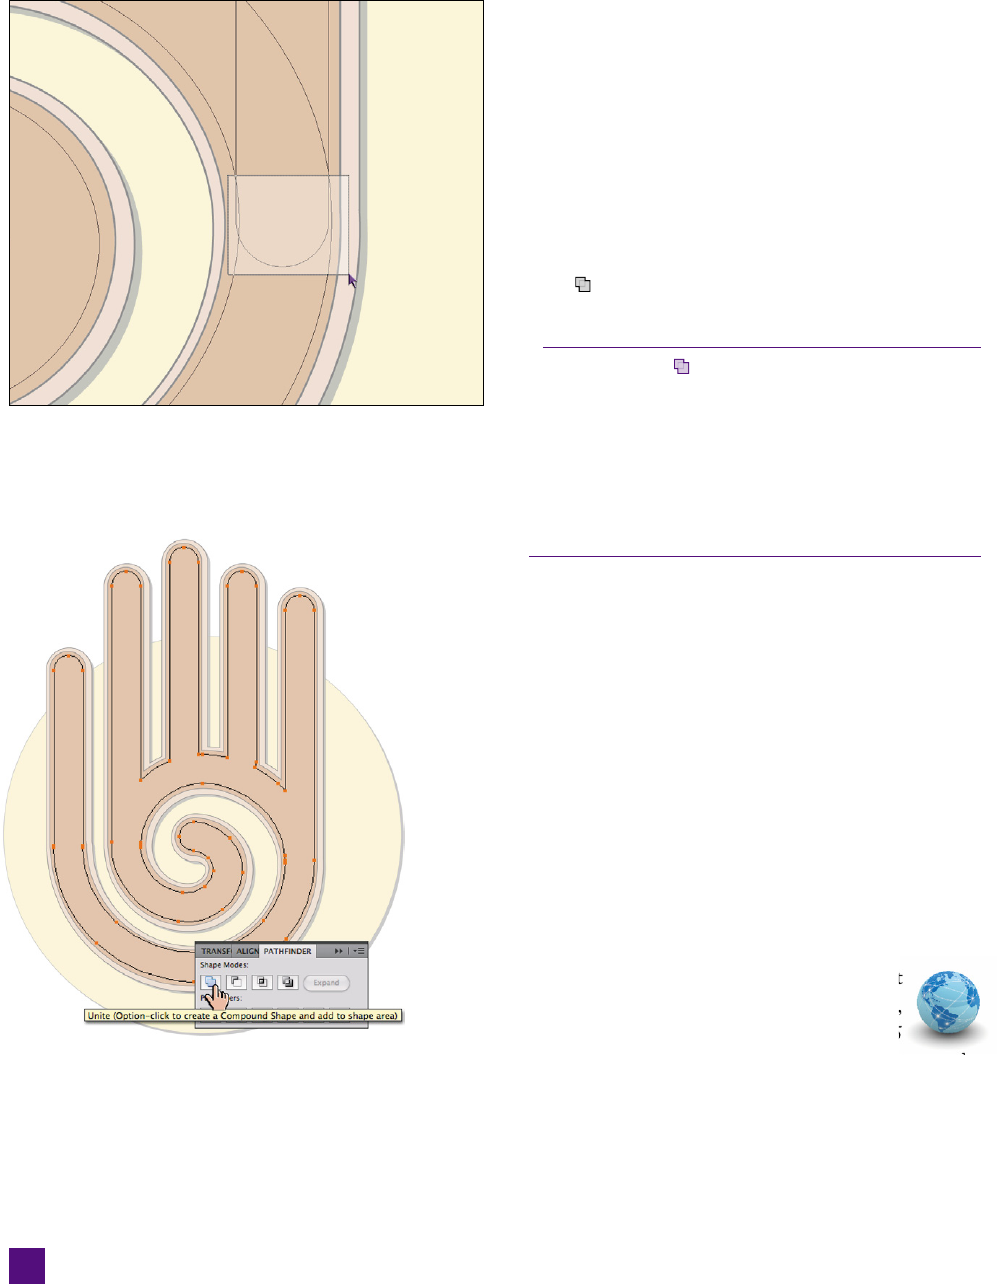
Zoom out and select all the shapes. Now that every-
thing’s aligned properly and your shapes are overlap-
ping, zoom back out so you can see the full artwork.
Select all the shapes by pressing Ctrl+A (-A).
25.
Join the shapes with the Pathfi nder panel. Bring
up the Pathfi nder panel by pressing Ctrl+Shift+F9
(-Shift-F9) or choosing Window➝Pathfi nder. Click
the icon to join (or unite) the shapes into a single
fi lled path, as shown in Figure 5-20.
After you click , you should see one single outline
with no points left inside the shape. If your shapes look
unchanged, however, not to worry
—
Illustrator joined
them into a compound path, that is, a path made up of
multiple shapes, rather than a new single path. Simply
click the Expand icon in the Pathfi nder panel to complete
the step. I discuss the Pathfi nder panel fully in the next
lesson.
Figure 5-20 .
Figure 5-19 .
The hand is now complete, and you accomplished all those steps
without using a single drawing tool. Save your work because in the
next exercise you’ll be returning to it to put the fi nishing touches
on your stop sign.
Offsetting Paths to Simulate Depth
In the last exercise, you used various transformations to create
the basic shapes of the stop sign. But Illustrator has still more
transformations in store. In this exercise, I’ll walk you through
a transformation creating the illusion of depth, and you’ll put
the fi nal touches on your artwork with graphics styles, swatches,
and transparency.
1. Open the work in progress. If you still have the art
from the last exercise open, skip ahead; otherwise,
open your saved fi le, or navigate to the Lesson 05
folder inside the Lesson Files-AIcs5 1on1 folder and open the
fi le Joined shapes.ai.
2.
Offset the path to thicken the fi ngers. Comparing the hand
on the Shapes layer to the Finished Art layer, it’s clear that the
fi ngers could use a little more weight. While you could simu-
146
Lesson 5: Transform and Reshape
late the effect with a stroke, why not just transform the path
itself? Here’s how:
• With the black arrow tool, select the hand on the Shapes
layer.
• Choose Object➝Path➝Offset Path.
•
In the Offset Path dialog box, shown in Figure 5-21, change
the Offset to 3 pt, and make sure the Preview box is
checked so that you can see the offset. (The other op-
tions are fi ne left at their defaults.)
• Click OK to accept the transformation.
Note that Illustrator clones the path before applying the trans-
formation; you now have two hand paths, one inside the other.
3.
Offset the path again to create the bevel. Select the inner hand
path with the black arrow tool, and again choose Object➝
Path➝Offset Path. This time, set the Offset to 7 pt, and click OK.
4. Delete the original path. The original skinny path has served
its purpose. Select it for the last time, and delete it by pressing
the Backspace or Delete key.
5.
Draw the circle for the background. Only one element is miss-
ing at this point—the large circle that serves as the background
of the stop sign.
• Switch to the ellipse tool by pressing the L key or choosing
it from the fl yout menu of the
tool.
•
Drag diagonally down from the upper-left part of the arc,
shown in Figure 5-22, toward the lower right. After (and
only after) you start the drag, add the Ctrl and Shift keys
( and Shift on the Mac) to draw from arc to arc and
constrain the shape to a perfect circle. If your circle still
isn’t in quite the right position, hold down the spacebar
to temporarily drag the circle to a new spot, and release
it to continue drawing.
•
Once you’re satisfi ed with the circle, release the mouse but-
ton, and then release any keys you pressed.
6. Turn off the Finished Art layer. You don’t really need to see
the template any more at this point. Bring up the Layers panel,
and click the
icon next to the Finished Art layer to hide it.
7.
Switch back to preview mode. Now that all the shapes are
in place, it’s time to fi ll in the details. Switch the Shapes layer
Figure 5-21 .
Figure 5-22 .
147
Offsetting Paths to Simulate Depth
Get Adobe Illustrator CS5 One-on-One now with the O’Reilly learning platform.
O’Reilly members experience books, live events, courses curated by job role, and more from O’Reilly and nearly 200 top publishers.

