Figure 4-3 .
Placing, Entering, and Editing Text
In the fi rst exercise, we’ll start with the basics: getting text
into Illustrator and editing it for content once it’s in your
artwork. As we move through the lesson, I’ll demonstrate
progressively more sophisticated ways to manipulate type,
but we’ve got to start somewhere.
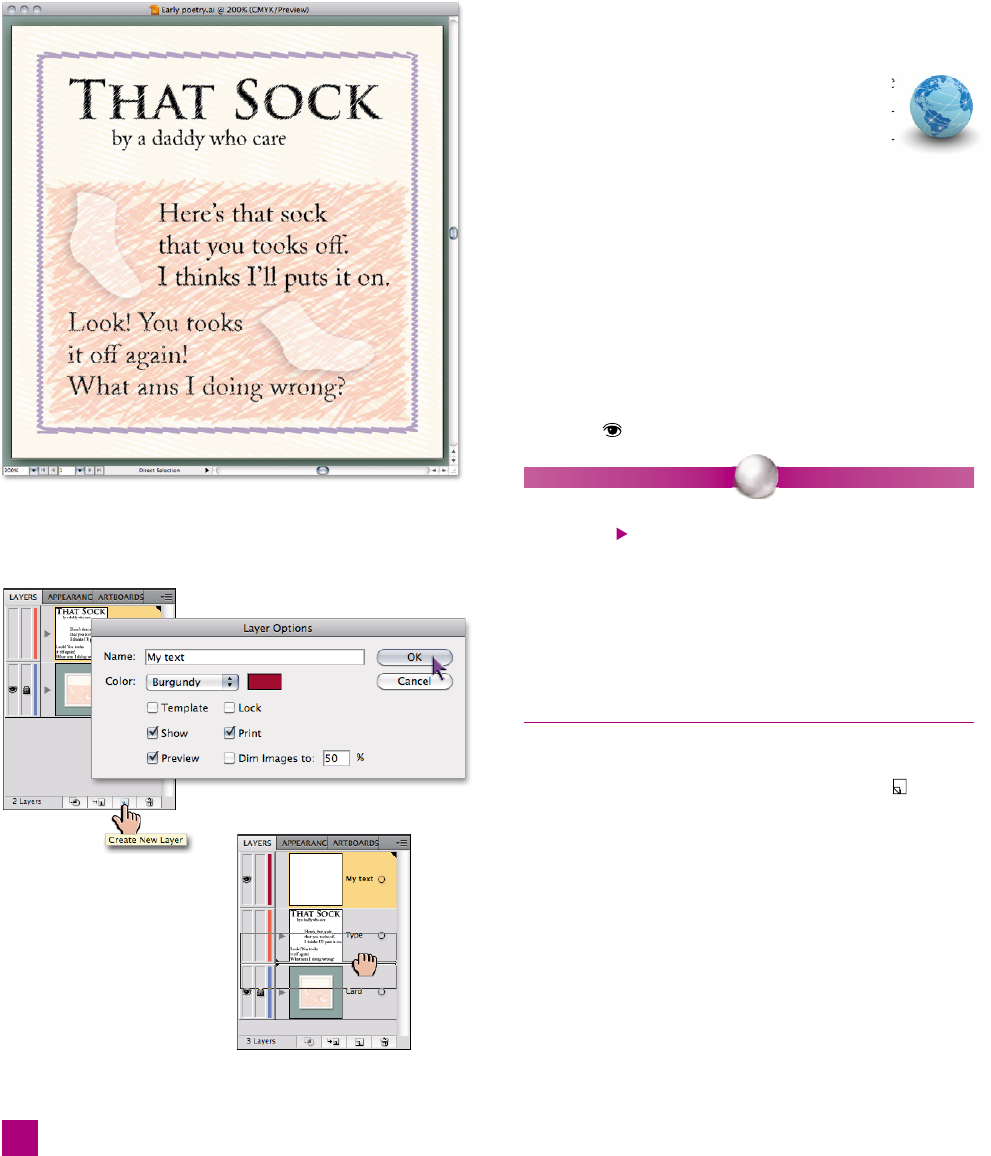
1. Open a piece of artwork. Navigate to the
Lesson 04 subfolder inside the Lesson Files-
AIcs5 1on1 folder. Inside you’ll fi nd an Il-
lustrator fi le called Early poetry.ai. This poem is so
named not because it was one of my fi rst forays into
metered verse; I wrote it when my eldest son was very
young and had a penchant for removing his socks.
You should see artwork like that shown in Figure 4-3.
2. Hide the Type layer. Bring up the Layers panel by
pressing F7 (or choosing Windows➝Layers). This
document has two layers, Type and Card. In the next
few exercises, you’ll be recreating the Type layer, so
click the
icon to hide the layer.
P E A R L O F W I S D O M
If you examine the Card layer (you can twirl it open by
clicking the
arrow), you’ll notice only three objects in the
layer
—
two socks and a rectangle labeled scribbles. All the
strokes and fi lls you see on the Card layer are created by live
effects, which I cover in Lesson 10, but you can check them
out by selecting the scribbles object and viewing the effects
in the Appearance panel. You don’t need to concern yourself
with these effects, but if you’re interested to see how the
effects are done, they’re there to explore.
3. Create a new layer for your type. From within the
Layers panel, Alt-click (Option-click) the
icon to
create a new layer, as seen in Figure 4-4. Pressing the
Alt (or Option) key creates a new layer and simultane-
ously opens the Layer Options dialog box. Name the
new layer “My text,” change the Color to something
unique (I chose burgundy), leave the other options
unchanged, and click OK.
4. Move the new layer below the old layer. Move the
newly created layer by dragging it down between the
Type and Card layers, as in Figure 4-5. Release the
mouse button to complete the move.
Figure 4-4 .
Figure 4-5 .
112
Lesson 4: Creating and Formatting Text

Figure 4-6 .
5.
Import some text to the new layer. Choose
File➝Place to open the Place dialog box, as
shown in Figure 4-6. Navigate to the Lesson
04 subfolder inside the Lesson Files-AIcs5 1on1
Inside is a Microsoft Word document labeled That
sock.doc. Select the fi le, and click the Place button.
Illustrator now presents you with a Microsoft Word
Options dialog box, seen in Figure 4-7.
Note that Illustrator is capable of importing plain text
documents (ending with .txt) or rich text format documents
(ending in .rtf ) in addition to Word documents.
6. Dismiss the Word options dialog box. The table of
contents, footnotes, and index are fantastic features
when working on a long document (such as this
book), they tend to be overkill for Illustrator. While the multiple
artboards introduced in CS4 certainly allow you to simulate a
multipage layout in a document, Illustrator is poorly suited to
manage documents of any signifi cant length—the very kind of
documents that require these features.
The only option that will likely be useful to you is Remove Text
Formatting, which strips the placed text of all the formatting
applied inside Word. In this instance, you’ll be reformatting
the text regardless, so don’t bother to check the box.
Click OK to dismiss the dialog box.
7.
Turn on the bounding box. Your text should now be
in your illustration, as shown in Figure 4-8. If your
text looks anything like mine, the frame is oddly
sized and positioned. In nearly every layout or design
program, you could simply grab one of the corners
to resize the text box. But at the moment, Illustrator
is treating the corners of the box as standard corner
points, just as though you had drawn the shape with
the rectangle tool. (The standard corner points are
indicated by the small fi lled squares at the corners.)
To resize the text box, we need to make the bounding
box visible. Choose View ➝Show Bounding Box, or
press Ctrl+Shift+B (-Shift-B on the Mac). The cor-
ners should now turn into open squares, revealing
handles to manipulate the text box.
Figure 4-7 .
Figure 4-8 .
113
Placing, Entering, and Editing Text
Get Adobe Illustrator CS5 One-on-One now with the O’Reilly learning platform.
O’Reilly members experience books, live events, courses curated by job role, and more from O’Reilly and nearly 200 top publishers.

