Figure 3-3 .
Establishing a Bitmapped
Tracing Template
In the previous lesson, I demonstrated how to draw artwork using a
tracing template based on Illustrator paths. A much more common
way to work is to take a digital image—whether a photograph or a
scan of traditionally drawn pen-and-paper art—and use that image
as a tracing template to recreate the art in Illustrator.
Throughout this lesson we’ll be recreating artwork based on a pic-
tograph I saw at Agawa Rock in Ontario, along the shore of Lake
Superior. The pictograph is of a mishipizheu, or underwater panther,
painted by the native Ojibwe people.
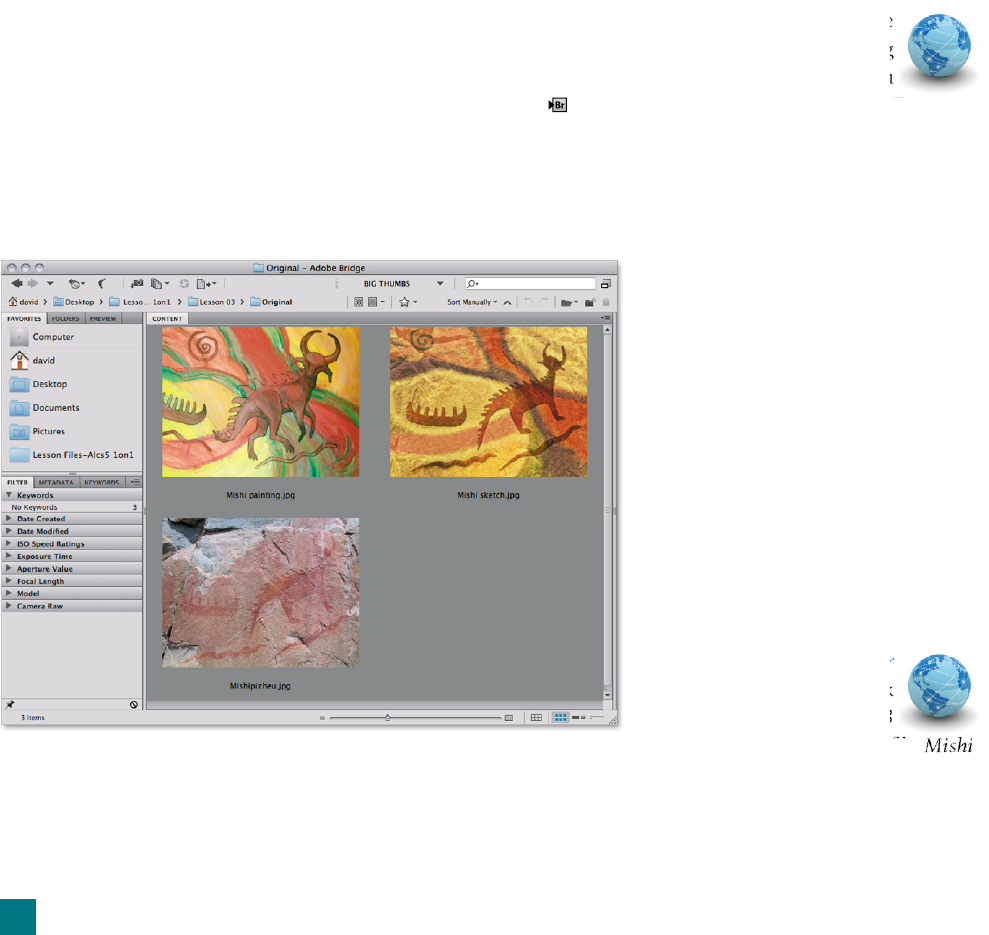
1.
Examine the evolution of the artwork. Open the
Bridge by choosing File➝Browse in Bridge or pressing
Ctrl+Alt+O (-Option-O on the Mac). Conversely, you
can click the icon in the application bar. From the Favorites
panel in the upper left, navigate to the Lesson 03 folder inside
the Lesson Files-AIcs5 1on1 folder, as seen in Figure 3-3. (This
assumes you followed the instructions in Step 10 on page 15 in
Lesson 1.) Inside the Original subfolder, you should see three bit-
Figures are misnumbered from here on Figure 303 is
actually the fi le Figure 3-4. Not a big deal -- David did
this but just fyi
map images: Mishipizheu.jpg, Mishi
sketch.jpg, and Mishi painting.jpg.
The fi rst fi le, Mishipizheu.jpg, is
the original photograph I took at
Agawa Rock, while Mishi sketch.
jpg is a rough digital sketch I cre-
ated in Photoshop. Finally, Mishi
painting.jpg is a digital photograph
I took of an acrylic underpainting
I made, inspired by the original
photo. (I subsequently ruined the
painting, but that’s another story.)
We’ll use this fi nal image for our
tracing template.
2.
Open the Illustrator
fi le. After navigating back
up to the main Lesson 03
folder, double-click the fi le
drawing.ai to open it in Illustrator.
You should see a document with
88
Lesson 3: Using the Pen Tool
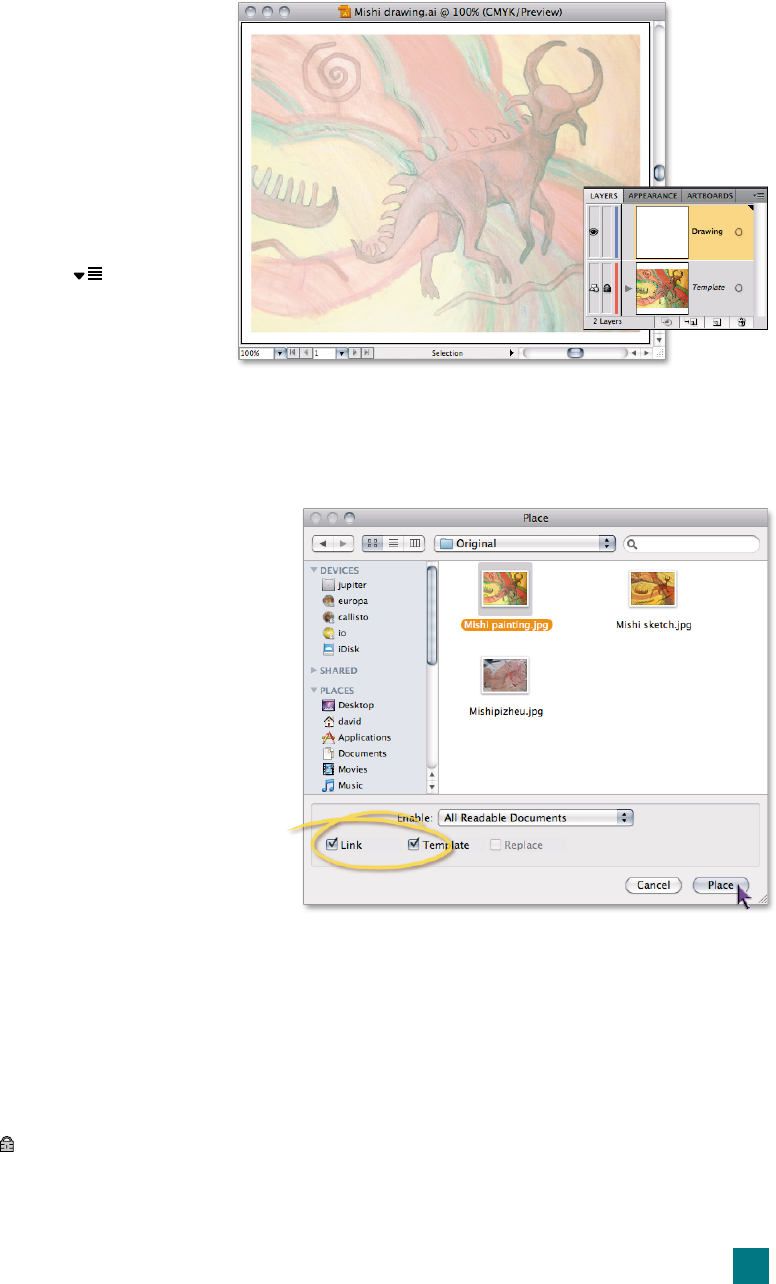
two layers, as shown in Figure 3-4. (If you
don’t see the Layers panel, press the F7 key
to bring it to the front.)
3.
Delete the existing template layer. While it’s
great that you have the template layer already
in this fi le, we need to delete it to recreate the
tracing template. Delete the layer by dragging
it to the trash can icon at the bottom of the
panel, or by selecting the layer and choosing
Delete “Template” from the menu. If you
see a warning dialog, click Yes to dismiss it;
you’re sure you want to delete the layer.
4.
Import the tracing template into the
fi le. Choose the File➝Place command;
the resulting Place dialog box is shown in
Figure 3-5. There are a couple of options in
this dialog box that you should note:
•
The Link check box determines whether Illustra-
tor links to the selected fi le or embeds a copy of
the fi le inside the Illustrator document. If you’re
concerned you might lose your original fi le, you
can embed it so a copy is saved with your illus-
tration—but I generally don’t recommend this
option. Doing so increases the document size
signifi cantly and makes it more diffi cult to edit
the embedded artwork. This option should be
turned on by default.
•
The Template check box instructs Illustrator
to automatically perform a bevy of steps when
placing the fi le. Choose Mishi painting.jpg from
the Originals folder, make sure the Template
box is selected, and then click the Place button.
Because you selected the Template check box, Illustrator auto-
matically created a new layer behind all the other layers, placed
the image on this layer, locked the layer, and dimmed the art-
work. Unfortunately, the artwork may or may not be aligned
to the artboard; we’ll fi x that in the next few steps.
5. Unlock the template layer and select the artwork. In the Lay-
ers panel, click the
icon to unlock the Template layer. Then,
using the black arrow tool, click somewhere along the edge of
the artwork to select it.
Figure 3-4 .
Figure 3-5 .
89
Establishing a Bitmapped Tracing Template
Get Adobe Illustrator CS5 One-on-One now with the O’Reilly learning platform.
O’Reilly members experience books, live events, courses curated by job role, and more from O’Reilly and nearly 200 top publishers.

