Drawing Primitive Shapes
So far we’ve been working primarily with open paths, that
is, paths that have endpoints. In this exercise, we’ll be
working with closed paths—simple shapes known as
primitives. A primitive is a basic shape, such as a rect-
angle, a circle, an ellipse, a triangle, a polygon, or
a star. These primitives, along with the basic
line shapes, are the elements that make up every
drawing produced in Illustrator.
For the rest of this lesson, we’ll be working on one fi le
that will continue from exercise to exercise. But this isn’t just
any old piece of art. It’s a stylized tonalpohualli, an ancient 260-
day Mesoamerican calendar used primarily by the Aztecs. In the
fi rst exercise, you’ll create a tracing template and draw many of the
basic shapes that make up the illustration.
1.
Open the tonalpohualli. Navigate to the Lesson 02
folder inside the Lesson Files-AIcs5 1on1 folder. Open
the fi le named, appropriately enough, Tonalpohualli.
ai. You’ll be greeted with a round piece of artwork, replete with
primitive shapes like rectangles, circles, ellipses, and stars.
2.
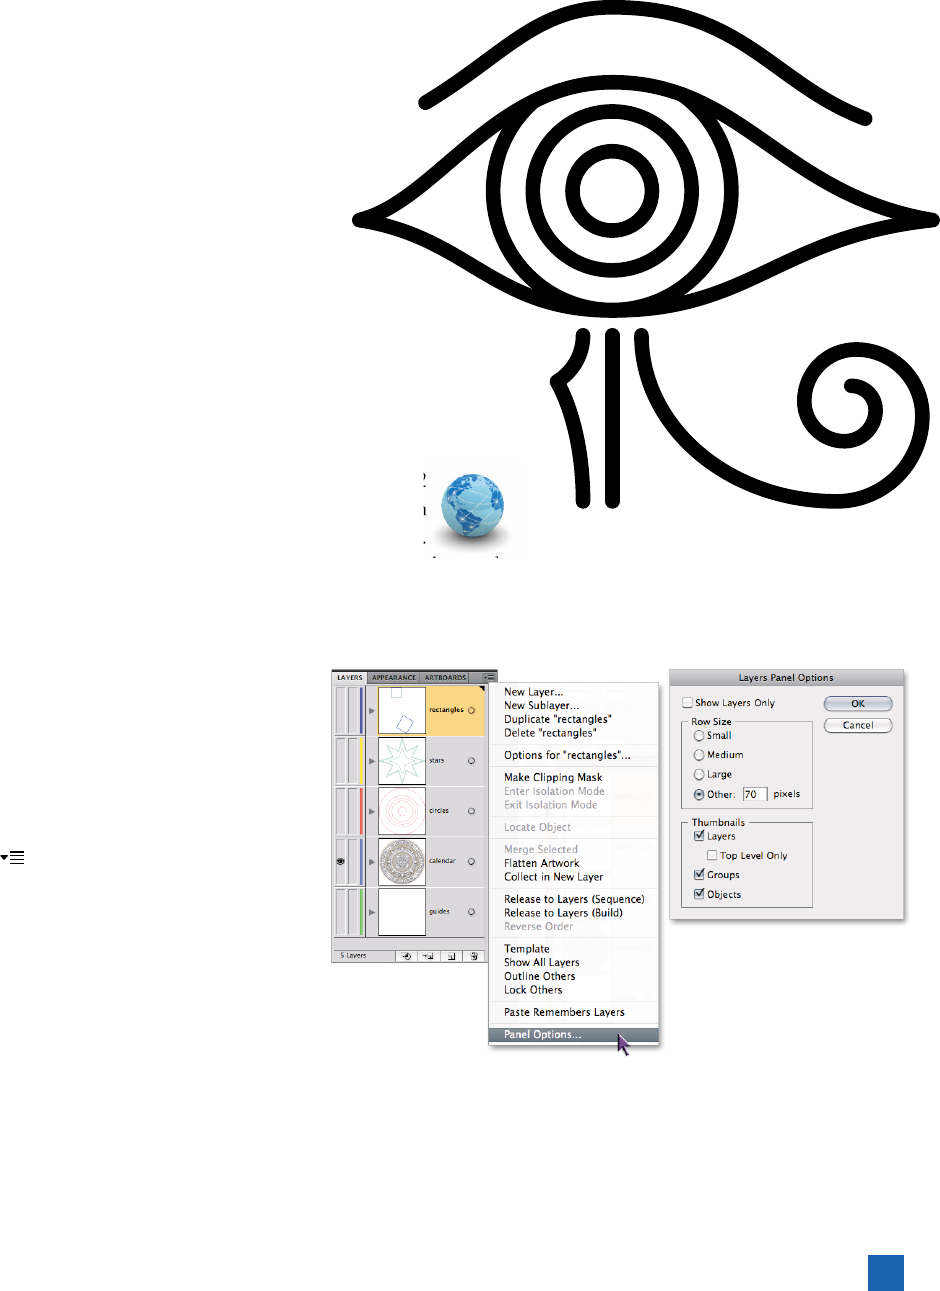
Examine the Layers panel. Bring up the
Layers panel (if it’s not already visible)
by pressing the F7 key. You’ll see that
this document has a total of fi ve layers.
One issue I have with the Layers panel
as it stands is that the thumbnails are
so small as to be nearly useless. That’s
something you can easily rectify. Click
the
button in the upper-right corner
of the panel, and choose Panel Options
from the panel menu. This brings up the
dialog box as seen in Figure 2-26. You
could change the thumbnail option to
Large, but why when you can create your
own custom size? Select Other in the
dialog box, and enter a value between
60 and 100, depending on your avail-
able screen real estate. (I went with 70.)
Now your thumbnails are large enough
for you to see the details on each layer.
Figure 2-25 .
Figure 2-26 .
51
Drawing Primitive Shapes

3. Make a tracing template from the Calendar layer. Now it’s
time to turn the existing artwork into a tracing template to fol-
low. You can accomplish this in a few simple steps:
• In the Layers panel, click the
icon (affectionately known
as “the meatball,” shown in the left side of Figure 2-27) to
the right of the Calendar layer name. This selects the layer
and all the artwork on it.
• In the control panel, set the Opacity to 25 percent.
• Finally, back in the Layers panel, click the square to the
right of the
to lock the Calendar layer (indicated by the
icon, shown in the right side of Figure 2-27). Note that
locking the layer also deselects all the artwork on that layer.
4.
Repeat for the Circles layer. You’ll notice that I’ve placed some
other tracing templates in this document: three additional lay-
ers that provide templates for the primitive shapes you’ll be
drawing. For now, focus on the Circles layer:
•
Make the Circles layer visible by clicking the leftmost
square, waking up the icon.
•
“Meatball” the layer (by clicking the icon). This time, set
the Opacity to 50 percent via the control panel.
• Lastly, lock the layer.
5. Turn on and lock the Guides layer. Using the same methods,
make the Guides layer visible, then lock it to prevent the guides
from being moved.
6. Create a new layer. One layer that is conspicuously missing
from this document is a layer for drawing your artwork. Create
a new layer by clicking the icon at the bottom of the Layers
panel. Double-click the new layer (by default named
Layer 6) to bring up the Layer Options dialog box,
as seen in Figure 2-28. Name the layer “My drawing”
and change the layer’s default color. I chose orange,
because it stands out well from the other layer col-
ors, but feel free to pick whatever color you’d like.
P E A R L O F W I S D O M
A shortcut when creating new layers will save you a lot of time in the long
run. Rather than creating a layer by clicking the
icon, then double-clicking
the layer to edit its options, you can Alt-click (or Option-click) the
icon.
This creates a new layer and brings you directly to the Layer Options dialog
box without the need for a second step.
Figure 2-27 .
Figure 2-28 .
52
Lesson 2: Lines, Shapes, and Color
Get Adobe Illustrator CS5 One-on-One now with the O’Reilly learning platform.
O’Reilly members experience books, live events, courses curated by job role, and more from O’Reilly and nearly 200 top publishers.

