Now that we’ve explored the basic principles of ActionScript, let’s apply those principles in the context of a real Flash movie. We’ll start our applied study of Flash programming by creating a multiple-choice quiz using very simple programming techniques, most of which you’ve already learned. We’ll revisit our quiz in later chapters to see how it can be improved after learning more advanced programming concepts. We’ll eventually make the code more elegant so that it’s easier to extend and maintain, and we’ll add more features to our quiz so that it can easily handle any number of questions.
The finished .fla file for this quiz may be found in the online Code Depot. This is a lesson in Flash programming, not Flash production. It is assumed that you are already comfortable creating and using buttons, layers, frames, keyframes, and the Text tool. The quiz shows real-world applications of the following aspects of ActionScript programming:
Variables
Controlling the playhead of a movie with functions
Button event handlers
Simple conditionals
Text field variables for on-screen display of information
Our quiz, part of which is shown in Figure 1.4, will have only two questions. Each question comes with three multiple-choice answers. Users submit their answers by clicking the button that corresponds to their desired selections. The selections are recorded in a variable so that they may be used to grade the user’s score. When all the questions have been answered, the number of correct answers is tallied and the user’s score is displayed.
When building
Flash movies, it’s important
to organize your content into manageable divisions by keeping
different content elements on individual layers. Layering content is
a good production technique in general, but it is essential in Flash
programming. In our quiz, and in the vast majority of our scripted
movies, we’ll keep all our
timeline scripts on a single isolated
layer, called scripts. I keep the
scripts layer as the first one in my layer stack
so that it’s easy to find.
We’ll also keep all our
frame labels on a separate layer, called
(surprise, surprise)
labels
. The
labels layer should live beneath the
scripts layer on all your timelines. In addition
to these two standard layers (scripts and
labels), our quiz movie has a series of content
layers on which we’ll isolate our various content assets.
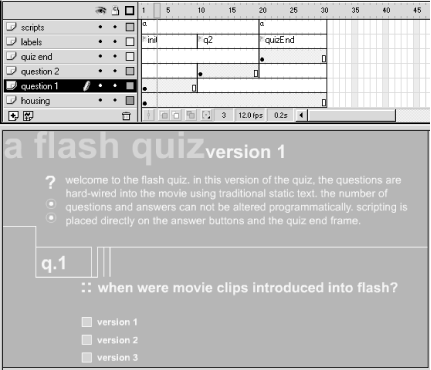
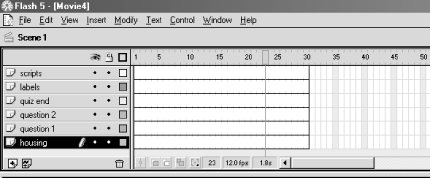
Start building your quiz by creating and naming the following layers and arranging them in the order that they appear here:
| scripts |
| labels |
| quiz end |
| question 2 |
| question 1 |
| housing |
Now add 30 frames to each of your layers. Your timeline should look like the one in Figure 1.5.
Before we get into the scripts that run the quiz, we need to set up the questions and the interface that will let the user proceed through the quiz.
Here are the steps you should follow:
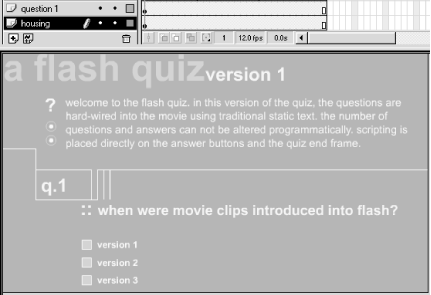
With frame 1 of the housing layer selected, use the Text tool to type your quiz title directly on the Stage.
At frame 1 of the question 1 layer, add the question number “1” and the text for Question 1, “When were movie clips introduced into Flash?” Leave room for the answer text and buttons below your question.
Create a simple button that looks like a checkbox or radio button and measures no higher than a line of text (see Figure 1.6).
Below your question text (still on the question 1 layer), add the text of your three multiple-choice answers: “Version 1,” “Version 2,” and “Version 3,” each on its own line.
Next to each of your three answers, place an instance of your checkbox button.
We’ll use Question 1 as a template for Question 2. Select the first frame of the question 1 layer and choose Edit → Copy Frames.
Select frame 10 of the question 2 layer and choose Edit → Paste Frames. A duplicate of your first question appears on the question 2 layer at frame 10.
While still in frame 10 of the question 2 layer, change the question number from “1” to “2” and change the text of the question to, “When was MP3 audio support added to Flash?” Change the multiple-choice answers to “Version 3,” “Version 4,” and “Version 5.”
Finally, to prevent Question 1 from appearing underneath Question 2, add a blank keyframe at frame 10 of the question 1 layer.
Figure 1.6 shows the Flash movie after you’ve added the first question to the quiz. Figure 1.7 shows how your timeline will look after you’ve added the two questions to the quiz.
Our first order of business in our quiz script (and in most scripts)
is to create the main timeline variables we’ll use throughout
our movie. In our quiz we do this on the first
frame of the movie, but in
other movies we’ll normally do it after preloading part or all
of the movie. Either way, we want to initialize our
variables before any other scripting
occurs. Once our variables are defined, we invoke the stop(
)
function to keep the user paused on
the first frame (where the quiz starts).
For more complex movies, we may also set the initial conditions by calling functions and assigning variable values in preparation for the rest of the movie. This step is known as initialization. Functions that start processes in motion or define the initial conditions under which a system operates are frequently named init.
Our quiz init code, shown in Example 1.1, is attached to frame 1 of the
scripts layer of our movie.
Example 1-1. Init Code for Quiz
// Init main timeline variables
var q1answer;          // User's answer for question 1
var q2answer;          // User's answer for question 2
var totalCorrect = 0;  // Counts number of correct answers
var displayTotal;      // Text field for displaying user's score

// Stop the movie at the first question
stop( );
Line 1 of our init sequence is a code comment . Code comments are notes that you add in your code to explain what’s going on. A single-line comment starts with two forward slashes and a space, which is then followed by a line of text:
// This is a comment
Notice that comments can be placed on the same line as your code, like this:
x = 5; // This is also a comment
Line 2 of Example 1.1 creates a variable named
q1answer. Recall that to create a variable we use
the var keyword followed by a variable name, as
in:
var favoriteColor;
So, the second through fifth lines of our code declare the variables we’ll need, complete with comments explaining their purpose:
q1answerandq2answerwill contain the value of the user’s answer (1, 2, or 3, indicating which of the three multiple-choice options was selected for each question). We’ll use these values to check whether the user answered the questions correctly.totalCorrectwill be used at the end of the quiz to tally the number of questions that the user answered correctly.displayTotalis the name of the text field that we’ll use to show the value oftotalCorrecton screen.
Take a closer look at Line 4 of Example 1.1:
var totalCorrect = 0; // Counts number of correct answers
Line 4 performs double duty; it first declares the variable
totalCorrect and then assigns the value
to that variable using the assignment operator, =.
We want totalCorrect to default to
in case the user hasn’t answered any of the questions
correctly. The other variables don’t need default values
because they are all set explicitly during the quiz.
After our variables have been defined, we call the stop(
) function, which halts the playback of the movie on frame
1, where the quiz begins:
// Stop the movie at the first question
stop( );
The stop( ) function has the exact same effect
as any stop Action you may have used in Flash 4
or
earlier (it pauses the playhead in
the current frame).
Tip
Observe, again, the use of the comment before the stop(
) function call. That comment explains the intended effect
of the code that follows. Comments are optional, but they help
clarify our code if we leave it for a while and need a refresher when
we return or if we pass our code to another developer. Comments also
make code easy to scan, which is important during debugging.
Now that you know what our init code does, let’s add it to our quiz movie:
Select Frame 1 of the
scriptslayer.Make sure you’re using Expert Mode, which can be set as a permanent preference under Edit → Preferences.
Into the right side of the Frame Actions panel, type the
initcode as shown earlier in Example 1.1.
We’ve
got our
quiz’s init script done and our questions
built. We should now add some frame labels so that we can control the
playback of our quiz.
In order to step the user through our quiz one question at a time,
we’ve separated the content for Question 1 and Question 2 into
frames 1 and 10. By moving the playhead to those keyframes,
we’ll create a slide show effect, where each slide contains a
question. We know that Question 2 is on frame 10, so when we want to
display Question 2, we can call the gotoAndStop(
)
function like this:
gotoAndStop(10);
which would cause the playhead to advance to frame 10, the location
of Question 2. A sensible piece of code, right? Wrong! Whereas using
the specific number 10 with our gotoAndStop( )
function works, it isn’t flexible. If, for example, we added
five frames to the timeline before frame 10, Question 2 would
suddenly reside at frame 15, and our
gotoAndStop(10) command would not bring the user
to the correct frame. To allow our code to work even if the frames in
our timeline shift, we use frame labels instead
of frame numbers. Frame labels are
expressive names, such as q2 or
quizEnd, by which we can refer to specific points
on the timeline. Once a point is labeled, we can use the label to
refer to the frame by name instead of by number.
The flexibility of frame labels is indispensable. I hardly ever use
frame numbers with playback-control functions like
gotoAndStop( ). Let’s add all the labels
we’ll need for our quiz now, so that we can use them later to
walk the user through the quiz questions:
On the
labelslayer, click frame 1.Select Modify → Frame. The Frame panel appears.
In the Label text field, type
init.At frame 10 of the labels layer, add a blank keyframe.
In the Frame panel, in the Label text field, type
q2.At frame 20 of the labels layer, add a blank keyframe.
In the Frame panel, in the Label text field, type
quizEnd.
Our questions are in place, our variables have been initialized, and our frames have been labeled. If we were to test our movie now, we’d see Question 1 appear with three answer buttons that do nothing when clicked and no way for the user to get to Question 2. We need to add some code to the answer buttons so that they will advance the user through the quiz and keep track of his answers along the way.
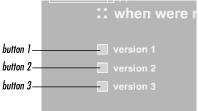
For convenience, we’ll refer to the multiple-choice buttons as button 1, button 2, and button 3, as shown in Figure 1.8.
Our three buttons get very similar scripts. Example 1.2 through Example 1.4 show the code for each button.
The button code consists of two statements (lines 2 and 3) that are executed only when a mouseclick is detected. In natural language, the code for each button says, “When the user clicks this button, make a note that he chose answer 1, 2, or 3, then proceed to Question 2.” Here’s how it works.
Line 1 is the beginning of an event handler :
on (release) {The event handler waits patiently for the user to click button 1. Recall that an event handler listens for things (such as mouseclicks) that happen while the movie is running. When an event occurs, the code contained in the appropriate handler is executed.
Let’s dissect the event handler that begins on line 1. The
keyword on signals the start of the event
handler. (If the word on seems a little awkward
to you, think of it as when until you’re
comfortable with it.) The keyword release,
enclosed in parentheses, indicates the type
of event that the event handler is listening
for; in this case, we’re listening for a
release event, which occurs when the user clicks
and releases the mouse over the button. The opening curly brace
({) marks the beginning of the block of statements
that should be executed when the release event
occurs. The end of the code block is marked by a closing curly brace
(}) on line 4, which is the end of the event
handler.
Line 2 is the first of the statements that will be executed when the
release event occurs. The code in line 2 should
be getting quite familiar to you:
q1answer = 1;
It sets the variable q1answer to 1 (the other
answer buttons set it to 2 or 3). The q1answer
variable stores the user’s answer for the first question. Once
we have recorded the user’s answer for Question 1, we advance
to Question 2 via line 3 of our button code:
gotoAndStop ("q2");Line 3 calls the gotoAndStop( ) function,
passing it the frame label “q2” as an argument, which
advances the playhead to the frame q2 where
Question 2 appears.
Now that you know how the button code works, let’s add it to the Question 1 buttons:
With the Actions panel open, select button 1 on the Stage. The Frame Actions title changes to Object Actions. Any code you add now will be attached to button 1 (the selected object on the Stage).
Into the right side of the Actions panel, type the code from Example 1.2.
Repeat steps 1 and 2 to add button code to buttons 2 and 3. On button 2, set
q1answerto 2; on button 3, setq1answerto 3, as shown in Example 1.3 and Example 1.4.
The code for the Question 2 buttons is structurally identical to that
of the Question 1 buttons (we change only the name of the answer
variable and the destination of the gotoAndStop(
) call). Example 1.5 shows the code for
button 1 of Question 2.
We use the variable q2answer instead of
q1answer because we want the buttons to keep track
of the user’s selection for Question 2. We use
“quizEnd” as the argument for our gotoAndStop(
) function call to advance the playhead to the end of the
quiz (i.e., the frame labeled quizEnd) after the
user answers Question 2.
Let’s add the button code for the Question 2 buttons:
Click on frame 10 of the question 2 layer.
Click on button 1.
Into the Actions panel, type the code from Example 1.5.
Repeat steps 2 and 3 to add button code to buttons 2 and 3. On button 2, set
q2answerto 2. On button 3, setq2answerto 3.
Having just added button code to six buttons, you will no doubt have noticed how repetitive the code is. The code on each button differs from the code on the others by only a few text characters. That’s not exactly efficient programming. Our button code cries out for some kind of centralized entity that records the answer and advances to the next screen in the quiz. In Chapter 9 we’ll see how to centralize our code with functions.
Our quiz is nearly complete. We now have two questions working with an answer-tracking script that lets the user answer the questions and progress through the quiz. We still need a quiz-ending screen where we tell the user how well he fared.
To build our quiz-end screen, we need to do some basic Flash production and some scripting. Let’s do the production first:
At frame 20 of the question 2 layer, add a blank keyframe. This prevents Question 2 from appearing underneath the contents of our quiz-end screen.
At frame 20 of the quiz end layer, add a blank keyframe.
While you’re still on that frame, put the following text on the Stage: “Thank you for taking the quiz. Your final score is: /2.” Make sure to leave a decent amount of blank space between “is:” and “/2.” We’ll put the user’s score there.
At frame 20 of the scripts layer, add a blank keyframe.
That takes care of the production work for our quiz-end screen. Your end screen should look something like the one shown in Figure 1.9.

Now let’s work on the quiz-end script. When the playhead lands
on our quizEnd frame, we want to calculate the
user’s score. We need a
calculation script to execute
when the playhead reaches frame 20. Because any script placed on a
keyframe in the timeline is automatically executed when the playhead
enters that frame, we can simply attach our calculation script to the
keyframe we added at frame 20 of the scripts
layer.
In the calculation script, we first determine the user’s score, and then we display that score on the screen:
// Tally up the user's correct answers
if (q1answer == 3){
  totalCorrect = totalCorrect + 1;
}
if (q2answer == 2){
  totalCorrect++;
}
// Show the user's score in an on-screen text field
displayTotal = totalCorrect;
Lines 1 and 8 are code comments that summarize the functionality of
the two sections of the script. On line 2, the first of two
conditionals in our calculation script
begins. In it, we see our q1answer variable put to
use:
if (q1answer == 3){The keyword if tells
the interpreter we’re about to provide a list of statements
that should be executed only if a certain condition is met. The terms
of that condition are described in the parentheses that follow the
if keyword: (q1answer ==
3), and the opening curly brace begins the list of
statements to be conditionally executed. Therefore, line 2 translates
into, “If the value of q1answer is equal to
3, then execute the statements contained in the following curly
braces.”
But how exactly does the condition q1answer == 3
work? Well, let’s break the phrase down. We recognize
q1answer as the variable in which we’ve
stored the user’s answer to Question 1. The number 3 indicates
the correct answer to Question 1, because movie clips first appeared
in Flash 3. The double equal sign (==) between our variable and the
number 3 is the equality comparison operator,
which compares two expressions. If the expression on its left
(q1answer) equals the one on its right (3), our
condition is met, and the statements within the curly braces are
executed. If not, our condition is not met, and the statements within
the curly braces are skipped.
Flash has no way of knowing the right answers to our quiz questions.
Checking if q1answer is equal to 3 is our way of
telling Flash to check if the user got Question 1 right. If he did,
we tell Flash to add one to his total score as follows:
totalCorrect = totalCorrect + 1;
Line 3 says, “Make the new value of
totalCorrect equal to the old value of
totalCorrect plus one,” (i.e.,
increment
totalCorrect).
Incrementing a variable is so common that it has its own special
operator, ++.
So instead of using this code:
totalCorrect = totalCorrect + 1;
We normally write:
totalCorrect++;
which does exactly the same thing, but more succinctly.
At line 4, we end the block of statements to execute if our first condition is met:
}
Lines 5 through 7 are another condition:
if (q2answer == 2){
  totalCorrect++;
}
Here we’re checking whether the user answered Question 2
correctly (MP3 audio support first appeared in Flash 4). If the user
chose the second answer, we add one to
totalCorrect using the increment operator ++.
Because there are only two questions in our quiz, we’re done
tallying the user’s score. For each question that the user
answered correctly, we added one to totalCorrect,
so totalCorrect now contains the user’s
final score. The only thing left is to show the user his score, via
line 9, the last line of our quiz-end script:
displayTotal = totalCorrect;
You already know enough about
variables to guess that the statement
on line 9 assigns the value of totalCorrect to the
variable displayTotal. But how does that make the
score appear on screen? So far, it doesn’t. In order to make
the score appear on screen, we need to create a special kind of
variable called a text field variable that has a
physical representation on the screen. Let’s make one now so
you can see how it works:
Select the Text tool.
On the
quiz endlayer, click frame 20.Place your pointer just before the text “/2” that you created earlier, then click the Stage.
Drag out a text box big enough to hold a single number.
Choose Text → Options.
In the Text Options panel, change Static Text to Dynamic Text.
In the Variable text field, type
displayTotal.
The variable displayTotal now has a screen
representation. If we change displayTotal in our
script, the corresponding text field variable will be updated on the
screen.
Well, that’s it. Our quiz is finished. You can now check whether the quiz works using Control → Test Movie. Click on the answers in different combinations to see if your quiz is keeping score correctly. You can even create a restart button by attaching the following code to a new button:
on (release) {
  gotoAndStop("init");
}
Because totalCorrect is set to
in the code on the init frame, the score will
reset itself each time you send the playhead to
init.
If you find that your quiz isn’t working, try comparing it with the sample quiz provided at the online Code Depot. You may also want to investigate the troubleshooting techniques described in Chapter 19.
Get ActionScript: The Definitive Guide now with the O’Reilly learning platform.
O’Reilly members experience books, live events, courses curated by job role, and more from O’Reilly and nearly 200 top publishers.

