Chapter 4. Table API
Although most Accumulo client code will consist of reading and writing data as we have outlined in Chapter 3, many administrative functions are also available via the client API. Accumulo requires very little setup before an application can write data. Unlike relational databases and even some other NoSQL databases, Accumulo does not require any upfront declaration about the structure of the data to be stored in tables. Row IDs and columns do not have to be specified before data is written, nor does information about the lengths or types of values. The bare minimum required to begin writing and reading data is simply to provide a name when creating a new table.
However, the Accumulo API does provide a wide array of features for configuring and tuning tables and for controlling cluster actions. We outline those features in this chapter. Most of these operations can also be carried out via shell commands. We list the API methods here and the shell commands in “Table Operations”.
Basic Table Operations
Accumulo provides an API for creating, renaming, and deleting tables. This API can be used to manage the construction and lifecycle of tables entirely within an application.
Permission to perform various table operations—such as creating, reading, writing, altering, and deleting tables—is controlled on a per-user basis. More information on these permissions can be found in “Table Permissions”.
Creating Tables
Tables can be created via the TableOperations object:
TableOperationsops=connector.tableOperations();ops.createTable('myTable');
The TableOperations object allows us to check whether a table exists and to delete a table as well:
if(ops.exists('myTable'))ops.delete('myTable');
Tables can also be created through the Accumulo shell:
user@accumulo> createtable myTable
In our example code, we need to create a table to store Wikipedia articles. For this we’ll use the following code:
TableOperationsops=connector.tableOperations();if(!ops.exists("WikipediaArticles")){ops.createTable("WikipediaArticles");}
We can obtain a list of tables by calling the list() method:
SortedSet<String>tables=ops.list();
In the shell, this command is called tables:
user@accumulo> tables
accumulo.root
accumulo.metadata
In Accumulo 1.6, all Accumulo instances start with two tables, the root table and the metadata table. These keep track of which tablet server is hosting each tablet, and other information about the system. The use of these tables for internal operations is described in Chapter 10.
Options for creating tables
Newly created Accumulo tables have several default settings. Many of these are set at reasonable values for a range of cluster sizes and may not require changing.
Options that can be set via the API on a table at creation time are whether to enable versioning and what timestamp type is used.
The VersioningIterator is enabled by default and configured to remove all but the latest version of each key.
In addition, as of Accumulo 1.6, the DefaultKeySizeConstraint is also enabled, which rejects any keys that are larger than 1 MB, though values can still be larger.
The constraint on key sizes is designed to help prevent performance degradation due to memory requirements of larger keys.
We discuss iterators and constraints at length in “Iterators” and “Constraints”.
The VersioningIterator can be disabled with an additional parameter to the createTable() method:
booleanuseVersioningIterator=false;ops.createTable('myTable',useVersioningIterator);
Both the VersioningIterator and the DefaultKeySizeConstraint can be disabled when you create a table in the shell with the --no-default-iterators flag:
user@accumulo> createtable myTable --no-default-iterators
The default time type is TimeType.MILLIS. This instructs tablet servers to use the current system time in milliseconds since the Unix epoch when assigning timestamps to mutations that have no timestamps provided by the client, which is common.
The other possibility is TimeType.LOGICAL, which uses a one-up counter.
Logical time can be enabled through the API like this:
booleanuseVersioningIterator=true;ops.createTable('myTable',useVersioningIterator,TimeType.LOGICAL);
Or in the shell:
user@accumulo> createtable myTable -tl
Caution
Most table settings can be changed, enabled, or disabled after a table is created. However, the time type of a table cannot be changed after the table is created.
When creating tables, you may want to consider placing them into their own namespace, which we discuss in “Table Namespaces”.
Renaming
Tables can be renamed via the rename() method.
If a table is assigned to a user-defined namespace, the new name must include the same namespace as the old name (we cover naming tables within a namespace in “Creating”):
ops.rename("oldName","newName");
In the shell this can be done via the renametable command:
user@accumulo oldname> renametable oldname newname
user@accumulo newname>
Deleting Tables
Tables can be deleted via the delete() method:
voiddelete(StringtableName)
This will remove the table, its configuration, and all data from the system. Disk space will not be reclaimed from HDFS until the Accumulo garbage collector has a chance to identify the files that were used by the deleted table and remove them from HDFS.
Tables can be deleted in the shell via the deletetable command:
user@accumulo> deletetable myTable
deletetable { myTable } (yes|no)? yes
Table: [myTable] has been deleted.
user@accumulo>
Deleting Ranges of Rows
A range of rows within a table can be deleted via the deleteRows() method.
This can be used to remove a specific range, or to eliminate all rows within a table without removing the table itself.
To remove a range of rows, specify a start and end row to the deleteRows() method:
TextstartRow=newText("k");TextendRow=newText("r");ops.deleteRows("myTable",startRow,endRow);
Note
When you specify start and end rows, the deleteRows() method will remove rows that sort after but not including the start row, and rows that sort before and including the end row.
To delete all rows from the beginning of the table, use null for the start row parameter. In this example, all rows from the beginning of the table to the specified end row will be deleted:
TextendRow=newText("r");ops.deleteRows("myTable",null,endRow);
Similarly, rows after a specific start row to the end of the table can be deleted:
TextstartRow=newText("k");ops.deleteRows("myTable",startRow,null);
To remove all rows, use null for both the start and end row.
This is equivalent to truncating a table in a relational database.
Removing all rows will leave the table and its configuration intact:
ops.deleteRows("myTable",null,null);
These operations can be done in the shell using the deleterows command:
user@accumulo> deleterows --table myTable --begin-row k --end-row r
To delete rows beginning at the start of the table, or ending at the end of the table, or both, the --force flag must be present:
user@accumulo> deleterows --table myTable --begin-row k --force
user@accumulo> deleterows --table myTable --end-row r --force
To remove all rows (truncate), simply specify --force with no start or end row:
user@accumulo> deleterows --table myTable --force
Deleting Entries Returned from a Scan
The previous section outlined deleting a simple range of rows. All columns for all rows specified will be deleted in that case.
But we might want to delete a more complex set of entries—for example, not just all columns for all rows in a range, but perhaps just certain columns.
We cover a method for deleting entries that would be returned in a particular scan configuration with a BatchDeleter in “Batch Deleter”.
The same functionality is available in the shell via the deletemany command.
Configuring Table Properties
Tables have a set of properties that control the features that are enabled and that tune table behavior. There are three main methods for setting, removing, and viewing these settings.
To list the current properties for a table, use the getProperties() method:
for(Entry<String,String>property:ops.getProperties(StringtableName))System.out.println(property.getKey()+"\t"+property.getValue());
This can be done in the shell via the config command.
The config command and other commands that run on a specific table can either use the default table or the table specified with the --table or -t option.
The Accumulo shell displays the current table in the command prompt, if the current table is set.
The following prompt shows that the current table is myTable, switches to another table, and runs the config command on myTable:
user@accumulo myTable> table otherTable
user@accumulo otherTable> config --table myTable
-----------+---------------------------------------------+----------------------
SCOPE      | NAME                                        | VALUE
-----------+---------------------------------------------+----------------------
default    | table.balancer ............................ | org.apache.accumu...
To set a property, use the setProperty() method.
For example, to change the replication factor for new files associated with this table we could do the following:
ops.setProperty("myTable","table.file.replication","1");
This can be done in the shell via the config command with the -s or --set option followed by the name and value of the property to set, separated by =:
user@accumulo> config --table myTable --set table.file.replication=1
To remove a property, use the removeProperty() method.
Removing a property causes the table to revert to the default setting for a property.
For example, if we remove the table-specific setting for table.file.replication, the table will revert to the default setting of 0, which indicates that the HDFS default replication factor should be used:
ops.removeProperty("myTable","table.file.replication");
This can be done in the shell via the config command and the -d or --delete option specifying the property to be removed:
user@accumulo> config --table myTable --delete table.file.replication
These methods can be used to set a variety of properties that enable certain features or alter table behavior as we describe in the following sections.
In some cases, the TableOperations object provides additional convenience methods for setting multiple related properties simultaneously, but these can always be set using the setProperty() and removeProperty() methods.
Locality Groups
Locality groups allow application designers to direct Accumulo to store certain sets of column families together on disk. This allows some sets of column families to be read from disk without having to read data from all the other column families. Locality groups are the reason that Accumulo and other Bigtable-style systems are sometimes grouped under the columnar NoSQL data stores category. We introduce the concept of locality groups in “Column Families”.
Accumulo’s locality groups are easy to set up and manage. Locality groups do not have to be specified during table creation, and changes to locality groups are effected via background compaction processes, so that tables can remain online and available through these changes.
A new table has only one default locality group, and all column families that might ever appear in a table are assigned to it. To assign some column families to a separate locality group from the default, the setLocalityGroups() method of TableOperations can be used:
Set<Text>groupOne=newHashSet<>();groupOne.add(newText("colFamA"));groupOne.add(newText("colFamB"));Set<Text>groupTwo=newHashSet<>();groupTwo.add(newText("colFamC"));groupTwo.add(newText("colFamD"));Map<String,Set<Text>>groups=newHashMap<>();groups.put("localityGroupOne",groupOne);groups.put("localityGroupTwo",groupTwo);ops.setLocalityGroups("myTable",groups);
Any column families not included in this mapping will remain in the default locality group. If new column families appear in the table they will also be stored in the default locality group.
Column families can be moved to a new locality group at any time. Newly written files will group data on disk according to the locality group settings at the time the file is created. This is true for either minor compaction or major compaction.
The current assignment of column families to locality groups can be seen via the getLocalityGroups() method of TableOperations:
for(Map<String,Set<Text>>group:ops.getLocalityGroups("myTable").entrySet()){System.out.println("\nGroup: "+group.getKey());for(TextcolFam:group.getValue()){System.out.println(colFam.toString());}}
Locality groups example
In our Wikipedia application, we have a situation that can benefit from using locality groups. We store the article text in the content column along with the article metadata columns together in the same row for each article.
This is convenient for reading all the information for a particular article; we can scan a single row to get what we need.
Other times this may not be so convenient. Consider the case when we want to read out one metadata column from multiple rows. We’d have to read large chunks of text from the content column and filter it out as we scan from one row to the next (Figure 4-1).
Using a locality group to separate the content and metadata columns from one another on disk allows us to leave the content on disk when we’re only reading metadata columns, but also preserves the ability to read content and metadata together when we need to (Figure 4-2). The trade-off is that reading out all the columns of a row will be slightly less efficient because we’ll have to read from two portions of a file instead of one.
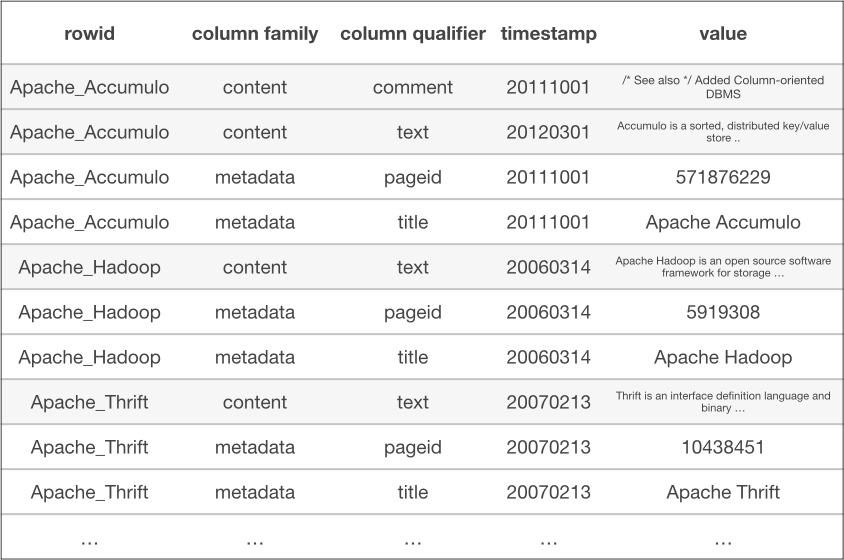
Figure 4-1. Reading over one column family still requires filtering out other column families
We can apply locality group assignments to our column families using the following example code:
publicvoidsetupLocalityGroups(finalbooleancompact)throwsAccumuloException,AccumuloSecurityException,TableNotFoundException{Set<Text>contentGroup=newHashSet<>();contentGroup.add(WikipediaConstants.CONTENTS_FAMILY_TEXT);Set<Text>metadataGroup=newHashSet<>();metadataGroup.add(WikipediaConstants.METADATA_FAMILY_TEXT);Map<String,Set<Text>>groups=newHashMap<>();groups.put("contentGroup",contentGroup);groups.put("metadataGroup",metadataGroup);conn.tableOperations().setLocalityGroups(WikipediaConstants.ARTICLES_TABLE,groups);...
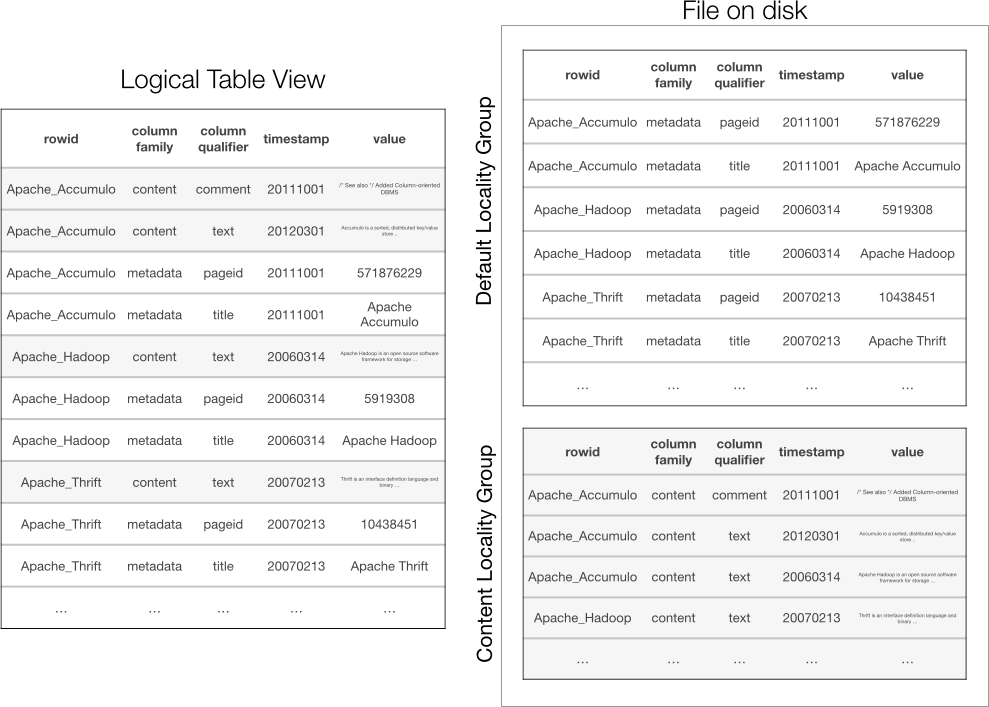
Figure 4-2. Column families in different locality groups are stored together on disk
Any newly written files will be organized according to these locality groups.
To cause any existing files to be reprocessed to reflect the locality group assignment, we can compact our table (we cover the compact command in “Compacting”):
publicvoidsetupLocalityGroups(finalbooleancompact)throwsAccumuloException,AccumuloSecurityException,TableNotFoundException{...if(compact){conn.tableOperations().compact(WikipediaConstants.ARTICLES_TABLE,null,null,false,false);}}
Now when using our WikipediaClient.scanColumn() method in the example code to read a metadata column, tablet servers will not have to read out any data from the content column family, resulting in better scan performance.
Bloom Filters
A bloom filter is a highly memory-efficient data structure for keeping track of set membership with allowed false positives but no false negatives. False positives in this situation mean that some percentage of the time, when we check a bloom filter to see if particular item is in a set, it will return the answer yes when the item is not actually in the set. But having no false negatives means that the bloom filter will never say no when the item is actually in the set.
This comes in handy in an Accumulo context when we are looking for a particular key in a table. Enabling bloom filters on a table will allow us to consult the bloom filter to see if a particular key is in a file associated with a tablet. By consulting the bloom filter, we can figure out if a file doesn’t contain a key at all instead of having to seek into and read the data portion of the file.
This is especially useful because often a key will exist in only one file when multiple files are associated with a tablet. Therefore, we often only need to read one file to retrieve the key-value pair. This can reduce the time to look up a particular key-value pair from hundreds of milliseconds, if there are many files, to perhaps tens of milliseconds.
Of course, because bloom filters can return false positives, some percentage of the time the bloom filter will say that a file has a key when it doesn’t. In this case we look in the file and find out that the key we want isn’t there after all, but this is acceptable behavior. We sometimes search files we don’t need to but are guaranteed never to skip a file that does contain our key.
Tip
Bloom filters are most useful when an application performs lots of lookups of single rows. They are less useful when an application mostly performs scans over multiple rows. A bloom filter is only consulted for ranges containing keys from a single row.
The cost of using bloom filters is the memory they take up. When bloom filters are enabled, each file has a bloom filter generated for it when it is created. This filter is stored along with the file and is, by default, lazily loaded into memory by the tablet server.
By default bloom filters are not enabled on tables, but they can be enabled via the TableOperations object:
ops.setProperty("myTable","table.bloom.enabled","true");
These can also be enabled and other settings configured via the standard config command in the shell:
user@accumulo> config -t myTable -s table.bloom.enabled=true
After bloom filters are enabled, newly written files will have bloom filters generated for them. Existing files will not. Compaction of older files will cause new files to be written with bloom filters for existing data. See “Compacting” for details on scheduling compaction operations for a table.
Additional options that can be set and their defaults are as follows:
table.bloom.error.rate-
This property specifies the desired acceptable error rate for the bloom filter, as a percentage. A lower error rate will require that more memory be used. The default value is 0.5%.
table.bloom.hash.type-
This property defines the type of hash function to use when storing and looking up items in the bloom filter. The default hash function type is
murmur. table.bloom.load.threshold-
Even when enabled, bloom filters are lazily loaded to keep the cost of loading a new tablet low. By default, a tablet server will wait until at least one seek that could have used a bloom filter is actually performed before loading the bloom filter from disk into memory. This behavior can be changed via the
table.bloom.load.thresholdproperty. Setting this property to0will cause a bloom filter to be loaded when the file is opened. table.bloom.size-
Bloom filters are configured with a particular number of slots. The combination of this property and the desired error rate ultimately determines the amount of memory dedicated to the bloom filter. The default value is 1,048,576 bytes, or 1 MB.
Key functors
Bloom filters can be configured to use just the row ID; a combination of row ID and column family: or row ID, column family, and column qualifier when checking to see if a key exists in a file.
For example, by default bloom filters only check to see if a file contains the same row ID as a given key. If a key has the same row ID as any key store in a file, the bloom filter will return yes to the question of whether or not the file should be opened. This could result in more false positives, because the keys in a file can be for the same row but different columns than the one our key identifies.
On the other hand, storing more than just the row ID in the bloom filter makes the lookup more specific. But this can cause the bloom filter to use up more memory in order to maintain the desired false positive rate, because there are more possible identifiers to be stored in the bloom filter.
The portion of the key stored in a bloom filter and used for lookups is controlled by the key functor.
The functor used can be configured on a per-table basis via the table.bloom.key.functor property. Accumulo ships with three possible functors:
org.apache.accumulo.core.file.keyfunctor.RowFunctor-
Causes only the row ID to be used when the bloom filter is consulted. This is the default setting.
org.apache.accumulo.core.file.keyfunctor.ColumnFamilyFunctor-
Causes the row ID and the column family to be used when the bloom filter is consulted.
org.apache.accumulo.core.file.keyfunctor.ColumnQualifierFunctor-
Causes the row ID, column family, and column qualifer to be used when the bloom filter is consulted.
Additional functors can be created by extending the org.apache.accumulo.core.file.keyfunctor.KeyFunctor Java interface.
This can be used to make a bloom filter take advantage of an application’s access patterns when deciding whether to search a file for a particular range.
Caching
Caching data in memory is extremely important to the performance of many conventional database applications. Often a separate set of processes designed to keep part or all of a database’s data in memory are used to keep the operational load placed on a database low.
In contrast, Accumulo is designed to make data access fast—even when data is fetched from disk—by keeping data organized, and to scale up the number of operations that can be performed by distributing data across multiple machines. Applications can then exploit spatial locality by doing one seek to find a set of related key-value pairs, which are then read off of disk sequentially at a high rate.
However, Accumulo also employs its own caching mechanisms to allow applications to take advantage of temporal locality. Temporal locality refers to the situation in which key-value pairs that have been accessed once are more likely to be accessed again within a short period of time. With caching, key-value pairs that are fetched several times within a short period are fetched from disk once and stored in memory. Subsequent accesses to the desired key-value pairs are fast because they can read from memory instead of going to disk again.
In particular, Accumulo provides two types of caches. The first is an index cache, which stores the internal key-to-data block mapping for each file of a tablet. These indexes are used to identify which block of a file should be read from disk to satisfy a read request. By default the index cache is enabled.
Another cache, the data block cache, is used to store data blocks read from files. By default the data block cache is disabled.
Tip
Whether or not temporal locality exists for a particular table depends on the access patterns of an application. For applications that tend to fetch the same sets of key-value pairs several times in a short period, enabling the data block cache can improve performance considerably, depending on the memory resources available.
Applications that don’t perform multiple fetches of the same sets of key-value pairs within a short time will not see a benefit from enabling the data block cache. Having the data block cache enabled for applications that scan large swaths of a table will not provide a benefit and can cause data blocks for other tables to be evicted from memory, decreasing the benefit of caching data blocks for those other tables.
Application designers can enable or disable either cache for a particular table in the usual manner, via the setProperty() method.
The data block cache property is called table.cache.block.enable, and the index cache property is table.cache.index.enable:
ops.setProperty("myTable","table.cache.block.enable","true");
The page for an individual table in the Accumulo monitor will show the index cache hit rate and the block or data cache hit rate.
Tablet Splits
Accumulo automatically splits tablets when they reach a certain size threshold and tends to create uniformly sized tablets that are load-balanced evenly across the cluster. Many applications have no need to alter the split points of a table.
However, in some instances applications might want to control the split points for a table, or to obtain a list of splits.
One scenario for splitting a tablet manually is when you are preparing to stream a large volume of writes to a new table or a new set of tablets within a table. For example, let’s say we have an application that wants to keep track of user interactions on a daily basis. We can choose to organize our table by defining row IDs consisting of the day followed by a user ID:
2015-03-14_usernameK
So each day, all of our writes will be sorted toward the end of the table, because the date portion of the row ID begins with the date. This is a problem, because the tablet that spans from the last known row to positive infinity is only hosted by one tablet server. Our ingest will be limited to the write throughput of one server, no matter how many servers we have.
User IDs may be somewhat randomly distributed throughout the day. We can improve the distribution of our writes each day by strategically presplitting the table with a new set of split points starting with tomorrow’s date, and a user ID portion based on perhaps the distribution of user IDs from the previous day or several days.
So if the previous day’s tablets ended up getting split automatically by Accumulo into the following split points:
2015-03-14_usernameC
2015-03-14_usernameF
2015-03-14_usernameJ
...
2015-03-14_usernameQ
2015-03-14_usernameV
We might opt, at the end of the day on March 14, to generate the following split points for the next day:
2015-03-15_usernameC
2015-03-15_usernameF
2015-03-15_usernameJ
...
2015-03-15_usernameQ
2015-03-15_usernameV
To add splits to a table, use the addSplits() method:
SortedSet<Text>partitionKeys=newTreeSet<>();// add splitspartitionKeys.add(newText("f"));partitionKeys.add(newText("j"));partitionKeys.add(newText("r"));...ops.addSplits("myTable",partitionKeys);
Note
Adding split points, either manually or automatically, will not cause data to be unavailable or files to be changed right away. Newly split tablets will share files for a period of time, each owning nonoverlapping ranges of keys in the files. For example, one tablet might use keys from the beginning of the file up until some midpoint key, with another tablet using keys after that midpoint through the end of the file. The files will continue to be shared until a major compaction writes out new files, one for each tablet. Creating new splits is primarily a matter of adding some entries to the metadata table.
We might want to take the splits from one table and apply them to a new table.
A list of splits within a table can be obtained via the listSplits() method:
Collection<Text>splits=ops.listSplits("myTable");// note: in earlier versions of Accumulo this was called getSplits()
It is possible to obtain a sample of the splits of a table by specifying the maximum number of splits to return. The splits will be sampled uniformly:
Collection<Text>sampleSplits=ops.listSplits("myTable",10);// note: in previous versions this methods was called getSplits()
Quickly and automatically splitting
Applications can control how aggressively tablet servers automatically split tablets by setting the table.split.threshold property.
Instead of adding specific split points, applications can temporarily lower the split threshold while live ingest is happening until a table has as many or more tablets as there are tablet servers.
Caution
Creating splits this way can result in many tablets sharing RFiles in HDFS initially. It is not until a major compaction is run for a tablet that an RFile can be created that belongs exclusively to a tablet.
Shared Rfiles are not typically a problem but can cause “chop” compactions to occur when later merging tablets. When merging tablets that may have been created using the split threshold lowering process, consider running the compact command on the table first.
To change the table split threshold, use the handy setProperty() method and specify a new threshold in terms of bytes:
ops.setProperty("table.split.threshold","500k");intnumTablets=0;intnumServers=conn.instanceOperations().getTabletServers().size();while(numTablets<numServers){// wait a while...numTablets=ops.listSplits("myTable",10);}ops.setProperty("table.split.threshold","1G");

See “Instance Operations” for details on the instance-level operations API.
We discuss splitting tablets for performance reasons more in “Splitting Tables”.
Merging tablets
Tablets can become empty over time, as data is aged off, or as data is deleted from a table, or as the result of adding splits that don’t end up reflecting the actual distribution of the keys.
Empty tablets don’t generally cause serious problems for tables. Perhaps the biggest issue with empty tablets is that they can cause the distribution of actual data within a table to be uneven across servers, because the default table load balancer only looks at the number of tablets, not the amount of data within each tablet.
Empty tablets or even just smaller tablets can be merged into larger tablets to achieve a more uniform distribution of data across tablets.
To merge tablets in a given range, use the merge() method:
ops.merge("myTable",newText("ja"),newText("jd"));
There is a utility class, org.apache.accumulo.core.util.Merge, that will loop over small tablets, merging until there are no more tablets smaller than a given size:
longgoalSize=AccumuloConfiguration.getMemoryInBytes("500M");booleanforce=true;Mergemerge=newMerge();Textstart=null;// begin at the start of the tableTextend=null;// go to the end of the tablemerge.mergomatic(conn,"myTable",start,end,goalSize,force);
A few other methods relating to tablets can be useful: getMaxRow() to find out the last existing row within a range; and splitRangeByTablets(), which can be used to split a range according to how tablets are currently split.
splitRangeByTablets() is used, for instance, in Accumulo’s MapReduce integration to align MapReduce input splits to tablets:
TextgetMaxRow(StringtableName,Authorizationsauths,TextstartRow,booleanstartInclusive,TextendRow,booleanendInclusive)Set<Range>splitRangeByTablets(StringtableName,Rangerange,intmaxSplits)
Compacting
New writes to Accumulo tables are sent to two places by the tablet server: a sorted in-memory data structure, called the in-memory map, and an unsorted log on disk, called the write-ahead log. When the in-memory map reaches a certain size, it is flushed to a new file in HDFS, a process called a minor compaction.
Applications can direct tablet servers to flush all the recent mutations from memory to disk for a particular table via the TableOperations.flush() method.
This is different from the BatchWriter.flush() method, which sends all of the mutations from a client to tablet servers.
Flushing a table can make it easier to perform certain operations, such as shutting down a tablet server, because a flushed table’s tablets require no recovery if a tablet server is shut down:
ops.flush(StringtableName,Textstart,Textend,booleanwait)
Over time, the number of files associated with each tablet increases, up to the maximum number of files per tablet specified for the table. Tablet servers automatically decide when to combine two or more files into one new file in a process called major compaction. Lookups on tablets with fewer files can be carried out more quickly because fewer disk seeks are involved in locating the start key of interest.
By default, Accumulo is tuned to allow each tablet to have several files. This has the effect of balancing the resources dedicated to ingest with those dedicated to lookups.
Applications can choose to compact a table on demand to improve lookup performance via the compact() method.
Unlike the periodic compactions that a tablet server performs in the background, an application-initiated compaction will always merge all files associated with a tablet into one file.
This can also help when you are attempting to remove deleted data from disk, or with ensuring that changes in configured options or iterators are immediately reflected in a table’s files.
Note
Major compactions scheduled from the API or the shell will always cause the data for each tablet to be rewritten to one new file, even when a tablet already has only one file.
This is useful for ensuring that changes in table configuration—affect all of the table’s data on disk.
Compactions can be scheduled over a particular range, or over an entire table. It is also possible to request that the compact method perform a minor compaction before starting the major compaction, and/or to make the method wait until the compactions are complete:
booleanflush=true;booleanwait=false;TextstartRow=newText("ja");TextendRow=newText("jd");ops.compact("myTable",startRow,endRow,flush,wait);
To compact the entire table, set the start and end row parameters to null:
ops.compact("myTable",null,null,flush,wait);
Compacting an entire table or a range within a table can be a useful way of ensuring that changes in table configuration are reflected in all the data stored on disk.
To configure iterators to be used just for the duration of a compaction, applications can pass in a list of IteratorSetting objects:
List<IteratorSetting>iterators=newArrayList<>();...booleanflush=true;booleanwait=false;voidcompact("myTable",start,end,iterators,flush,wait);
If compactions are already taking place, the requested compaction of a table will be queued up and performed as soon as resources become available.
A set of queued compactions for a table can be cancelled via the cancelCompaction() method:
ops.cancelCompaction("myTable");
Compaction properties
Compactions require precious I/O and CPU resources. As such, how often compactions take place can have a large effect on query and ingest performance. The following are the available compaction properties and their behavior:
table.compaction.major.ratio-
This property controls how aggressively tablet servers automatically compact files. By default the setting is
3, which instructs tablet servers to compact a set of files if their combined size is at least three times the size of the largest tablet in the set. For example, if there were three or more files of the same size, they would be compacted into a single file. Setting this ratio higher makes tablet servers wait longer before combining files. table.compaction.major.everything.idle-
This property controls how long after the last write to a tablet to wait before considering the tablet to be idle. A tablet server sometimes chooses to compact idle tablets, because compacting a tablet’s files into a single file can improve query performance. Idle compactions might never happen if the tablet server is busy. The default idle time is one hour. Tablets that already only have one file will not be compacted in this way.
table.compaction.minor.idle-
This property tells the tablet server how long after receiving the last mutation to leave a tablet’s data in the in-memory map before flushing to disk. Typically a tablet server waits until the available memory is close to being used up, but in this case, if a tablet has not seen any mutations for this period of time, the tablet server can opt to flush the data to disk. The default is 5 minutes.
table.compaction.minor.logs.threshold-
This is the maximum number of write-ahead logs that will be associated with a tablet before the tablet server will perform a minor compaction. After the minor compaction takes place, the tablet will no longer need the data previously written to those logs, which will reduce recovery time if the tablet server goes down. The default setting is
3.
Additional Properties
Several other settings can be controlled on a per-table basis. Application designers should at least be aware of these options, because their configuration can depend on access patterns and data used as part of the application. These include the following:
table.balancer-
This controls the way that a table’s tablets are distributed throughout the cluster. By default, a table’s tablets are spread across tablet servers so that each tablet server has close to the same number of tablets using the
DefaultLoadBalancerclass. This does not take into account the number of entries per tablet or the number of bytes per tablet, just the number of tablets. Some tables call for a different strategy of distributing tablets across servers.To implement a custom load balancer, create a Java class that extends
org.apache.accumulo.server.master.balancer.TabletBalancer, implementing the following methods:publicabstractclassTabletBalancer{.../*** Assign tablets to tablet servers. This method is called* whenever the master finds tablets that are unassigned.* ...*/abstractpublicvoidgetAssignments(SortedMap<TServerInstance,TabletServerStatus>current,Map<KeyExtent,TServerInstance>unassigned,Map<KeyExtent,TServerInstance>assignments);/*** Ask the balancer if any migrations are necessary.* ...*/publicabstractlongbalance(SortedMap<TServerInstance,TabletServerStatus>current,Set<KeyExtent>migrations,List<TabletMigration>migrationsOut);...} table.classpath.context-
This property allows the Java
CLASSPATHused for a particular table to be specified. Iterators and other custom classes can be loaded for a particular table without affecting the classes loaded for other tables. tserver.memory.maps.max-
This controls the amount of memory dedicated to holding newly written data in memory before flushing to disk.
table.failures.ignore-
If part of a table is unavailable for some reason—for example, if there is a problem with HDFS data nodes serving a particular block of a file associated with a tablet—a scan over that part of a tablet will result in an
Exception. It is possible to allow scans to proceed and return any data that is available, even in the presence of some unavailable data by settingtable.failures.ignoretotrue. By default this setting isfalse. table.file.blocksize-
This property controls the size of HDFS file blocks used for a table. Setting this value to be close to the split threshold means that a file can consist of just one block and therefore can be retrieved from a single HDFS data node, which can increase query performance.
table.file.compress.blocksize-
When Accumulo writes key-value pairs to disk, they are first grouped into blocks and, by default, compressed. The default setting is
100K, which groups 100 KB of key-value pairs before compression. This means that a compressed block that decompressed to about 100 KB will be retrieved from disk when even only a single key-value pair is read. If an application will mostly retrieve one, or few, small key-value pairs, setting this property lower can result in better query performance. If an application will regularly scan larger ranges of key-value pairs, setting this value higher will reduce file storage overhead slightly and result in prefetching more data from disk, which will be faster for these applications than having files that have more, smaller blocks. table.file.compress.blocksize.index-
The files Accumulo uses to store sorted key-value pairs on disk include a section for indexes. These indexes help a tablet server find which block or blocks of a file to load for a particular range of keys. This property controls the size of the blocks used to store index entries for a file. The default is 128 KB, represented as
128K. table.file.compress.type-
This property allows tables to be compressed with the specified algorithm. Accumulo ships with Gzip and LZO compression libraries. The default compression algorithm is Gzip. Compression can be turned off by setting this property to
none, which is not recommended for most apps. In general, choosing a compression algorithm involves a trade-off between resources needed to perform compression and the amount of compression. table.file.max-
This property sets the maximum number of files that can be associated with a tablet. If a new file needs to be written to this tablet and the maximum number of files is already reached, a tablet server will perform a merging minor compaction in which one data file is rewritten along with data from memory into a new file, so that the maximum number of files is not exceeded. Merging minor compactions are slower than compactions that simply flush out data in memory to a new file, because they involve reading an existing file and performing a merge-sort with data from memory to create a new file. This has the effect of slowing down ingest while keeping the number of files that a tablet server may need to open down to a reasonable number for any given query.
Setting this property to a value less than the value for
tserver.scan.files.open.maxwill prevent a tablet server from having more files than it is willing to open all at once. This property can be set to0, in which case it will default to the value oftserver.scan.files.open.max- 1.Increasing this value will allow more new files to be flushed to disk before merging minor compactions kick in, effectively tuning a table for faster ingest at the expense of queries. Conversely, setting this value lower will end up throttling ingest and will make queries faster. The default value is 15 files.
table.file.replication-
Controls the number of file block replicas associated with this table. A table that requires more fault tolerance can set this number higher. Tables that store data that can be restored from another source can set this property lower. Fewer replicas will result in faster ingest rates. Setting this property to
0will cause tablet servers to use the HDFS default replication setting.0is the default setting. table.file.type-
Older versions of Accumulo use a file type known as the map file type. Newer versions use a format called an RFile. The default setting for this property is
rf, meaning that new files will be written in the RFile format. See “File formats” for more information on these formats. table.formatter-
Some tables can have complex data elements stored in keys or values. For example, a table can contain a serialized Avro object. Anything that is not a Java
Stringwill likely show up in the shell as a jumble of characters. Specifying a custom table formatter can cause a table’s values to be printed out in a human-readable representation. CustomFormatterclasses are discussed in “Human-Readable Versus Binary Values and Formatters”. table.interepreter-
When scans are performed in the shell, arguments are interpreted as strings. This may not result in the type of range desired if a table’s rows or columns are not stored as strings. For example, a table may have serialized Java
Longobjects as row IDs.When row IDs or columns that are not Java
Stringsare used, an alternative interpreter can be used for performing scans within the shell. Custom interpreters can be created by extendingorg.apache.accumulo.core.util.interpret.ScanInterpreter:publicinterfaceScanInterpreter{TextinterpretRow(Textrow);TextinterpretBeginRow(Textrow);TextinterpretEndRow(Textrow);TextinterpretColumnFamily(Textcf);TextinterpretColumnQualifier(Textcq);}The methods defined by the
ScanInterpreterinterface can be used to transform a given start row, end row, or column name into the right format for a particular table. The default scan interpreter isorg.apache.accumulo.core.util.interpret.DefaultScanInterpreter. Setting a custom interpreter can be done by setting thetable.interepreterproperty to the fully qualified class name of the custom interpreter. table.scan.max.memory-
This is the maximum amount of memory that a server will use to batch results of a scan before sending them to a client. For applications with typically larger scans, setting this property higher can improve performance. The default is 512 KB (
512K). table.security.scan.visibility.default-
This setting allows key-value pairs in a table that have a blank column visibility to be considered to have a default column visibility. For example, we can store key-value pairs with no column visibility set but have the
table.security.scan.visibility.defaultproperty set topublic, which will have the effect of requiring that all users performing scans against these key-value pairs in the table at least possess the public authorization token.Note
When a scanner returns key-value pairs that have no column visibility set, they will appear to have blank column visibilities when returned to the client, even though a default visibility can be in place. That is, the tablet server does not fill in the column visibilities of key-value pairs returned with the default visibility for the table.
Also, this is a scan-time setting only. It will not cause the default column visibility to be persisted to disk within any of the keys. This is convenient because it allows the default visibility to be changed without rewriting all the data already stored thus far.
Key-value pairs without a column visibility set can be seen by anyone when there is no default visibility configured. See the discussion in “Using a Default Visibility” for more on using the default visibility setting.
table.walog.enabled-
This property controls whether to persist new writes to a log on disk before considering a write to be successful. By default all new mutations are persisted to the write-ahead log on disk before a tablet server reports to a client that the write succeeded. This setting is
trueby default. The write-ahead log only applies to writes written to a table via mutations added to aBatchWriter. The write-ahead log is not involved in bulk-loading new files to a table. This setting does not need to be set tofalsewhen using bulk loading; the write-ahead log is simply not used. See “MapReduce and Bulk Import” for more on bulk import.Caution
Tables that have the write-ahead log disabled can lose data if live writes are being streamed to servers and a server dies. The write-ahead log should only be disabled in cases where data is backed up elsewhere and where tables are regularly checkpointed, so that a consistent view of the table can be created from replaying live writes to data from the last complete checkpoint after a server failure.
Online Status
Accumulo tables can be brought offline, meaning they will be unavailable for queries and writes, and they will not utilize any system resources other than disk storage.
This can be useful for tables that do not need to be available at all times but occasionally can be brought online for some queries and then taken offline again to free up system resources for other tables. We cover another use case for taking tables offline when discussing cloning and exporting tables in “Importing and Exporting Tables”.
To take a table offline using the TableOperations object, use the offline() method:
ops.offline("myTable");
This will instruct all tablet servers to begin unloading all tablets for the table specified, flushing any data in memory to disk and releasing any system resources dedicated to those tablets, such as open file handles. Because this can take some time, depending on the size of the table, this call is asynchronous.
Applications can call this method with an additional parameter that causes the call to wait until a table is offline:
ops.offline("myTable",true);
Note
The accumulo.root and accumulo.metadata tables cannot be taken offline. To operate on the files associated with these tables, Accumulo would need to be shut down.
The /tables section of the Accumulo monitor shows the online status of all tables.
A table that is offline can be brought online again with the online() method:
ops.online("myTable");// orops.online("myTable",true);
This will instruct tablet servers to be assigned responsibility for all the tablets of the table specified.
Tables can be taken offline and back online in the shell as well. See “Changing Online Status” for shell methods relating to the online status of tables.
Cloning
Tables can be cloned via the clone() method.
Because all underlying files of Accumulo tables are immutable, cloning can be performed very efficiently.
When a table is cloned, it can also be optionally flushed to ensure that a consistent view of the table is cloned at a specific point in time, via the Boolean flush parameter.
A cloned table will inherit all the configuration of the original table.
Some properties of the original table can be excluded when the cloned table is created, and properties can be optionally set to specified values as well.
A cloned table will not inherit the table permissions of the original. The user that created the cloned table will be the only user authorized to read and alter the table at first:
booleanflush=true;Map<String,String>propsToSet=newHashMap<>();// set any properties to be different for the cloned table...Set<String>propsToExclude=newHashSet<>();// identify any properties not to be copied from the original table// defaults will be used instead unless set in propsToSet...ops.clone("originalTable","newTable",flush,originalProps,propsToExclude);
Cloning is a good option when the need arises for a consistent copy of a table that can be manipulated without affecting the original.
Using cloning as a snapshotting mechanism
Cloning can also be thought of as a way of taking a snapshot of a table at a particular time. If something corrupts a table that is outside the fault-tolerant measures of Accumulo—such as a bug in a client writing new data to a table or a user accidentally deleting data—being able to restore a table from a recent snapshot can save a lot of data and time.
Making a snapshot can be done as in this example:
...// clone the table as a snapshotSystem.out.println("Creating snapshot");booleanflush=true;Map<String,String>propsToSet=newHashMap<>();Set<String>propsToExclude=newHashSet<>();Stringtimestamp=Long.toString(System.currentTimeMillis());Stringsnapshot="myTable_"+timestamp;ops.clone("myTable",snapshot,flush,propsToSet,propsToExclude);...
Cloned tables as snapshots can be named with a unique identifier, such as the time they were cloned. Restoring a snapshot could be as simple as stopping clients, deleting or renaming the primary table, and cloning the snapshot table using the original table name as the name of the newly cloned table.
An example is as follows:
...System.out.println("Restoring from snapshot");ops.delete("myTable");ops.clone(snapshot,"myTable",flush,propsToSet,propsToExclude);// any existing scanners will no longer work// get a new onescan=conn.createScanner("myTable",newAuthorizations());for(Map.Entry<Key,Value>kv:scan){System.out.println(kv.getKey().getRow()+"\t"+newString(kv.getValue().get()));}...
Importing and Exporting Tables
Accumulo tables can be exported to a directory in HDFS, or other HDFS-compatible filesystems, and also imported.
For a table to be exported, it must be taken offline and stay offline for the duration of the export. This ensures that there is a consistent set of files in HDFS for all tablets in the table, and that the garbage collector process will not delete any files in the initial list created by the export command before the files can be copied to another place. Because offline tables are unavailable for new writes and reads, applications can choose to clone the table instead, take the clone offline, and export the clone instead of the original table.
Exporting a table will include information such as the table configuration, the split points, and the logical time information, if any, so that when the table is imported, the destination table will resemble the original.
To export a table, you must specify a path to a directory in HDFS in which table information can be written:
ops.offline("myTable");ops.exportTable("myTable","/exports/myTable/");
The /exports/myTable directory now contains metadata information and a file containing commands for Hadoop’s distcp feature that can be used to copy the files from our table to another HDFS instance. For instructions on doing this, see “Import, Export, and Backups”.
Tables exported in this way can be programmatically imported into Accumulo, but the data files must be copied first:
hadoop distcp -f /exports/myTable/distcp.txt /exports/myTable_contents
Once the files have been copied, the table can be imported with the following methods. The files can only be imported once. To import the same table again, the distcp command must be repeated:
ops.createTable("anotherTable");ops.importTable("anotherTable","/exports/myTable_contents")
Exporting and importing a table can facilitate moving a table from one Accumulo namespace to another, because simply renaming a table to move it into a different namespace is not possible.
Newly imported tables will have the same table configuration applied and split points as the exported table.
Additional Administrative Methods
There are a few additional features in the administrative API.
The clearLocatorCache() method can be used to cause a client to forget the mapping of tablets to servers and to learn the mapping anew by reading the metadata table:
voidclearLocatorCache(StringtableName)
The tableIdMap() method will return a Java Map of table names to IDs that are used to identify table resources in HDFS and in the metadata table. Looking up a table’s ID can be helpful for locating files in HDFS or entries in the metadata table.
Map<String,String>tableIdMap();
The getDiskUsage() command is useful for seeing how many bytes on disk are used by a table.
The method can be used for multiple tables simultaneously:
Set<String>tables=newHashSet<>();tables.add("testTable");List<DiskUsage>usages=ops.getDiskUsage(tables);System.out.println(usages.get(0).getUsage()+" bytes");
The testClassLoad() method is useful for testing whether a class can be correctly loaded for a given table—for example, a custom iterator or constraint or other user-defined class.
If a specific CLASSPATH is set for the table, it will be used to attempt to load the class.
The class can be tested for whether it implements a given interface:
StringclassName="org.my.ClassName";StringasTypeName="org.my.Interface";booleancanLoad=ops.testClassLoad("testTable",className,asTypeName);
To configure iterators or constraints on a table, see “Iterators” and “Constraints”, respectively.
Table Namespaces
A new feature in Accumulo 1.6 is that tables can be grouped using a namespace. For example, one department of an organization can have a set of tables that it can name without worrying about using the same name for a table as another department.
Here is an example of a set of tables in separate namespaces, perhaps supporting separate applications. There are three namespaces, intranet, wiki, and sensor, perhaps each storing data from different sources, but doing similar things such as storing records imported, and storing index entries:
intranet.index
intranet.records
intranet.stats
wiki.index
wiki.docPartIndex
wiki.articles
wiki.audit
sensor.records
sensor.index
sensor.trends
Each namespace can use any names for their tables. In addition, some settings can be applied at the namespace level and will affect all tables in that namespace. Namespaces provide a convenient way for configuring and managing tables in groups.
In a table name, the portion preceding a single dot (.) constitutes the namespace, and the portion following the dot represents the specific table within the namespace.
For example, the metadata and root tables live within the system namespace, accumulo, so they appear as accumulo.metadata and accumulo.root.
Tables without a namespace portion and a dot are assigned to the default namespace.
Namespaces can be controlled via the NamespaceOperations class, obtained from a Connector object:
NamespaceOperationsnsOps=conn.getNamespaceOperations();
Creating
A namespace must be created explicitly before a new table can be created within that namespace. A namespace can only consist of letters, numbers, and underscore characters. We can also check for the existence of a namespace:
if(!nsOps.exists("myNamespace"))nsOps.create("myNamespace");
Now we can create tables within this namespace. To assign a table to a namespace simply prepend the name of the namespace and a dot before the name of the table:
conn.getTableOperations().create("myNamespace.myTable");
Attempting to assign a table to a namespace, that doesn’t exist will result in an exception.
These actions can also be done in the shell:
user@accumulo> createnamespace myNamespace
user@accumulo> createtable myNamespace.myTable
Caution
Once a table has been created in a namespace it cannot be moved to another namespace simply by renaming. Tables can be renamed as long as the namespace portion of the name is unchanged.
You can move a table to a namespace by exporting it to a directory in HDFS and then importing it into a table in a different namespace. See “Importing and Exporting Tables”.
To obtain a list of namespaces, use the list() method:
for(Stringnamespace:nsOps.list())System.out.println(namespace);
To list namespaces in the shell, use the namespaces command:
user@accumulo> namespaces
accumulo
myNamespace
To get the name of the system namespace, use the systemNamespace() method. For the name of the default namespace, use the defaultNamespace() method.
It is possible to set properties on the default namespace, and all tables in the default namespace will be affected (we cover setting properties on namespaces in “Setting Namespace Properties”):
StringsystemNS=nsOps.systemNamespace();StringdefaultNS=nsOps.defaultNamespace();
Renaming
Namespaces can be renamed. In this case all the tables within the namespace will appear under the new namespace:
nsOps.rename("myNamespace","myNewNamespace");
In the shell this is achieved via the renamenamespace command:
user@accumulo> createnamespace ns
user@accumulo> createtable ns.test
user@accumulo ns.test> tables
accumulo.metadata
accumulo.root
ns.test
user@accumulo ns.test> renamenamespace ns newns
user@accumulo newns.test> tables
accumulo.metadata
accumulo.root
newns.test
Setting Namespace Properties
Any properties configured on a namespace will be applied to all the tables within it. This makes changing the properties for a group of tables easy. Tables can still have individual properties too, in which case they will override any corresponding namespace properties.
Tip
The only properties that should be applied to namespaces are those properties that are normally applied to individual tables.
These typically begin with the table prefix. For a list of table properties, see “Configuring Table Properties”.
To set a property, use the setProperty() method on a NamespaceOperations object:
nsOps.setProperty("myNamespace","table.file.replication","2");
The property will be propagated to all tablet servers via ZooKeeper and may take a few seconds to affect all tables within the namespace.
Similarly, to remove a property, use the removeProperty() method.
This will also be propagated within a few seconds to tablet servers.
When a property has been removed from a namespace, the tables within the namespace inherit the system setting if it exists, or the default setting:
nsOps.removeProperty("myNamespace","table.file.replication");
Properties of a namespace can be listed via the getProperties() method:
for(Entry<String,String>>e:getProperties("myNamespace"))System.out.println(e.getKey()+"\t"+e.getValue());
Setting and viewing namespace properties in the shell can be done with the -ns option to the config command:
user@accumulo> config -ns myNamespace -s property=setting
user@accumulo> config -ns myNamespace -d property
user@accumulo> config -ns myNamespace
Deleting
Before a namespace can be deleted, all the tables within the namespace must be deleted.
Once a namespace is empty, the delete() method can be used to remove it:
nsOps.delete("myNamespace");
A NamespaceNotEmptyException will be thrown if the namespace still contains any tables.
In the shell this can be done via the deletenamespace() command:
user@accumulo newns.test> deletenamespace newns
deletenamespace { newns } (yes|no)? yes
2014-08-23 12:14:37,297 ERROR [main] shell.Shell (Shell.java:logError(1139)) -
    org.apache.accumulo.core.client.NamespaceNotEmptyException: Namespace newns
    (Id=1) it not empty, contains at least one table
user@accumulo newns.test> deletetable newns.test
deletetable { newns.test } (yes|no)? yes
yes
Table: [newns.test] has been deleted.
user@accumulo> deletenamespace newns
deletenamespace { newns } (yes|no)? yes
yes
user@accumulo>
Configuring Iterators
Similarly to the way Accumulo iterators can be configured for individual tables as described in “Iterators”, iterators can be configured for a namespace, which will apply the iterator to all tables within the namespace.
Iterators can be configured to be applied at all scopes (scan-time, minor compaction, and major compaction) or specific scopes. To add an iterator on all scopes:
IteratorSettingiterSet=newIteratorSetting(10,"myIter",com.examples.Iterator.class);nsOps.attachIterator("myNamespace",iterSet);
Iterators can also be applied to specific scopes. For example, you can set an iterator to be applied at only minor compaction and major compaction times:
IteratorSettingiterSet=newIteratorSetting(10,"myIter",com.examples.Iterator.class);EnumSet<IteratorScope>scopes=EnumSet.of(IteratorScope.MINC,IteratorScope.MAJC);nsOps.attachIterator("myNamespace",iterSet,scopes);
The same methods available for working with iterators on individual tables can also be used for namespaces. These include:
-
checkIteratorConflicts() -
getIteratorSetting() -
listIterators() -
removeIterator()
See “Iterators” for details on using these methods.
Configuring Constraints
Constraints can be applied to namespaces in order to control the mutations allowed to be written to any tables within the namespace. Like the methods for configuring iterators, these methods are identical to their table-specific counterparts and include:
-
addConstraint() -
listConstraints() -
removeConstraint()
See “Constraints” for details on using these methods.
Testing Class Loading for a Namespace
The testClassLoad() method can be used to check whether a class can be loaded for a particular namespace.
This is similar to the table-specific method, described in “Additional Administrative Methods”.
Instance Operations
An Accumulo instance consists of all the processes that are participating in the same cluster.
It is possible to set instance-wide properties, and obtain information about the instance, via the InstanceOperations object:
InstanceOperationsinstOps=conn.instanceOperations();
Setting Properties
Properties can be set on an instance-wide basis. Setting a property will override the setting in accumulo-site.xml; or if a property doesn’t appear in the accumulo-site.xml file, it will override the default.
Any type of property can be set here, whether it applies to the instance, to a namespace, or to an individual table:
instOps.setProperty("property","value");instOps.removeProperty("property");
Configuration
To retrieve a list of property settings as they appear in the accumulo-site.xml file, use the getSiteConfiguration() method:
Map<String,String>siteConfig=instOps.getSiteConfiguration();for(Map.Entry<String,String>setting:siteConfig.entrySet()){System.out.println(setting.getKey()+"\t"+setting.getValue());}
To retrieve a list of properties as they are currently configured in ZooKeeper, use getSystemConfiguration().
Properties set via the shell or programmatically will be reflected here, in addition to any set in accumulo-site.xml, as well as the defaults:
Map<String,String>sysConfig=instOps.getSystemConfiguration();for(Map.Entry<String,String>setting:sysConfig.entrySet()){System.out.println(setting.getKey()+"\t"+setting.getValue());}
Cluster Information
The InstanceOperations object can be used to obtain current information about the instance.
To obtain a list of currently active tablet servers, use the getTabletServers() method:
List<String>servers=instOps.getTabletServers();
To get a list of active scans for a particular tablet server, specify the tablet server in the form IP address : port:
List<ActiveScan>scans=instOps.getActiveScans(tserver);for(ActiveScans:scans){System.out.println("age:\t"+s.getAge()+"\n"+"auths:\t"+s.getAuthorizations()+"\n"+"client:\t"+s.getClient()+"\n"+"columns:\t"+s.getColumns()+"\n"+"extent:\t"+s.getExtent()+"\n"+"idle:\t"+s.getIdleTime()+"\n"+"last contact:\t"+s.getLastContactTime()+"\n"+"scan id:\t"+s.getScanid()+"\n"+"server side iterator list:\t"+s.getSsiList()+"\n"+"server side iterator options:\t"+s.getSsio()+"\n"+"state:\t"+s.getState()+"\n"+"table:\t"+s.getTable()+"\n"+"type:\t"+s.getType()+"\n"+"user:\t"+s.getUser()+"\n");}
An ActiveScan object will contain several pieces of information:
age-
The time in seconds since the scan began on this server
auths-
A list of authorizations to apply to this scan
client-
The IP address and port number of the client process
columns-
A list of columns fetched as part of the scan, or blank for all
extent-
The tablet being scanned
idle-
The amount of time in seconds since the scan has returned any data
last contact-
The amount of time in seconds since the client last contacted the server
scan id-
An identifier for the scan
server side iterator list-
A list of iterators applied on the server side
server side iterator options-
Any options applied to server-side iterators
state-
One of:
-
RUNNINGwhen the scan is being performed -
IDLEwhen waiting for the client to request more data -
QUEUEDwhen waiting for system resources to become available to start the scan
-
table-
The name of the table being scanned
type-
One of:
-
SINGLEfor a regularScanner -
BATCHfor aBatchScanner
-
user-
The name of the user performing the scan
Here is a sample of the information returned:
age: 3507
auths:
client:  192.168.10.70:56689
columns: []
extent:  f<<
idle:  27
last contact:  27
scan id: 0
server side iterator list: []
server side iterator options:  {}
state: RUNNING
table: table8
type:  SINGLE
user:  root
age: 1941
auths:
client:  192.168.10.70:56619
columns: []
extent:  6<<
idle:  27
last contact:  27
scan id: 0
server side iterator list: []
server side iterator options:  {}
state: QUEUED
table: table9
type:  SINGLE
user:  root
age: 135
auths:
client:  192.168.10.70:56716
columns: []
extent:  7<<
idle:  1
last contact:  1
scan id: 0
server side iterator list: []
server side iterator options:  {}
state: IDLE
table: table1
type:  SINGLE
user:  root
To list active compactions scheduled or running on a tablet server, specify the server using a string consisting of IP address : port:
List<ActiveCompaction>compactions=instOps.getActiveCompactions(tserver);for(ActiveCompactionc:compactions){System.out.println("age:\t"+c.getAge()+"\n"+"entries read:\t"+c.getEntriesRead()+"\n"+"entries written:\t"+c.getEntriesWritten()+"\n"+"extent:\t"+c.getExtent()+"\n"+"input files:\t"+c.getInputFiles()+"\n"+"iterators:\t"+c.getIterators()+"\n"+"locality group:\t"+c.getLocalityGroup()+"\n"+"output file:\t"+c.getOutputFile()+"\n"+"reason:\t"+c.getReason().+"\n"+"table:\t"+c.getTable()+"\n"+"type:\t"+c.getType().+"\n");}
The ActiveCompaction object will consist of the following information:
age-
The length of time in seconds that the compaction has been running or scheduled
entries read-
The number of entries read from input files or from memory
entries written-
The number of entries written to the output file
extent-
An identifier for the tablet being compacted
input files-
A list of input files
iterators-
A list of iterators applied to the compaction
locality group-
Any locality groups involved
output file-
The path of the output file
- reason
-
The originator of the compaction. Either:
-
CHOPwhen part of a merge operation -
CLOSEas is done before unloading a tablet -
IDLEwhen a compaction is triggered by the settingtablet.compaction.idle -
SYSTEMwhen automatically triggered by the tablet server’s internal resource manager due to data in memory, or number of files -
USERwhen requested by the user
-
- table
-
The name of the table
- type
-
One of:
-
FULLresulting in one file for the tablet -
MAJORcombining several files into one -
MERGEcombining in-memory data with the tablet’s smallest file -
MINORflushing in-memory data to a new file
-
An example of some active compactions from the test program com.accumulobook.tableapi.InstanceOpsExample.java are as follows:
==== tserver.local:56481 ====
age: 914
entries read:  43008
entries written: 43008
extent:  j<<
input files: []
iterators: []
locality group:
output file: file:/var/folders/ks/ltzkjxtn5t9cb302mrgzxldm0000gn/T/
    1409356659029-0/accumulo/tables/j/default_tablet/F000002a.rf_tmp
reason:  SYSTEM
table: table15
type:  MINOR
age: 4519
entries read:  186368
entries written: 93184
extent:  6<<
input files: [file:/var/folders/ks/ltzkjxtn5t9cb302mrgzxldm0000gn/T/
    1409356659029-0/accumulo/tables/6/default_tablet/F000001l.rf, file:/var/
    folders/ks/ltzkjxtn5t9cb302mrgzxldm0000gn/T/1409356659029-0/accumulo/tables/
    6/default_tablet/F000001x.rf, file:/var/folders/ks/
    ltzkjxtn5t9cb302mrgzxldm0000gn/T/1409356659029-0/accumulo/tables/6/
    default_tablet/A000000f.rf, file:/var/folders/ks/
    ltzkjxtn5t9cb302mrgzxldm0000gn/T/1409356659029-0/accumulo/tables/6/
    default_tablet/F000001v.rf]
iterators: []
locality group:
output file: file:/var/folders/ks/ltzkjxtn5t9cb302mrgzxldm0000gn/T/
    1409356659029-0/accumulo/tables/6/default_tablet/A0000021.rf_tmp
reason:  USER
table: table9
type:  FULL
To check whether a tablet server is reachable, use the ping() method:
StringipAddress="10.0.0.1";Stringport="9997";try{instOps.ping(ipAddress+":"+port)}catch(AccumuloExceptionae){System.out.println("server "+ipAddress+":"+port+" unreachable.");}
You can also test whether a class is loadable from the instance-wide classpath by calling the testClassLoad() method:
StringclassName="org.my.ClassName";StringasTypeName="org.my.Interface";booleanloadable=instOps.testClassLoad(className,asTypeName);
Precedence of Properties
Properties that are applied more specifically take precedence over those applied more generally. For example, an instance-wide property can be overridden by a namespace-specific property, which itself can be overridden by a table-specific property (Figure 4-3).
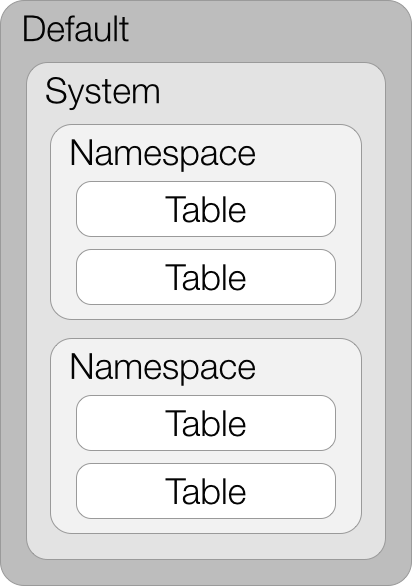
Figure 4-3. Precedence of properties
For example, we might choose to change a property across all tables from the default to a specific setting we choose. First, we’ll look at the default setting:
user@accumulo> config -f table.file.replication
-----------+----------------------------------------------------------+---------
SCOPE      | NAME                                                     | VALUE
-----------+----------------------------------------------------------+---------
default    | table.file.replication ................................. | 0
-----------+----------------------------------------------------------+---------
The value, 0, means to use whatever the default replication setting is in HDFS.
We can change the table file replication property for all tables in all namespaces by not specifying a namespace or table when we apply the property change:
user@accumulo> config -s table.file.replication=1
user@accumulo> config -f table.file.replication
-----------+----------------------------------------------------------+---------
SCOPE      | NAME                                                     | VALUE
-----------+----------------------------------------------------------+---------
default    | table.file.replication ................................. | 0
system     |    @override ........................................... | 1
-----------+----------------------------------------------------------+---------
If we now look at this property for a particular namespace or table, we see that it inherits the system-wide setting:
user@accumulo> config -f table.file.replication -t ns.test
-----------+----------------------------------------------------------+---------
SCOPE      | NAME                                                     | VALUE
-----------+----------------------------------------------------------+---------
default    | table.file.replication ................................. | 0
system     |    @override ........................................... | 1
-----------+----------------------------------------------------------+---------
user@accumulo> config -f table.file.replication -ns ns
-----------+----------------------------------------------------------+---------
SCOPE      | NAME                                                     | VALUE
-----------+----------------------------------------------------------+---------
default    | table.file.replication ................................. | 0
system     |    @override ........................................... | 1
-----------+----------------------------------------------------------+---------
We can override the system-wide property by setting the property for a namespace:
user@accumulo> config -ns ns -s table.file.replication=2
user@accumulo> config -f table.file.replication -t ns.test
-----------+----------------------------------------------------------+---------
SCOPE      | NAME                                                     | VALUE
-----------+----------------------------------------------------------+---------
default    | table.file.replication ................................. | 0
system     |    @override ........................................... | 2
-----------+----------------------------------------------------------+---------
user@accumulo> config -f table.file.replication -ns ns
-----------+----------------------------------------------------------+---------
SCOPE      | NAME                                                     | VALUE
-----------+----------------------------------------------------------+---------
default    | table.file.replication ................................. | 0
system     |    @override ........................................... | 2
-----------+----------------------------------------------------------+---------
The system-wide property is still in effect for tables outside the ns namespace:
user@accumulo> config -f table.file.replication
-----------+----------------------------------------------------------+---------
SCOPE      | NAME                                                     | VALUE
-----------+----------------------------------------------------------+---------
default    | table.file.replication ................................. | 0
system     |    @override ........................................... | 1
-----------+----------------------------------------------------------+---------
Finally, if we set a property for a particular table, it will override the namespace setting:
user@accumulo> config -t ns.test -s table.file.replication=3
user@accumulo> config -f table.file.replication -t ns.test
-----------+----------------------------------------------------------+---------
SCOPE      | NAME                                                     | VALUE
-----------+----------------------------------------------------------+---------
default    | table.file.replication ................................. | 0
system     |    @override ........................................... | 3
-----------+----------------------------------------------------------+---------
user@accumulo> config -f table.file.replication -ns ns
-----------+----------------------------------------------------------+---------
SCOPE      | NAME                                                     | VALUE
-----------+----------------------------------------------------------+---------
default    | table.file.replication ................................. | 0
system     |    @override ........................................... | 2
-----------+----------------------------------------------------------+---------
user@accumulo> config -f table.file.replication
-----------+----------------------------------------------------------+---------
SCOPE      | NAME                                                     | VALUE
-----------+----------------------------------------------------------+---------
default    | table.file.replication ................................. | 0
system     |    @override ........................................... | 1
-----------+----------------------------------------------------------+---------
Get Accumulo now with the O’Reilly learning platform.
O’Reilly members experience books, live events, courses curated by job role, and more from O’Reilly and nearly 200 top publishers.

