You need to allow users to choose filenames for opening and saving files. You know that Windows supports a common way to get these names. How can you use this mechanism from within Access?
Not only can you use the common File Open/Save dialogs, but you even have four ways to do it:
If you don’t have the ODE, the first suggestion won’t help. The wizard interface for using these dialogs is a bit simpler than doing the work from scratch, but it’s also quite limiting (you get only a few options), and it isn’t available in runtime versions of Access 2000. The new FileDialog object in Access 2002 is available in the runtime environment, but it also limits your options. Therefore, this solution shows how to call the Windows API directly and lists all the options you have when using these common dialogs.
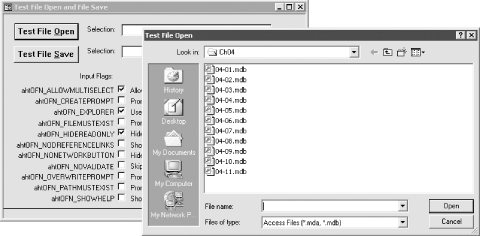
Open and run the form frmTestOpenSave from
04-08.MDB. This sample form allows you to set
various flags (described later in this solution) and to see the
results. You can try both the File Save and File Open common dialogs.
Try changing some of the settings and see what happens. Figure 4-16 shows the File Open dialog—with the Read
Only checkbox hidden and allowing for multiple
selections—displayed in explorer mode (as opposed to the older
Program Manager look, which is what Windows will use if you specify
the multiselect option by itself ).
To use this functionality within your own applications, follow these steps:
Import the module basCommonFile from
04-08.MDBinto your own application. This module provides the type and API function declarations you’ll need and the wrapper functions that make it easy for you to use the common dialogs.To use the File Open or File Save dialogs, call the acbCommonFileOpenSave function, passing to it information indicating what you want it to do. Table 4-2 lists the options available when you call the function. None of the parameters is required; the table lists the default values the function will use if you leave off each of the parameters. As a simple example, the following function call will ask for the name of the file to which you’d like to save, suggesting
FOO.TXTand returning the full path of the file you choose:varFileName = acbCommonFileOpenSave(FileName:="FOO.TXT", OpenFile:=False)
Table 4-2. Parameters for the acbCommonFileOpenSave function (all optional)
Parameter name
Description
Default value
FlagsA combination of zero or more flags from Table 4-1 that control the operation of the dialog. Combine them using the
ORoperator.0
InitialDirThe initial directory that the dialog should use.
“”
FilterA string listing the available file filters. Use acbAddFilter, as shown in the examples, to build this parameter. The format of this item is important, so make sure to use the function rather than just setting the value by hand.
“”
FilterIndexThe number of the filter item to use when the dialog first opens. The first filter is numbered 1.
1
DefaultExtA default file extension to be appended to the filename if the user doesn’t supply one. Don’t include a period.
“”
FileNameThe filename to use when the dialog is first displayed.
“”
DialogTitleThe title for the dialog. Usually, you won’t specify this parameter.
Open/Save As
hWndThe window handle for the parent window of the dialog. This value controls where the dialog will be placed.
Application.hWndAccessApp
OpenFileWhether it’s the Open or Save dialog. (True = Open, False = Save).
True
Tip
Because the acbCommonFileOpenSave function accepts so many optional parameters, and you’ll generally want to set only a few of them, you may find VBA’s support for named parameters useful. That is, rather than depending on the exact order of the parameters you send to acbCommonFileOpenSave, use the name of the parameter, a
:=, and then the value, as we’ve done in this example. This will make your code easier to read and far less error-prone.If you also want to specify filter choices that show up in the “Files of type:” combo box on the dialog, call the acbAddFilterItem function. This function accepts three parameters: the string of filters to which you want to add items; the description for your filter (“Databases (*.mdb, *.mda)”, for example); and the actual filter file specifications, delimited with a semicolon (“*.mda;*.mda”, to match the previous example). The function returns the new filter string. You can call acbAddFilterItem as many times as you need to build up your list of filters. For example, the following example (similar to the example in basCommonFile) sets up four filter expressions. You can call TestIt from the debug window in Access to test the filters:
Function TestIt(  )
    Dim strFilter As String

    strFilter = acbAddFilterItem(strFilter, "Access Files (*.mda, *.mdb)", _
     "*.MDA;*.MDB")
    strFilter = acbAddFilterItem(strFilter, "dBASE Files (*.dbf)", "*.DBF")
    strFilter = acbAddFilterItem(strFilter, "Text Files (*.txt)", "*.TXT")
    strFilter = acbAddFilterItem(strFilter, "All Files (*.*)", "*.*")

    MsgBox "You selected: " & acbCommonFileOpenSave(InitialDir:="C:\", _
     Filter:=strFilter, FilterIndex:=3, DialogTitle:="Hello! Open Me!")
End Function
You may want to specify some of the available options for controlling the common dialogs, as shown in frmTestOpenSave. You can specify any of the options shown there, and more, when you call the function. To specify your selected options, choose values from the items in Table 4-2, combine them together with the
ORoperator, and send this value to the acbCommonFileOpenSave function as theFlagsargument. For example, the following statement will build up aFlagsvalue that tells Windows to hide the Read Only checkbox and the Network button, and that the output path must already exist:lngFlags = acbOFN_HIDEREADONLY Or acbOFN_NONETWORKBUTTON Or _ acbOFN_PATHMUSTEXIST
When you call acbCommonFileOpenSave, you’re actually calling the GetOpenFileName or GetSaveFileName Windows API functions. The acbCommonFileOpenSave function takes only the parameters you send it, replacing missing ones with the default values shown in Table 4-2, and fills in a user-defined data structure that both API functions expect to receive. The API functions actually do the work, and acbCommonFileOpenSave returns to you the chosen filename. Although you may find it interesting to dig into the details of calling the API functions directly, that’s beyond the scope of this solution. The wrapper function, acbCommonFileOpenSave, handles a large majority of the cases in which you’ll need to use common File Open/Save dialogs.
Table 4-3
lists all the values you can use in the
Flags parameter of the call to
acbCommonFileOpenSave. You can skip the
parameter altogether, or you can use one or more of these values,
combined with the OR operator. For example, to
hide the Read Only checkbox and allow multiple files to be selected,
use this code:
lngFlags = acbOFN_HIDEREADONLY Or acbOFN_ALLOWMULTISELECT
Table 4-3. Values that can be combined in acbCommonFileOpenSave’s Flags parameter
|
Constant name |
On input |
On output |
|---|---|---|
|
|
Allows you to select more than one filename (File Open only). |
The strFile member will contain the chosen path, followed by all the
files within that path that were chosen, separated with spaces, as in
|
|
|
Prompts you if the selected file doesn’t exist, allowing you to go on or make a different choice. | |
|
|
Creates an Open or Save As dialog that uses user-interface features similar to the Windows Explorer. | |
|
|
Set if the chosen filename has a different extension than that
supplied in the | |
|
|
Forces you to supply only existing filenames. | |
|
|
Hides the Read Only checkbox. | |
|
|
Causes the Open or Save As dialog to display long filenames. If this
flag is not specified, the dialog displays filenames in 8.3 format.
This value is ignored if | |
|
|
Restores the current directory to its original value if the user changed the directory while searching for files. | |
|
|
Returns the path and filename of the selected shortcut
( | |
|
|
Specifies that long filenames are not displayed in the File Name list
box. This value is ignored if | |
|
|
Hides the Network button. | |
|
|
Specifies that the returned file does not have the Read Only checkbox checked and is not in a write-protected directory. | |
|
|
Normally, | |
|
|
Disables filename validation. Normally, Windows checks the chosen filename to make sure it’s a valid name. | |
|
|
Issues a warning if you select an existing file for a File Save As operation. | |
|
|
Forces you to supply only valid pathnames. | |
|
|
Forces the Read Only checkbox to be checked. |
Set if the user checked the Read Only checkbox. |
|
|
Ignores sharing violations. Because Access code cannot handle the errors that occur when sharing violations occur in this code, you should not set this flag. | |
|
|
Shows a Help button on the dialog. Though this option works, the button will not, so its use in Access is limited. |
Not all of the flags make sense for both File Open and File Save
operations, of course. Your best bet is to experiment with the flags,
either in your own code or using the sample form frmTestOpenSave from
04-08.MDB.
Some of the flags are useful only on
return from the function call. For example, if you select the Read
Only checkbox on the common dialog, Windows passes that fact back to
you in the Flags parameter. To retrieve
that information from your call to
acbCommonFileOpenSave, pass the
Flags argument in a variable, not directly
as a literal value. Because
acbCommonFileOpenSave accepts the
Flags argument by reference, it can return
the value to your calling procedure after you’ve selected a
filename. To check if a particular flag value was set during the call
to acbCommonFileOpenSave, use the
AND operator with the return value, as in this
example fragment (see Section 11.1.2
for more information on using the
AND and OR operators):
Dim lngFlags As Long
Dim varFileName As Variant

lngFlags = 0
varFileName = antCommonFileOpenSave(Flags:=lngFlags)
If lngFlags AND acbOFN_READONLY <> 0 Then
   ' The user checked the Read Only checkbox.
End if
If
you pass a variable to acbCommonFileOpenSave
containing the Flags information (rather
than not sending the parameter, or sending a literal value), the
function will return to the caller information about what happened
while the dialog was in use. Several of the flags listed in Table 4-3 provide information on output. That is, you
can check the state of the Flags variable,
and if it contains the flags from Table 4-3, you
know that the tested condition was true. For example, to open a file
and then check to see if the selected file is to be opened read-only,
you could use code like this:
Dim lngFlags As Long
Dim varRetval As Variant

varRetval = acbCommonFileOpenSave(Flags:=lngFlags)
If Not IsNull(varRetval) Then
   If lngFlags AND acbOFN_READONLY Then
      MsgBox "You opened the file read-only!"
   End If
End If
As you can see in this example, you can use the
AND operator to see if
Flags contains the specific flag in which
you’re interested.
The file filter (the
Filter parameter to
acbCommonFileOpenSave) has a unique format: it
consists of pairs of strings. Each item is terminated with
vbNullChar (Chr$(0)). The first
item in the pair supplies the text portion, which appears in the
combo box in the lower-left corner of the dialog. The second item
supplies the file specifications that Windows uses to filter the list
of files. Though it doesn’t matter what you use in the first
item, by convention, most applications use something like this:
Oogly Files (*.oog)
listing the file description. The conventional file specification looks something like this:
*.oog
To simplify building these filter strings, use the acbAddFilter function from basCommonFile. See Step 3 for an example.
Take the time to study all the parameters in Table 4-2 and all the options in Table 4-3. There’s not room here to go into detail for each one, so your best bet is to try out all of them. You can play with frmTestOpenSave to test the effects of some of the flag values. See what happens when you place a value into one of them, and then experiment from there.
Although you have no direct control over
the placement of the common dialogs when they pop up, the choice of
the parent window can affect the location. If you pass 0,
Application.hWndAccessApp, or a normal form’s hWnd property for
the hWnd argument to
acbCommonFileOpenSave (or just don’t send
a value, so it uses the default value), the dialog will appear in the
upper-left corner of the Access MDI client window. If, on the other
hand, you pass it the hWnd property of a pop-up form, Windows will
place the dialog in the upper-left corner of that pop-up form
even if the form is not visible. Therefore, for
complete control over the placement of the dialog, create a form, set
its PopUp property to True, and use that form to
place the dialog.
Finally, remember that these dialogs don’t actually do anything—they just supply you with the names of files. It’s up to your application code to open or save the requested files.
Get Access Cookbook now with the O’Reilly learning platform.
O’Reilly members experience books, live events, courses curated by job role, and more from O’Reilly and nearly 200 top publishers.

