Input masks are a great tool, but they apply to only a few specific types of informationâusually fixed-length text that has a single, unchanging pattern. To create a truly bulletproof table, you need to use more sophisticated restrictions, like making sure a number falls in a certain range, checking that a date hasnât yet occurred, or verifying that a text value starts with a certain letter. Validation rules can help you create all these restrictions by drawing on the full power of the SQL language.
Note
Youâll get a more thorough introduction to SQL starting in Chapter 6. Fortunately, you need only a dash of SQL to write a validation rule. The key ingredient is a validation expression, and youâll see several practical examples of expressions that you can drop straight into your tables.
A validation ruleâs premise is simple. You set up a restriction that tells Access which values to allow in a field and which ones are no good. Whenever someone adds a new record or edits a record, Access makes sure the data lives up to your validation rules. If it doesnât, then Access presents an error message and forces you to edit the offending data and try again.
Each field can have a single validation rule. The following steps show you how to set one up. Youâll start out easy, with a validation rule that prevents a numeric field from accepting 0 or any negative number (and in the following sections youâll hone your rule-writing abilities so you can tackle other data types).
Hereâs how to add your validation rule:
In Design view, select the field to which you want to apply the rule.
All data typesâexcept Memo, AutoNumber, and OLE Objectâsupport validation. The validation rule in this example works with any numeric data type (like Number or Currency).
In the Validation Rule field property, type a validation expression (Figure 4-14).
An expression is a bit of SQL that performs a check on the data youâve entered. Access performs its validation check when you finish entering a piece of data, and try to navigate to another field or another record. For example, >0 is a validation rule that forces the value in a number field to be larger than 0. Youâll learn more validation rules in the following sections.
Type some error-message text in the Validation Text field property.
If you enter a value that fails the validation check, then Access rejects the value and displays this error text in a dialog box. If you donât supply any text, then Access shows the validation rule for the field (whatever you entered in step 2), which is more than a little confusing for most mere mortals.
Right-click the tab title, and then choose Datasheet View.
If your table has existing records, Access gives you the option of checking them to make sure they meet the requirements of your validation rule. You decide whether you want to perform this check, or skip it altogether.
Once youâre in Datasheet view, youâre ready to try out your validation rule (Figure 4-15).
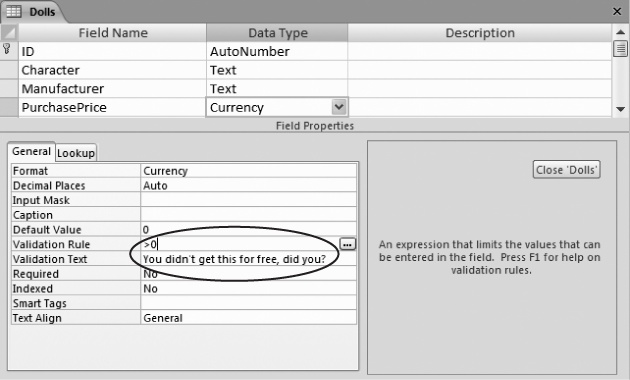
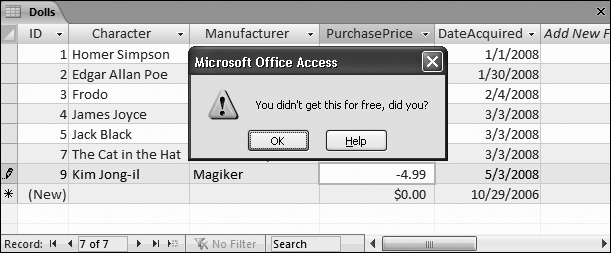
Figure 4-15. Here, a validation rule of >0 prevents negative numbers in the Price field. When you enter a negative number, Access pops up a message box with the validation text you defined, as shown here. Once you click OK, you return to your field, which remains in edit mode. You can change the value to a positive number, or press Esc to cancel the record edit or insertion.
As you can see, itâs easy enough to apply a validation rule to a field. But creating the right validation rule takes more thought. To get the result you want, you need to take your first step into the sometimes quirky world of SQL.
Although validation is limited only by your imagination, Access pros turn to a few basic patterns again and again. The following sections give you some quick and easy starting points for validating different data types.
Note
Access uses your validation rule only if a field contains some content. If you leave it blank, then Access accepts it without any checks. If this isnât the behavior you want, then just set the Required property to Yes to make the field mandatory, as described on Data Integrity Basics.
For numbers, the most common technique is to check that the value falls in a certain range. In other words, you want to check that a number is less than or greater than another value. Your tools are the comparison signs < and >. Table 4-3 shows some common examples.
Table 4-3. Expressions for Numbers
Comparison | Sample Expression | Description |
|---|---|---|
Less than | <100 | The value must be less than 100. |
Greater than | >0 | The value must be greater than 0. |
Not equal to | <>42 | |
Less than or equal to | <=100 | The value must be less than or equal to 100. |
Greater than or equal to | >=0 | The value must be greater than or equal to 0. |
Equal to | =42 | The value must be 42. (Not much point in asking anyone to type it in, is there?) |
Between | Between 0 and 100 | The value must be 0, 100, or somewhere in between. |
As with numbers, date validation usually involves checking to see if the value falls within a specified range. Here, your challenge is making sure that your date is in the right format for an expression. If you use the validation rule >Jan 30, 2010, Access is utterly confused, because it doesnât realize that the text (Jan 30, 2010) is supposed to represent a date. Similarly, if you try >1/30/2010, then Access assumes the numbers on the right are part of a division calculation.
To solve this problem, use Access universal date syntax, which looks like this:
#1/30/2010#
A universal date always has the date components in the order month/day/year, and itâs always bracketed by the # symbol on either side. Using this syntax, you can craft a condition like >#1/30/2010#, which states that a given date must be larger than (fall after) the date January 30, 2010. January 31, 2010, fits the bill, but a date in 2009 is out.
The universal date syntax can also include a time component, like this:
#1/30/2010 5:30PM#
Note
When comparing two dates, Access takes the time information into consideration. The date #1/30/2010# doesnât include any time information, so itâs treated as though it occurs on the very first second of the day. As a result, Access considers the date value #1/30/2010 8:00 AM# larger, because it occurs 8 hours later.
Once youâve learned the universal date syntax, you can use any of the comparison operators you used with numbers. You can also use these handy functions to get information about the current date and time:
Note
A function is a built-in code routine that performs some task, like fetching the current date from the computer clock. Youâll learn about many more date functions, which let you perform advanced tasks like finding the day of the week for a date, on Date Functions.
Table 4-4 has some examples.
Table 4-4. Expressions for Dates
With text, validation lets you verify that a value starts with, ends with, or contains specific characters. You perform all these tasks with the Like operator, which compares text to a pattern.
This condition forces a field to start with the letter R:
Like "R*"
The asterisk (*) represents zero or more characters. Thus, the complete expression asks Access to check that the value starts with R (or r), followed by a series of zero or more characters.
You can use a similar expression to make sure a piece of text ends with specific characters:
Like "*ed"
This expression allows the values talked, walked, and 34z%($)#ed, but not talking, walkable, or 34z%($)#.
For a slightly less common trick, you can use more than one asterisk. The following expression requires that the letters a and b appear (in that order but not necessarily next to each other) somewhere in a text field:
Like "*a*b*"
Or consider this example, that tests for an email address by allowing any amount of text, followed by an @ sign, followed by more text, followed by a period, and then followed by the last bit of text:
Like "*@*.*"
Along with the asterisk, the Like operator also supports a few more characters. You can use ? to match a single character, which is handy if you know how long text should be or where a certain letter should appear. Hereâs the validation rule for an eight-character product code that ends in 0ZB:
Like "?????0ZB"
The # character plays a similar role, but it represents a number. Thus, the following validation rule defines a product code that ends in 0ZB and is preceded by five numbers:
Like "#####0ZB"
You can combine the ? or # with * to allow a variable amount of text, but require a certain number of characters. For example, the expression ?* tells Access to accept one character, followed by zero or more additional characters.
Using this technique, you can build a slightly smarter email expression that requires a minimum of four characters arranged around the special character @ and the period. (So a bogus value like @. is no longer allowed, but a@b.cd is good.) Hereâs what the expression looks like:
Like "*?@*?.*??"
And finally, you can restrict any character to certain letters or symbols. The trick is to put the allowed characters inside square brackets.
Suppose your company uses an eight-character product code that always begins with A or E. Hereâs the validation rule you need:
Like "[AE]???????"
Note that the [AE] part represents one character, which can be either A or E. If you wanted to allow A, B, C, D, youâd write [ABCD] instead, or youâd use the handy shortcut [A-D], which means âallow any character from A to D, including A and D.â
Hereâs one more validation expression, which allows a seven-letter word and doesnât allow numbers or symbols. It works by repeating the [A-Z] code (which allows any letter) seven times.
Like "[A-Z][A-Z][A-Z][A-Z][A-Z][A-Z][A-Z]"
As you can see, text validation expressions arenât always pretty. Not only can they grow to ridiculous sizes, but there are lots of restrictions they canât apply. You canât, for instance, let the length of the text vary between a minimum and maximum that you set. And you canât distinguish between capitalized and lowercase letters.
Tip
You can get around many of these limitations by using some of the functions that Access provides. On Text Functions, youâll learn how to use functions that can snip out bits of text, test lengths, check capitalization, and more.
No matter what the data type, you can also combine your conditions in two different ways. Using the And keyword, you can create a validation rule that enforces two requirements. This trick is handy, because each field can have at most a single validation rule.
To use the And keyword, just write two validation rules, and put the word âAndâ in between. It doesnât matter which validation rule is first. Hereâs a validation rule that forces a date to be before today but later than January 1, 2000:
<Date() And >#1/1/2000#
You can also use the Or keyword to accept a value if it meets either one of two conditions. Hereâs a validation rule that allows numbers greater than 1000 or less than â1000:
>1000 Or <-1000
Field validation rules always apply to a single field. However, database designers often need a way to compare the values in different fields. Suppose you have an Orders table that logs purchases from your monogrammed sock store. In your Orders table, you use two date fields: DateOrdered and DateShipped. To keep everything kosher, you need a validation rule that makes sure DateOrdered falls before DateShipped. After all, how can you ship a product before someone orders it?
Because this validation rule involves two fields, the only way to put it in place is to create a validation rule for the whole table. Table validation rules can use all the SQL tricks youâve learned about so far, and they can pull the values out of any field in the current record.
Hereâs how to create a table validation rule:
Switch to Design view, if youâre not there already. If the Property Sheet isnât visible, choose Table Tools | DesignâShow/HideâProperty Sheet.
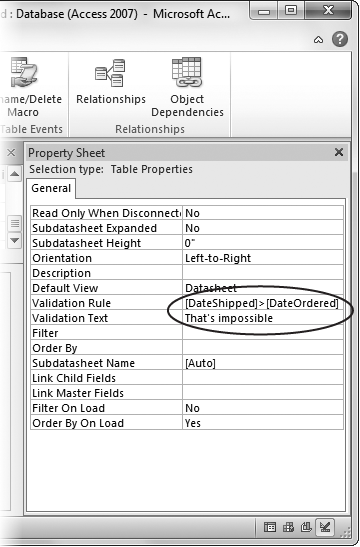
A box with extra settings appears on the right side of the window (Figure 4-16).
In the Property Sheet tab, set the Validation Rule.
A table validation rule can use all the same keywords you learned about earlier. However, table validation rules usually compare two or more fields. The validation rule [DateOrdered] < [DateShipped] ensures that the value for the Date-Ordered field is older than that used for DateShipped.
When referring to a field in a table validation rule, you need to wrap square brackets around your field names. That way, Access can tell the difference between fields and functions (like the Date() function you learned about on Setting Default Values).
Set the Validation Text.
This message is the error message thatâs shown if the validation fails. It works the same as the validation text for a field rule.
When you insert a new record, Access checks the field validation rules first. If your data passes the test (and has the right data types), then Access checks the table validation rule.
Get Access 2010: The Missing Manual now with the O’Reilly learning platform.
O’Reilly members experience books, live events, courses curated by job role, and more from O’Reilly and nearly 200 top publishers.

