Unlike other programs, Access doesnât require that you save your data. It automatically saves any edits you make to the records in a table. This automatic-saving process takes place every time you change a record, and it happens almost instantaneously. It also takes place behind the scenes, and you probably wonât notice anything. But donât be alarmed when you exit Access and it doesnât prompt you to save changes, as any change to your data is saved the moment you make it.
Note
The rules are a bit different for database objects (Understanding Access Databases). When you add or edit a database object, Access waits until you finish and close the object, at which point it prompts you to save or discard your changes. If youâre a bit paranoid and you canât stand the wait, just choose FileâSave to save the current database object immediately.
The automatic save feature can pose a problem if you make a change mistakenly. If youâre fast enough, you can use the Undo feature to reverse your last change (Figure 1-11). However, the Undo feature reverses only your most recent edit, so itâs no help if you edit a series of records and then discover the problem. It also doesnât help if you close your table and then reopen it.
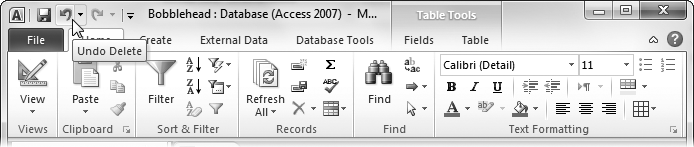
Figure 1-11. The Undo command appears in the Quick Access toolbar at the top left of the Access window, so itâs always available.
For these reasons, itâs a good idea to make frequent database backups. To make a database backup, you simply need to copy your database file to another folder, or make a copy with another name (like Bobblehead_Backup1.accdb). You can perform these tasks with Windows Explorer, but Access gives you an even easier option. First, choose FileâSave & Publish. Then, under the File Types heading, choose Save Database As. Finally, under the Save Database As heading, double-click Back Up Database. This opens to create a copy of your database, in the location you choose (Figure 1-12).
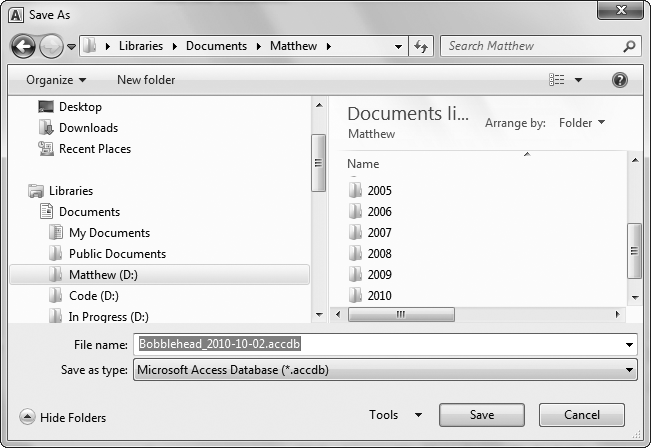
Figure 1-12. When you choose to create a backup, Access fills in a suggested file name that incorporates the current date. That way, if you have several backup files, you can pick out the one you want.
Of course, itâs still up to you to remember to copy your database backup to another location (like a network server) or to a different type of storage (like a DVD or a USB memory stick), so youâre ready when disaster hits. You can use any number of different backup tools to safeguard your computer, including the Backup and Restore Center included in Windows Vista and Windows 7.
Youâve probably already noticed the FileâSave Database As command. When you click it, you can save your database with a new name. With this command, however, youâre limited to the standard .accdb format used in Access 2010 and Access 2007, which isnât compatible with older versions of Access. If you try to open Bobblehead.accdb in Access 2003, youâll get nothing more than a blank stare and an error message.
Instead, Access 2003 uses the .mdb file format (which stands for Microsoft database). And, as you can see in Figure 1-13, the .mdb format actually comes in three versions: the really, really old original format, a retooled version that appeared with Access 2000, and the improved-yet-again version that Microsoft introduced with Access 2002 and reused for Access 2003.
To save the current database using an older Access file format, you have to use FileâSave & Publish, and then, under the File Types heading, click Save Database As. The standard .accdb format is the best choice if you donât need to worry about compatibility, because it has the best performance and a few extra features. But if you need to share databases with people running much older versions of Access, the .mdb format is your only choice.
Keep in mind that once Access creates the new database file, that file is the one it keeps using. In other words, when you create a table or edit some data, Access updates the new file. (If you want to go back to the old file, you either need to open it in Access, or need to use FileâSave Database As to save it again.)
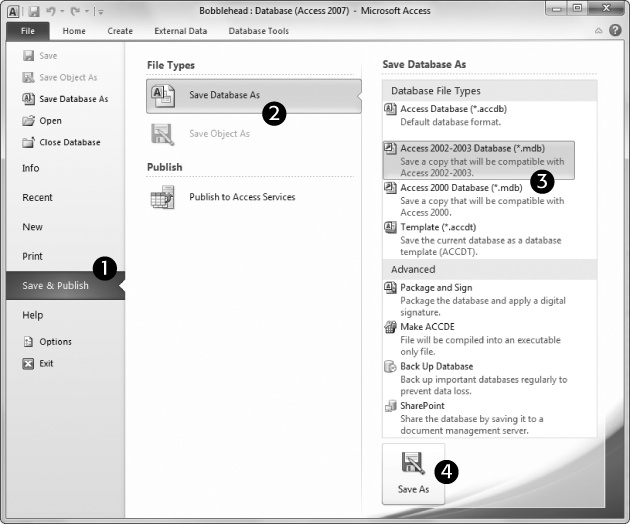
Figure 1-13. To change the format of your database, choose FileâSave & Publish (1), click Save Database As (2), and then pick the format you want from the âDatabase File Typesâ section (3). Use âAccess 2002-2003 Databaseâ or âAccess 2000 Databaseâ to save a .mdb file that works with an older version of Access.
You can also use the old-style .mdb format when you first create a database. Choose FileâNew and then click the folder icon next to the File Name box. Access opens the File New Database dialog box (which you saw back in Figure 1-2). It includes a âSave as typeâ box where you can choose the Access 2002-2003 file format or the even older Access 2000 format. (If youâre set on going back any further, say the Access 95 format, your best bet is a time machine.)
When you add information to a database, Access doesnât always pack the data as compactly as possible. Instead, Access is more concerned with getting information in and out of the database as quickly as it can.
After youâve been working with a database for a while, you might notice that its size bloats up like a week-old fish in the sun. If you want to trim your database back to size, you can use a feature called compacting. To do so, just choose FileâInfo and click the big Compact & Repair Database button. Access then closes your database, compacts it, and opens it again. If itâs a small database, these three steps unfold in seconds. The amount of space you reclaim varies widely, but itâs not uncommon to have a 10 MB database shrink down to a quarter of its size.
Note
If you compact a brand-new database, Access shows a harmless security warning when the database is reopened. Youâll learn about this message, and how to avoid it, in the next section.
The only problem with the database-compacting feature is that you need to remember to use it. If you want to keep your databases as small as possible at all times, you can switch on a setting that tells Access to compact the current database every time you close it. Hereâs how:
Choose FileâOptions to get to the Access Options window.
In the list on the left, choose Current Database.
Under the Application Options heading, turn on the âCompact on Closeâ checkbox.
Click OK to save your changes.
Access tells you that this change has no effect until you close and reopen your database.
You can set the âCompact on Closeâ setting on as few or as many databases as you want. Just remember, itâs not switched on when you first create a new database.
Get Access 2010: The Missing Manual now with the O’Reilly learning platform.
O’Reilly members experience books, live events, courses curated by job role, and more from O’Reilly and nearly 200 top publishers.

