Despite the many improvements in software over the years, one feature hasn't improved a bit: Microsoft's documentation. In fact, with Office 2007, you get no printed user guide at all. To learn about the thousands of features included in this software collection, Microsoft expects you to read the online help.
Occasionally, these help screens are actually helpful, like when you're looking for a quick description explaining a mysterious new function. On the other hand, if you're trying to learn how to, say, create an attractive chart, you'll find nothing better than terse and occasionally cryptic instructions.
This book is the manual that should have accompanied Access 2007. In these pages, you'll find step-by-step instructions and tips for using almost every Access feature, including those you haven't (yet) heard of.
Note
This book is based on Access 2007: The Missing Manual (O'Reilly). That book is a truly complete reference for Access 2007, covering every feature, including geeky stuff like XML, VBA, SQL Server, and other things you'll probably never encounterâor even want to. But if you get really deep into Access and want to learn more, Access 2007: The Missing Manual can be your trusted guide.
This book's divided into four parts:
Part One: Storing Information in Tables . In this part, you'll build your first database and learn how to add and edit tables that store information. Then you'll pick up the real-world skills you need to stop mistakes before they happen, browse around your database, and link tables together.
Part Two: Manipulating Data with Queries . In this part, you'll build queries: specialized commands that can hunt down the data you're interested in, apply changes, and summarize vast amounts of information.
Part Three: Printing Reports and Using Forms . This part shows you how to use reports to take the raw data in your tables and format it into neat printouts, complete with fancy formatting and subtotals. You'll also learn how to build formsâcustomized windows that make data entry easy, even for Access newbies.
Part Four: Sharing Access with the Rest of the World . In this part, you'll learn how to pull your data out of (or put your data into) other types of files, like text documents and Excel spreadsheets.
Throughout this book, you'll find sentences like this one: "Choose Create â Tables â Table." This method's a shorthand way of telling you how to find a feature in the Access ribbon. It translates to the following instructions: "On the ribbon, click the Create tab. On the tab, look for the Tables section. In the Tables box, click the Table button." (Look back to Figure I-2 to see the button you're looking for.)
As you saw back in Figure I-3, the ribbon adapts itself to different screen sizes. Depending on your Access window's size, the button you need to click may not include any text. Instead, it shows up as a small icon. In this situation, you can hover over the mystery button to see its name before deciding whether or not to click it.
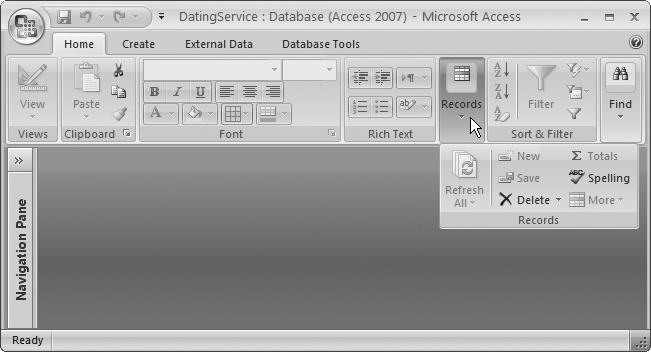
If you resize the Access window so that it's really small, you might run out of space for a section altogether. In that case, you get a single button that has the section's name. Click this button, and the missing commands appear in a drop-down panel (Figure I-9).
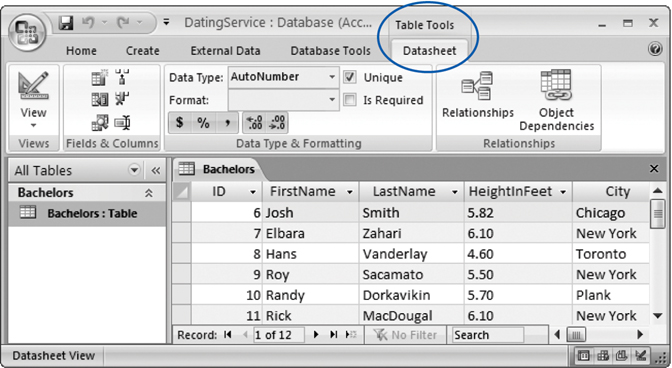
Although nice, predictable tabs are a great idea, some features obviously make sense only in specific circumstances. Say you start designing a table. You may have a few more features than when you're entering data. Access handles this situation by adding one or more contextual tabs to the ribbon, based on your current task. These tabs have additional commands that are limited to a specific scenario (Figure I-10).
When dealing with contextual tabs, the instructions in this book always include the title of the tab section (it's Table Tools in Figure I-10). Here's an example: "Choose Table Tools | Datasheet â Fields & Columns â New Fields." Notice that this instruction's first part includes the contextual tab title (Table Tools) and the tab name (Datasheet), separated by the | character.
From time to time you'll encounter buttons in the ribbon that have short menus attached to them. Depending on the button, this menu appears as soon as you click the button, or it appears only if you click the button's drop-down arrow, as shown in Figure I-11.
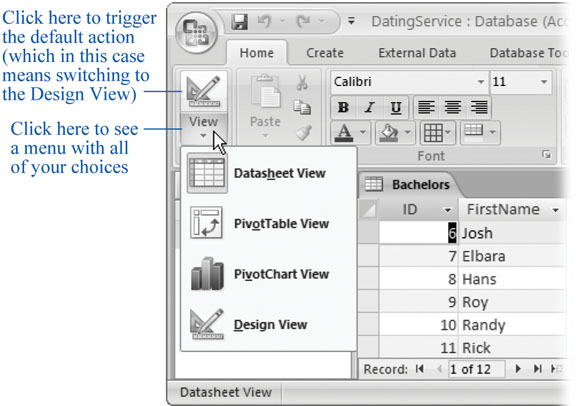
Figure I-11. Access lets you switch between several different views of your database. Click the bottom part of the View button to see the menu of choices shown here, or click the top part to switch to the next view in the list, with no questions asked.
When dealing with this sort of button, the last step of the instructions in this book tells you what to choose from the drop-down menu. For example, say you're directed to "Home â Views â View â Design View." That tells you to select the Home tab, look for the Views section, click the drop-down part of the View button (to reveal the menu with extra options), and then choose Design View from the menu.
Note
Be on the lookout for drop-down arrows in the ribbonâthey're tricky at first. You need to click the arrow part of the button to see the full list of options. If you click the other part of the button, then you don't see the list. Instead, Access fires off the standard command (the one Access thinks is the most common choice), or the command you used most recently.
Every time you take your hand off the keyboard to move the mouse, you lose a few microseconds of time. That's why many experienced computer fans use keystroke combinations instead of toolbars and menus wherever possible. Ctrl+S, for one, is a keyboard shortcut that saves your current work in Access (and most other programs).
When you see a shortcut like Ctrl+S in this book, it's telling you to hold down the Ctrl key, and, while it's down, press the letter S, and then release both keys. Similarly, the finger-tangling shortcut Ctrl+Alt+S means hold down Ctrl, then press and hold Alt, and then press S (so that all three keys are held down at once).
This book gives you three kinds of instructions that require you to use your computer's mouse or trackpad. To click means to point the arrow cursor at something on the screen and thenâwithout moving the cursor at allâpress and release the left-side clicker button on the mouse (or laptop trackpad). To double-click, of course, means to click twice in rapid succession, again without moving the cursor at all. And to drag means to move the cursor while holding down the button.
As you read this book, you'll see a number of examples that demonstrate Access features and techniques for building good databases. Many of these examples are available as Access database files in a separate download. Just surf to www.missingmanuals.com, click the link for this book, and then click the "Missing CD" link to visit a page where you can download a zip file that includes the examples, organized by chapter.
At www.missingmanuals.com, you'll find news, articles, and updates to the books in the Missing Manual and For Starters series.
But the Web site also offers corrections and updates to this book (to see them, click the book's title, and then click Errata). In fact, you're invited and encouraged to submit such corrections and updates yourself. In an effort to keep the book as up to date and accurate as possible, each time we print more copies of this book, we'll make any confirmed corrections you've suggested. We'll also note such changes on the Web site, so that you can mark important corrections into your own copy of the book, if you like.
In the meantime, we'd love to hear your own suggestions for new books in the Missing Manual and For Starters lines. There's a place for that on the Web site, too, as well as a place to sign up for free email notification of new titles in the series.
When you see a Safari® Enabled icon on the cover of your favorite technology book, that means the book is available online through the O'Reilly Network Safari Bookshelf.
Safari offers a solution that's better than e-books. It's a virtual library that lets you easily search thousands of top tech books, cut and paste code samples, download chapters, and find quick answers when you need the most accurate, current information. Try it for free at http://safari.oreilly.com.
Get Access 2007 for Starters: The Missing Manual now with the O’Reilly learning platform.
O’Reilly members experience books, live events, courses curated by job role, and more from O’Reilly and nearly 200 top publishers.

