Ever since Microsoft Office conquered the world (way back in the 1990s), programs like Word, Excel, and Access haven't changed a lot. Although a genuinely useful new feature appears once in a while, Microsoft spends more time wedging in odd gimmicks like a talking paper clip.
Access 2007 breaks this pattern and introduces some of the most dramatic changes Office fans have seen since Office 95. The most obvious change is the thoroughly revamped user interface (the windows, toolbars, menus, and keyboard shortcuts you use to interact with Access). After spending far too long trying to simplify the haphazard, toolbar-choked interfaces in most Office applications, Microsoft finally worked up the courage to redesign it all from scratch.
The Access 2007 ribbon is a super-toolbar that replaces the various toolbars and menus in previous versions.
Note
Access doesn't show the ribbon until you create a database. If you can't stand the suspense any longer, and you want to be able to look at the ribbon on your monitor as you read the next couple of pages, follow the instructions in Section 1.2.1 to create a blank database.
The ribbon's divided into task-specific tabsâHome, Create, External Data, and so on. Initially, Access starts out with four tabs (although other tabs appear when you perform specific tasks). When you launch Access, you start at the Home tab. Click Create (as shown in Figure I-2), and you get access to a slew of powerful commands that let you add new database components.
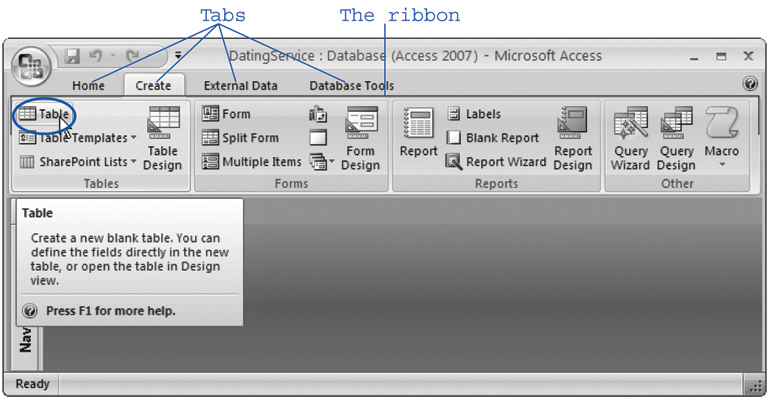
Figure I-2. The ribbon's full of craftsman-like detail. When you hover over a button, you don't see a paltry two- or three-word description in a yellow box. Instead, you see a friendly pop-up box with a complete mini-description. Here, the mouse is hovering over the Table command.
Tip
Want to reclaim the screen real estate that the ribbon occupies? Just double-click the current tab, and the ribbon collapses, leaving only the row of tab titles visible. Double-click the tab again to pop the buttons back into sight. Section 1.4.2 has more about this feature.
Here's a quick snapshot of the four basic ribbon tabs:
Homegathers together a variety of common commands, including the familiar copy-and-paste tools and formatting commands for tweaking fonts and colors. You'll also find handy features like sorting, searching, and filtering, all of which you'll tackle in Chapter 3.
Createhas commands for inserting all the different database objects you'll learn about in this book (see Section 1.1 for the lowdown). These include the tables that store data, the queries that search it, the forms that help you edit it, and the reports that help you print it.
External Datahas commands for importing data into Access and exporting it to other programs. You'll use these commands in Chapter 10.
Database Toolsfeatures the pro tools that help experts perform deep-tissue data analysis and add Visual Basic code (a scripting language). Most civilians can safely avoid this tab, although you will tap into its abilities occasionally in Chapter 5, when you learn about linking tables.
It's worth spending some time getting accustomed to the tab-based ribbon. Try clicking one tab after the other, rifling back and forth through the four sections to see what they hold. You'll learn more about all these commands as you make your way through this book.
Tip
If you have a scroll mouse, you can breeze through the tabs even faster by moving the mouse pointer over the ribbon, and then moving the scroll wheel up or down.
One nice ribbon tab feature is that they never changeâin other words, you don't see commands mysteriously moving around or winking out of existence. Microsoft designed the ribbon to be predictable, so commands always remain in the same place. However, commands will change their arrangement a bit if you resize the Access window, so that they better use the available space (Figure I-3).
If you're a diehard keyboard lover, you'll be happy to hear that you can trigger ribbon commands with the keyboard. The trick's using keyboard accelerators, a series of keystrokes that starts with the Alt key (the same keys you used to use to get to a menu). When using a keyboard accelerator, you don't hold down all the keys at the same time. (As you'll soon see, some of them have enough letters to tie your fingers up better than the rowdiest game of Twister.) Instead, you hit the keys one after the other.
The trick to keyboard accelerators is to understand that once you hit the Alt key, you do two things, in this order:
Pick the correct ribbon tab.
In that tab, choose a command.
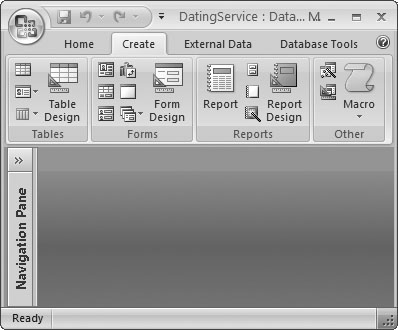
Figure I-3. This super-skinny Access window doesn't have much room for ribbon buttons. All the same commands that you saw in Figure I-2 are still in the ribbon, but now you see only small icons with no text. When you're in doubt about a button, hover over it to see its name.
Before you can trigger a specific command, you must select the right tab (even if you're already there). Every accelerator requires at least two key presses after you hit the Alt key. You'll need even more if you need to dig through a submenu.
By now, this whole process probably seems hopelessly impractical. Are you really expected to memorize dozens of different accelerator key combinations?
Fortunately, Access is ready to help you out with a new feature called KeyTips. Here's how it works: Once you press the Alt key, letters magically appear over every tab in the ribbon. Once you hit a key to pick a tab, letters appear over every button in that tab. You can then press the corresponding key to trigger the command. Figure I-4 shows how it works.
Note
In some cases, a command may have two letters, and you need to press both keys, one after the other. You can back out of KeyTips mode at any time without triggering a command by pressing the Alt key again.
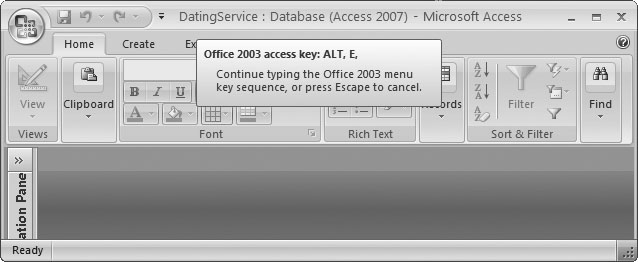
Some other shortcut keys don't use the ribbon. These key combinations start with the Ctrl key. For instance, Ctrl+C copies highlighted text, and Ctrl+S saves your current work. Usually, you find out about a shortcut key by hovering over a command with the mouse. Hover over the Paste button in the ribbon's Home tab, and you see a tooltip that tells you its timesaving shortcut key is Ctrl+V. And if you've worked with a previous version of Access, you'll find that Access 2007 keeps most of the same shortcut keys.
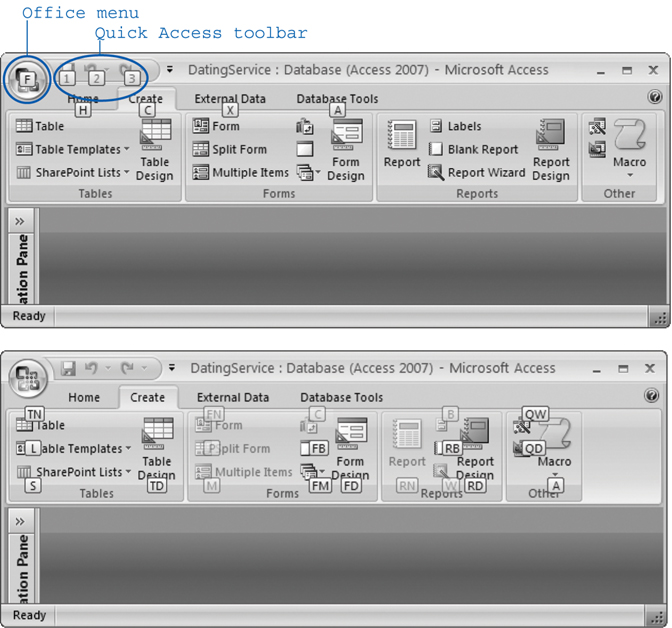
Figure I-4. Top: When you press Alt, Access pins KeyTips next to every tab, over the Office menu, and over the buttons in the Quick Access toolbar (more about the Office menu and the Quick Access toolbar in a moment). Bottom: If you follow up with C (for the Create tab), you'll see letters next to every command in that tab. Now you can click another button to run a command. Don't bother trying to match letters with tab or button names; the ribbon's got so many features packed into it that in many cases, the letters don't mean anything at all.
One small part of the traditional Access menu's left in Access 2007âsort of. The traditional File menu that lets you open, save, and print files has been transformed into the Office menu. You get there using the Office button, which is the big, round logoin the window's top-left corner (Figure I-6).
You generally use the Office menu for three things:
Opening, creating, and saving your database. You'll do plenty of this in Chapter 1.
Printing your work (Chapter 3) and sending it off to other people by email.
Configuring how Access behaves. Choose Access Options at the bottom of the menu to get to the Access Options dialog box, an all-in-one hub for configuring Access settings.
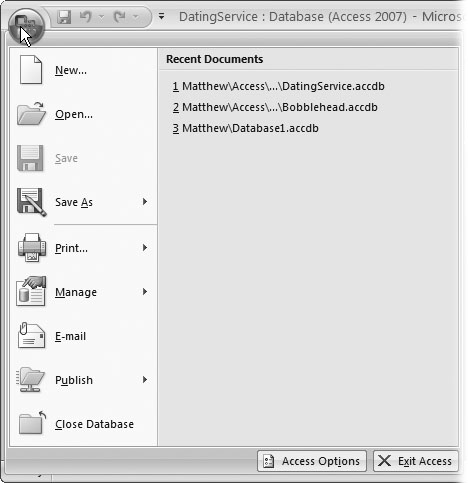
Figure I-6. The Office menu's bigger and easier to read than a traditional menu. When you click it, it displays a list of menu commands (on the left) and a list of the databases you used recently (on the right).
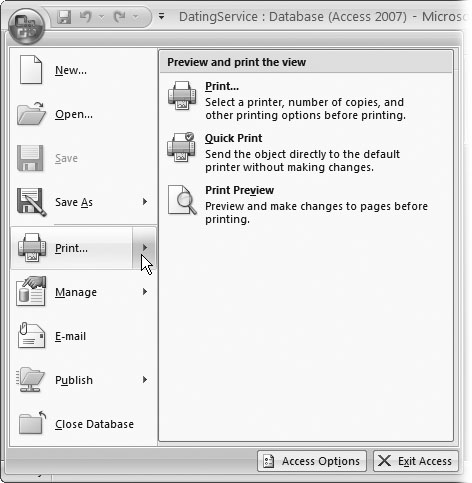
There's one menu quirk that takes a bit of getting used to. Some Office menu commands hide submenus that have more commands. Take the Print command. You can choose Print from the Office menu to fire off a quick printout of your work. But if you click the right-pointing arrow at the edge of the Print command (or if you hover over it for a moment), then you see a submenu with more options, as shown in Figure I-7.
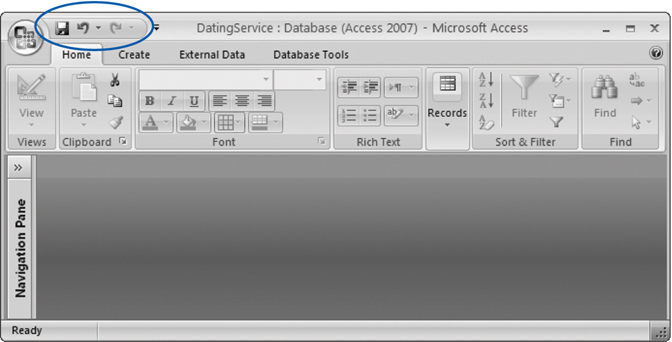
Keen eyes will have noticed the tiny bit of screen real estate that sits on the Office button's right side, just above the ribbon (Figure I-8). This bit of screen holds a series of tiny icons, like the toolbars in older versions of Access. This area's the Quick Access toolbar (or QAT to Access nerds).
Get Access 2007 for Starters: The Missing Manual now with the O’Reilly learning platform.
O’Reilly members experience books, live events, courses curated by job role, and more from O’Reilly and nearly 200 top publishers.

