There is much talk in the communications industry of providing last-mile connectivity. Think of Bluetooth as providing connectivity for the last 10 feet. Bluetooth excels as a handy cable-replacement technology, helping to eliminate the need for cumbersome wires that you might find on headsets, remote controls, PDAs, and other small devices. Bluetooth aims to end the days of needing to carry a three-foot piece of cable with obscure connectors on either end everywhere you go, just to interface to your laptop. You can use Bluetooth-enabled devices to talk to a laptop or a desktop, or even have them talk to each other to exchange data almost effortlessly. This chapter presents hacks on getting Bluetooth working with a wide range of devices and then doing some very interesting tricks.
If you can provide connectivity for the last 10 feet, how do you find yourself on this blue-green sphere we call Earth? The global positioning system (GPS) has migrated from being a military-only technology to something that is built into cars, phones, and a number of other devices. In this chapter, you can learn how to do some very unusual things with GPS that the designers probably never intended.
Mobile phones are everywhere. For many people, they have become the sole telephone of choice, enabling them to abandon land lines altogether. When you combine a mobile phone and Bluetooth, even more hacks become possible.
Linux kernels from 2.6 onward have easy-to-use tools for Bluetooth.
Prior to the release of the 2.6 Linux kernel, getting Bluetooth support involved compiling your own kernel as well as the necessary utilities. There were also multiple Bluetooth stacks available, each with their own features, adapter support, and quirks. In 2.6, the BlueZ stack was crowned as the officially supported way to use Bluetooth in Linux, and thatâs the focus of this hack.
First, make sure you have a supported Bluetooth adapter. You used to be able to find a reasonably current list of BlueZ-supported hardware at http://www.holtmann.org/linux/bluetooth/devices.html. However, as of March 2005, this information has been removed because of threatened legal action from the Bluetooth SIG. What this basically means is that the association of companies who maintain the Bluetooth standard donât want anyone to advertise that their devices are compliant with Linux unless you pay the SIG a lot of money and fill out a bunch of paperwork. So, youâre on your own here. Probably the best place to get advice is in the BlueZ Users mailing list, which can be found at http://www.bluez.org/lists.html.
Next, youâll need to make sure that your kernel has Bluetooth support enabled. All distributions shipping the 2.6 kernel have Bluetooth support. 2. 4 kernels shipped with both the Red Hat 9.0 and Debian Sarge distributions already include Bluetooth support. You can test your kernel for Bluetooth support by running modprobe rfcomm as root. If the modprobe fails, youâll need to install the packages that support Bluetooth.
Red Hat and Fedora users should install these packages using yum or rpm. This assumes youâre using GNOME as your window manager:
yum install bluez-utils gnome-bluetooth
Likewise, Debian and Ubuntu users should install using apt:
apt-get install bluez-utils gnome-bluetooth
This next bit is for UART-based (that is, non-USB) devices only, so if youâre using a USB Bluetooth adapter, you can skip ahead. Serial-style USB devices, which include serial dongles and PCMCIA cards, need to be explicitly attached to the Bluetooth host controller interface, using the hciattach utility. When you connect the device, the appropriate kernel driver might be loaded automatically, leaving a log entry in /var/log/messages.
If youâre using a UART-based device, you may see a reference to a /dev/ttySn serial device, where n is some integer. In any event, you can try attaching the device to the Bluetooth host controller device by running /sbin/hciattach/dev/ttySn any from the command line. Like any good Unix utility, you know that hciattach worked if it returns without printing anything. If it doesnât work, make sure you have the right device and check the manpage for other options.
Assuming that the hciattach command did work, you will want to add a reference to this device to your /etc/bluetooth/uart file, so that the device can be appropriately attached to the Bluetooth host controller interface at boot time. If this file doesnât exist, create it. Add a single line to this file that reads /dev/ttySn any, replacing n with the appropriate serial device number.
Now that you have everything installed, plug in your Bluetooth adapter and try running /etc/init.d/bluetooth start as root. In Debian and Ubuntu, start Bluetooth with /etc/init.d/bluez-utils start. You should see some appropriate status messages in your /var/log/messages. Assuming everything works, you might want to add the Bluetooth script to the appropriate rc.d directory for your default run level with the chkconfig utility or via a manual symlink. Chances are good your package install has already added this for you, but itâs a good idea to check.
Now run
hciconfig from the command line. You should see something like
	hci0:	Type: USB
			BD Address: 00:11:22:33:44:55 ACL MTU: 192:8 SCO MTU: 64:8
			UP RUNNING PSCAN ISCAN
			RX bytes:99 acl:0 sco:0 events:13 errors:0
			TX bytes:296 acl:0 sco:0 commands:12 errors:0
If you donât see anything like this, make sure that hcid is running and that there arenât any error messages in /var/log/messages. The BD Address shown is the unique Bluetooth identifier for your adapter, much like an Ethernet MAC address.
Now, bring another Bluetooth device within range of your computer, and make sure that the device is visible to Bluetooth scans. Then, run hcitool scan from the command line. It might take up to 15 or 20 seconds to complete its scan, and then it should display something like this:
$ hcitool scan Scanning ⦠00:99:88:77:66:55 Nokia3650
You can now test the device to see which services it supports, using sdptool browse 00:99:88:77:66:55. You should see a lengthy list of supported services, providing information that can be used to configure access to those services.
âSchuyler Erle
The Bluetooth wireless standard is a great way to get computers and gadgets talking to each other. Hereâs how to set it up on Windows XP.
Bluetooth wireless support is showing up in all sorts of devices these days, and the software is easy to use. Few consumers know about it or know how to use it, though. This hack will expose you to the basics of Bluetooth and how to set up some Bluetooth devices, and it will point you to some good sources of information about the ways you can use Bluetooth in your life.
Some people confuse Bluetooth with the 802.11x standards (Wi-Fi), since they are both wireless technologies. But Wi-Fi is intended primarily for Internet data and connecting computers, while Bluetooth is used to communicate between a wide variety of devices. Where WiFi needs to get into every corner of your world to be effective, Bluetooth is best at short ranges. In fact, the effective range of most Bluetooth communications is about 32 feet (10 meters).
Bluetooth can be used to connect all kinds of different devicesâPCs, cell phones, cell phone headsets, PDAs, keyboards, portable game systems, audio headphones, GPS receivers, printers, digital cameras, barcode scanners, medical equipment, and even your car. Each device supports one or more profiles that dictate what types of devices it can communicate with and how that communication will take place. If two devices share a profile, they can communicate; otherwise, they will not even make the attempt.
My own initiation into Bluetooth was when I needed a new mouse for my laptop. I had avoided buying one of the infrared wireless mice because of the line-of-sight issues, but a Bluetooth mouse seemed like just the ticket. I purchased a Bluetooth wireless mouse and a Bluetooth dongle that plugs into my laptopâs USB port. In addition to the dongle-type adapters, you can also get permanent Bluetooth cards that go into the PCI slot of your desktop computer. The installation procedure is mostly the same.
The Plug-and-Play mechanism in Windows XP works so well that I usually just attach any new piece of hardware without bothering to use the software CD unless I have to. But due to the way that Bluetooth works, itâs best to install the software first so that you have an opportunity to configure Bluetooth prior to using it.
When you install the software, youâll find the usual assortment of wizard pages, asking you where you want to install the software and such. The installer might display a warning about Bluetooth devices and signed drivers. This is a security precaution and a convenience for you. If you click OK, the installer will temporarily disable the signed drivers messages while installing the Bluetooth adapter. Otherwise, you would end up with a lot of messages about unsigned drivers.
Once the installation is complete, attach your Bluetooth adapter. If you have a PCI Bluetooth adapter, install the card in an open slot and restart your PC. Windows XP will detect the adapter and associate the drivers with those that you installed earlier. You will probably see several messages show up in the system tray as it installs the drivers for the Bluetooth adapter.
Once Windows XP has finished loading the drivers, you can start configuring your Bluetooth adapter. The My Bluetooth Places icon, shown in Figure 1-1, will open a window that allows you to discover and browse nearby Bluetooth devices. There is also an icon in the system tray for Bluetooth; itâs a blue circle with the runic B on it. The B in the system tray icon changes color depending on the status of the Bluetooth connectionâred for when no Bluetooth adapter is connected, white for when an adapter is connected, and green for when a device is communicating with your PC.
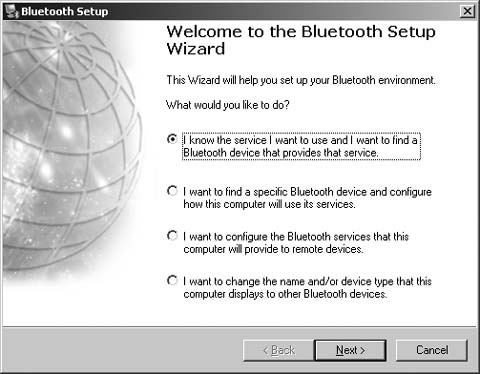
Open the My Bluetooth Places window. If you have a Bluetooth device nearby and it is turned on, it might show up on this list. Ignore any devices for the moment while we go through the configuration process. In the upper-left corner of My Bluetooth Places, there is a list of links under the heading Bluetooth Tasks. Click the link labeled Bluetooth Setup Wizard. The choices you are presented with, shown in Figure 1-2, pertain to how you want to use your Bluetooth adapter. For now, choose the last option, the one that begins with âI want to change the nameâ¦.â
If you want to set up service for a particular type of device, such as a mouse or a printer, choose the button labeled âI know the service I want to useâ¦.â If you want to connect to a specific device (in case more than one person is using a Bluetooth device in your proximity), choose the button labeled âI want to find a specific Bluetooth deviceâ¦â and click the Next button. In this screen, you provide the name of your computer and the type of computer you are using (laptop or desktop). I use a generic name for the computer because this value is broadcast to the world. People who attempt to hack into Bluetooth-connected computers could use this information to their advantage. Click the Finish button to go back to My Bluetooth Places.
If you havenât already done so, now would be a good time to turn on your Bluetooth device and make sure it is running properly. Click the Bluetooth Setup Wizard link again. This time, when presented with the wizard screen of choices, choose âI know the service I want to useâ¦â and click the Next button. The wizard will present you with a complete list of items that it knows how to communicate with. This is where you will go if you want to add a printer or a headset in the future. To set up the mouse, scroll the list to the bottom, select Human Interface Device, and click the Next button.
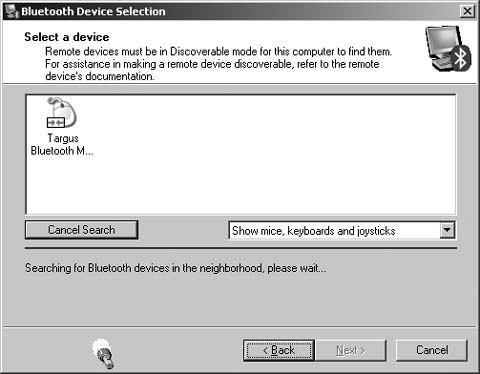
The next screen, shown in Figure 1-3, will cause Windows XP to search for all Bluetooth devices in range. If your device does not show up, make sure it is powered on and operating correctly. There might be a Connect or Pair button on the device that you must press to start the communication with the PC. If many devices are in the area, you can use the pop-up box beneath the list to show only certain types of devices. If the device you want to connect is in the list, choose it and click the Next button.
At this point, the Bluetooth wizard will attempt to connect with the device. If all went well, you should see the confirmation window shown in Figure 1-4. This is your way of knowing the device you are looking for is available and communicating with your computer. Once you click the confirmation button, your mouse and your PC are paired. If you ever see this window and you werenât expecting it, it could be a sign that someone nearby is attempting to communicate with your computer via the Bluetooth connection.

If you are planning to add multiple Bluetooth products to your computer, you add them by going to the Bluetooth Setup Wizard and choosing the âI know the service I want to useâ¦â option for each device. Different devices will follow the same instructions as weâve done with the mouse in this example, although there might be device-specific settings that you will have to configure once the connection is made.
Bluetooth can make your computing experience more convenient by eliminating some of the need for cables. Unfortunately, because the signal is being broadcast on open frequencies, anyone is free to listen in or even participate in the discussion. Thatâs why itâs necessary for you to take precautions.
The first precaution is to enable only the services you need for your computer. In the Bluetooth Setup Wizard, the choice labeled âI want to configure the Bluetooth servicesâ¦â allows you to enable and disable different types of Bluetooth communications. Disable any types of communications that you do not plan to use at that moment. Click the Finish button when you have made the changes you need. These services can be easily reenabled through the Bluetooth Setup Wizard or from the link labeled View My Bluetooth Services.
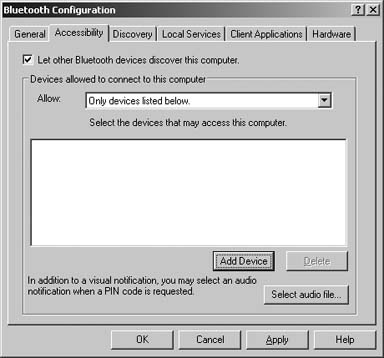
The next precaution involves locking out other devices. Go to My Bluetooth Places and choose the link labeled âView or modify configuration.â The Bluetooth Configuration screen, shown in Figure 1-5, allows you to choose how your Bluetooth connection communicates to the outside world.
Click the tab labeled Accessibility. Remove the check mark from the box labeled âLet Bluetooth devices discover this computer.â This will prevent unwelcome intrusions by unknown devices. The Discovery tab allows you to configure which devices your connection can discover. This is useful if you are in an office environment with many different types of Bluetooth devices. The Local Services tab lets you configure how various types of devices interact with software services installed on your PC. This will be necessary for synchronizing a PDA, listening to music, or transferring files.
Two of the more publicized Bluetooth security problems are called Bluejacking and Bluesnarfing. Both of these exploits require the attacker to be within communication range of the victim, which is less than 32 feet (10 meters) for most phones and laptops. Bluejacking involves the unsolicited receipt of messages to a Bluetooth device, usually a phone. Itâs primarily used as a prank; your phone starts vibrating and you get a message criticizing your hairstyle or the brand of phone you are using. Your attacker will be close by, and chances are good that he is around 15 years old. Bluesnarfing is more dangerous because the attacker is out to retrieve datebook and contact information from your phone. In both cases, if you disable the Bluetooth features of your phone when you arenât using them, you wonât have these problems.
Bluetooth provides many of the same features Wi-Fi does. Bluetooth has a maximum data transmission rate of somewhere around 100,000 bytes per second, which is much lower than 802.11. Plus, its limited range means all the parties must be in very close proximity. For these reason, itâs not an effective competitor to 802.11 for day-to-day wireless networking.
There are times, however, when an ad hoc wireless network using Bluetooth could be useful. If no network is present and no one has a floppy or flash drive handy, you can use a Bluetooth connection between the computers to share files. Keep in mind that the data rate for Bluetooth is miniscule compared to 802.11, so use it sparingly.
For details on how to pair your PC via Bluetooth with another device such as a cell phone to connect to the Internet, see âConnect Windows XP with a Bluetooth Phoneâ [Hack #5] .
The OâReilly Wireless web site (http://wireless.oreilly.com) has a good deal of Bluetooth-related information.
Windows XP Unwired by Wei-Meng Lee (OâReilly) is a good source for Bluetooth-related advice.
âConnect Windows XP with a Bluetooth Phoneâ [Hack #5]
âEric Cloninger
No hotspots nearby? Use your Mac and a Bluetooth phone to get online almost anywhere.
If your mobile phone plan [Hack #17] gives you some flavor of cellular data accessâGPRS, EDGE, 1xRTT, or any of their acronym cousinsâyou can use that access with a Bluetooth phone and your Mac to get online. The benefits are obvious: you donât need a wireless access point in range, you donât have to pay for access to a hotspot, and a mobile signal is available (almost) everywhere.
Mac OS X makes cellular data access simple. If you are setting up your Bluetooth phone with your Mac for the first time, follow along and youâll be using your cellular data minutes in, well, minutes!
Obviously, youâre going to need a Mac with Bluetooth. Bluetooth has come standard with most PowerBooks for a couple years now or as an option on many other Mac models, including iBooks, PowerMacs, and iMacs. Third-party Bluetooth adapters are also available from vendors such as D-Link, for practically any Mac with a USB port.
Secondly, youâll need a Bluetooth-capable phone. Apple maintains a list of phones (http://www.apple.com/macosx/features/isync/devices.html) known to work with the iSync program that ships with Mac OS X 10.3 and later. There are also many Bluetooth phones not on this list that will happily pair with your Mac and which can be used to connect you to the Internet. Ross Barkman maintains a page (http://www.taniwha.org.uk) with updated modem scripts and information on Bluetooth mobile phones for use with Mac OS X.
Mac OS X gives you a handy Bluetooth icon in the menubar. Click here to get a drop-down menu like the one shown in Figure 1-6. Choose âSet up Bluetooth Deviceâ¦â to get started.

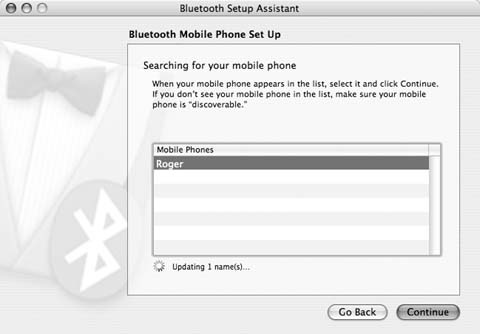
Make sure your mobile phone is turned on, you have Bluetooth enabled, and your phone is discoverable. Youâll be prompted in a new window on your Mac to select a device type. Choose Mobile Phone, and click Continue. Mac OS X will search using Bluetooth to locate your phone, as shown in Figure 1-7.
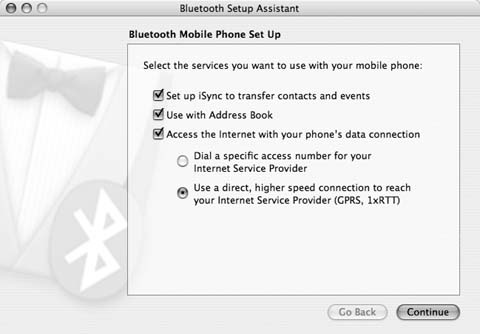
Select your phone from the list, and click on Continue. Your Mac will now attempt to pair with your mobile phone. When this happens, an alert box on the Mac will give you a six-digit number that will also need to be entered on your mobile phone. This setup will vary from phone to phone, so consult your userâs manual for directions. Once youâve completed the pairing process, youâll be asked what services you want to use on your mobile phone, as shown in Figure 1-8.
Unless you plan on using your cell phone as an expensive but crappy analog modem, make sure you choose the last option on this screen: âUse a direct, higher speed connection to reach your Internet Service Provider.â
Now comes the fun part. There are hundreds of Bluetooth phones out there and many mobile providers, and each one is going to have a different setup. Iâll present three different setups for larger U.S. providers. If you have a different provider, or live outside the United States, youâll want to either search online for details or contact your mobile provider for help.
Any connection setup is going to require a username, password, a CID string (also known as âAPNâ for GSM providers, and "phone numberâ for CDMA providers), and a modem script. Mac OS X ships with modem scripts for many popular mobile phone makers, but if you donât see your phone, check Ross Barkmanâs page.
Our example connection, shown in Figure 1-9, is for T-Mobile GPRS subscribers. Although the username and password are not used for this connection, you do need a specific APN string to enter in the CID field.
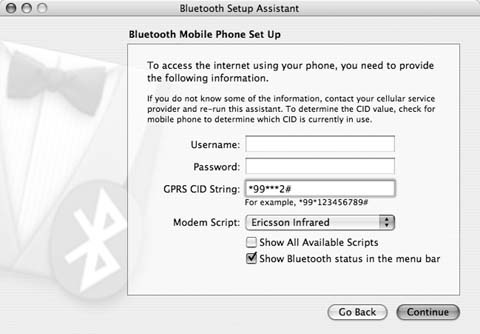
Table 1-1 shows the usernames, passwords, and APN/phone numbers to use for popular U.S. carriers.
Table 1-1. Network settings for popular providers
|
Provider |
Username |
Password |
APN/Telephone number |
|---|---|---|---|
|
Cingular GPRS |
|
| |
|
Verizon 1xRTT |
|
| |
|
AT&T |
None |
None |
Proxy |
|
T-Mobile |
None |
None |
WAP users( |
|
Sprint |
PCS Vision username |
PCS Vision Password |
#777 |
Tip
Operaâs site for GSM providers has an excellent list of APNs at http://www.opera.com/products/mobile/docs/connect/.
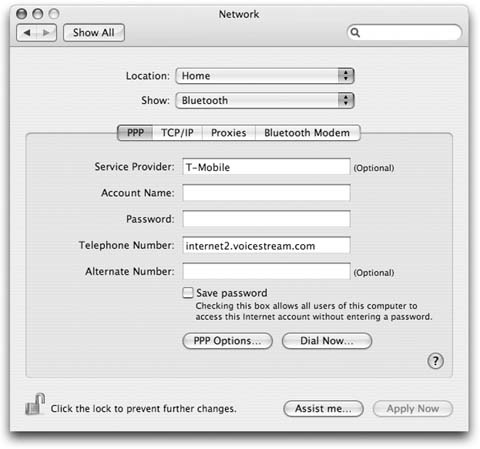
The last thing youâll need to do is make sure your Network settings are configured to use the new connection. Open System Preferences and click on Network. In the Network Port Configurations section, make sure your new phone connection is checked. Finally, click on the PPP tab and make sure the information you entered during Bluetooth setup is listed, as shown in Figure 1-10.
When selecting a modem type, pick the model that is closest to your phone. If you canât find an appropriate model, you could try a third-party phone script. There is a very good site full of scripts for various models of new phones (including 3G and GPRS) at http://www.taniwha.org.uk. Download the scripts for your phone, install them in /Library/Modem Scripts/, and then restart System Preferences.
Finally, you may want to consider enabling dial-on-demand for your Bluetooth connection. In Network Preferences, select the Bluetooth modem, click PPP Options, then check the first checkbox, âConnect automatically when needed.â Then show your Network Port Configurations, and drag the Bluetooth line somewhere near the bottom. Your Mac will try each connection in order from top to bottom when connecting to the Internet. On my laptop, I list them from fastest to slowest: FireWire first, then Ethernet, Air-Port, Bluetooth, and finally Internal Modem.
Now, when you open any program that attempts to connect to the Internet, your Mac will automatically fall back to your Bluetooth phone when no other connection is available. Enjoy!
Use your Bluetooth phone as a modem when Wi-Fi isnât available.
No doubt the novelty of being able to scan for nearby Bluetooth devices from your Linux machine will wear off all too soon, and then youâll want to actually do things with your shiny new Bluetooth connection. Being able to use your cell phone as a modem from all those places you canât pull in a Wi-Fi signal would be pretty cool, wouldnât it?
Bluetooth supports a number of
profiles, which define the way that Bluetooth devices can communicate with each other. In this case, we want to make use of the Dial-up Networking (DUN) profile, which relies on a protocol called RFCOMM to emulate a serial link between two devices. You can use RFCOMM to connect your Linux box to your phone, and then run pppd over the link to get access to the Internet. This should work using various mobile data protocols including CDPD, GPRS, EDGE, 1xRTT, and 1xEV-DO. More information on the various mobile data acronyms can be found in Appendix A.
Assuming youâve got Bluetooth working [Hack #1] , you should be able to bring your phone within range of your computer and scan for it using hcitool. Weâll presume that youâve done this, and that hcitool reports a BD address for your phone of 00:11:22:33:44:55.
You can also use
sdptool to verify that thereâs a device in range that supports the DUN profile:
sdptool search DUN Inquiring ⦠Searching for DUN on 00:11:22:33:44:55 ⦠Service Name: Dial-up Networking Service RecHandle: 0x10001 Service Class ID List: "Dialup Networking" (0x1103) "Generic Networking" (0x1201) Protocol Descriptor List: "L2CAP" (0x0100) "RFCOMM" (0x0003) Channel: 1
Note this channel number, because youâll need it later. As you can see, hcitool and sdptool offer a lot of other useful Bluetooth diagnostic functions, which you can read more about on their respective manpages.
Before you can actually connect to the phone, however, you may need to set up whatâs referred to as device pairing between your Linux box and your phone, so that your phone knows to allow your computer access to its services, and possibly vice versa. Your computerâs PIN can be found in /etc/ bluetooth/pin, and you will want to alter this to a unique value that only you know.
Warning
Itâs important to note here that Bluetooth pairing is not a very secure process. Security researchers have found ways to hijack the pairing process and even force a re-pairing remotely. Until workarounds are found, the best thing you can do is change your PIN frequently, and use a PIN of the maximum length of 16 characters.
Most phones have a Bluetooth PIN that you can configure within the phone itself. The BlueZ stack comes with a little Python utility called bluepin that pops up a GTk+ dialog to ask for your phoneâs PIN as needed.
If you donât want to be bothered with pop-up windows, the following Perl script can be saved to /etc/bluetooth/pindb, and you can use it store PINs for multiple Bluetooth devices:
	#!/usr/bin/perl
	while () {
		print "PIN:$1\n" if /^$ARGV[1]\s+(\w+)/o;
	}
	_ _DATA_ _
	# Your Bluetooth PINs can go here, in BD address / PIN pairs,
	# one to a line, separated by whitespace.
	#

	00:11:22:33:44:55		11111
Make sure that /etc/bluetooth/pindb is owned by root and is chmod 0700âyou donât want other users being able to look up your PINs. The options section of your /etc/bluetooth/hcid.conf should accordingly look something like this:
	options {
			autoinit yes;
			security auto;
			pairing multi;
			pin_helper /etc/bluetooth/pindb;
	}
This ensures that HCI devices are configured at boot, that pairing is allowed, and that hcid will check pindb for your PINs on a per-device basis. Be sure to restart hcid by running /etc/init.d/bluetooth restart if you made any changes to your /etc/bluetooth/hcid.conf.
Now that your computer is set up for pairing, youâll have to set up your phone similarly, for which youâll need to refer to your userâs manual. This set-up process often requires that the phone scan for your computerâs Bluetooth adapter, so be sure that your computer is within range with a working Bluetooth adapter. The interface will probably come up as BlueZ (0) or something similar, unless you changed the name option in your hcid.conf. You probably want to set up the pairing on the phone as trusted, or the equivalent, so that the phone doesnât ask you to verify the connection each time you try to dial out from your Linux box.
Now that we have found a device in range that offers dial-up networking, and set up pairing with it, the next step is to bind an RFCOMM interface to that device. First, make sure that there are RFCOMM entries in your /dev directory, using ls -l /dev/rfcomm*. If ls reports âNo such file or directory,â you can easily create 64 RFCOMM device entries by switching to the superuser and doing the following:
	# for n in `seq 0 63`; do mknod -m660 /dev/rfcomm$n c 216 $n; done
	# chown root:uucp /dev/rfcomm*
If youâre running Debian or Ubuntu, you will want to chown your RFCOMM devices to group dialout, instead of uucp.
Now, as the superuser, bind /dev/rfcomm0 to your phone on the channel reported for DUN by sdptool earlier, using the rfcomm utility from bluezutils:
# rfcomm bind /dev/rfcomm0 00:11:22:33:44:55:66 1
Youâll know that the device was bound successfully if, like any good Unix utility, rfcomm just returns silently. You can demonstrate that it did actually work, however, by running rfcomm
without any arguments:
	# rfcomm

	rfcomm0: 00:11:22:33:44:55 channel 1 clean
Now you can just treat this serial device as if it were an ordinary modem. Just to prove it, try running minicom as root, and switch the serial device to /dev/rfcomm0. When the terminal loads, type AT and press Enter. If the phone responds OK, then congratulations are in orderâyouâre talking to your cell phone over a Bluetooth connection.
Before going any further, you might want to add the following to your /etc/bluetooth/rfcomm.conf so that the RFCOMM device is configured by default when Bluetooth loads:
	rfcomm0 {
			# Automatically bind the device at startup
			bind yes;
			device 00:11:22:33:44:55;
			channel 1;
			comment "My Phone";
	}
From here, itâs just a short hop to getting your computer on the Net. Put the following into /etc/ppp/peers/gprs:
	/dev/rfcomm0

	connect '/usr/sbin/chat -v -f /etc/ppp/peers/gprs.chat'
	noauth
	defaultroute
	usepeerdns
	lcp-echo-interval 65535
	debug
Then, save the following as /etc/ppp/peers/gprs.chat:
	TIMEOUT			15
	ECHO			ON
	HANGUP			ON
	''				AT
	OK				ATZ
	OK				ATD*99#
Alternately, if you prefer using wvdial, try adding the following to your /etc/wvdial.conf:
	[Dialer gprs]
	Modem       = /dev/rfcomm0
	Phone       = *99#
	Username    = foo
	Password    = bar
Note that while European providers give you a username and password, in the United States you still need to supply dummy values to satisfy wvdial. Consult your network providerâs web site for details about what values you may need to use. Your GPRS is actually already authenticated by your very presence on the cellular network, so you donât have to re-authenticate just to use PPP. The phone number listed in the previous configuration files is the standard GPRS dial-up number, which may work for you right off the bat if your phone is configured properly.
Most GSM phones support multiple GPRS access points, so if the default for your phone doesnât work for you, try going into minicom and typing AT+CGDCONT? followed by a carriage return. Your phone should respond with a list of available Packet Data Protocol (PDP) contexts. Pick the one that seems the most appropriate, and then set your GPRS phone number in /etc/wvdial.conf to *99***
n#, replacing n with the number of the PDP profile you want to use. Failing that, try contacting your service provider for advice.
You can test this setup as root by running either pppd call gprs or wvdial gprs, depending on your setup, and watching /var/log/messages in another window. The only hitch with this setup is that it doesnât set up your nameservers in /etc/resolv.conf by default. The way around this on Red Hat and Fedora is to store the following in /etc/sysconfig/network-scripts/ifcfg-ppp0 (or ppp1, ppp2, etc., as you prefer):
	# comment out CHATSCRIPT and uncomment WVDIALSECT if you're using wvdial
	DEVICE=ppp0
	MODEMPORT=/dev/rfcomm0
	CHATSCRIPT=/etc/ppp/peers/gprs.chat
	# WVDIALSECT=gprs
This way you can just use ifup ppp0 and ifdown ppp0 to bring the link up and down. To get the identical result on Debian, use the pppd configuration just shown and add the following to your /etc/network/interfaces:
	iface ppp0 inet ppp
		provider gprs
If youâre not using a Red Hat-or Debian-like distribution, you can always just add the following additional lines to your /etc/ppp/peers/gprs to make DNS work right, and use pppd call gprs and killall pppd to bring the link up and down:
	welcome 'cp -b /etc/ppp/resolv.conf /etc/resolv.conf'
	disconnect 'mv /etc/resolv.conf~ /etc/resolv.conf'
Thatâs just about all you need to know to get online from anywhere you can get GSM service. Just donât expect blistering speeds from it: as of this writing, GPRS ranges in speed from under 5k/s to just over 20k/s, depending on your serviceânot exactly high speed by modern standards, but amazingly usable where you would otherwise have nothing at all.
As a little bonus, hereâs a short iptables script to let you share that GPRS with anyone in Wi-Fi range, and which could be stored as or called from /etc/ppp/ip-up.local:
	# Enable IP forwarding and rp_filter (to kill IP spoof attempts).
	echo "1" > /proc/sys/net/ipv4/ip_forward
	echo "1" > /proc/sys/net/ipv4/conf/all/rp_filter

	# Load relevant kernel modules, if necessary.
	for i in ip_tables ipt_MASQUERADE iptable_nat
		ip_conntrack ip_conntrack_ftp ip_conntrack_irc \
		ip_nat_irc ip_nat_ftp; do
		modprobe $i 2>/dev/null;
	done

	# Masquerade anything that's not from a PPP interface
	# (e.g. ethernet, Wi-Fi, etc.)
	iptables -t nat -A POSTROUTING -o ppp+ -j MASQUERADE
But what, you ask, about regular dial-up connections? How about faxes? Well, it turns out that youâre in luck: simply replace the GPRS access number with any regular phone number of your choice and (on most phones) you get a 9,600 baud data connection to that line. Configuring efax or mgetty-sendfax to use Bluetooth to fax from a GSM phone in this manner is therefore left as an exercise for the reader.
âSchuyler Erle
Donât worry about normal phone dial-up connections, hotspots, or WiFi. No matter where you are, the Internet is with you, as long as you have a Bluetooth-enabled phone.
Lots of phones these days include Bluetooth connections, and if you have one, Internet access for your Windows XP laptop is only a phone call away. All youâll need to do is fire up your laptop and phone, connect them to one another, and make the Internet connection. To do this, youâll of course need a laptop with Bluetooth capabilities as well.
Tip
If your laptop doesnât have Bluetooth capability, itâs easy to add. You just need a USB Bluetooth adapter. Companies such as D-Link, Keyspan, Belkin, and many others sell them, often for around $30. Just plug the little device into your USB port, follow installation instructions, and youâll be set.
Donât expect broadband connection speeds when you do thisâat least not yet. The exact connection speed youâll get varies according to the precise technology your cell phone uses and, of course, depending on the quality of your current cell phone connection. These days, though, expect 20 to 40kbps with a GSM/GPRS cell phone, 20 to 150kbps with EDGE, about 50 to 120kbps with CDMA 1xRTT, and from 300 to 500kbps with CDMA 1xEV-DO. If you donât know which technology your cell phone uses, check with your cell phone carrier, and theyâll let you know.
The exact screens youâll see when you make the connection will vary somewhat from phone to phone, so for this hack Iâll show you how to do it with the Sony Ericsson T68i Bluetooth-enabled phone. The steps with other Blue-tooth-enabled cell phones should be very similar.
First, turn on your cell phone and laptop, and make sure theyâre within range of one another. Then turn on the phoneâs Bluetooth radio. To do this on the Sony Ericsson T68i, press the joystick button and select Connect â Bluetooth â Options â Operation Mode â On.
Next, youâll have to make the phone discoverable so that your laptop can find it. On the Sony Ericsson T68i, press the joystick button and then select Connect â Bluetooth â Discoverable.
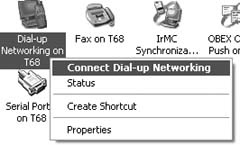
Now you need to discover the phone in Windows XP. In Windows Explorer, go to My Bluetooth Places and select View Devices in Range. You should see the Sony Ericsson T68i icon; right-click it and select Discover Available Services. Youâll get to a group of icons that show the list of available services. Now right-click the Dial-Up Networking service and select Connect Dial-up Networking, as shown in Figure 1-11.
Youâll be asked whether you want to accept or decline the connection or âadd to paired.â Itâs a good idea to select the âadd to pairedâ option. That way, the next time you want to connect to the Internet using your laptop and cell phone, theyâll automatically discover one another and you wonât have to go through the entire discovery process.
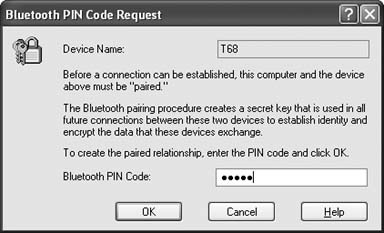
When you select âadd to paired,â the screen shown in Figure 1-12 will appear. The device name will already be filled in for you. Make up a PIN that you want to use for pairing the devices, and type it into the Bluetooth PIN code box.
Tip
Itâs a good idea to use only numbers for your PIN; otherwise, you might have problems with keying in alphabetic characters using your phoneâs PIN dialog box.
On your cell phone, youâll have to accept the pairing. A dialog box will appear asking if you want to accept the pairing. Select Add to Paired, and type in the same PIN you used on your laptop.
From now on, connecting to the Internet is the same as with any other dialup connection. The familiar dial-up connection dialog box will appear in XP, asking for a username, password, and phone number. Enter the information you normally use to connect to your ISP, including your username, password, and phone number. Click the Dial button, and youâll dial in and connect.
âPreston Gralla
Use your Palm Treo to connect your laptop to the Internet. You can also use your Treo as a backup Internet connection for your desktop machine.
If youâve signed up for your carrierâs wireless data plan, you can get the entire Internet on your Treo. It may not seem like it at times, because the small screen can really constrain your web-browsing experience when compared to, say, your laptop or your desktop computer, but itâs all thereâ every last byte. Better still, it is possible to feed the Internet connection of your Treo through to your laptop computer. This is called tethering, and it allows your tethered laptop to work with the Internet as if it were connected via a normal dial-up, cable, or DSL modemâexcept that you are connected through your Treo. Anywhere your Treo has enough signal strength to connect to its wireless data service, you can tether it to supply a laptop with Internet.
Setting up tethering is specific to the model of your Treo and your cellular service provider, as summed up in Table 1-2. You use either your Treo 650âs Bluetooth connectivity to use the Treo as a wireless modem for your laptop or desktop, or you need a third-party Windows application called PdaNet, which allows you to connect your Treo (as a modem) to your laptop or desktop via the USB sync cable.
Warning
Tethering might be frowned upon by your carrier. Carriers will argue that tethering is abusing a network infrastructure that is set up in anticipation of the light bandwidth consumption of average smartphone users. Power users will argue that when paying $45 per month for âunlimited Internet,â you are entitled to get that for which youâve paid. So itâs important that you become familiar with your service providerâs policy on tethering if you plan to use it frequentlyâyou may be surprised.
Table 1-2. Wireless providers
|
Device |
Carrier |
Tethering technique |
|---|---|---|
|
Sprint |
Built-in Bluetooth DUN is now supported, provided you apply the "Treo 650 Updater 1.12 for Sprint PCS,â found at http://www.palm.com/us/support/downloads/treo650updater/sprint.html. You may also use PdaNet for tethering over your USB sync cable or wirelessly over Bluetooth. | |
| Â |
Built-in Bluetooth DUN is not supported, and no firmware update is promised. Hack your device to enable Bluetooth DUN now, without waiting for Verizonâs firmware update. The hack is fairly stable. You may also use PdaNet for tethering over your USB sync cable or wirelessly over Bluetooth. | |
| Â |
Cingular and other GSM carriers (e.g., AT&T Wireless, Rogers) |
Built-in Bluetooth DUN is not supported. Cingular promises a firmware update âlater this year,â according to a Palm support page dated March 31, 2005. Hack your device to enable Bluetooth DUN now, without waiting for a firmware update. The hack is fairly stable. You may also use PdaNet for tethering over your USB sync cable or wirelessly over Bluetooth (no hack required). |
|
Treo 600 |
All |
This device does not support Bluetooth. Your only option is to use PdaNet for tethering over your USB sync cable. |
To enable Bluetooth DUN on your Treo 650:
Run the Bluetooth application.
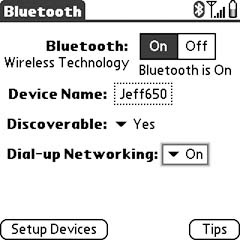
Enable the Dial-up Networking settings, as shown Figure 1-13. (If you donât see this setting, you need to check for a firmware update for your Treo 650, or apply the shadowmite patch; see the sidebar âThe shadowmite Patch).
The steps in getting Bluetooth DUN set up on your laptop (or desktop) varies with operating systems and Bluetooth hardwareâplease consult your manuals for help here. But in general, you want to do something like this:
Make sure your Treo is on and Bluetooth has been enabled!
Open the Bluetooth control panel/system preferences on your laptop (or desktop).
Your Treo 650 should be discovered; Mac users will need to set up a new Mobile Phone device.
Establish a connection between your laptop and your Treo 650.
Look for your Treo 650âs Dial-Up Networking service on your laptop; if you only see its Object Exchange service, try performing a soft reset on your Treo 650.
Create a dial-up connection to your Treo 650âs Dial-Up Networking service on your laptop. See Table 1-3 for the values that should work for you. A quick phone call to your carrier can get you going if these donât work.
Table 1-3. Carrier data connection information
|
Carrier |
Username |
Password |
Phone number |
|---|---|---|---|
|
Sprint |
|
|
#777 |
|
Verizon |
|
|
#777 |
|
Cingular |
|
**99***1# | |
|
T-Mobile |
none |
none |
*99# |
You can download the PdaNet application from June Fabrics PDA Technology Group at http://www.junefabrics.com. It has a 15-day trial, after which the application costs $34 to register to your Treo device.
Tip
For Treo 600 users with a Mac, the picture is grim. (Treo 650 users with a Mac should opt to use the Bluetooth technique described earlier). PdaNet suggests it can run under Virtual PC, though that only gives your emulated PC access to the Internetâand this usage is not supported. There is also WirelessModem, which you can download from http://www.notifymail.com/palm/wmodem/. It has a 14-day free trial; then itâs $37.50 to register the application. Be very careful with this application: many users are unable to maintain an Internet connection to their Mac for more than five minutes, and there is no return policy.
There is a great guide to connecting your Treo 650 to a Mac using Bluetooth at http://vocaro.com/trevor/treo-dun/.
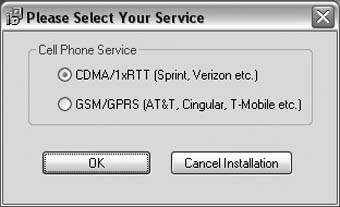
Once youâve downloaded and run the installer for your specific Treo model (check carefully!), you are prompted to select the appropriate cell phone service from the screen in Figure 1-14.
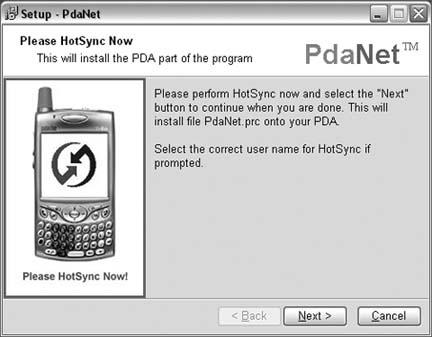
The Windows component is installed to your desktop, and then you are prompted to HotSync the Palm component onto your Treo (see Figure 1-15).
Once the installation is complete, you will notice a new PdaNet icon in your System Tray (the icons by your clock), which indicates your connection status, as shown in Figure 1-16.

The PdaNet icon indicates whether you have an active Internet connection through your Treo; right-click on it to get to the advanced PdaNet settings.
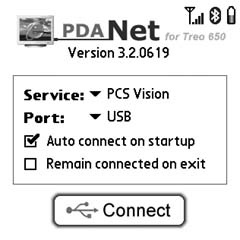
After youâve installed the PdaNet application onto your Treo, make sure your device is connected to your laptop with a USB HotSync cable (serial HotSync cables will not work), and then simply launch the PdaNet application on your Treo. Figure 1-17 shows PdaNet running on a Treo.
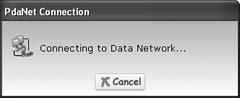
Your Treo automatically attempts to establish a connection to its wireless Internet service; if successful, PdaNet will then tether that connection over your USB HotSync cable to your laptop. Figure 1-18 shows PdaNetâs desktop component confirming its Internet connectivity.
You should be able to use any Internet applications on your laptop, as long as your Treo is able to keep connected to its wireless Internet service. Be sure to disconnect it when youâre done!
Warning
Though some service providersâ wireless data plans offer unlimited usage, most allot a certain number of kilobytes per month, and will charge you a fortune for overages. Check into this before you consume too many KB on your Treo.
âJeff Ishaq
Stop fiddling around with your phoneâs keypad and use a PowerBook for text messaging.
Short Message Service (SMS) is better known as text messaging for mobile devices. It has proven to be surprisingly popular in many parts of the world (particularly Japan, the Philippines, and much of Europe), but for one reason or another has been less than enthusiastically received in the United States. Part of the barrier to entry for many people is the sometimes painful text entry interface on most mobile phones.
The demand for tiny phones has squeezed out virtually all hope of a usable integrated keyboard. While predictive text technologies such as T9 have helped make typing require fewer keystrokes, the interface is still far from intuitive. Many people find themselves obsessively hitting number keys in a feeble effort to express themselves, most times mistyping one or two letters along the way. And entering punctuation marks and symbols is so inconvenient that most people donât bother.
If you have a Bluetooth-enabled phone, there is a better way. Mac OS X provides some good integration with these devices and SMS.
Tip
A complete list of phones supported by Mac OS X is available at http://www.apple.com/macosx/features/isync/devices.html.
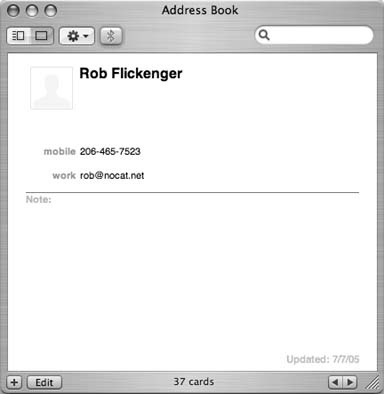
To get started, be sure that Bluetooth is enabled and that your phone is paired with your laptop. When you launch Address Book with Bluetooth enabled, you will notice an extra Bluetooth button at the top-left corner of the window, as shown in Figure 1-19. Click this button to enable Bluetooth integration in Address Book.
Having Bluetooth enabled turns on a number of useful features. In addition to being able to simply dial the number directly from an Address Book entry, you can also send an SMS message. Click the label to the left of the number you want to message (Figure 1-20) and select SMS Message. This opens a small textbox for you to type in your message. Lo and behold, you can use your standard keyboard to enter SMS messages!

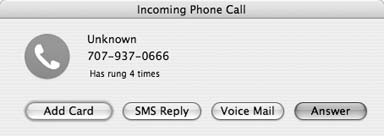
Address Book also gives you possibly the most useful Caller ID implementation there is. When your phone rings, Address Book will pop up a window with the name and phone number of the person calling, shown in Figure 1-21. You can choose whether to answer the call, send the caller straight to voice mail, or send back an SMS message.
Clicking SMS Reply sends the call to voice mail, but it also opens a window that allows you to enter an SMS message. As long as Address Book is open, incoming SMS messages will be displayed automatically and will allow you to reply via SMS as well. While not nearly as portable as SMS on a mobile phone, using a regular keyboard with SMS can help you be more expressive much more quickly.
Incidentally, one good application for SMS messaging is in situations where mobile phone coverage is flaky on one side (or both sides) of the conversation. In areas where mobile voice calls drop out frequently or arenât even possible, SMS messages will automatically be retried until they get through. This can be ideal for squeezing in a quick message to a friend when you canât otherwise establish a phone call. A low bandwidth message that gets through no matter what can be infinitely more useful than a high bandwidth message that just never gets there.
Windows users who would like to have similar SMS functionality with their Bluetooth phones should check out [Hack #14] for an application that lets you do that and much more.
Use your phone/PDA as a remote control for presentations or media players, and create new remote functions with AppleScript.
The Salling Clicker is one of the best applications available for Bluetooth. It turns a whole range of Bluetooth-capable mobile phones and PDAs into fullcolor, programmable remotes for Mac OS X. You can launch applications, control presentations in PowerPoint or Keynote, and use it as a general-purpose mouse. It plays media files in iTunes, DVD Player, and VideoLan Client and now supports the EyeTV and AlchemyTV digital video recorders (DVRs).
The software works with 21 models of Sony Ericsson phones, 12 Nokia phones, a couple models from Motorola, and it supports almost all PalmOS 4 or 5 devices with PalmSource Bluetooth. A complete list of supported devices is listed in the FAQ at http://homepage.mac.com/jonassalling/Shareware/Clicker/faq.html#supported_devices.
You can download the software directly from the authorâs web site at http://homepage.mac.com/jonassalling/Shareware/Clicker/. The application is shareware and costs $19.95. A trial version, limited to 30 clicks from your remote, is also available.
The download package comes with a basic installer, which will install itself as a new control panel and automatically launch. In order for you to use Salling Clicker, your phone or PDA must be paired with your Mac. If you havenât done this already, run the Bluetooth Setup Assistant, found in /Applications/Utilities.
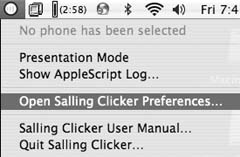
After software installation, Salling Clicker appears as a new item in System Preferences. When you open the new preferences item, a small circular icon will also appear in the menu bar, as shown in Figure 1-22. Click Select Phone, and ensure that your phone is on and somewhere near your computer and that you have Bluetooth enabled on your Mac.
Select your phone from the list and save the changes. You can now use your phone to steer Mac OS X, as well as to publish custom menus to the phone itself. Under the Clicker Items tab, you can create custom menus of whatever you like and publish them to your phone. Control Mac OS X by navigating these menus on the phone and selecting what you want to do, such as launch an app or skip to the next track in iTunes. Some phones (such as the Sony Ericcson T630) even allow you to use the phone as a mouse, making it possible to control any application. Just select System â Control Mouse, and you can use the tiny control stick on the phone as a pointer.
If you have a Symbian-based smartphone, such as any of the Nokia Series 60 phones, or a Sony Ericsson P900, thereâs an additional installation step youâll need to take to get Salling Clicker working. In the downloaded Salling Clicker package, locate and launch the installer program for your particular phone. This will activate Bluetooth File Exchange to transfer some necessary Salling Clicker files to your phone. Depending on your phone and its particular security settings, you might either need to enable file transfers, or click Yes on the phone to allow the transfer. Youâll also see a security warning on the smartphone, which is normal, because the Clicker software hasnât been approved by the phone manufacturer.
Lastly, if you have a device that runs PalmOS Version 4 or 5, you also need to install a small software package on your PDA. Locate the PDA installation for your Palm in the downloaded Salling Clicker package. You can choose to install it through Palm HotSync or Bluetooth File Exchange.
Now your smartphone or PDA is ready to connect to Salling Clicker, just as you connected a regular phone in the previous section. Youâll need to open the Clicker application on the PDA or smartphone and select the Connect option. Also, make sure your Mac Bluetooth is configured for Discovery; otherwise, the phone will never find the Mac.
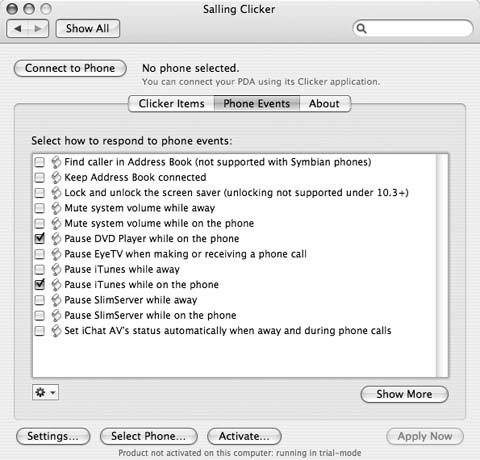
Since Bluetoothâs range is limited to 30 feet or less, it is possible to signal Clicker to take action when your phone moves in and out of range. You can control this functionality by looking under the Phone Events tab, shown in Figure 1-23. For example, you might want Clicker to pause iTunes and turn on the screensaver whenever you leave your machine. The program comes with many default events, and you can click Show More to select other scripts to run at specified times.
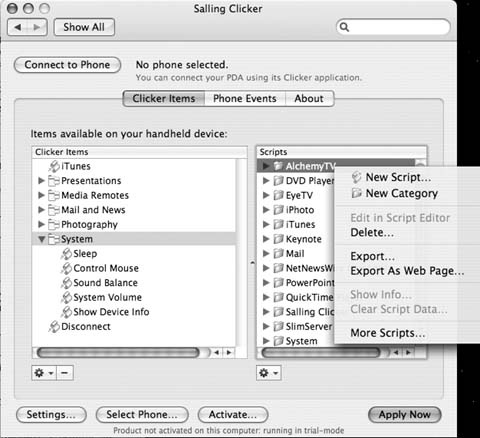
If the built-in actions donât do everything you need, you can always create your own. The actions are just AppleScript snippets, so anything that you can do with AppleScript can be triggered with the phone. You can edit existing actions or create your own by Control-clicking in the Scripts section under the Clicker Items tab in the Clicker control panel, as shown in Figure 1-24.
Clicker comes with handy actions for remotely controlling slideshows in PowerPoint or Keynote, and since it can simulate any keystroke, it can be used with just about any other application, too. It is particularly handy when making presentations, because you are virtually guaranteed to have your phone with you (and it is likely to be charged). The latest version of Salling Clicker, if used with Microsoft PowerPoint 2004, will preview the title of the upcoming slide on your phone. Youâre guaranteed not to lose a beat when you know what the next slide is!
When most people think of Bluetooth, they think of voice or data applications, but Clicker is a clever app that transcends the traditional cable replacement idea. If you use Mac OS X and own any of the supported phones, smartphones, or PDAs, you will probably find all sorts of novel uses for this software. Particularly because it is easy to use and is fully scriptable, Clicker is an application that just screams âhack me!â
At the time of this writing, the author, Jon Salling, has responded to requests for support of Microsoft smartphones and PocketPC-based PDAs. Check back on the product web page for updates to the program, because this will be a major addition to device support for Salling Clicker.
Never fear, Linux users! You too can control your machine with a Bluetooth phone.
Continuing with the remote control theme, hereâs an option for Linux users who would like to have functionality similar to Salling Clicker [Hack #8] or PuppetMaster [Hack #13] .
Bluemote is a software package written specifically to take advantage of the capabilities of a Sony Ericsson phone. We tested it using a T630, but several other models from the same manufacturer should also work. Many of the steps in this hack are similar to the next hack [Hack #10] . In fact, Bluemote was inspired by the bluexmms application, extending this control to the operating system.
In order to get Bluemote working, youâll need a working Bluetooth stack and utilities [Hack #1] and a Sony Ericsson phone that is paired with your computer [Hack #4] . Download the software itself from http://www.geocities.com/saravkrish/progs/bluemote. You will also need a copy of the scripts the author has developed for the package, found at http://www.geocities.com/saravkrish/progs/bluemote/scripts.tar.gz.
Uncompress the Bluemote package. In the newly created bluemote directory, there is a compiled bluemote binary file. The author states that the binary was compiled under Fedora Core 1, and we had no problem running it on later versions of Fedora Core or Ubuntu Linux. The source code is also provided, should you wish to compile it yourself. Itâs a good idea to copy bluemote to somewhere in your path, such as /usr/local/bin.
Next, uncompress the scripts package. Bluemote looks for the newly created scripts directory in your user home directory, so if it isnât there now, you should move it appropriately. To take advantage of the scripts for volume control, you will need to install the
aumix software. Ubuntu and Debian users can install it with apt-get install aumix.
Finally, youâll need to create a .bluemote directory inside your home directory. In the unpacked Bluemote source code package, you will find a file called bluemote-example.cfg. Copy this file to the new .bluemote directory and rename it bluemote.cfg:
	mkdir ~/.bluemote
	cp ~/scripts/bluemote-example.cfg ~/.bluemote/bluemote.cfg
Chances are that your phone is paired with your computer using channel 1. You can determine this by executing rfcomm without any parameters:
	rfcomm
	rfcomm0: 00:0F:DE:E5:2E:65 channel 1 clean
Bluemote requires your phone to use channel 4. This is easily accomplished by running the following command using sudo or as the root user:
rfcomm bind /dev/rfcomm0 00:0F:DE:E5:2E:65 4
You can confirm this was successful by executing rfcomm again with no parameters.
Thatâs got all of the requirements out of the way! Now, you can run bluemote from the command line. If you wish, you can append --log to have the program save debug information in the .bluemote directory.
If everything has been done correctly, your phone should now prompt you to accept a new connection from your Linux machine. Youâll need to enter a PIN on the phone, and if you have left the Bluetooth settings alone, a window should pop up on your Linux box, asking you to confirm the PIN.
Once the pairing is complete, after a few seconds your phone should say âBluemote loadedâ on the main screen. Navigate to the Connectivity â Accessories menu, and youâll be presented with a selection of items you can now use to control your Linux machine:
- Mute/Unmute and Volume Control
These options control system sound settings.
- Rhythmbox
This option conveniently shows what is currently playing in the GNOME media player.
- Media
This menu allows you to control the transport in either Rhythmbox or XMMS.
- Lock Screen
This option allows you to lock the GNOME screen remotely.
- Mouse control
This option seems to work only partially using the joystick, but you can use keys 5 and 9 to move side to side, and keys 6 and 8 to move up and down. Key 1 performs mouse clicks.
If you own a Sony Ericsson phone and use Linux as your primary operating system, you really should check out this free and convenient program.
Use your Bluetooth phone to control your music remotely under Linux.
If you have a mobile Bluetooth device that youâd like to use to control the XMMS media player in Linux, you might be in luck. There are actually a couple of applications out there that use a WAP-like serial interface to Sony Ericssonâs T-series phones (including the T68i and the T39m) to configure them for use as XMMS remote controls.
The first of the two is a standalone Ruby-based application called bluexmms, which is available from http://linuxbrit.co.uk/bluexmms. Make sure your phone is paired [Hack #4] with the Bluetooth interface on your computer. Install bluexmms, and then use rfcomm to bind an RFCOMM device to channel 2 on the T68i, which is the T68âs generic telephony service.
Next, run bluexmms /dev/rfcomm1 on your device, substituting the name of the RFCOMM device you just created. You should now be able to go to Accessories â XMMS Remote on your phoneâs menu, and voilà ! You can now control XMMS directly from your phone.
A second, but similar approach, involves an XMMS plug-in called BTE (a.k.a.btexmms), which can be downloaded from http://www.lyola.com/bte. Build and install the plug-in, and create an RFCOMM device on channel 2, as just described. Then, go into the XMMS preferences menu and, under Effects â General Plugins, enable and configure the BTE Control plug-in. Set the device to whatever RFCOMM device you created for this purpose, and save your changes. Now you should be able to access the remote control from Accessories â XMMS Remote, as described previously.
If you donât have a Sony Ericsson T-series phone, you might try Bemused, which runs on SymbianOS devices, such as the Nokia 3650/7650 and the Sony Ericsson P800. Unlike the T68 apps just listed, which rely on the computer to establish a connection to the phone, Bemused instead uses a client that initiates the connection from your phone to a server running on your computer.
You can get the Bemused server and client from http://www.compsoc.man.ac.uk/~ashley/bemused. First, unpack bemused.zip and upload and install the .sis file on your phone. Then, download bemusedlinuxserver.tar.gz, and build and install it on your computer. Youâll need to advertise Bluetooth serial port services on your laptop by running sdptool add --channel=10 SP, and then edit and configure /etc/bemused.conf appropriately. The Bemused README suggests using Bluetooth channel 10 on your computer, but any unused channel will do. Start your X11 window manager of choice, if you havenât already. Run bemusedserverlinux from the command line. At this point, you should be able to fire up the Bemused application on your phone and have the full power of XMMS at your fingertips, from clear across the room.
If you donât have one of these devices, donât fret; nearly every Bluetooth device these days implements some kind of serial communications layer. Using examples from the projects just listed, you can probably create an XMMS remote control for your own phone or PDA. The hackability quotient of Bluetooth for this particular kind of application is pretty high.
Clearly, if youâve made it this far, youâre probably thinking that, with a wireless remote control for XMMS, you could plug a dedicated MP3 server running Linux into the hi-fi amplifier in your living room and never need a monitor or a keyboard for it. Or maybe youâre considering plugging a low-power FM transmitter into your sound card, so you can listen to your music collection from any radio in the house.
Youâre absolutely right. Bluetooth can do this and much more. Read on for more hacks that show you just what you can do with a Bluetooth device and various computer operating systems.
âSchuyler Erle
With a laptop, a Bluetooth adapter, and an LCD projector, you can make slideshows of other peopleâs photographs.
Since time immemorial, slideshows have been a dreaded tool of oppression and tedium. Heretofore constrained to only the slides that the presenter wished to show, the slideshowâs audience was doomed to mind-numbing boredom, if it turned out that the slides failed to entertain.
Thanks to the ubiquity of mobile phones with both cameras and Bluetooth, the institution of photographic slideshows can now be thrown open, willy-nilly, to the viewing public as both a read and write medium! Allowing people to contribute photos from their phones to a participatory slideshow can offer interesting and often quite entertaining results.
To set up a participatory slideshow, youâll need a laptop or a PC running Linux, a supported Bluetooth adapter, and an overhead projector. The concept of this hack can certainly be adapted to other operating systems, but the implementation shown here is specific to the Linux Bluetooth stack and to the X11 Window System used on most open source operating systems. The best Linux distros for this purpose are Debian or Ubuntu, because all of the pieces are already available through apt-get.
If you havenât got a Linux PC handy, Ubuntu (http://www.ubuntulinux.org/download) can be installed on an old leftover Pentium in about a half hour. If you use Ubuntu, youâll want to make sure you have the universe and multiverse repositories in your /etc/apt/sources.list. If youâre using another version of Linux, you should be able to find the source code and possibly even binary packages for all the software youâll need somewhere on the Net.
Once youâve selected a suitable computer, install the BlueZ Bluetooth stack
[Hack #1]
. Next, plug in your Bluetooth adapter, and make sure the kernel can see it by running
dmesg and checking for a suitable notification towards the bottom of the output. (If your Bluetooth adapter is built-in, dmesg | grep -i Bluetooth is your friend.) Next, as root, back up your /etc/bluetooth/hcid.conf and then alter it so that it reads more or less as follows:
	options {
		autoinit yes;
		security none;
		pairing none;
	}
	device {
		name "slideshow";
		class 0x100;
		iscan enable;
		pscan enable;
	}
These settings turn off Bluetooth security (thus allowing anyone to send files to the Bluetooth device), set the name of the device to
slideshow, and allow anyone to scan for it. Naturally, once you no longer want anyone sending anything to your computer, you should copy your backup of hcid.conf back into place. Now, as root, run /etc/init.d/bluez-utils restart to restart your Bluetooth manager. On other Linux distros, hcid.conf lives in /etc, rather than /etc/bluetooth, and /etc/init.d/bluez-utils might be called /etc/init.d/bluetooth, instead.
Next, youâll need an OBEX server to receive files sent from peopleâs phones. OBEX is a FTP-like file transfer protocol that runs on top of Bluetooth. A simple OBEX server, quite logically called ObexSERVER, is available using apt-get. The source code for ObexSERVER lives at http://www.frasunek.com/sources/unix/obexserver.c, but youâll need to have the OpenOBEX libraries from http://openobex.sf.net to build it.
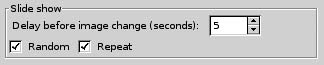
Youâll also need an image viewer for X11 that supports a slideshow mode. There are a ton of these out there, with the most popular possibly being GQview and feh. Of these two, I prefer GQview, but Iâll show how to use feh also. Again, both of them are available using apt-get. If you decide to use GQview, youâll want to load it up, and then go to Edit â Options⦠to configure the slideshow options on the General tab. Check the Random and Repeat boxes, and set the delay to something short, like five seconds, as shown in Figure 1-25.
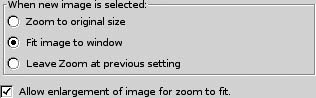
Also, over on the Image tab, youâll probably want to select âFit image to windowâ and âAllow enlargement,â as shown in Figure 1-26. If youâd rather use feh, weâll see later on that this configuration is done on the command line instead.
Last but not least, youâll need to create an empty directory to hold the contributed slideshow images. I used /home/sderle/slideshow, but any directory you can write to is fine.
Finally, seed the slideshow with a single file, which can be an image of anything. The best bet for the seed image is a plain slide that reads âShare your favorite photos by sending them via Bluetooth to 'slideshow'!â You can hack up a slide with some words to that effect using the GIMP in about three minutes. Once everythingâs configured, youâre ready for the code that makes it all go.
The following shell script accepts images via Bluetooth and displays them in fullscreen mode using GQview:
	#!/bin/bash

	SLIDESHOW_PATH=/home/sderle/slideshow

	xset s off
	xset s noblank
	sdptool add --channel=10 OPUSH

	cd $SLIDESHOW_PATH
	gqview --slideshow --fullscreen &
	while true; do
		obexserver
		mv /tmp/*.{jpg,JPG} .
	done
First, the calls to xset turn off the X11 screensaver functions, so that it doesnât load the screensaver after some period of inactivity or make the screen go blank. The call to sdptool sets up the Bluetooth channel to receive files via the OBEX PUSH profile.
Tip
You might need to run this bit as root first, or change the script to use sudo for that line, and then type in your password when you start the script.
Next, the slideshow script switches to the slideshow image directory; donât forget to change SLIDESHOW_PATH to point to wherever you plan to keep the photos. Once in that directory, the script starts up gqview to run in the background, in fullscreen slideshow mode. Then, the script runs obexserver, which waits for a file to arrive via Bluetooth, and then puts the file into /tmp and quits. Our script moves that file into the current directory, where gqview will automatically detect its presence and add it to the slideshow. Finally, we loop back to run obexserver again, and so on.
Once this script is running, all you need to do is plug the computer into an overhead projector, and youâre set. To stop the slideshow, hit Ctrl-Q to get out of gqview, and then Ctrl-C in your terminal to kill the slideshow script.
The nice thing about using GQview, as mentioned earlier, is that it regularly scans the current directory for new files, unlike feh, which scans the directory contents once at startup. If you wanted to use feh instead, you could do the following in the slideshow script, which restarts feh every time a new file arrives:
	cd $SLIDESHOW_PATH
	while true; do
		feh -D5 -F -z -Z * &
		obexserver
		mv /tmp/*.{jpg,JPG} .
		killall feh
	done
The principle is basically the same, however. The main advantage of this is that it saves you the trouble of having to configure (and possibly later reconfigure) the image viewer just to display a slideshow; the disadvantage is that it increases the likelihood that feh will display some photos with disproportionate frequency, because each time it reloads it loses its idea of which ones itâs already shown.
Enjoy your new participatory slideshow! If you use this idea at a party or other gathering, please do let us know how it works out for you.
âSchuyler Erle
Tired of one letter typing on your phone keypad? Send complete SMS messages from Linux instead.
As shown in âSend SMS from a PowerBookâ [Hack #7] and âControl Your Bluetooth Phone with FMAâ [Hack #14] , itâs relatively simple to set up your Bluetooth phone so that you can send Short Message Service (SMS) text messages using your computer. Fortunately, thereâs also a way to do this in Linux.
In order to make this work, youâll need to have your Bluetooth phone paired and configured as a dial-up networking device [Hack #4] . Once those tasks are done, your phone will be communicating with your Linux box using Bluetooth, and you will have a new serial device mapped to /dev/rfcomm0 that you can use.
What this means practically is that you can treat your Bluetooth phone as a modem, and send it standard AT commands, using any serial terminal program like gkermit, minicom, or screen.
To find out whether your phone lets you send SMS messages using AT commands, youâll need to connect to your phone with one of these programs, and execute the query AT+CSMS=0. Here is an example using the screen program:
	screen /dev/rfcomm0
	ATE1 #this won't be echoed to the screen, but it turns echo on
	OK
	AT+CSMS=0
	+CSMS: 1,1,1

	OK
The output after the AT+CSMS=0 command is listed in three columns, which indicate whether the device is capable of receiving messages, sending messages, or sending broadcast messages. In this case, the phone is capable of all three.
If your cell phone supports this capability, you can work with text messages using AT commands. You can list your text messages with AT+CMGL=4 (the 4 indicates all messages: use 0 for unread, 1 for read, 2 for unsent, and 3 for sent messages) and read a message with AT+CMGR=
MESSAGE_NUMBER:
	AT+CMGL=4
	+CMGL: 1,1,,28
	07919170389103F2040B91XXXXXXXXXXF100013011320211500A0AD3771D7E9A83DEEE10
	+CMGL: 2,1,,25
	07919170389103F2040B91XXXXXXXXXXF100013011329135610A06C8F79D9C0F01

	OK
	AT+CMGR=1
	+CMGR: 1,,28
	07919170389103F2040B91XXXXXXXXXXF100013011320211500A0AD3771D7E9A83DEEE10

	OK
However, youâll want to put the phone into text mode, so the responses that you receive are human-readable. Use AT+CMGF=1 for this, and try reading the message again:
	AT+CMGF=1
	OK
	AT+CMGR=1
	+CMGR: "REC READ","+14015559000",,"03/11/23,20:11:05-20"
	Soup's on!

	OK
You can send a message with AT+CMGS="PHONE_NUMBER" (but make sure youâve set responses to be human-readable with AT+CMGF=1). Youâll be prompted for the message; type it and press Ctrl-Z when you are finished:
AT+CMGF=1 OK AT+CMGS="4015559000" >Hello, world!^ZOK
You can also use the gsmsendsms utility from gsmlib (http://www.pxh.de/fs/gsmlib/index.html) to send the message:
bjepson@debian:~$ gsmsendsms -d /dev/rfcomm0 4015559000 "Hello, World"
âBrian Jepson
Use your phone/PDA as a remote control for media, presentations, and other programs.
If youâre a Windows user, youâve probably skimmed âRemote Control Mac OS X with Bluetooth Phones and PDAsâ [Hack #8] and thought, âWhy canât I do that?â Well, you too can control your PC via Bluetooth, with a wide range of phones and PDAs.
Most PCs, aside from some newer laptops, do not come with built-in Bluetooth. To take advantage of the programs in this hack, youâll need a Bluetooth adapter. USB-based adapters are available for as little as $20. Some of these devices are low-power Class 2 devices, transmitting up to 10 feet, while other Class 1 devices have extendable antennas and claim to cover upwards of 300 feet. If youâre planning on using the device with software for presentations, the longer-range models are probably what you want.
Windows requires drivers to operate with your Bluetooth device. Windows XPcomes with built-in Bluetooth driver support, and if your USB device is recognized when you insert it, we recommend that you use the Microsoft drivers [Hack #2] .
This hack uses PuppetMaster software, which is available from http://www.lim.com.au/PuppetMaster. If you are in doubt about the capabilities of your Bluetooth phone, check that site for more information on device support. While PuppetMaster supports a variety of phones and PDAs, we tested using a Sony Ericsson T630. Setup and capabilities in these programs vary from phone to phone, so be sure to check to see if your phone is supported.
In addition to a Bluetooth adapter, PuppetMaster requires Windows 2000 or XP and one of the following mobile devices with Bluetooth onboard:
Symbian Series 60 phone (complete list at http://www.series60.com/products)
Symbian UIQ phone (complete list at http://www.uiq.com/uiqphones)
Microsoft Smartphone
Microsoft PocketPC 2003
Java Phones with Bluetooth API support
Sony Ericsson T68, T610, T630, K700i, or Z1010
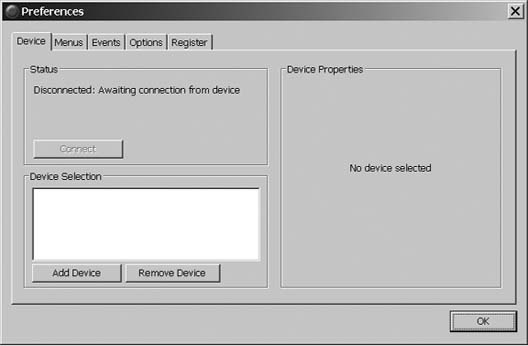
Installation of the software is simple. Accept all of the defaults. Once PuppetMaster has been installed, run it from the Start Menu. A circular icon will appear in the taskbar, indicating the program has loaded, and you should see the status window shown in Figure 1-27.

In our testing, we did not have the Sony Ericcson T630 phone paired with our test PC. If you are using non-Microsoft Bluetooth drivers, you might need to pair your phone with your PC ahead of time. Instead, we selected the Preferences button in the dialog to open the PuppetMaster Preferences window, as shown in Figure 1-28.
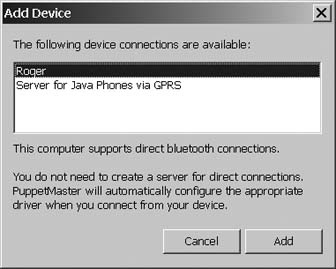
At this point, enable Bluetooth on your phone to make it discoverable. Click the Add Device button, and PuppetMaster will scan available Bluetooth devices, or virtual COM ports if your non-Microsoft drivers support this feature. In either case, you will be presented with a list of appropriate device connections that PuppetMaster found (Figure 1-29).
Choose your phone from the list and click Add. Youâll be prompted on your phone to allow the connection and enter a numeric PIN. Once youâve entered the PIN on the phone, a confirmation window will appear on the PC, asking for the same PIN. Confirm the choice to add your phone to PuppetMaster. To complete the setup, click Connect in the Preferences dialog.
Now that you are connected, you can control many aspects of your PC directly from your phone. Using the Sony Ericsson T630, select Connectivity â Accessories from the phone menu to display a whole list of items that can be controlled from the phone. As shown in Figure 1-30, you can add menu categories in PuppetMaster, and then add items to those categories to expand your control options.
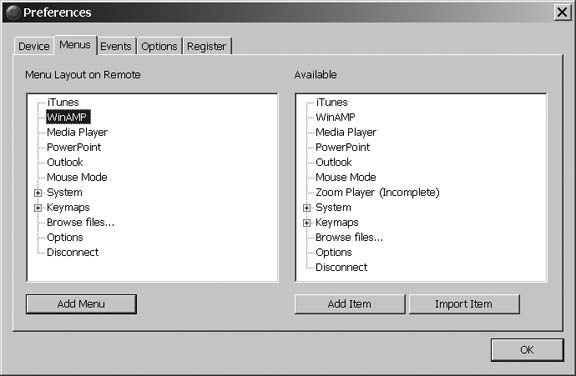
Out of the box, PuppetMaster supports controlling iTunes, WinAmp, and Windows Media Player. Most importantly for presentations is the ability to control PowerPoint. You can perform system commands such as shutting down, activating the screensaver, or browsing files. Another great function for presentations is Mouse Mode. On phones that have a directional control, such as the T630, you can direct the mouse cursor remotely.
One final set of abilities that PuppetMaster gives you is Events. As shown in Figure 1-31, you can set up special events to occur when the phone comes in range of the PC, when it leaves range, or when you get a call.
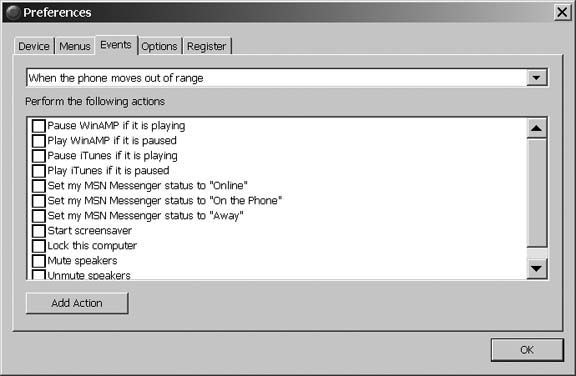
Events are handy if you are using your phone as a media controller. You can have iTunes pause the currently playing track when your phone rings, so you can hear your caller. If your phone goes out of range of the PC, you can make it assume that you have left and activate your screensaver, set your status to Away in your IM program, and mute the speakers.
PuppetMaster is an amazingly cool program that extends control of your PC to many types of Bluetooth phones and PDAs. If you use Linux, check out "Remote Control Linux with a Bluetooth Phoneâ [Hack #9] for a hack that lets you do the same thing. If you have a Sony Ericsson phone, definitely go on to âControl Your Bluetooth Phone with FMAâ [Hack #14] , which shows even more great things you can do over Bluetooth with your phone.
flOatâs Mobile Agent lets you take complete control of your Bluetooth phone.
flOatâs Mobile Agent (FMA) is a whole different program design than PuppetMaster [Hack #13] . While it does allow you to control your PC remotely from your Bluetooth phone, it also is a complete synchronization utility, allowing you to edit your phone contacts; store, sort, and send text (SMS) messages; and much more.
You can get the binary installer or the source code from http://fma.sourceforge.net. This is an open source package licensed under the GPL, so if youâre a Windows programmer, you can hack away at the source code all you like.
FMA is designed around the capabilities of the Sony Ericsson T610/T630 phones. Many other phones have been tested, but there is no central list of known working phones. You will need to search for your phone by clicking the Tested Devices link on the FMA web site, which will take you to a SourceForge bug reports page.
The program is also somewhat different from PuppetMaster in that, in addition to Bluetooth, it also supports infrared and serial phone connections. For serial support, you can use Windows 98 or greater; infrared requires Windows 2000 or greater, and Bluetooth is supported on Windows XP only.
Bluetooth requirements are the same as for PuppetMaster. FMA supports both native (Microsoft) Bluetooth drivers and third-party drivers. Unlike PuppetMaster, we were required to pair our T630 phone with the test PC before FMA would communicate with the phone. FMA can talk to your phone in several ways. As shown in Figure 1-32, you can tell FMA which COM port has been mapped to the phone; you can specify the MAC address of your phone for the Native Bluetooth drivers; and you can also use infrared if your phone supports it.
While the FMA setup is similar to any other program youâve installed in Windows, there are a couple sections that you should be familiar with prior to installation. The first is the selection of components, shown in Figure 1-33. If you opt to not install the Microsoft Components, FMA will not work correctly until it is reinstalled with the components.
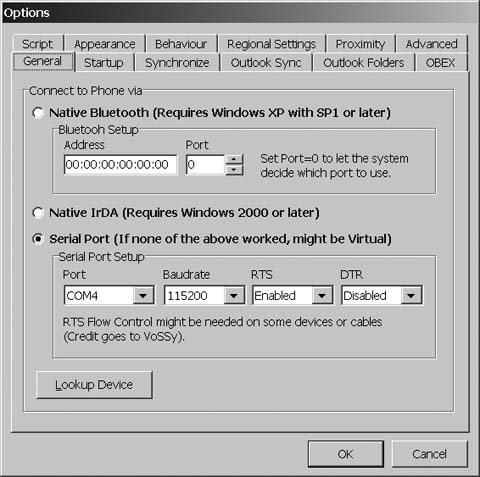
Secondly, you can customize the installation as usual by choosing where icons are created, as shown in Figure 1-34. You need to make sure to include at least the two top Microsoft components; otherwise, FMA will not function. It would be nice if there were documentation to cover this with the package.
Once the program completes installation, it will launch automatically. A phone icon will appear in your taskbar, showing that the program is running. As covered in the next section, you might need to adjust the Bluetooth device settings using the Tools â Options menu to make sure FMA can communicate with your phone.
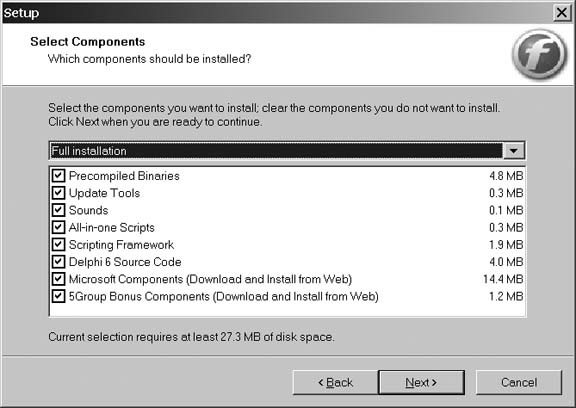
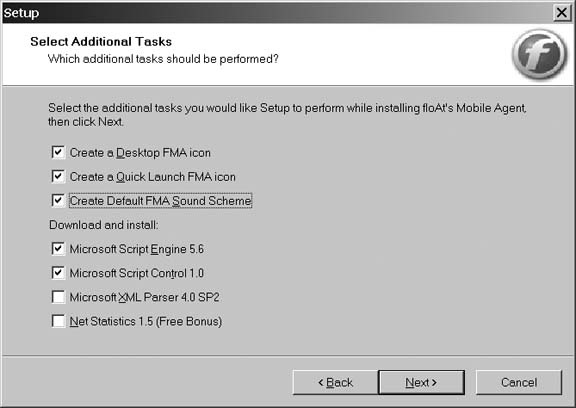
The main screen of FMA, shown in Figure 1-35, should give you a pretty good idea of what the program is capable of.
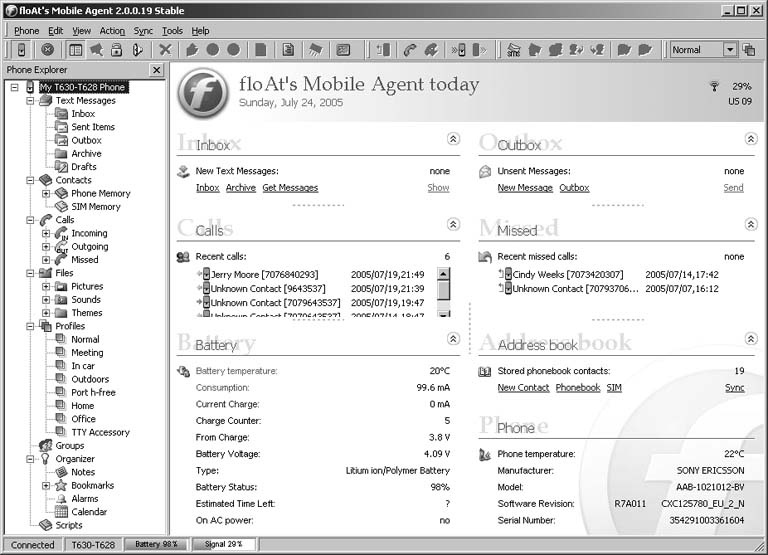
FMA gives you complete control over your text messaging. Choose Action â New Message to compose and send your SMS messages. The New Message window is shown in Figure 1-36. You can also view new messages in your Inbox, organize them in the default folders shown, or create new folders to categorize your messages.
The program also gives you control over your contacts, both in phone and SIM memory. As shown in Figure 1-37, FMA lets you assign custom icons to a contact, and give them a custom ringtone. You can also set the preferred number for the calling contact, as well as associate each contact with a specific contact in Outlook.
When FMA is loaded and communicating with your phone, you can make and answer calls from your PC. When a new call arrives, you will get a Caller ID pop-up window on your screen, as shown in Figure 1-38. If you have a headset connected to the PC, and the correct Bluetooth Audio settings turned on, you can use your headset to answer and receive calls.
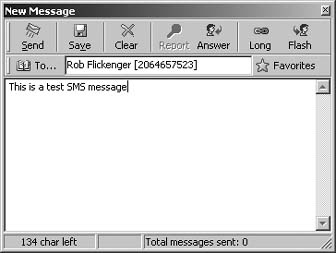
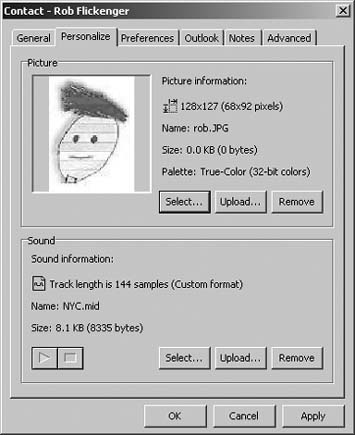
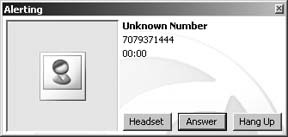
You have complete call logs of all incoming, outgoing, and missed calls. This can be a real lifesaver when you know that you called a client 37 days ago and left a message, but they tell you no one ever called them. Print out the log and send it to them as proof!
You can also browse the files on your phone. Tired of those hideous background pictures that come by default? Delete them. Sick of those horrible MIDI files that you get for ringtones? Delete them! Even better, replace them with custom pictures and MIDI files. From the FMA menu, choose Action â Upload and choose the file you want to upload to the phone. Supported image types are JPEG and GIF, and the only supported audio type is MIDI. There are millions of MIDI files available for free online.
You can really manage all aspects of your phone from FMA. It will even let you power off the phone or lock the keypad of the phone from your PC. Lastly, you can control your PC. When FMA is loaded, a menu of options appears on your phoneâs screen. By default, the menu includes controls for iTunes, Windows Media Player, Windows Media Center, Winamp, VLC (VideoLan Client), PowerDVD and WinDVD. There are also controls for PowerPoint and two mouse modes to control the PC mouse from the joystick or keypad.
FMA also provides a General Tools menu on your phone that allows you to turn the PC display on and off, lock the display, start the screensaver, and log off the current user, as well as hibernate, shutdown, and restart. You can even disconnect FMA from the phone or close FMA altogether!
FMA does have scripting support from the Microsoft Script tools that it downloaded during installation. Youâll need to have a decent scripting background to make your own scripts and menus, but it is possible.
In short, FMA is probably the coolest Bluetooth application out there for certain Bluetooth phones and Windows users.
Have you ever wanted to do something on your computer from across the room? How about from the other side of the world?
It can be useful to be able to access your desktop machine remotely. You could check server logs, restart failed services, or even post to your weblog. If you have a home network, you can set up all of your computers so that they are accessible remotely.
Virtual Network Computing (VNC) is an open source application that is designed to allow one machine to control another machine over a network. It was originally developed at Bell Labs. VNC is also useful for collaboration. Multiple viewers (clients) can connect to the same server. Each viewer has its own cursor. You can use these cursors to point to content on the remote machine. The viewers display the cursors for all of the other viewers as well. Each cursor is displayed differently from the others so you can tell them apart.
The server side comes in Windows, Mac, and Linux flavors. You can download these versions and get more information from the main VNC web site (http://www.realvnc.com). There are other versions of VNC available as well. For Windows and Linux machines, there is TightVNC (http://www.tightvnc.com). For Windows, there is also UltraVNC (http://www.ultravnc.com), which supports server-side scaling. For Macs, you will need OSXvnc (http://www.redstonesoftware.com/vnc.html). The built-in VNC on Macs doesnât work with PalmVNC.
You will also need an application to access the server. In typical computer-speak, this application would be called the client, but VNC uses the term viewer instead. The Palm viewer is called PalmVNC (http://palmvnc2.free.fr). You can also download UltraVNC for Windows with PalmVNC.
Tip
For a different kind of remote control experience, check out the Pebbles Project (http://www.pebbles.hcii.cmu.edu/), which makes a variety of remote control products for Palm devices. For example, their SlideShow Commander is a specialized application for remotely controlling PowerPoint Presentations. If youâre on a Mac, check out Salling Clicker [Hack #8] , a general-purpose remote control package that can be extended with a little bit of AppleScript programming.
To access your desktop remotely, you need to know its external IP address. If you have a single computer that is directly connected to the Internet and has a static IP address, thatâs easy. All you have to do is look up your IP address in the appropriate place and write it down for use in setting up PalmVNC.
If you have a dynamic IP address (e.g., your home computer is sitting behind a router), the situation is a little more complicated. You need to consider using an IP publishing service (see the "IP Addressesâ sidebar). An IP publishing service will typically let you choose a hostname within their domain. You end up with a name like hostname.domainname.com. Keep this symbolic address handy for setting up PalmVNC.
Download and install the appropriate version of VNC on your desktop machine. After VNC has finished installing, run the configuration part of it. You will be able to choose a password for VNC, as shown in Figure 1-39.
Choose a good password (at least eight characters and a mixture of upper and lowercase characters, numbers, and punctuation). This password is all that is needed to access your machine over the Internet, so choose carefully. Either write it down or remember it; you will need the password when configuring PalmVNC.
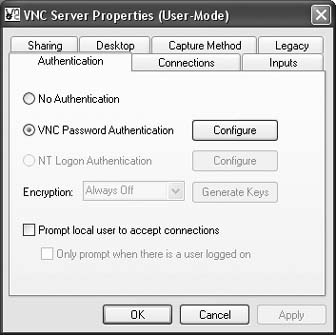
When you run OSXvnc, you will see a screen similar to Figure 1-40. Select a display number (usually 1) and port (usually 5901). Set a password; this is the password you will use when you log in from PalmVNC.
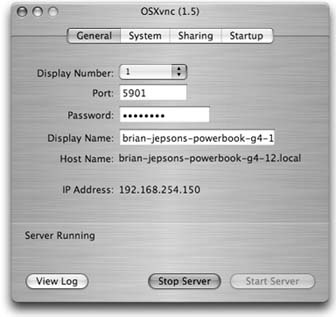
When your Mac is set up, then you can proceed to setting up PalmVNC. When everything is working and you are connected, you should see a screen on your Palm device that looks like Figure 1-41.

You will need to open some ports in your firewall for VNC, and VNC itself needs access to ports 5900-5902 on your computer. By default, VNC sends information (including passwords) as plaintext. You can use SSH (a secure protocol that can encapsulate other types of connections such as VNC; see http://www.openssh.org for more information) instead for more security. You will need to open port 22 in your firewall for SSH, if you have not already done so.
Some of the servers (notably TightVNC) have SSH set up by default. For other VNC servers, the process is fairly simple. From the client side of a desktop machine, you want to run something similar to the following:
ssh âL 5902:localhost:5901remotehostâlusername
PalmVNC comes with a plug-in that does RSA-40 encryption. If you want more security than that, you can tunnel your VNC connection through a VPN.
Whenever VNC is running, it will look for incoming connections. If you have a personal firewall (e.g., Norton Internet Security, ZoneAlarm), youâll need to set the firewall to allow VNC to access the Internet. If you have a port-based firewall, youâll need to allow access to the ports that VNC uses. By default, VNC uses ports 5900 and 5800 (port 5800 is only used for a Java-based viewer), but you can change those ports under the Connections tab.
There is a Palm VPN client called Mergic VPN (http://www.mergic.com). To set up a VPN, you need to have an externally visible IP address for your desktop machine. Enter that IP address into Mergic VPN in the area titled VPN Server Name or Address, as shown in Figure 1-42.
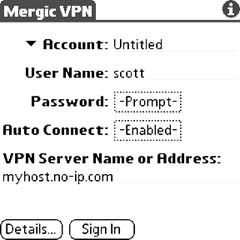
You can create multiple VPN accounts for connecting to different machines. Set the account name in the Account edit box. Note that this name is only used to distinguish between different setups in Mergic. The actual username for logging into VNC goes into the User Name field. You can also choose to have Mergic VPN autoconnect to the server when specific applications are run.
You can run PalmVNC using the VPN from Mergic. You can see Mergic VPN being set to run automatically whenever PalmVNC runs in Figure 1-43.

You also need to configure a VPN service on your desktop machine.
Windows XP comes with VPN available by default. Start by creating a new network connection (from the Network Connections section of the Control Panel). Select an Advanced Connection, as shown in Figure 1-44.

The next dialog box lets you select the advanced connection options. Select Accept incoming connections, as shown in Figure 1-45. Next, choose the device that you want to allow VPN connections from.

Figure 1-45. Selecting Accept incoming connections from the Advanced Connection Options dialog box
Then, you will need to allow VPN connections in the dialog box shown in Figure 1-46.
After that, select the users that you want to allow to use VPN. You will need one of these usernames (and the corresponding password) when you set up Mergic VPN. The final steps are to allow access to different types of services (at a minimum you need TCP/IP; others are at your choice) and to set up the IP address for your computer.
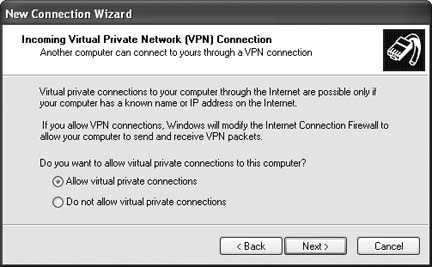
Download PalmVNC from http://palmvnc2.free.fr. Unzip it and install palmvnc.prc onto your Palm device.
Connect your Palm device to the Internet and run PalmVNC. Set up a new connection to your desktop machine, as shown in Figure 1-47. Enter the IP address for your desktop machine and the password you used when setting up the VNC server, and then tap OK and Connect from the next form. If everything is working, you should now see your desktop on your Palm device.

You can move around the desktop by using the narrow scrollbars on the right and bottom of the screen. If you set up server-side scaling when you were configuring the server, then you can take advantage of scaling by selecting from PalmVNCâs menus or the Advanced dialog box, as shown in Figure 1-48. At 1:2 scaling, you can view a 640 x 640 desktop on a 320 x 320 Palm device or even up to a 640 x 960 desktop on a 320 x 480 Palm device. Thatâs large enough to see (and do) a decent amount.
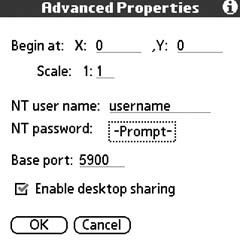
No matter which operating system your desktop is running, you can still control it with PalmVNC and an appropriate server. Make sure that you use an appropriate level of security for the environment you are in (running over a local network or running over the Internet).
âScott McHaffie
You know that stack of infrared (IR) remotes thatâs always spilling onto the floor? Your Palm can take the place of all of them.
You need software to convert your Palm into an infrared (IR) remote. Two choices are OmniRemote (http://www.pacificneotek.com) and NoviiRemote (http://www.novii.tv). You should look at the home theater devices that these two programs support and pick the one that is compatible with your gear.
If neither program covers all of your devices, then you have a couple of choices. If you have the remotes for your devices, and you are looking at simplifying down to just your PDA, then you can switch the applications into learning mode. Line up the remote and your Palm device on a flat surface with the IR end of the remote pointed at the IR port on your PDA and run through all of the important buttons on the remote. Save the buttons for each device under a unique name.
If you are missing some of the remotes, then you can try to find an IR code library on the Web. One good source is RemoteCentral (http://www.remotecentral.com), which has IR files under the Files tab on the home page. The files for the Philips Pronto can be used with OmniRemote by using a converter from the OmniRemote web site. If you canât find your specific device, then try to find a similar device by the same manufacturer.
Once you have all the codes for the devices you want to control, it is time to create button layouts. There are a variety of interesting button layouts on the Web. The web sites for the IR software have some button layouts, as does RemoteCentral. You can look at these for inspiration.
You should keep in mind what you want to do with each button layout that you create. For example, a common layout is watching DVDs. To do this, you may need to turn on the TV, DVD, and home theater systems. You could combine these actions into a macro, then have a single Power button that turns everything on. You might also need volume, play, pause, stop, fast forward, rewind, menu, and arrow keys. A button layout for watching TV might include a number pad, and channel-up and channel-down buttons.
One of the big problems with using a Palm as an IR remote is the limited range of the Palmâs IR port.
Fortunately both companies also provide hardware versions of their products. Pacific Neo-Tek (http://www.pacificneotek.com) sells a Springboard module for the Handspring Visor and Handspring Prism. You will need to find a used Visor. The Visors have a Springboard slot in the top that can take plug-in modules. All you have to do is stick the OmniRemote module into the Visor. The software is pre-loaded on the module.
NoviiRemote makes a product called the NoviiRemote Blaster. This is an SD card that functions similarly to the OmniRemote product, except that it works with SD-compatible devices such as recent Palm-branded devices.
At the time of this writing, I was unable to locate a similar product for the Sony Clié.
The first part of these instructions apply to using both OmniRemote and NoviiRemote:
Make sure that the software (or hardware) that you want to use is compatible with your PDA. If not, consider buying a cheap Palm to use as a dedicated remote control.
Even if you plan on buying a hardware device to install in your PDA, start by downloading the corresponding trial softwareâyou need the software to check that it can control your device.
NoviiRemote provides standard button layouts for a number of different devices, such as TVs, VCRs, etc. You can easily switch between different devices, as shown in Figure 1-49.
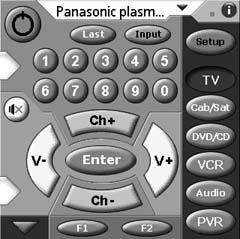
Here are some tips for using NoviiRemote:
Use the trial version of NoviiRemote to make sure that the controls work. Start with the default codebases (collections of remote control codes) that came with the software. For each device you want to control, try out the included codes to see if the functions you want to use work.
If the included codebases donât work, then check the companyâs web site for additional (sometimes user-supplied) codebases. Download these and try again.
If the downloaded codebases donât work, then you can try using OmniRemote instead, if it supports your PDA.
If none of that works and you have the remote controls for the devices that donât have codebases, then you can put the program into âlearnâ mode and teach it all of the buttons. If you are successful with this, then you can help other users by uploading the results back to the companyâs web site.
OmniRemote, shown in Figure 1-50, provides macros in addition to the standard buttons. A macro can combine multiple actions (e.g., turn on the TV and turn on the VCR). OmniRemote supports a different set of devices natively than NoviiRemote.
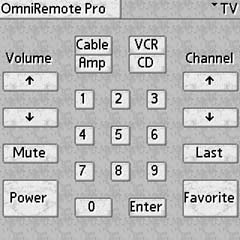
Here are some tips for getting the most out of OmniRemote:
Use the trial version of OmniRemote to make sure that it can control your devices. You need to either program all of the buttons yourself (if you have the corresponding remote controls), or you can try to find codes on the Web.
If you want to find codes on the Web, start by downloading CCFCnvt.zip from the OmniRemote web site, unzipping it, and installing it. This program is called CCF Converter, and it converts remote control libraries from .CCF format to the internal format that OmniRemote uses.
Go to RemoteCentral (http://www.remotecentral.com) and look under Files for code databases for the Philips Pronto device, a popular remote that can control just about anything. These databases are the .CCF files that you can convert. If you find files that seem to match your home theater devices, then download them. You will need to unzip the files as well.
Run CCFCnvt.exe. You will see a screen similar to Figure 1-51. In this program, you will click Read CCF to load each of the CCF files that you downloaded in the previous step. For each file, look for the device that you want (many of the CCFs are for a set of devices so you may need to experiment to figure out which file corresponds to the device you want).
When you find the appropriate device in CCF Converter:
Use the arrow button to add it to your selected list. Repeat this for each device.
When you have collected all of your devices, then select Create PDB File to generate a new database with your devices in it.
Click Add and choose the PDB file that you created in the previous step.
HotSync your PDA to download the configurations.
Test to make sure that you can correctly control your devices now.
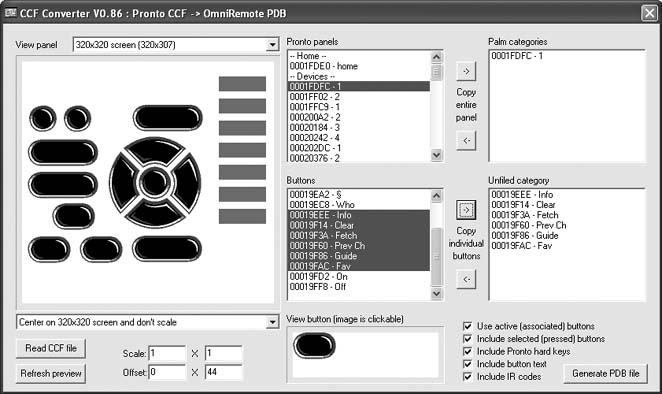
Tip
One of the nice features of OmniRemote is that you can create macros. For example, you might have a Watch DVD macro that turns on the TV, DVD, stereo, or home theater, and sets the volume to the correct level for a DVD. To create a macro, start by creating a new button and select Macro as the type of button. Then click on the Edit Macro button and hit Insert. You will be prompted to tap buttons to add them to the macro.
Either of these devices can simplify your remote controls. You will end up with a single Palm device instead of a stack of remotes. You also have the ability to create sophisticated macros to handle multiple common chores at once. You can see an example of creating a macro to turn on the TV, increase the volume, and switch to channel 25 in Figure 1-52.
Macros can give you a lot of power in a single button. With a few macro buttons on a single page, you can easily perform a number of functions.
âScott McHaffie
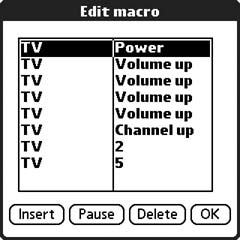
If youâre going to use your phone to connect to the Internet, make sure youâve got the right data plan.
Your cellular phone can connect you to the Internet in a lot of ways, but itâs going to cost you. Before you commit to a costly data plan, you need to consider what youâll do with the phone. Will you send and receive email on the phone? Do you plan to send a lot of camera phone pictures or video clips? How about posting to your weblog [Hack #18] ? And most important, will you use your phone to connect (tether) your laptop to the Internet [Hack #4] ?
Itâs possible for you to use your phone for a lot of what your computer can do, and yes, there are plenty of hotspots around for that data fix when you need it. But I think youâll give in and tether eventuallyâjust wait until the first time you open up your laptop and find no WiFi signal while your phone is showing five bars!
Tip
We will use the word tether even when referring to wireless methods of using your handset, such as the Bluetooth connection.
Data plans come in two flavors: metered and unlimited. With a metered plan, you get anywhere between 1 and 20 MB per month as a base allotment, and if you go over, you pay by the kilobyte. There are two types of unlimited plans: handset plans and really, honest, we-mean-it unlimited plans that let you use your phone as a wireless modem for your laptop or PDA.
The phone typically relies on the wireless operatorâs data network to connect to the Internet. The underlying wireless network technology is known as the data bearer of the mobile data. Hereâs a quick overview of the data bearers available from todayâs wireless service plans.
- GSM
The GSM network provides data access over the phone (data calls). It works in the same way as the dial-up modem on a PC. The benefit of this technology is that it is available everywhere you can get coverage. However, the drawbacks are the slow data rate (between 9.6 and 13.2 Kbps) and the dedicated phone call for the connection. Since the call must be connected for the entire data session, it counts against your airtime minutes. If you want to make a voice call, you must first disconnect the data call. GSM data is known as 2G (second generation).
- GPRS
The GPRS network allows the phone to have direct access to the packet-switched data from the network. The phone does not need to dial any calls. This feature allows the phone to have always-on access to data without using up airtime minutes. GPRS is known as 2.5G (halfway between second and third generation). The data speed of 2.5G data bearers (between 20 and 40 Kbps) is also faster than that of the 2G data bearers.
- EDGE
The EDGE network works much like the GPRS network, except that EDGE has a much faster data rate (up to 230 Kbps). The EDGE network coverage is still limited. In the United States, only AT&T Wireless (now part of Cingular Wireless) has national EDGE coverage. Only a handful of devices released since 2004 support the EDGE data bearer.
- UMTS
The UMTS network is whatâs known as third-generation (3G) wireless networking technology. It offers broadband data speeds of around 384 Kbps. However, UMTS coverage is very limited. In the States, it is currently available in only a few selected cities. In addition, UMTS service plans can be very expensive. New phones such as the Nokia 6630 support UMTS.
- 1xRTT and 1xEV-DO
CDMA-based networks have two kinds of data bearers: Single Carrier Radio Transmission Technology (1xRTT) and Single Carrier Evolution Data-Only (1xEV-DO). 1xRTT has typical rates of 70â120 Kbps, and 1xEV-DO has typical downstream speeds of 300â500 Kbps (with upstream speeds the same as those of 1xRTT). In the States, 1xRTT is available nationwide from Verizon Wireless, but only selected cities have 1xEV-DO.
Which data bearer is available to you depends on your wireless operator, your location, and your service plan. GPRS service should be available from all GSM operators wherever you have voice coverage. Likewise, 1xRTT should also be available from most CDMA operators. If your current service plan does not include any data service, you can call up your wireless operator and add it for an extra monthly fee. The data service is typically metered by the bandwidth you use in a billing period. In the United States, most operators also offer flat-fee subscriptions for unlimited data use; for example, T-Mobile charges $20â$30 per month for its GPRS-only network and Cingular charges $80 per month for its EDGE and GPRS networks.
This could be the hard part, but the good news is that you can just take a best guess. If the plan you select doesnât work out, most providers will let you change data plans midstream. Here are some considerations:
- Web browsing
If youâre going to browse the Web using your built-in browser, chances are good that you wonât use a lot of data, simply because that browser doesnât offer the rich graphical and multimedia content you get with a desktop browserâin this case, it might be OK to go with a metered plan. However, if you use a third-party browser, itâs possible you could end up using a lot of data, especially if you find yourself turning to your phone for web surfing more than you do your laptop.
If you plan to use your phone for sending and receiving email, this wonât take up a huge amount of data (but see the next item). For the most part, email is text, and unless youâre likely to use your phone to work with office documents, you probably wonât move a lot of data with email. As such, you could get away with a metered data plan. If youâre going to be sending and receiving lots of photos and video, get yourself an unlimited plan.
- Tethering
If you plan to connect your laptop to your cell phone to get online, welcome to what some folks think is a gray area. Hereâs the problem: most of the low-priced unlimited data plans are intended for use with your phone only. However, itâs technically possible to connect your laptop to your phone and get online. You will probably get away with this if you donât use a lot of data. However, anecdotes abound concerning people who claim to have received nastygrams from their cellular operator after using large amounts of data in this way. Itâs insanely simple for a cell provider to distinguish between traffic that originates from a phone and traffic that originates from a laptop. For example, every web browser transmits a User-Agent identifier every time you load a page; this is a dead giveaway.
Some providers will bill you differently based on your usage. AT&T Wireless (which was being absorbed into Cingular at the time of this writing) had a $24.99 monthly handset data plan, but vowed it would charge $1 per megabyte to users who tethered a laptop or PDA to their mobile phone. Furthermore, cell providers routinely, and sometimes temporarily, block access to certain ports (there have been reports of SSH, secure IMAP, and POP for email, and even secure HTTP being blocked), with the (misguided) rationale that most handset users donât need those ports.
If you plan to use your cell phone as your laptop or PDAâs lifeline to the Internet and you donât want to risk unexpected overages or a service disconnection, go with an unlimited plan that explicitly supports tethering.
- SMS and MMS
In theory, SMS and MMS come out of a different billing bucket than does Internet data, so the number of messages you send and receive shouldnât affect your choice of a data plan.
All those guidelines aside, the best thing to do is choose an unlimited data plan, if one is available (otherwise, pick the most generous metered plan). That way, if you donât use a lot of data, you can progressively downgrade each month. If you do use a lot of data, at least you wonât get whacked with per-kilobyte charges.
Although wireless data might seem as though itâs brand-new, its pricing is settled, for the most part. Usually youâll pay around $5 to $10 per month for something that lets you do basic web surfing and email, and around $20 to $30 for more capabilities. So, if youâre planning to use a lot of third-party network applications, such as instant messaging and RSS readers, you should go for the plan that gives you more. If you plan to use your phone as a wireless modem for your laptop, you should definitely choose an unlimited plan that supports tethering. Table 1-4 shows a few unlimited data plans that were current as of this writing.
Table 1-4. Unlimited data plans by provider
|
Provider |
Handset |
With tethering |
|---|---|---|
|
Cingular |
$24.99; MEdia Net Unlimited |
$79.99; Data Connect Unlimited |
|
Nextel |
$54.99; Unlimited Wireless PC Access Plan | |
|
Orange UK |
£88.13; (if you exceed 1000MB per month, you will probably get a nastygram) |
Same as handset |
|
Sprint |
$15; Unlimited Vision |
None |
|
T-Mobile |
$4.99; Unlimited t-zones (email and web only) $9.99; Unlimited t-zones Pro |
$29.99; T-Mobile Internet ($19.99 with a qualifying voice plan) |
|
Verizon Wireless |
$15; VCAST $4.99; Mobile Web (uses up plan minutes) |
$79.99; BroadbandAccess or NationalAccess Unlimited |
If you think Table 1-4 looks very U.S.-centric, youâre right. Although the United States lags behind in terms of the latest gizmos, itâs a feeding frenzy for those who are determined to get all-you-can-eat data. In other parts of the world, metered data plans are more common. And the States has its share of those as well. Table 1-5 shows some of these plans, from the low-end to the high-end offerings, and includes the range of charges you can expect if you go over the metered limit.
Table 1-5. Metered data plans by provider
|
Provider |
Low-end metered |
High-end metered |
Overage |
|---|---|---|---|
|
Cingular |
512KB for $2.99 |
60MB for $59.99 |
Varies with plan: $0.005/KB to $0.01/KB |
|
Nextel |
1MB for $9.99 |
100MB for $99.99 |
Varies with plan: $0.003/KB to $0.01/KB |
|
Orange France |
5MB for 5 |
20MB for 20 |
Varies with plan: 0.10/KB to 0.15/KB |
|
Orange UK |
4MB for £4 |
400MB for £52.88 |
Varies with plan: £0.59/MB to £1/MB |
|
Rogers (Canada) |
256KB for CAN$3 |
100MB for CAN$100 |
Varies with plan: CAN$1.02 to CAN$10/MB |
|
Sprint |
Unlimited plans only |
N/A |
N/A |
|
Telcel Mexico |
1000KB for MEX$100 |
50,000KB for MEX$500 |
Varies with plan: MEX $0.10/KB to MEX$0.02/KB |
|
T-Mobile |
Unlimited plans only |
N/A |
N/A |
|
T-Mobile Germany |
5MB for 5 |
500MB for 110 |
Varies with plan: 0.80/MB to 3.90/MB |
|
8Verizon Wireless |
20MB for $39.99 |
60MB for $59.99 | |
|
Vodafone UK |
2.6MB for £2.55 |
51.1MB for £34.04 |
£2/MB |
In most cases, youâll choose the data plan when you sign up for your voice service. However, most providers will let you add or change your data plan at any time. But before you make a change, ask the all-important questions: will this require me to agree to a contract extension, and will I be charged a termination or activation fee to make this kind of change? If you donât like the answer to either question, you should reconsider adding a data plan until itâs time to renew your contract, or look into setting up a data plan on a separate line of service.
Warning
One problem you might run into is a customer service rep that is unfamiliar with the plan you want. The best thing you can do is make sure you know the name of the service. To find this out, visit the providerâs web site. If you canât find the name of their data plan in 5 minutes, go through this simple exercise: add a phone to your shopping cart and then choose a voice planâpreferably, the same one you are signed up for. The data plans available to you might depend on what level of voice service you have. For example, the price for T-Mobileâs unlimited Internet plan is $19.99 with most voice plans, and $29.99 without a voice plan (or if you have a cheap plan).
At this point, the providerâs web ordering system should offer you a data plan (you might need to click around for an optional services or features link), and you should write down the name of the service, call customer service, and ask them to add it to your plan.
Once youâve selected a data plan, log into your providerâs web site every day or so and keep an eye on your data usage as you goâif you accidentally configure your email client to check mail every 30 seconds, you could be in for a surprise. The data total that shows up on the web site will probably be behind by 24 hours, perhaps more if youâve used your data plan while roaming.
If youâre on a metered plan and see yourself getting dangerously close to the limit, change plans right away. Although most providers will prorate the new plan after you change it, make sure you understand what exceptions are in place between the date you change the plan and the date your billing cycle resets. For example, suppose your billing cycle ends on the 28th of each month, and you are just shy of the 20MB limit on a metered plan when you switch to an unlimited plan on the 23rd of the month. You might think that you can use as much data as you want between the 23rd and 28th, but be sure to askâwhen it comes to cellular billing, nothing is as simple as it appears.
âBrian Jepson
Use a mobile blogging service to post blog entries with pictures from your mobile phone.
Not long ago, bloggers could only update their blogs using a computer. Inspiration, however, does not always coincide with the presence of a bulky computer. At the turn of the century, some adventurous and creative bloggers started blogging from their mobile devices. The word moblog was thus coined, referring to blogging from a mobile device (mobile phones, PDAs, etc.).
If blogging without a computer is convenient, moblogging with a camera phone is exciting. In just a few clicks you can snap a quick shot and add a few punch lines, and minutes later the neatly formatted post on your personal blog can be shared with the entire world! Figure 1-53 shows a snapshot of OâReilly editor Brian Jepsonâs moblog. You can see Brianâs world through pictures taken from his phone camera and comments that captured his instantaneous thoughts. (The dry spell between November and March? Thatâs when Brian used a phone without a camera for a few months before switching back to his Nokia 3650.)
There are two major approaches to moblogging, regardless of the myriad phone models and their different capabilities: SMS moblogging and email moblogging. This hack introduces and compares these two methods, with an emphasis on the latter.
Tip
Instead of email, you can also use MMS to post blog entries from your camera phone. The MMS message is sent to an email address, and hence, MMS moblogging is essentially the same as email moblogging.
SMS moblogging works on any handset that can send SMS, which is virtually every mobile phone nowadays. You write the blog entry on the mobile phone and send it via SMS to a service phone number provided by a moblog service. The moblog service interprets the received SMS message and posts it to your blog. You can be identified by the caller ID or an ID code embedded in the SMS message. A good example of such an SMS moblog service is Txtsolutions (http://blog.txtsolutions.com). Txtsolutions can host your blog on its own site, or post your blog entries to your account in a list of supported third-party blog hosts.
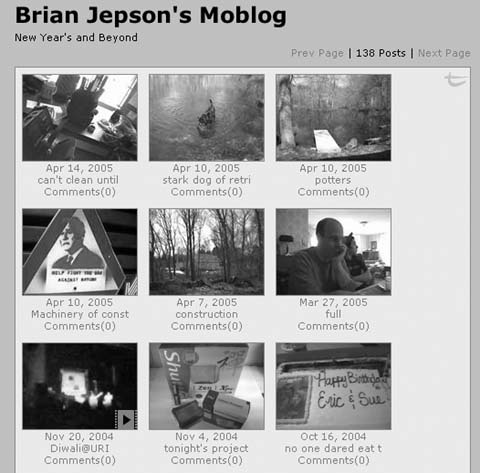
Tip
If the SMS moblog service posts the blog entries to a third-party blog host on your behalf, it needs to know your login information on that third-party site.
Despite the meager prerequisite of the handset, SMS moblogging has some major drawbacks. First is the nagging 160-character limitation for SMS. Second, even if you are laconic enough to squeeze each of your posts into fewer than 160 characters (not words), SMS moblogging is text-only. Third, you need to pay extra to the SMS moblog service provider. For example, Txtsolutions charges £0.10 for each message. This charge is in addition to your regular SMS fee (from your wireless operator) and cost for the blog hosting service if it applies.
If your mobile phone supports sending email or MMS, email moblogging doesnât have any of the drawbacks of SMS moblogging:
Email moblogging works in much the same way as its SMS counterpart, except that you send email from the phone to a (hopefully) secret email address. The email Inbox is polled by the moblog service at regular intervals (e.g., every five minutes). When a new message is detected, the moblog service retrieves the message and parses the content. If the moblog service supports picture attachments (most do), you can even have a mobile photo blog!
Warning
It is important that you keep the email address private. Any message sent to that email address will be automatically posted on your blog.
The easiest way to set up an email-based moblog is to use a blog hosting service that supports email posting. It typically takes only a few minutes. After you open a regular blog account at the hosting service, there is usually a field under the user preferences screen where you can set the private email address. All emails sent to this address will be posted to the blog you just opened.
Most popular blog hosting providers now support email posting from mobile phones, either free of charge (e.g., Blogger) or with a premium paid account (e.g., LiveJournal). Table 1-6 compares several providers that emphasize moblog support.
Table 1-6. Moblog support in popular blog hosting services
Besides the major blog providers, some new providers specialize in moblog hosting. Among them are Textamerica (http://www.textamerica.com) and Fotolog (http://www.fotolog.net). Both of them offer free accounts for users to blog directly from their mobile phones.
The aforementioned photo moblogging solutions tie you into specific blog hosting services. But in many cases, you do not want this tie-in:
Is there a service that is free and independent of your blog server? As it turns out there is, and itâs called Flickr.
Flickr (http://www.flickr.com) started out as a photo storage provider. The one feature that makes Flickr really interesting from a moblog point of view is that it allows you to upload photos (to Flickr) by email and create a blog entry at your designated blog site. The blog site can be any of the blog hosts mentioned in the previous section, or even your own web site running popular blog server software.
The post includes the email content as its main body and an inline thumbnail, which is linked to the picture stored on Flickr. The thumbnail posting feature in Flickr is really cool and sets it apart from other services, especially if you have a camera phone that produces megapixel pictures. Without resizing to thumbnails, megapixel pictures would clutter up your blog and mess up the web page layout (e.g., sidebars, etc.).
The free account at Flickr allows you to upload up to 20MB of photos per month. A subscription fee of $24.95 per year will push the quota to 2GB per month. Considering most (mobile phone) moblog attachments are smaller than 100KB, the free Flickr account is more than sufficient for even the most aggressive mobloggers. Combining the Flickr email posting service with a free blog hosting service (or your own blog server), you can set up a powerful and free moblog with photo posting in no time!
Figure 1-54 shows the information Flickr needs to post to your blog site on your behalf. Obviously, it needs to know your site address and account credentials.
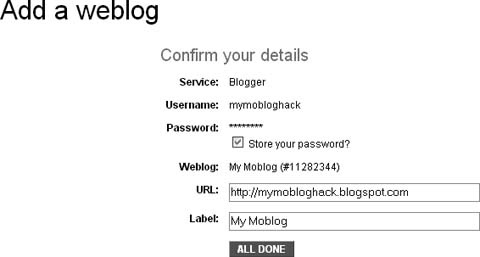
Figure 1-55 shows the private posting email addresses Flickr provides to you when you open an account. One address is for adding pictures to your Flickr account, and the other is for adding the pictures and then posting thumbnails to the designated blog.
The default email application on many phones restricts the size of an attachment to a maximum of 100KB. To get around this limitation and to provide a more integrated user experience, you can use a phone application that takes pictures and then automatically posts them to Flickr without having to switch applications and enter email addresses.
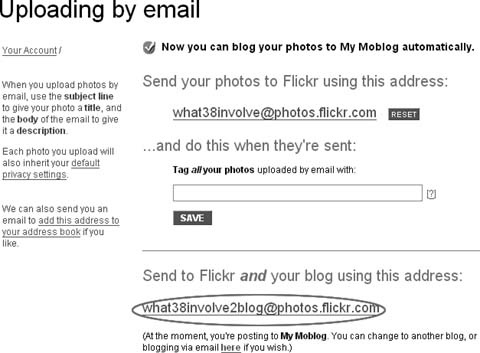
Figure 1-55. The free email address Flickr provides for each account to post blog entries and pictures
Manoj TK wrote a little open source J2ME (Java 2 Mobile Edition) program that does just that. You can download it from http://sourceforge.net/projects/moblogger2/. To learn how the program works, please refer to http://manojtk.blogspot.com/2005/01/smtp-email-attachments-from-nokia-6600.html.
Many power bloggers run their own blogging server so that they can have complete control over the content and presentation of their blog. While Flickr can interoperate with many popular blog systems, it is still a hosted service that is beyond the bloggerâs control. For instance, there is no guarantee that the free Flickr service wonât be replaced by a for-pay service in the future. If you want complete end-to-end control over your moblog, you can customize existing blog server software to make it support email posting with photo attachments from a mobile phone. In this hack, you will learn how to set up the popular WordPress blog server to support photo moblog postings.
Tip
Running your own server also gives you complete access to web site visitor statistics, the ability to back up the web site, and many other features.
WordPress (http://www.wordpress.org/) is an open source blog server based on PHP and MySQL. It is available free of charge from the WordPress web site. You can run it on your own server or on any ISPserver account that supports PHP4.1 and MySQL 3.23.23 or greater. As a PHP and MySQL application, WordPress runs on almost any modern operating system, including Linux, Unix, BSD, Windows, and Mac OS X.
By following the installation instructions (see http://wordpress.org/docs/installation/5-minute/) you can install WordPress in five minutes. After creating a user account, you can start to post and publish blogs on your very own blog server now! Out of the box, you can use Flickr to post photos to your freshly installed WordPress server. In the rest of this hack, I will discuss how to set up WordPress so that you can moblog with it without needing a third-party service.
WordPress supports email posting, albeit with two main drawbacks. First, it does not support email attachments. And second, it does not filter the senderâs email address. Anyone can send email to the email address and have their messages appear on your blog. Without sender-address filtering, your moblog can be easily flooded with spam messages.
A patch by âlansmashâ fixed both drawbacks. Applying the patch is straightforward. First, download the file wp-mail-0.2.zip from the web address http://blade.lansmash.com/index.php?cat=5. Unzip the archive to the WordPress root directory. This adds the files PEAR.php and mimedecode.php to the directory, and replaces the original wp-mail.php file. Now, create two directories, wp-photos and wp-filez, under the WordPress root directory to store images and other attachments, respectively. You can choose other directory names as long as you remember to modify the corresponding settings in the new wp-mail.php file.
If you want automatic picture resizing (an important feature for megapixel camera phones), you need to install an additional hack provided by Hugo. Simply replace the default wp-mail.php file in your WordPress installation with a new file download from http://www.vienna360.net/files/wp-mail.phps.
Now, you can test your setup by sending an email message with a picture attachment to the email address specified in the Options â Writing section of the WordPress configuration page. Make sure you enter the correct server and login information. Nothing appears on your blog just yet. That is because the wp-mail.php script needs to be manually loaded to poll the email server for the new message. Do this by pointing your browser to http://your-domain-name/MyMoblog/wp-mail.php.
Of course, if you need to open a browser and load the wp-mail.php script manually every time you post a moblog entry, it defeats the whole point of moblogging. So, letâs discuss how to automate the email polling process in WordPress.
To automate the email polling and blog posting process in WordPress, you need to schedule a recurring task that loads the wp-mail.php script at fixed intervals (e.g., every five minutes). You need two tools for this: a lightweight URL loader called cURL to load the PHP script, and the open source cron daemon to schedule the recurring URL loading tasks. Both cron and cURL are installed by default on Linux, Unix, and Mac OS X computers. For Windows, you can install the Cygwin toolkit (http://www.cygwin.com/) to get a common set of Unix utilities including cron and cURL.
Tip
You can use a fully featured web browser, such as Firefox, to load the wp-mail.php script every five minutes. But that is a huge waste of server resources.
Next, log into your server and type the following on the command line:
crontab âe
This opens the cron control file, which contains all scheduled tasks, in the systemâs default text editor. You should append one line to the bottom of the file, save it, and exit the editor. cron automatically reloads the control file.
*/5 * * * * /usr/local/bin/curl http://yourdomain/wp-mail.php > /dev/null
The preceding line in the cron control file schedules the system to run the curl command every five minutes in every year, month, week, and day. Thatâs it! You now have a fully functional photo moblog server.
Tip
If you do not want to use the default editor, you can always export the cron control file to a text file, edit it externally, and then import the edited file back to crontab. See the crontab manual for more information.
âHaihao Wu
Turn your Java-enabled cell phone into a portable mapping appliance.
If you have a GSM phone from the last three years or so, you (probably) have a powerful mobile mapping appliance in your pocket.
Mobile GMaps is a free program that lets you view Google Maps on your cell phone. It is limited to J2ME (Java 2 Mobile Edition) enabled phones, such as the Symbian Series 60 and Series 80 phones. The program is available at http://www.mgmaps.com. Read the instructions on the download page at http://www.mgmaps.com/download.php.
The easiest way to install the app is to use your phoneâs browser to go to http://wap.mgmaps.com. Then click on the Download link, and agree when it asks if you want to download and install the application.
When the program completes installation, youâll get a completed message and then be returned to the http://wap.mgmaps.com page. You can now exit from your phoneâs web browser. On my Nokia 3650 the program MGMaps installed into the Apps folder. Click on the application, and then select Start from the Options menu.
By default you will see a map of the United States fully zoomed out. You can navigate with the 2, 4, 6, and 8 keys. Zoom in with 5 or # and zoom out with 7 or *. Figure 1-56 shows Mobile GMaps on a Nokia 3650.
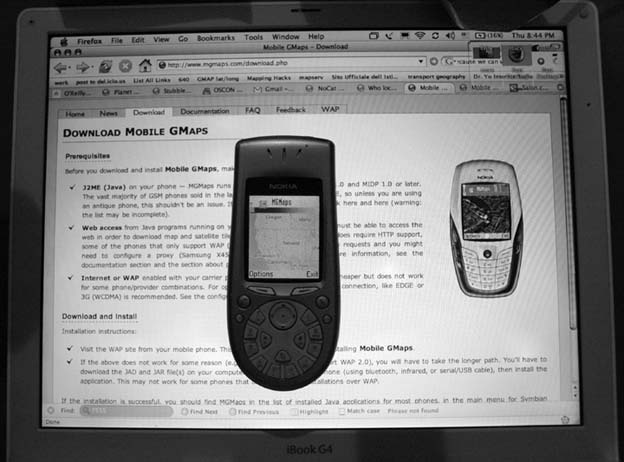
Selecting Options gives you a menu of Satellite, Zoom, Location, Search, Settings, About, and Exit. Satellite flips you to Satellite imagery. Zoom brings up a menu that lets you zoom in, zoom out, or select a zoom level from 0â14. Locations are like waypoints on a GPS. You can set latitude, longitude, zoom level, and map or satellite view, and then return to that view from the Location menu. Search brings up a search screen that calls the Google search system.
There are a number of tricks and hints on the GMaps web site. Mobile GMaps was written by Cristian Streng. It is released under the Attribution/ NonCommercial/NoDerivs Creative Commons license. This means that you can use and distribute the program for free, but you canât make derivative works or use it for commercial purposes.
And as Cristian says, âIf you like Mobile GMaps and find it useful in your daily life, if it saves you time and money, please show that you value my time, my expenses, my effort and my knowledge and consider a donation to me.â
âRich Gibson
Caravanning with friends, but only one person has a GPS? Play nice and share.
Road trip caravans are more fun when the people in the two cars can communicate with each other. People have used CBs and Family Band Radio Service (FRS) radios for years just for this purpose. If you want to exchange data instead of voice over radio, you can set up a roving Wi-Fi network and then share a GPS between vehicles.
Connect a GPS to one computer and then set up a wireless network. Clients in other vehicles can connect to the GPS on the host machine. Normally, only one program at a time can access a serial portâconnected GPS. This can quickly become a problem. You probably want to run gpsmap [Hack #22] to get maps, and then a program to log your position, and perhaps another program to let you create spatial annotations of your travels.
That is way too many connections for a single-user serial port! Fortunately, GPSd is available as a daemon that connects directly to the GPS and then acts as a server for position information. Once you have GPSd installed, all of your GPS aware applications can share a single GPS.
GPSd is available at http://gpsd.berlios.de/. It runs under Linux, FreeBSD, Mac OSX, and any POSIX compliant Unix variant. You can build and install GPSd in the standard way, as shown here, but do follow any current instructions from the web site (replace x.xx with the current version):
	$ tar xvfz gpsd-x.xx.tar.gz
	$ cd gpsd-x.xx
	$ ./configure
	$ make
	$ make install
Most GPS units have a serial port and can be configured to output the current position using a standard protocol called NMEA. GPSD expects your GPS to send NMEA formatted data, but can also accept data in different formats. Check the GPSd site for how to enable other formats if you have a GPS that does not output standard NMEA sentences.
Once it is installed you can run it with this command:
$ gpsd -p /dev/ttyS0 -s 4800If you have problems getting GPSd to start, consult the documentation. Once youâve got it running you can connect to it with telnet to see what it is reporting:
$ telnet localhost 2947
Trying 127.0.0.1â¦
Connected to localhost.
Escape character is '^]'.Now you are connected to GPSD. The commands are single characters, and you can chain them together. So if you want your Position, Altitude, and GPS Status, issue this command:
PADSYou will get the full GPS position, with your latitude and longitude, altitude, current date and time, and GPS status. The status is the last section: S=0 or S=1, where 1 means the GPS is connected and sending data and 0 means there is no data coming from the GPS.
You can now run Kismet, GPSDrive, and any other GPS-aware applications at the same time, and your friends in the other car can connect to your GPS over the Wi-Fi network. The Perl code in Example 1-1 will connect to GPSd and print the current position and time.
Example 1-1. Connecting to GPSd with dump_gps.pl
	#!/usr/bin/perl

	# /usr/local/sbin/gpsd -p /dev/ttyS0
	use 5.6.1;
	use IO::Socket;
	use Term::ReadKey;
	use strict;

	BEGIN { $|++ }; # autoflush STDOUT.

	# Set parameters based on command line options, with defaults.
	my $GPSD = shift( @ARGV ) || "localhost:2947";

	# Connect to gpsd.
	warn "connecting to gpsd \n";
	my $gps = IO::Socket::INET->new($GPSD)
		or die "Can't connect to gpsd at $GPSD: $!\n";

	while (1) {
		# Tell gpsd we want position, altitude, date, and status.
		$gps->print("pads\n");

		# Parse out the response. If the date is blank, gpsd needs
		# a second to catch up.
		my $location = <$gps>;
		my ($lat, $long, $alt, $date, $status) =
			($location =~ /P=(.+?) (.+?),A=(.+?),D=(.+?),S=(.+?)/gos);

		next unless $status;

		# Print a line of data to both STDOUT and STDERR, and wait.
		print $_ join("|", $lat, $long, $alt, $date || "" ), "\n"
			for ( \*STDOUT, \*STDERR );

		sleep( 1 );
	}
Save this into a file called dump_gps.pl and run it with this command:
$ ./dump_gps.plYou will get coordinates, the altitude, and current date at one-second intervals. We use this trick further in âBroadcast Your GPS Positionâ [Hack #21] .
Casey Westâs OâReilly Network article on his cross-car road trip network: http://www.oreillynet.com/pub/a/wireless/2002/08/01/highway_lan.html
âRich Gibson
Entertain yourself and passing wardrivers by abusing the beacon frame (and MAC address).
Have you ever wanted a lightweight protocol that would allow you to broadcast your current position? Many times you can see a wireless network, but you canât connect to it. In the NoCat community network (http://nocat.net) we would often do sight surveys that showed lots of networks, but we could not associate with them. Perhaps the access point has a more powerful network card, or a better antenna, and is able to blast a signal out, but you are not able to get your signal back to the access point.
What to do? With a complete abuse of the 802.11 beacon frame you can share your position with anyone around you!
802.11 wireless networks in both Ad Hoc and Infrastructure mode [Appendix A] send periodic beacon frames. These are about 50 bytes long and contain information that a client needs in order to associate with a wireless network. The beacon frame includes the Service Set Identifier (SSID), which is the name of the network.
Wireless discovery programs such as NetStumbler [Hack #24] , iStumbler [Hack #27] , and Kismet [Hack #29] get all of their information from sniffing for these beacon frames. So what happens if we change the SSID on the access point? What happens if we change it whenever we get a new GPS fix?
For our purposes the SSID, at 32 bytes, provides enough room to encode the latitude and longitude of our current position to 5 digits of precision (about 1 meter). We can also separate the coordinates with readable delimiters and still have 11 characters for a unique station ID.
To run this hack, you need to have a DIY Linux access point [Hack #63] . Then, set up the GPSd daemon and connect a GPS [Hack #20] .
Once you have your access point and GPSd functional, use the Perl script in Example 1-2 to broadcast your current position by using the beacon frame.
Example 1-2. Broadcasting your position through GPSd using beacon_abuse.pl
#!/usr/bin/perl

# /usr/local/sbin/gpsd -p /dev/ttyS0
use 5.6.1;
use IO::Socket;
use Term::ReadKey;
use strict;

BEGIN { $|++ }; # autoflush STDOUT.
my $station_id = shift( @ARGV ) || 'myid';
my $GPSD       = shift( @ARGV ) || "localhost:2947";
my $delay      = 3; # number of seconds to sleep
my $ssid       = 'gpsd not initialized';;

# Connect to gpsd.
warn "connecting to gpsd \n";
my $gps = IO::Socket::INET->new($GPSD)
	or die "Can't connect to gpsd at $GPSD: $!\n";

while (1) {
	# Tell gpsd we want position, altitude, date, and status.
	$gps->print("pads\n");

	# Parse out the response. If the date is blank, gpsd needs
	# a second to catch up.
	my $location = <$gps>;
	my ($lat, $long, $alt, $date, $status) =
		($location =~ /P=(.+?) (.+?),A=(.+?),D=(.+?),S=(.+?)/gos);
	# create new SSID
	$lat = sprintf("%9.5f", $lat);
	$long = sprintf("%10.5f", $long);
	$ssid = "$station_id:$lat:$long";
	print "$ssid\n";
   `iwconfig wlan0 essid "$ssid" mode "Master" channel 1 rate "Auto"`;
    sleep( $delay );
}
Copy the code into a file called beacon_abuse.pl and run it from the command line:
$ ./beacon_abuse.pl myidIn this example, myid is the unique station ID that will preface the latitude and longitude in the SSID generated by the code. The code enters a loop where it connects to GPSd to get the current position, then changes the SSID of the network card and prints out the new SSID. You will know it is working if you get a series of new SSIDâs that consist of your station ID and the latitude and longitude; for example:
myid: 38.40254:-122.182889
Depending on your platform you can use MacStumbler, NetStumbler, or Kismet to watch the SSID change, as shown in Figure 1-57.
If your machine isnât moving too quickly, or you stop beacon_abuse.pl, you can connect to the machine as a normal access point, as shown in Figure 1-58.
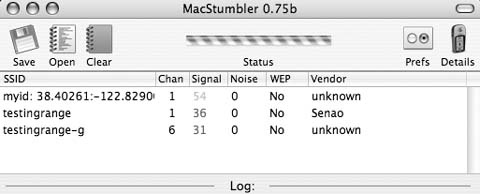
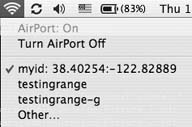
One disadvantage of the script in Example 1-2 is that your Stumbler program probably shows only the most recent SSID. This is because the programs use the MAC address of the wireless card to uniquely identify the access point. By design, this is the right thing to do, because MAC addresses are not supposed to change. Unless we want them to change.
This code flips the MAC address, and sets the SSID as well:
	#!/usr/bin/perl
	$cnt=0;
	while (1) {
		`ifconfig wlan0 hw ether 0000000000$cnt`;
		`iwconfig wlan0 essid "foo:$cnt" mode "Master" channel 1 rate "Auto"`;
		print "new essid foo:$cnt\n";
		sleep 1;
		$cnt++;
	}
Copy the code into a file called bad_plan.pl and run it from the command line:
$ ./bad_plan.plThis is almost certainly a Bad Idea, but it does let you create amusing Stumbler logs like Figure 1-59 for passing wardrivers.
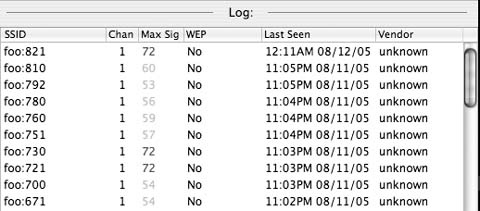
Changing your SSID on a whim is almost certainly a bad idea, but imagine an event such as Burning Man (http://www.burningman.com), where the action happens in a wireless-friendly flat plane. You could add a wireless card to the computer to serve MP3s in your art car and broadcast your position with GPS. Since the beacon frame drops down to 1MB and is sent relatively infrequently, you could have quite a few location-aware vehicles sharing a single Wi-Fi radio channel.
This hack lets you communicate your position (or anything else you can convey 32-bytes at a time) to a client and there is no way for the server, or anyone listening in, to identify which clients are getting the position information. This technique has lots of disadvantages, not least of which is that it destroys all normal use of the link, but thatâs what makes it a hack.
More on 802.11 beacons: http://www.wi-fiplanet.com/tutorials/article.php/1492071
âRich Gibson
Use these two powerful Linux tools to map out the locations of Wi-Fi networks.
GPSd [Hack #20] is a great tool to get data from your GPS receiver. You can make it even more powerful by combining it with Kismet [Hack #29] , allowing you to physically map locations of wireless networks.
In order to make this work, you will need to have both GPSd and Kismet installed and functioning with your Linux system. Consult the hacks on both pieces of software if you have setup questions.
If you plan to do some network mapping with Kismet, keep the following in mind:
Put the computer somewhere safe and out of the way. Donât put it someplace where a sudden stop will send it into your lap or through a window.
Forget that the computer is there while you are driving. If you have to fiddle with it, pull over first. If you can have a friend ride with you who can operate the computer, all the better. Do not let the computer distract you while you are driving.
Make sure that the GPS gets a fix before you start driving. Itâs a lot harder for it to get a fix while you are in motion.
Put the GPS somewhere that it can easily pick up the satellite signals. Your best bet is to get a magnetized external antenna that can attach to your roof. Be sure that there are no loose wires sticking out of your window. Donât slam the wires in the door!
Above all, when you are driving a car, your first responsibility is to drive safely. Pay attention to the road and drive carefully.
To begin mapping networks with Kismet and GPSd, take the following steps:
Load any modules needed for the serial port youâre using for the GPS (optional):
$ sudo modprobe pl2303$ dmesg | grep ttyttyS00 at 0x03f8 (irq = 4) is a 16550A ttyS02 at 0x03e8 (irq = 4) is a 16550A usbserial.c:PL-2303converternowattachedtottyUSB0(orusb/tts/0for devfs)Start GPSd, specifying the serial port with
-pand the speed with-s:$ sudo gpsd -D9 -p /dev/ttyUSB0 -s 4800Telnet to GPSd and use p until you have a reliable fix, then disconnect when you are done: $telnet localhost 2947 Trying 127.0.0.1⦠Connected to debian. Escape character is '^]'.pGPSD,P=0.000000 0.000000pGPSD,P=41.485882 -71.524841 ^] telnet>qConnection closed.Launch Kismet with the
-g(GPS) switch, and specify the hostname and port that GPSd is listening on:$ sudo kismet -g localhost:2947Go for a drive. Press Shift-Q when you are done with the drive to terminate Kismet.
When you shut Kismet down, it writes out logfiles. Check the logtemplate setting in kismet.conf to see where it puts its log files; for example:
logtemplate=/var/log/kismet/%n-%d-%i.%l
Kismet writes several logfiles in the logtemplate directory (in the following filenames, I starts at 1 and increments each time you run Kismet on a given day):
- Kismet-MMM-DD-YYYY-I.csv
Kismet log in semicolon-separated fields, one line per entry. The first entry contains the field names.
- Kismet-MMM-DD-YYYY-I.dump
Kismet log in a pcap(3) format suitable for loading under Ethereal (http://www.ethereal.com).
- Kismet-MMM-DD-YYYY-I.gps
Kismet log in a format designed to be read by the gpsmap utility, which is included with the Kismet distribution.
- Kismet-MMM-DD-YYYY-I.network
A human-readable dump of the networks that Kismet encountered.
- Kismet-MMM-DD-YYYY-I.xml
Kismet log in an XML format.
To generate a map, run gpsmap on the .gpslog file. See the gpsmap manpage for all the drawing and mapping options. If you choose to use a downloaded map (the default), you must be online. Figure 1-60 shows a map generated by the following command:
$ gpsmap -S3 -p /var/log/kismet/Kismet-Feb-16-2004-5.gps
The -S option specifies which map server to use:
(0=MapBlast;1=Map-Point;2=Terraserver;3=Tiger Census)
If you have trouble with one of these map servers, try another (Tiger is loosely maintained by the Census Bureau and is not up 100% of the time). Use -p to show power levels or -e to simply plot the locations of the hotspots on the map (see the gpsmap manpage for more options).
For even more mapping goodness, check out âAnalyze Elevation Profiles for Better Long-Range Wireless Networkingâ [Hack #94] .
âBrian Jepson
Get Wireless Hacks, 2nd Edition now with the O’Reilly learning platform.
O’Reilly members experience books, live events, courses curated by job role, and more from O’Reilly and nearly 200 top publishers.

