Standard File Sharing
If you need more security and flexibility than Simple file sharing affords—or if your computer is part of a corporate domain—then the time has come to tackle Standard file sharing.
The process of sharing a folder is much the same as it is in Simple file sharing, except that there’s an additional step: specifying who else on the network can access the share, and what they’re allowed to do with it.
Note
Before you can create Standard file shares, you must disable Windows XP’s Simple file sharing feature, as described on Section 20.6.
Step 1: Turn on Sharing
After you’ve located the icon of the drive, folder, or printer you want to share, proceed like this:
Right-click the disk or folder icon. From the shortcut menu, choose Sharing and Security.
The Sharing tab of the Properties dialog box opens (see Figure 20-11). If you’ve ever seen this dialog box when using Simple file sharing, you’ll notice that it looks quite a bit different now.
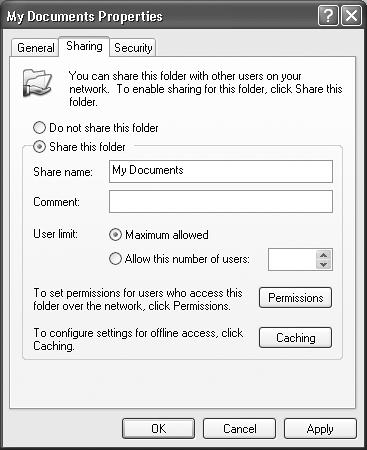
Figure 20-11. The Sharing tab for a disk or folder on a Windows XP domain system. From here, you can share this folder, specify the maximum number of people who can access it at once, and specify who can access the share and to what degree.
Turn on “Share this folder.”
The other options in the dialog box become active.
Type a name for the shared disk or folder.
This is the name other people will see when they open their My Network Places ...
Get Windows XP Professional: The Missing Manual now with the O’Reilly learning platform.
O’Reilly members experience books, live events, courses curated by job role, and more from O’Reilly and nearly 200 top publishers.

