Perhaps no aspect of a Windows environment can cause as many headaches, frustrations, and consumption of valuable IT time as Active Directory (AD). Active Directory was first introduced into Windows Server with the release of Server 2000 and has steadily evolved in subsequent Windows Server versions. Server 2012 includes the most polished Active Directory services offering to date. One major reason why this is the best AD yet is that an Active Directory Domain Services (AD DS) deployment now integrates all the steps required to deploy new domain controllers into a single interface with the new Active Directory Domain Services Configuration Wizard.
AD DS is also easier to manage in Server 2012 due to an enhanced wizard built on PowerShell that integrates with Server Manager. Preinstallation checks with the Adprep.exe tool and prerequisite validation are part of the install process, helping to lessen the chance of errors with an AD DS install.
Do these enhancements mean deploying and managing AD is flawless in Server 2012? Not by any means. While deploying Server 2012 AD for the first time, I ran into some errors and cautions warning me that certain services or features had to be added or configured a certain way for a successful AD install.
Yet I got those warnings and errors automatically, not by having to hunt through Event Viewer for AD-related warnings, as I would normally have to do in Server 2008 R2 and older Windows Server versions. Warnings, errors, and suggestions for getting the server in shape to run AD are all displayed as easy-to-read, comprehensible alerts within the updated Server Manager. The entire AD install deployment centralized in Server Manager makes AD deployment more efficient and easier to troubleshoot.
This chapter introduces the new Active Directory Administrative Center (ADAC) interface. I’ll also cover deploying and managing AD DS, as well as how to join Server 2012 to an existing domain and, conversely, join a member Server 2012 machine to a Server 2008 R2 domain.
The chapter also outlines using new and updated features in AD, such as using the AD Recycle Bin to restore deleted objects, performing AD searches, deploying AD with PowerShell, and remotely managing Server 2012.
With both Server Manager and Active Directory refreshed with updated management interfaces in Server 2012, the install process may be not as familiar even to those who have installed AD DS before. Before installing Active Directory Domain Services, ensure that DNS Server is running on the network; otherwise, you will be prompted to install DNS after the AD install.
To deploy Active Directory Domain Services on a local Server 2012 machine, launch Server Manager and select “Add roles and features” in the “Configure this local server” area of the dashboard.
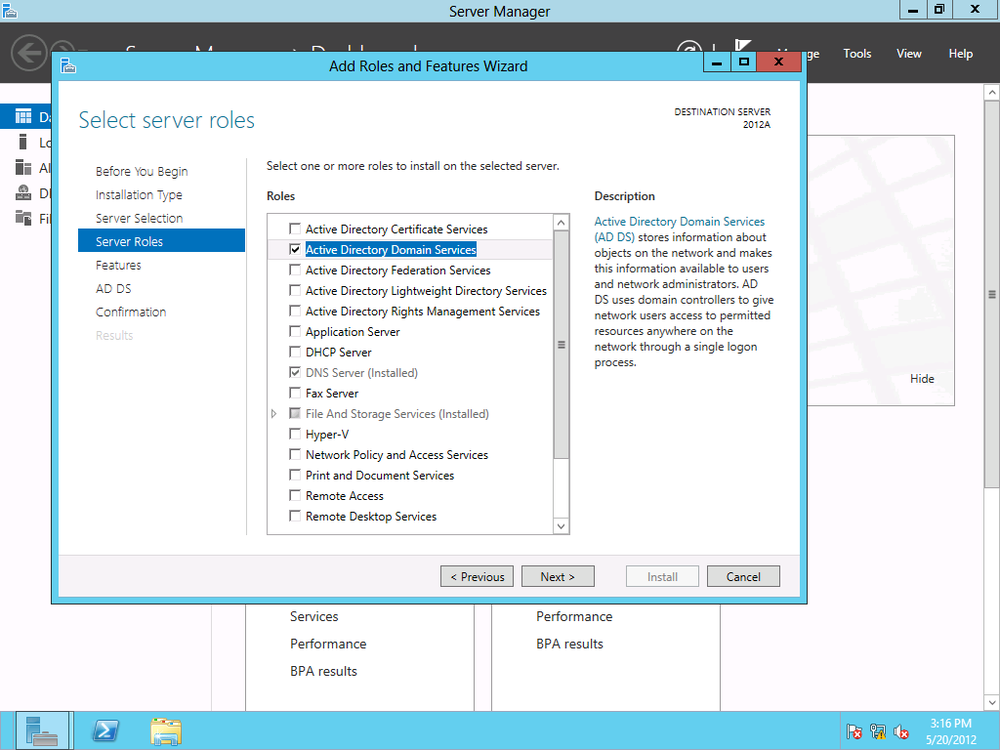
Select “Role-based or feature-based installation,” and click Next. Then select the local server (or the server to which you want to deploy AD DS) as the destination server. Choose Active Directory Domain Services. (See Figure 4-1.)
There are several features and tools that you are required to install along with AD DS. These features are listed, and you are given the option to install them as well. To do so, click “Add features,” then click Next.
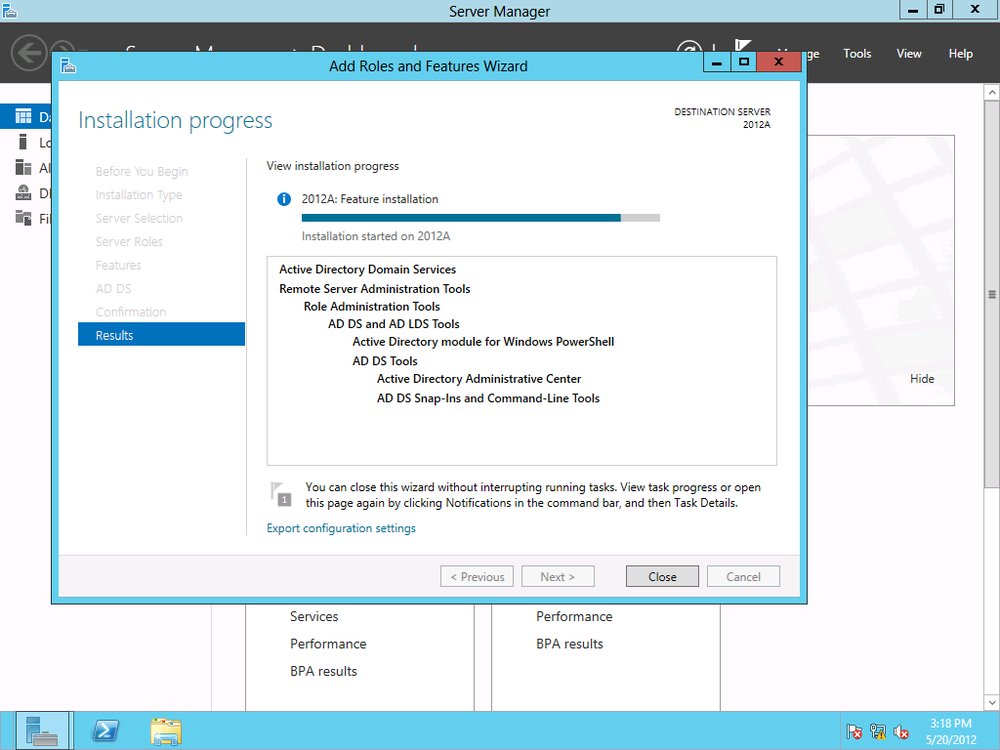
You can opt to install additional features, or just click Next once again to begin the installation process (Figure 4-2).
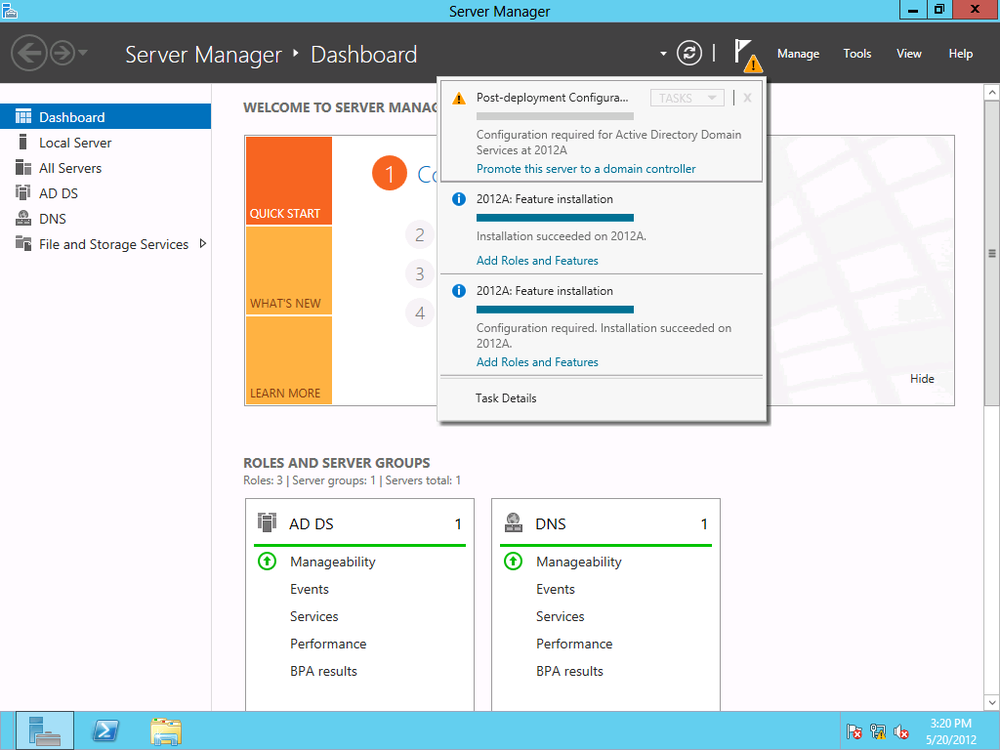
After a successful install, Server Manager’s notification prompts you to “Promote this server to a domain controller,” as shown in Figure 4-3.
Note
Of course, you don’t want to just start adding servers as domain controllers (DCs) in a network. Most readers will probably already have DCs deployed. You can certainly add Server 2012 as a physical or virtual DC, or as a read-only DC for security purposes. Before promoting any new Server 2012 deployments to DCs, consider your existing infrastructure and what role Server 2012 should play.
You have several options to promote to a DC. You can use the GUI or PowerShell. There’s some confusion about whether or not Microsoft has eliminated the Dcpromo command system that administrators have long used to promote servers to DCs.
Dcpromo can still be executed in Server 2012. You run the command
by pointing to an answer file, using the dcpromo.exe command in the command prompt. The
answer file is a text file you create with specific fields that will
customize an unattended DC promotion based on the configuration needed
for your particular organization.
Promoting DCs using Dcpromo and an answer file is necessary only if an organization already has in-place automation for creating DCs or for infrastructures that need to deploy large numbers of DCs. For smaller organizations, using the DC install and promotion capabilities within Server Manager is easier and more efficient because you have less chance of syntax errors than with creating answer files. For those comfortable with scripting, PowerShell also provides a good alternative for creating and promoting servers as DCs.
The Active Directory Administrative Center allows you to add a DC to an existing domain, add a new domain to an existing forest, or add a new forest. To set up an entirely new domain without an existing forest, select “Add a new forest,” as shown in Figure 4-4. You must specify a root domain name, in the form of <domainname>.com or <domainname>.net, for example, or whatever top-level domain (TLD) ending is designated for your organization.

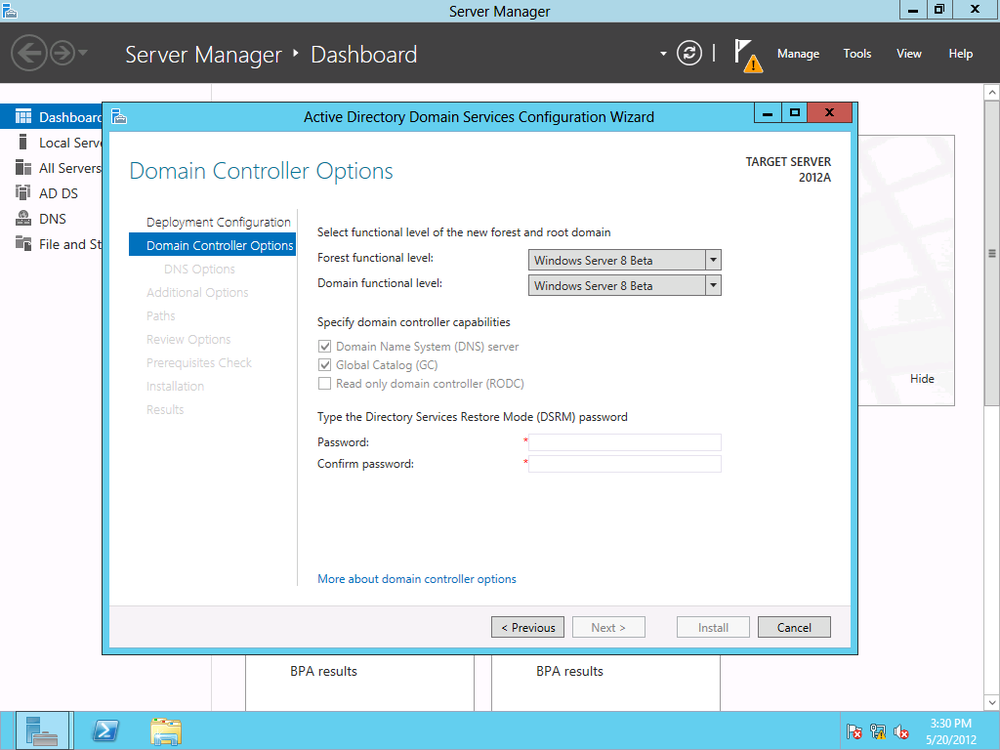
Next, you have to select the forest and domain’s functional level. The functional level you select depends on whether you have an existing AD domain or forest and which servers you are running. For instance, if your infrastructure has Server 2003 servers, you may keep the forest or domain level set at Windows 2003 until all DCs are upgraded to Server 2008 or 2008 R2.
Server 2012 can be set to Server 2012 AD, Server 2008 R2, Server 2008, or Server 2003 functional levels. If the DC is going to also function as a global catalog server, or as a read-only DC, you can select those capabilities in this step as well. It is important to ensure that adding a new DC does not execute an unplanned upgrade of the functional level of the domain, so read all of the wizard text closely when joining an existing domain.
Finally, in the next screen (Figure 4-5), you can also set the Directory Services Restore Mode (DSRM) password.
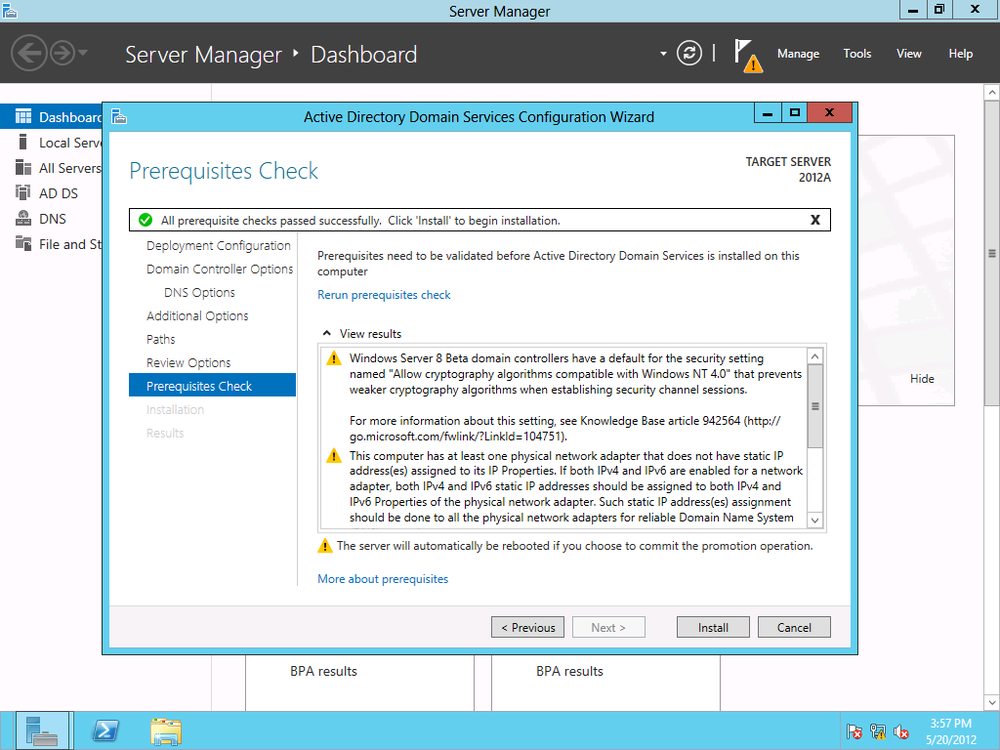
Before final installation, a prerequisites check is automatically run to ensure that there are no issues with the AD install (Figure 4-6).
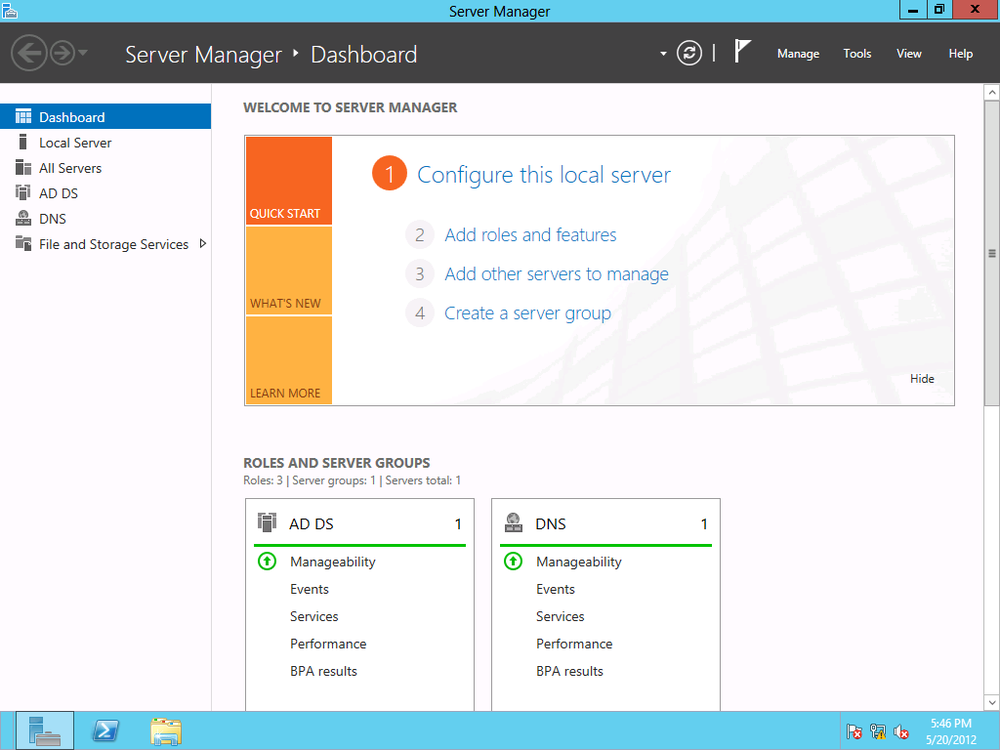
After a successful install, AD DS is listed in the dashboard, as shown in Figure 4-7.
Traditionally, IT professionals will upgrade servers before upgrading client machines or just replace dated user machines with new ones preinstalled with the latest Windows client operating system. It’s conceivable that there will be organizations that will want to join not only Windows 8 clients, but Windows 7 (and in some cases, Windows XP) machines, to Server 2012 domains.
Client machines and servers can be joined to domains in large organizations and enterprises via automated methods such as scripting and batch files. This section focuses on client-side installation through the GUI, the method typically employed in smaller networks. These steps will also work for virtual machines.
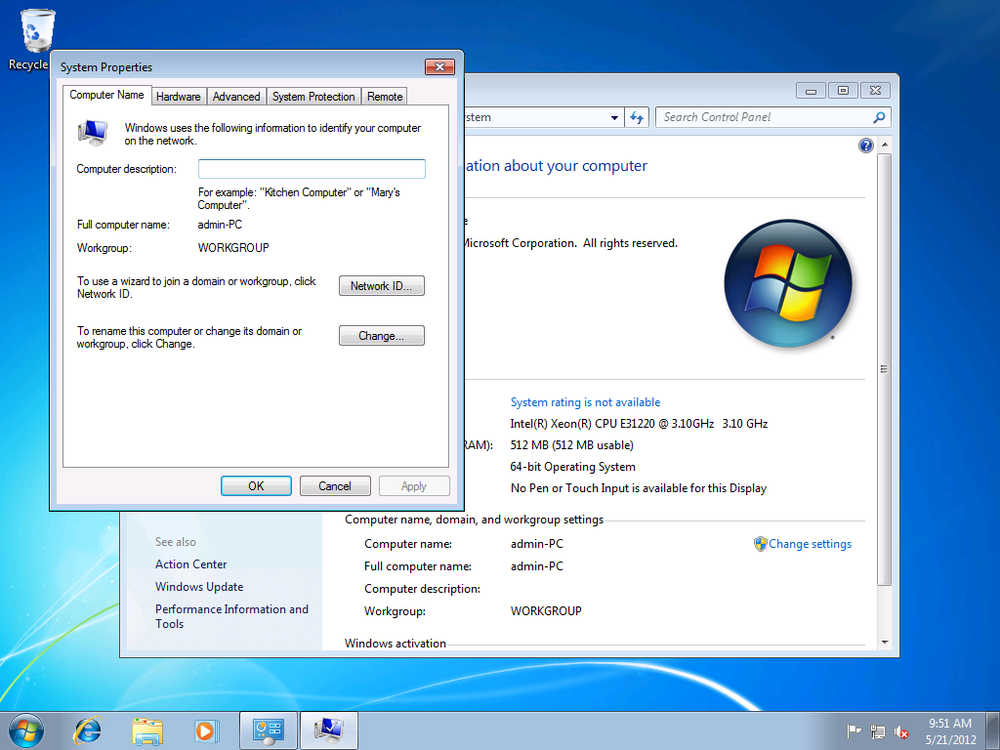
From System Properties in the Windows 7 client’s Control Panel, click the Computer Name tab and click Change, as shown in Figure 4-8.
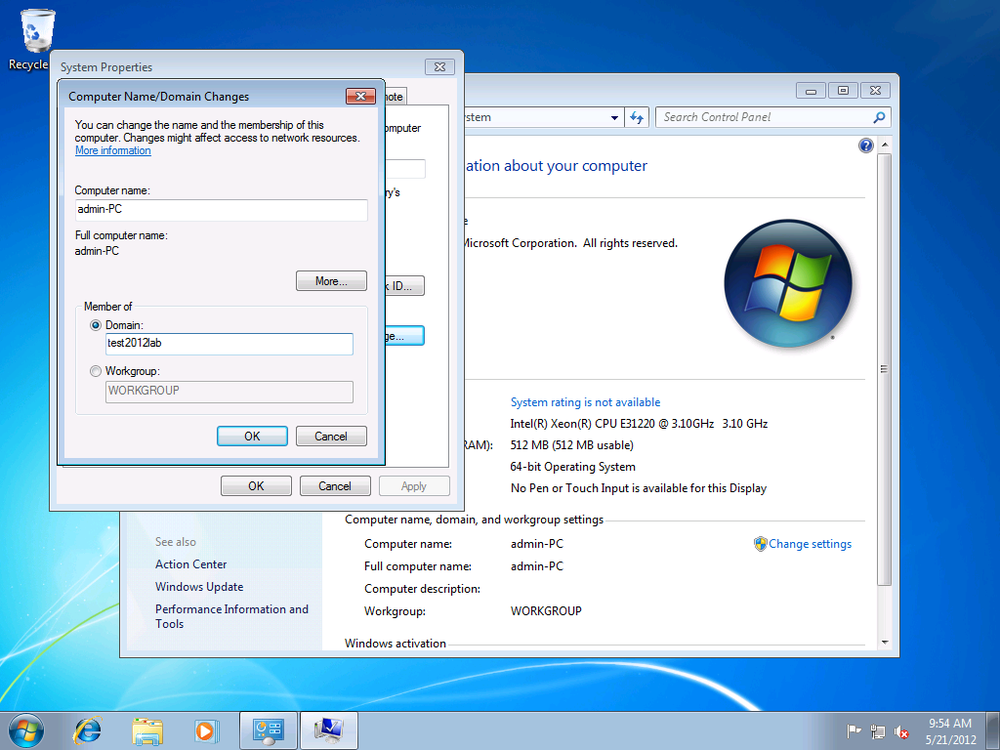
Enter the domain name under “Member of” in the Domain field (Figure 4-9).
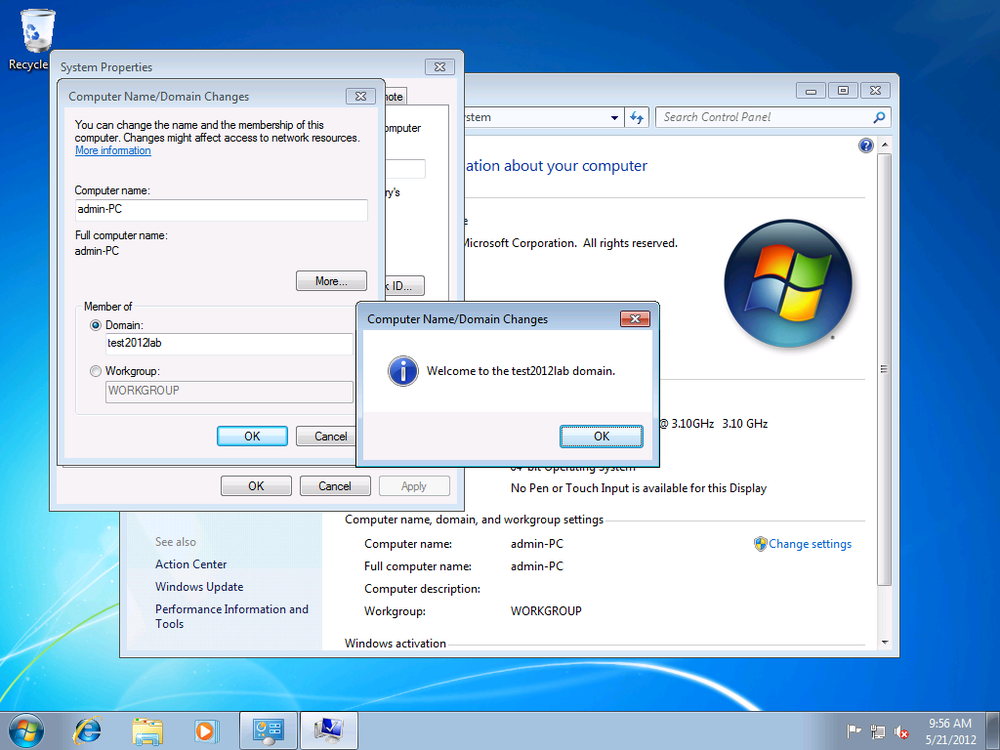
Enter user account credentials with permission to join computers to the domain. A confirmation message pops up when the machine is successfully joined (Figure 4-10).
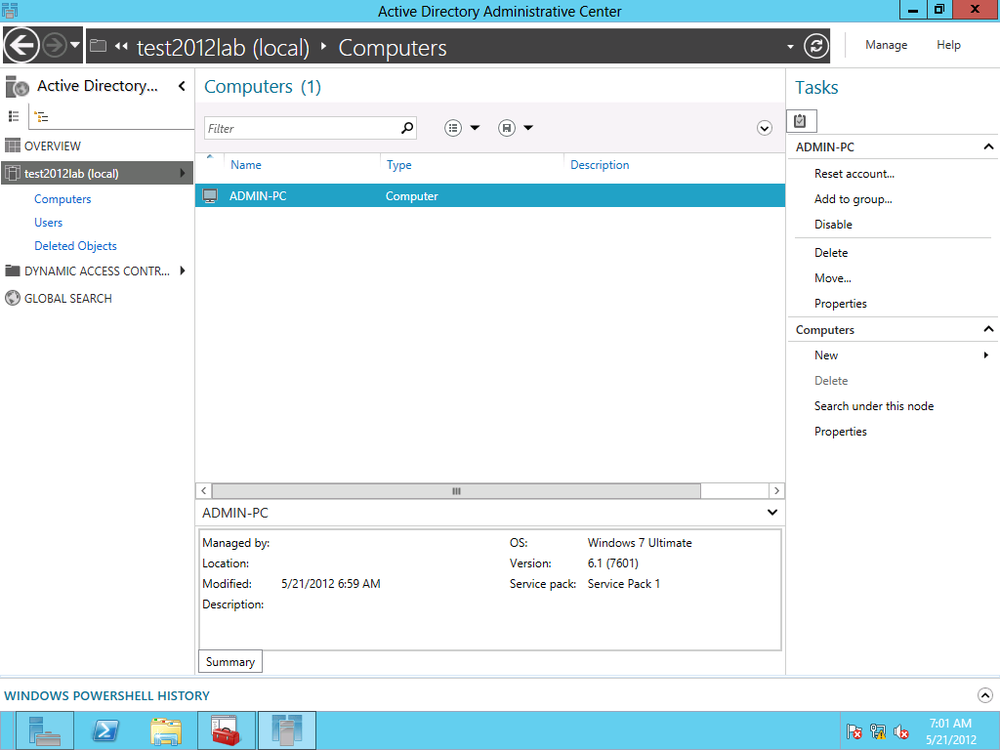
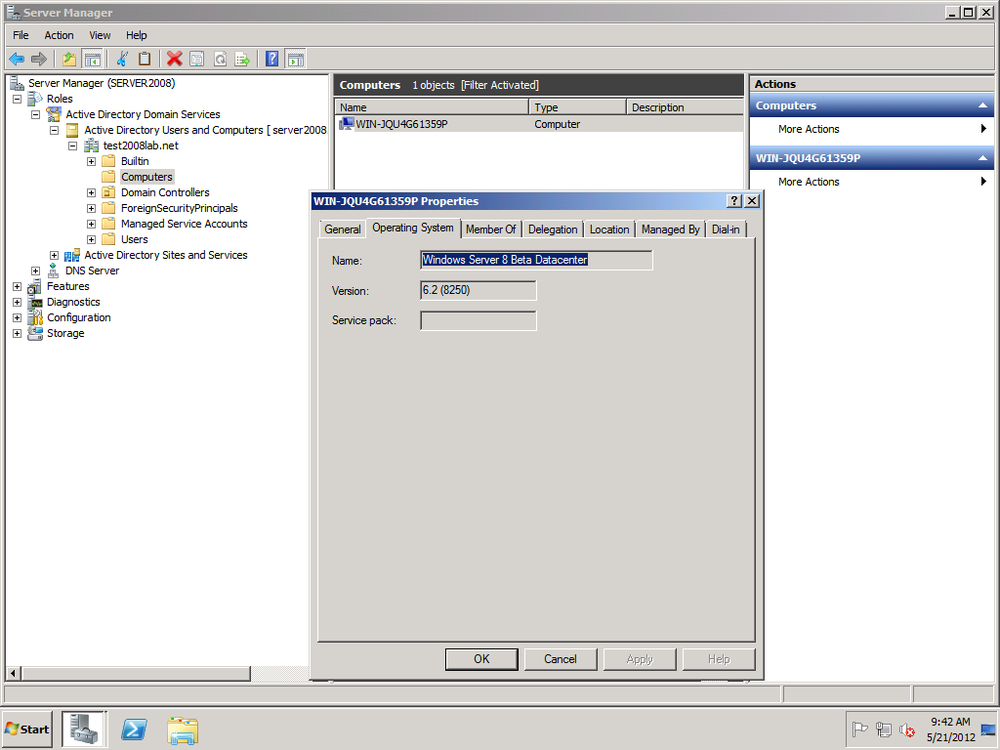
Once the client machine is joined to the domain, you can find the machine in the Computers container in the ADAC, as shown in Figure 4-11.
Since Windows 8 was released in Consumer Preview version, there has been lots of controversy surrounding the Windows 8 client and criticisms that the operating system is designed more as a consumer mobile operating platform with less emphasis on the enterprise. However, it’s inevitable that Windows 8 will find its way into business infrastructures, if only for its novelty at first. I remember my days as a Windows Server administrator, having to fit the latest client OS into the domain infrastructure simply because some C-level executive wanted to test-drive the latest operating system!
There’s good news and bad news about joining Windows 8 to corporate domains. Windows 8 systems installed on ARM-based mobile devices—called Windows RT—can’t officially join a Windows domain. That does not mean you can’t introduce Windows RT mobile devices into your organization’s infrastructure; there are native Windows capabilities and plenty of third-party utilities for mobile device management (MDM).
You can, however, join computers with Windows 8 installed to a domain, as well as Windows 8 virtual machines. To install Windows 8 clients to a Server 2012–level domain, you follow the same procedures as for joining a Windows 7 client. Launch the Control Panel and click “System and Security.” Click System and then “Advanced system settings.”
Click the Computer Name tab and click Change. Type the domain name into the Domain field. Once joined, the computer is added in ADAC in the Computers container.
The procedures for joining Server 2003, 2008, and 2008 R2 as member servers to a Server 2012 domain follow the same steps as joining Windows clients.
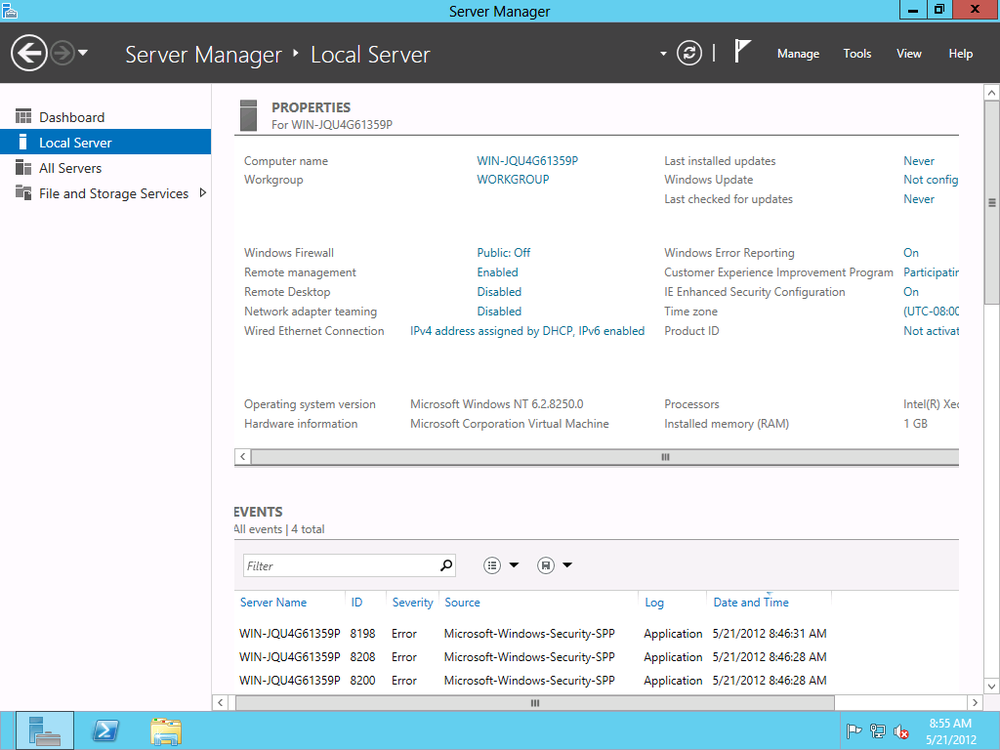
The refreshed Server Manager interface in Server 2012 allows you to quickly add a Server 2012 to a domain. To do so, open Server Manager. Click “Configure this local server.” Under Properties, click Workgroup, as shown in Figure 4-12.
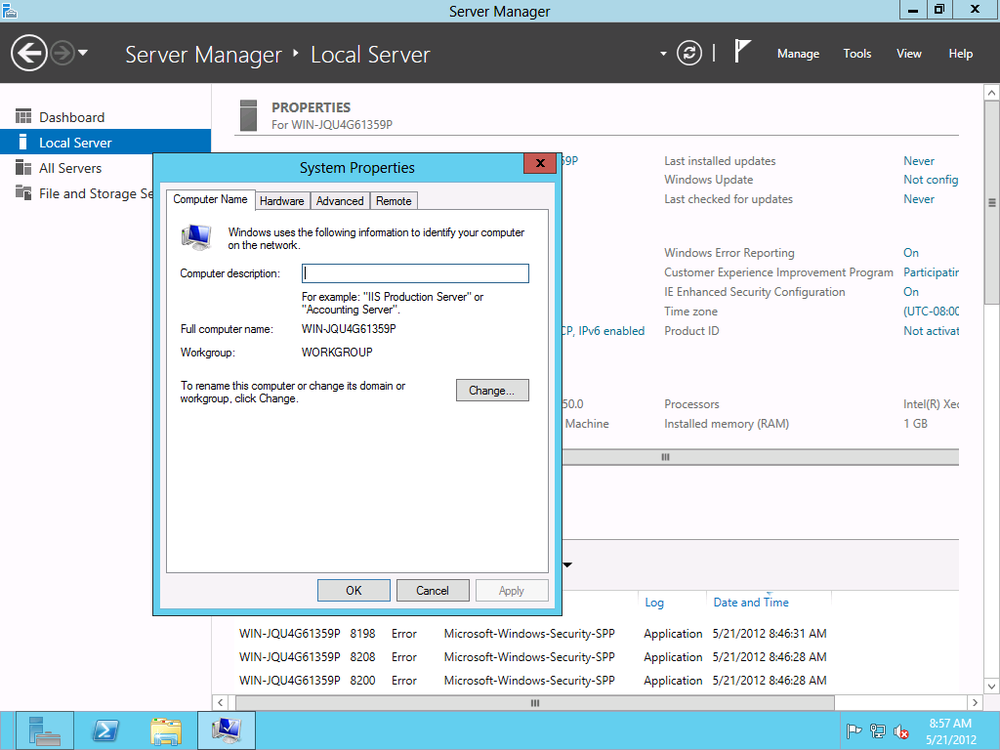
The Workgroup link brings up the System Properties window, from which you can add the server to a domain (Figure 4-13).
You can add Server 2012 machines to other functional levels of Active Directory domains, although such a mixed environment won’t have the benefits of a Server 2012 domain.
To add a Server 2012 machine to a Server 2008 R2 domain, for example, open Server Manager. Click “Configure this local server.” Under Properties, click Workgroup. Under System Properties, add the server to the 2008 R2 domain. (See Figure 4-14.)
Once added, the Server 2012 machine is listed in the Computers container in the Server 2008 R2.
The Active Directory Administrative Center is the console used to manage AD. You launch the console from Server Manager by clicking Tools.
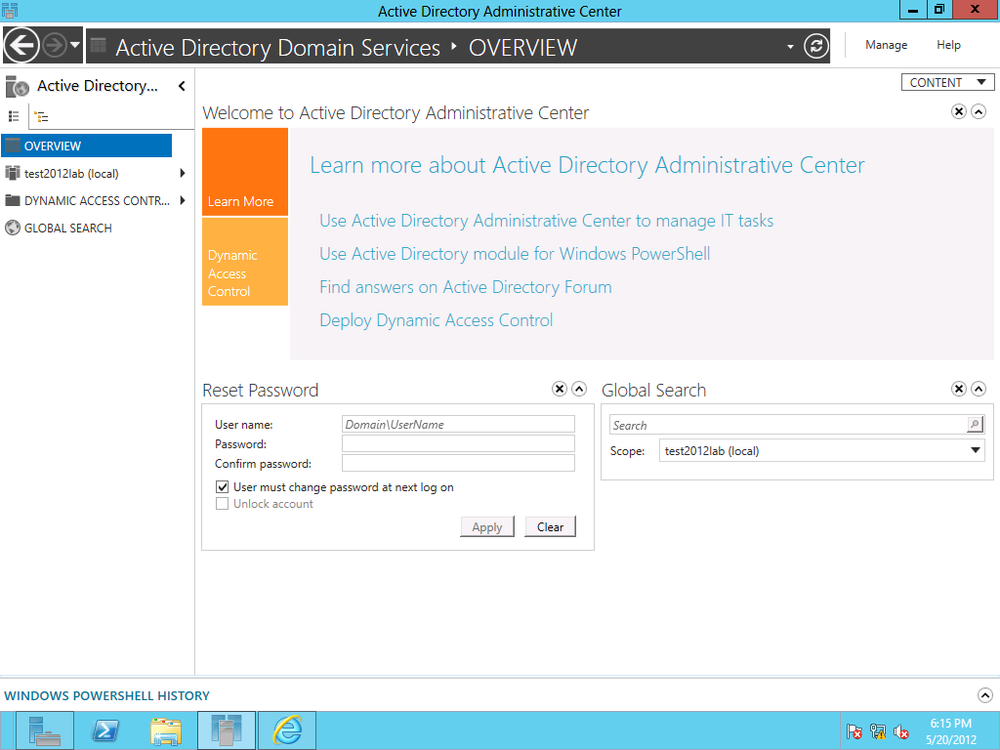
ADAC has the same tiled interface as Server Manager. The interface provides a nice overview that offers useful links and help documentation on AD, as well as detailed deployment of Dynamic Access Control (covered in Chapter 5).
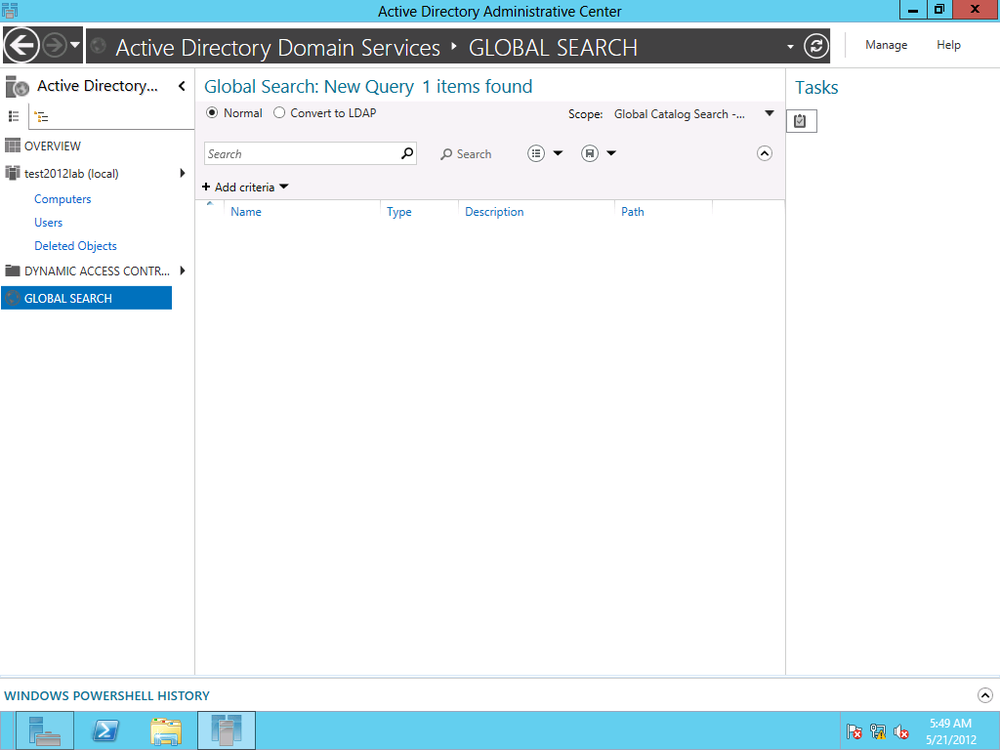
Figure 4-15 shows the initial ADAC screen. From here, you can reset the domain administrator’s password and perform a global search against AD. On the left side of the screen, you can select the DC you want to manage.
When you select the DC, a listing of all the AD objects, including containers and organizations units (OUs), is displayed. On the right of the screen is a menu for performing various AD-associated tasks, such as adding new objects, deleting objects, searching, and viewing properties of containers (permissions, for example).
The layout for creating objects in AD has gone through some changes. First we will walk through creating a new group.
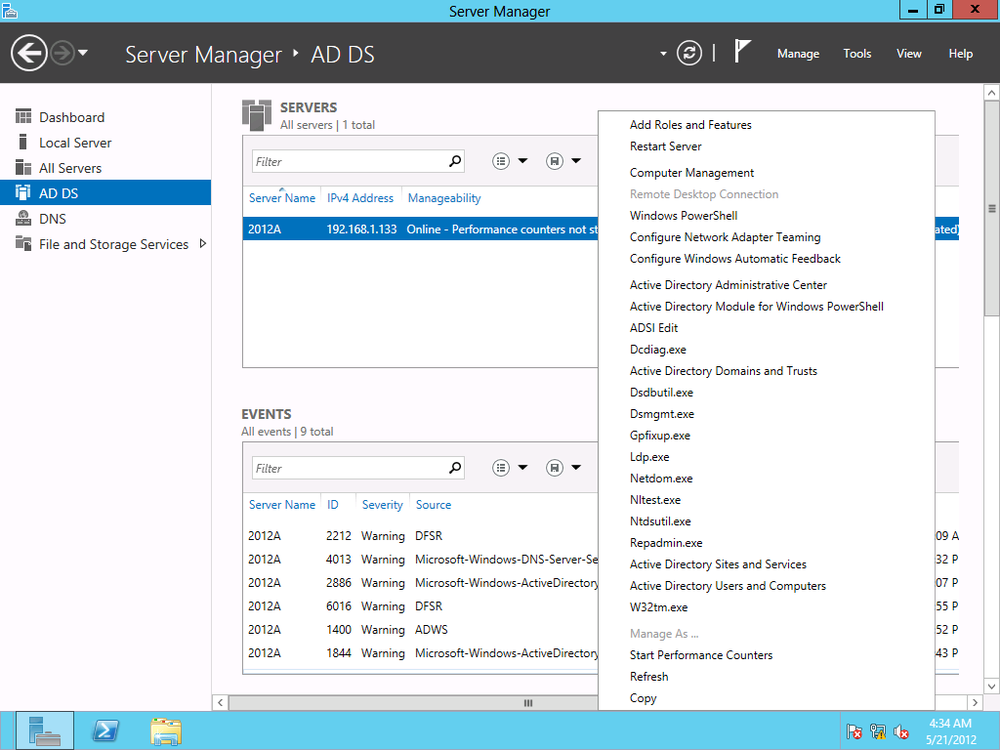
To begin creating a new group, open Server Manager. In the dashboard, from the left menu, click “AD DS.” Right-click the local server (or the server on which you’ve installed AD) and select Active Directory Administrative Center, as shown in Figure 4-16.
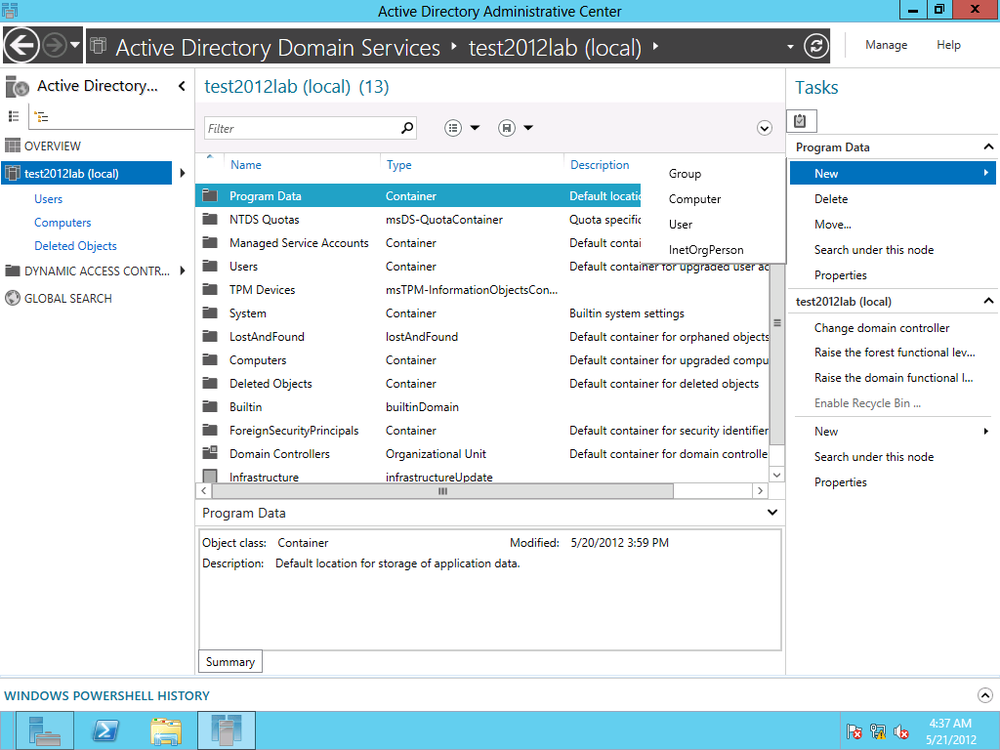
From the left menu in ADAC, click on “AD DS.” All AD container objects are displayed. From the righthand Tasks menu, under Program Data, click New and then Group (Figure 4-17).
The Create Group screen opens. Fields with red asterisks are required. In Figure 4-18, I name my group Human Resources NY. As you type the group name, the field directly under the “Group name” field, Group (SamAccountName), is automatically populated.
Note
Group(SamAccountName) is used as an alternate logon for legacy pre-AD clients and servers such as Windows 95.
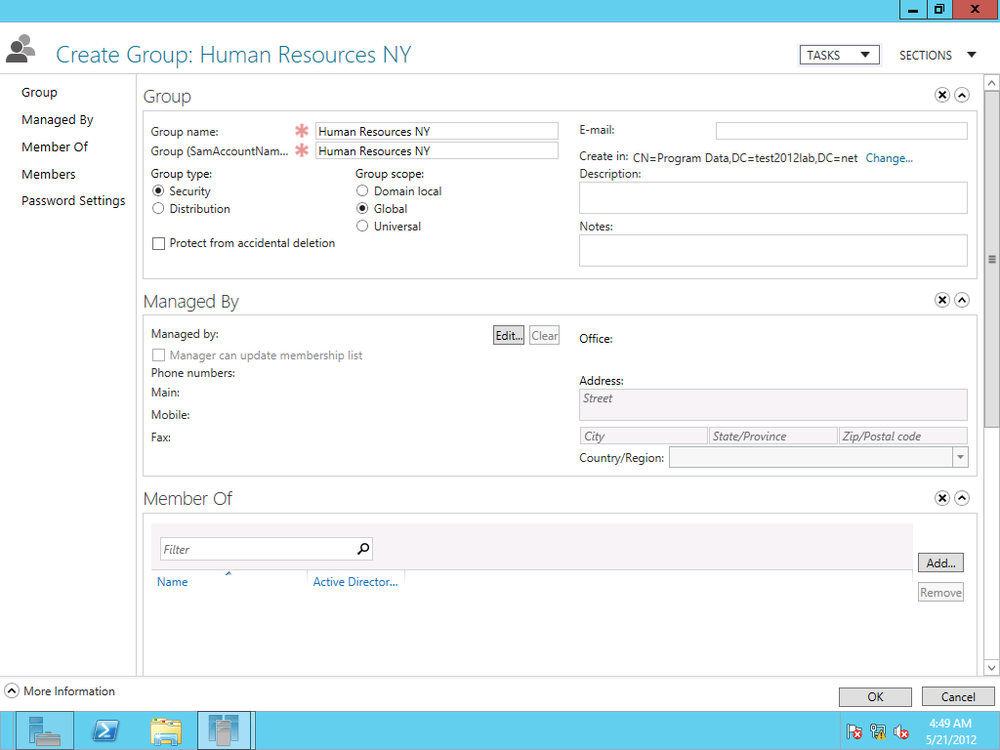
Next, select the group type; by default, this is set to Security, but you can set it as an email distribution list as well. Then choose the group scope. The default scope is Global, but we can set it to only the local domain or to universal (i.e., permissions and accessibility across multiple Active Directory forests).
You can add a member to the group or make the group a member of a parent group under the “Members” and “Member of” sections, respectively. The rest of the fields are optional, such as adding information about who manages the group, a description, notes about the group, and so on.
If you don’t need to see all that information in the Create Group screen, you can hide sections. For example, a small organization with few IT staff members may not need to specify who manages a group. To customize this interface, click the Sections drop-down button at the top right of the Create Group screen. As shown in Figure 4-19, checked sections are displayed. To hide a section, simply uncheck it.
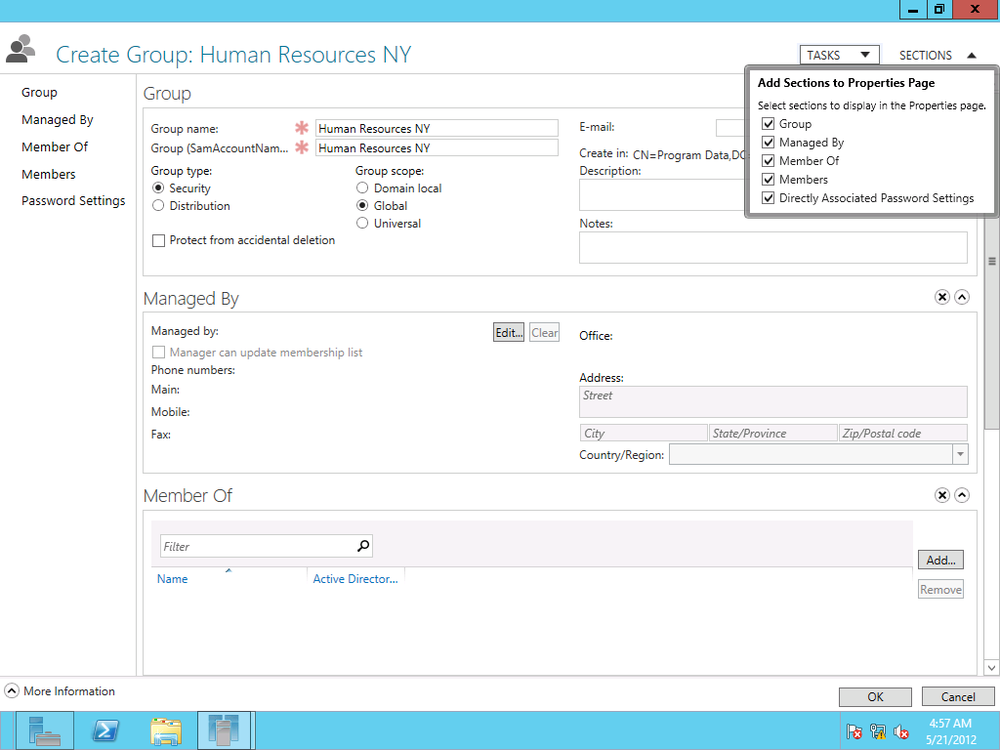
You can also close a section by clicking the X button directly above and to the far right of each section.
If you use a specific section at times, you may just want to collapse it when you don’t need it instead of closing it. To collapse a section, click on the arrow next to the X button directly above and to the far right of each section.
The interface is consistent for creating any kind of AD object in ADAC, although fields may change depending on the object (such as a new computer or user). Creating and managing users is detailed more thoroughly in Chapter 5.
ADAC also allows you to perform domain-wide duties, such as changing the domain controller or raising the forest or domain functional level.
The Active Directory Recycle Bin is a way to restore deleted AD objects without losing any of those objects’ attributes. For example, if you delete a user account and restore it using the AD Recycle Bin, that account retains its permissions and group memberships.
Note
When creating a new AD object, you can set it to never get accidentally deleted by checking “Protect from accidental deletion” in the Create screen.
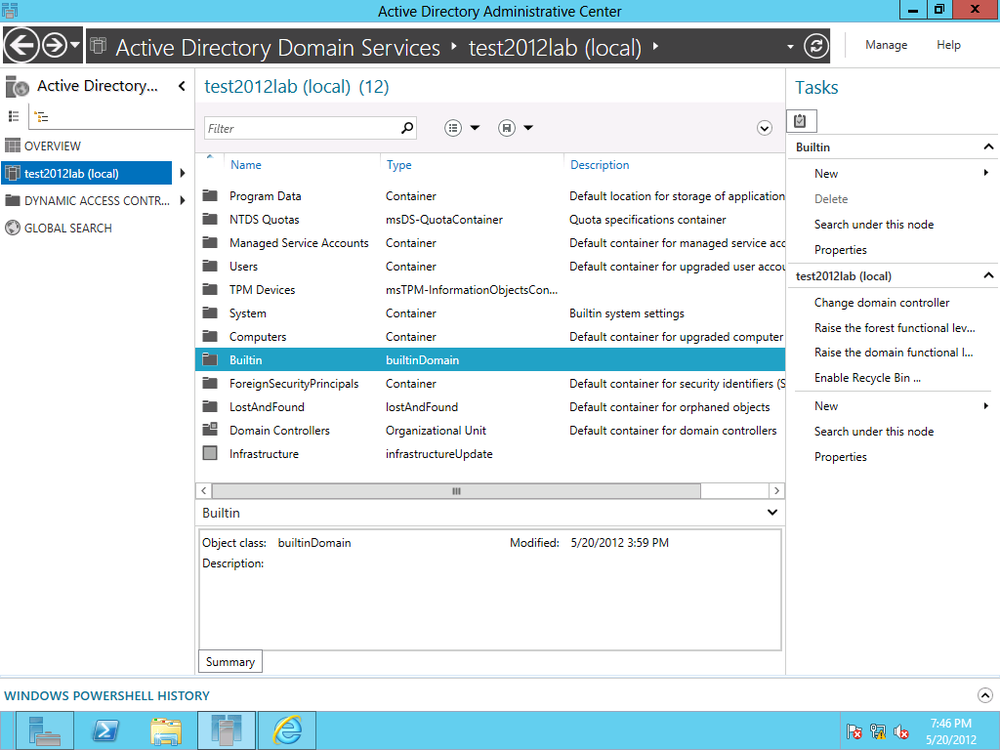
ADAC in Server 2012 provides an easy way to enable the AD Recycle Bin. From the right side of the ADAC window, under Tasks, click Enable Recycle Bin (Figure 4-20).
Click OK in the pop-up message to confirm enabling the Recycle Bin (Figure 4-21). Refresh the screen and a new container, Deleted Objects, is listed.
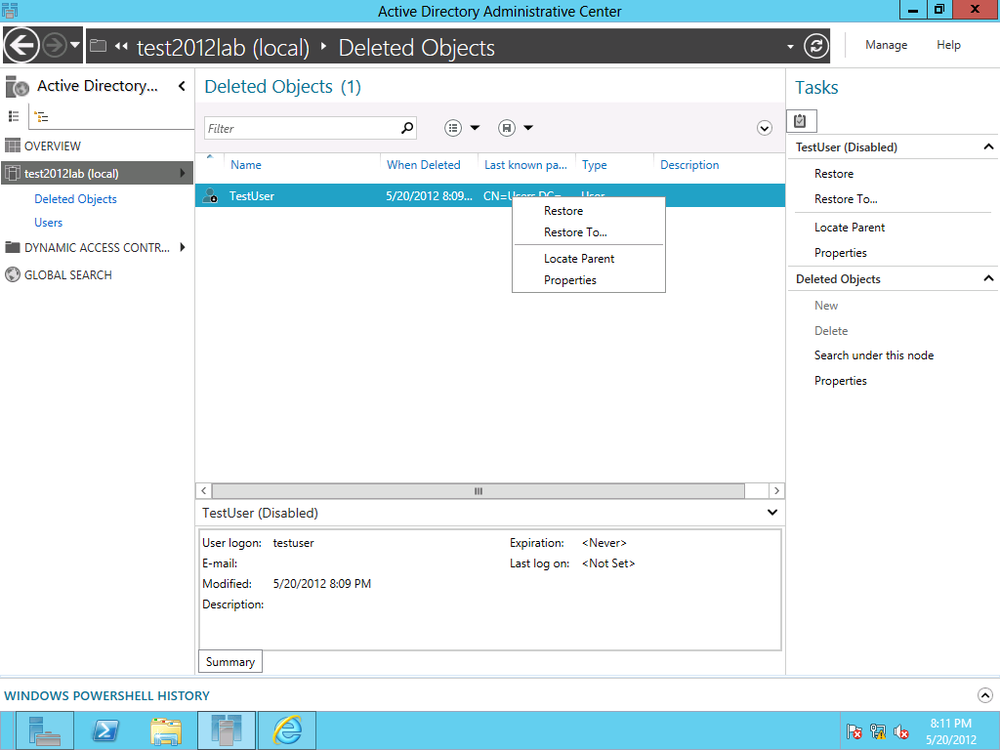
To restore a deleted object, open Deleted Objects and either right-click the container and select Restore to restore the object to its original location, or click Restore To to specify a location (Figure 4-22). You can also access the same commands under the Tasks menu.

Sometimes you need to perform an action on a specific object within AD. Perhaps you have to disable a user account for a user who no longer is part of your organization. It can be tedious to scroll through Active Directory looking for that user account, especially in large organizations that may have many AD objects.
That’s where ADAC’s search capabilities come in very handy. You can perform global searches in the ADAC against the local AD or throughout an entire AD infrastructure.
To search, click Global Search on the left menu of ADAC. You can type a term directly, or you can build a search query for more complex searches.
To start building a query, click the arrow to the far right of the search field to display the “+Add criteria” drop-down menu (Figure 4-23).
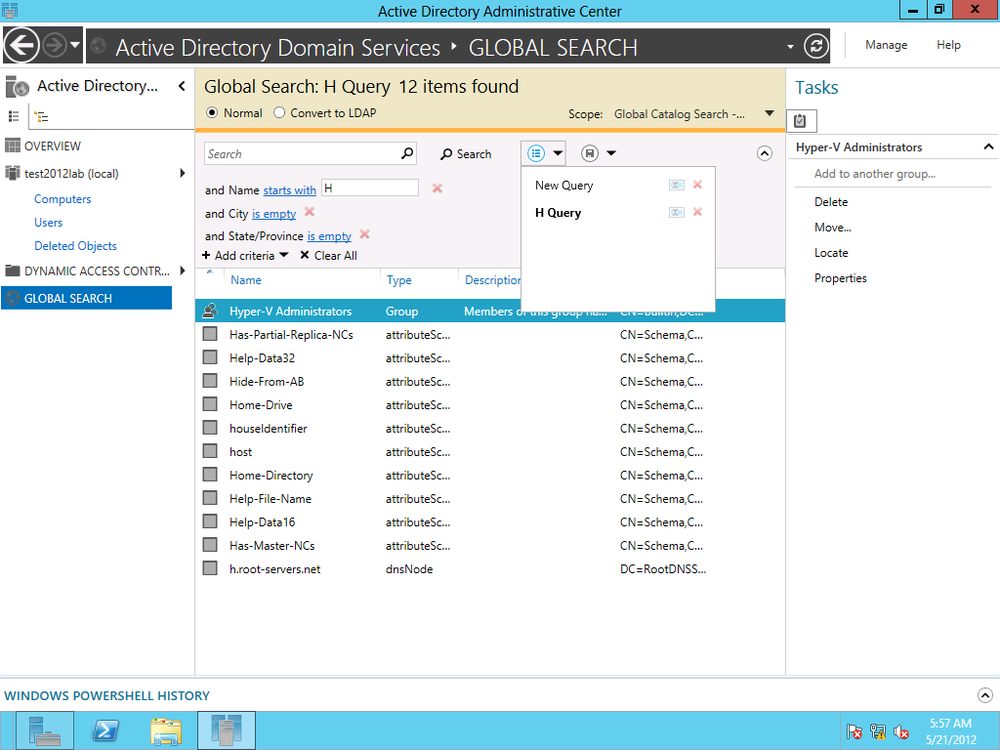
The drop-down list contains the fields you can search against to build your query. Figure 4-24 shows a query built with the Name, City, and State fields.

Press Enter or click the magnifying glass to execute the query.
You can save queries by clicking the disk icon to the right of the search field (Figure 4-25).

Once you’ve saved a query, you can quickly access it by clicking the query list icon (Figure 4-26).
At the bottom of the ADAC interface is Windows PowerShell History, a section that is collapsed by default. By clicking on the up arrow all the way to the right of the section, you can expand the area.
Displayed here are all the PowerShell commands associated with the tasks you perform in the ADAC GUI. It’s a great way to become acquainted with PowerShell syntax. The Copy option will copy selected syntax to the clipboard for you to save for later use.
Take the time to learn how the routine tasks are iterated with PowerShell. Microsoft could not have made it easier with Server 2012 for you to see how much more efficiently you can do some of your normal tasks with PowerShell. So, when you need to get many things done, you have a scripted way to avoid spending incredible amounts of interactive time in the GUI.
The administrative tasks performed in the ADAC can also be handled in PowerShell. While the focus of this book is not to teach PowerShell, it’s a good idea to become familiar with PowerShell to do major management tasks such as deploying AD.
To deploy AD via PowerShell, type the following in the PowerShell console (Figure 4-27):
Install-windowsfeature -name AD-Domain-Services -IncludeManagement Tools
Upon successful execution, the installation begins, as shown in Figure 4-28.

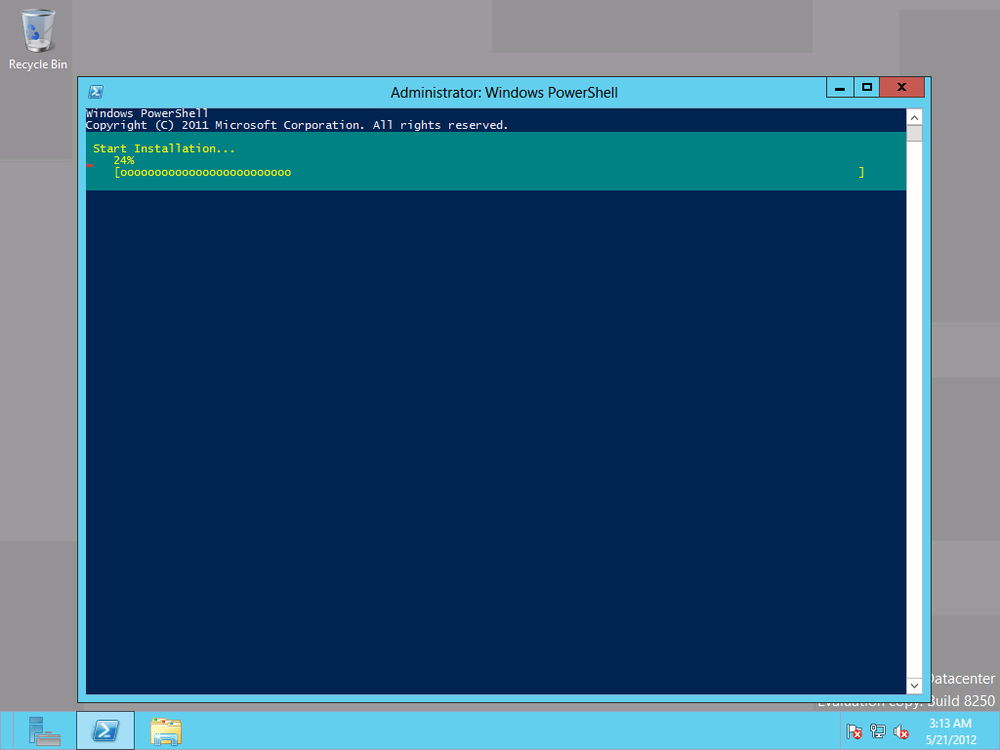
After AD is deployed, a confirmation is displayed, as well as any follow-up action needed for a successful AD deployment.
Note
Just about any task that can be performed in the ADAC GUI can be done in PowerShell. For example, to enable the ADAC Recycle Bin, you can use this cmdlet:
Enable-ADOptionalFeature –Identity'CN=RecycleBinFeature,
CN=OptionalFeatures,CN=DirectoryService,CN=WindowsNT,
CN=Service,CN=Configuratio,DC=xyz,
DC=local'ScopeForestofConfiguratioSet-Target 'xyzlocal'
Active Directory Domain Services is more efficient to manage in Server 2012. It offers more centralized administration with preinstallation checks, and integrated Adprep.exe with the install process means a more hassle-free deployment experience.
Having AD DS configured easily and correctly is a critical step to ensure the effectiveness of a directory service for amenities such as user identity management, security and authorization management, and device management.
Although the Active Directory Administrative Center has capabilities that have been included in previous Windows servers, such as search and the Recycle Bin, the interface has changed enough that it’s important to familiarize yourself with where to find features and how to use them. The interface also offers customization functionality, such as the ability to collapse or hide sections when creating new AD objects.
Server 2012 Active Directory can run at the Server 2012 functional level, or it can be incorporated into older functional levels of Active Directory domains, although some functionality may be sacrificed.
While it may seem like a bother to use PowerShell to execute commands that you can perform with just a click in the GUI, it’s worth getting acquainted with various PowerShell commands—in particular, ones related to Active Directory tasks—in order to manage AD quickly and efficiently. The best way to grasp PowerShell’s potential is to imagine needing to apply a slight change to every user object in Active Directory—a process that would take forever with the GUI. Investing a little time in learning PowerShell can make accomplishing such seemingly daunting tasks quick and easy, and this is a central theme of Server 2012.
Get Windows Server 2012: Up and Running now with the O’Reilly learning platform.
O’Reilly members experience books, live events, courses curated by job role, and more from O’Reilly and nearly 200 top publishers.

