In this section, I'll guide you through the process of actually creating a nameserver, and then in the remainder of the chapter I'll add to the functionality of the nameserver to prepare it for use with Active Directory.
Nameservers need a constant connection to the Internet and a non-changing IP, either set statically on the server itself or delivered consistently through a DHCP reservation. The machine you're building out as a nameserver doesn't need to be that powerful; a fast Pentium III machine with 512 MB or so of RAM will be more than sufficient.
Tip
In the following examples, I will use the fictitious domain name hasselltech.net, with the also fictitious machine name "colossus" and IP address 192.168.0.5. You can, of course, replace these as appropriate when following along with your own computer.
The first step is to install the nameserver software onto your Windows Server 2008 computer. To do so, follow these steps:
Open Server Manager.
In the left pane, click Roles, and then in the right pane, click Add.
Click Next in the Add Roles Wizard.
Find DNS Server in the list, check its box, and click Next.
Click Next on the "Introduction to DNS Server" screen.
Click Install, wait for the process to complete, and then close the Add Server Roles box.
Tip
If you have your computer set up to receive an IP address via DHCP, the DNS Server role installation will complain loudly that DNS isn't intended to work on dynamically assigned IP addresses. For this example, we can acknowledge the warnings and continue. As mentioned previously, make sure nameservers that are actually in production—not a test environment—have a consistent, unchanging IP address.
Next, point your new nameserver to itself for name resolution so that when you run tests, you're not querying your ISP's nameservers. In fact, most nameservers point to themselves, rather than to other nameservers, for name resolution. I recommend setting this through the command line using the netsh command, like so:
netsh int ip set dns "Local Area Connection" static 192.168.0.5 primary
You can replace Local Area Connection with the name, as it appears in your network connection properties, of your network connection. Also, replace 192.168.0.5 with the local nameserver's IP.
Of course, you also can change the nameservers to use for name resolution through the Windows interface by following these steps:
Inside the Control Panel, double-click the Network Connections applet.
Inside the Network Connections dialog box, right-click the name of your network connection and choose Properties from the context menu.
Navigate to the General tab, and then select Internet Protocol (TCP/IP).
Click the Properties button.
Click the "Use the following DNS server address" radio button, and then enter the nameserver's IP address into the box.
Click OK.
Now that the DNS server software is installed, you need to start the DNS service. Select Start, then click Administrative Tools and select DNS. The DNS Management snap-in will appear, as shown in Figure 4-1 (although it will not have all of the Forest Lookup Zones shown in the figure).
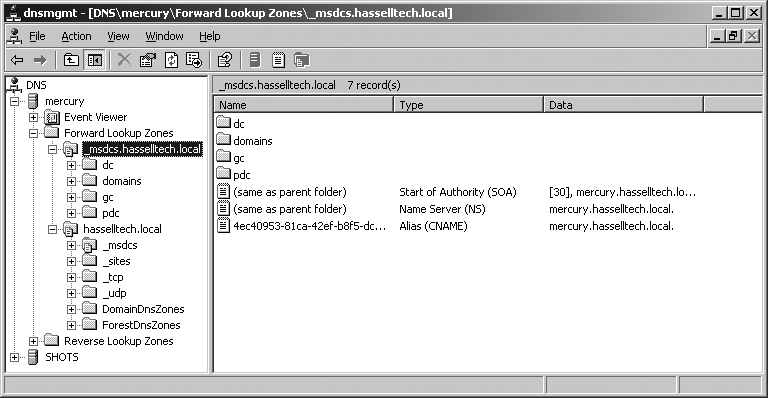
We'll manually set up DNS later in this chapter, so ignore the message to use the Configure Your DNS Server Wizard. At this point, you have a functional nameserver, which performs "caching-only" functions—that is, it doesn't hold any DNS information unique to itself, but it does know how to contact the 13 root servers as held by ICANN, the master of DNS on the Internet, and it can resolve Internet addresses by contacting them. Windows Server 2008's DNS software knows how to do this by default, without any configuration on your part.
Windows Server 2008's DNS component is compliant with RFC 1995 and can do incremental transfers (as mentioned earlier, known as IXFRs in DNS parlance) with other Windows Server 2003 or Windows Server 2008 servers supporting the feature. It can also still do the old-style full zone transfers, referred to as AXFRs, with noncompliant nameservers and with non-Windows Server 2003 or Windows Server 2008 machines. There is no way to instruct Windows Server 2008 to always send full zone files to all servers, regardless of whether they are compliant. You can, however, tell Windows to send incremental zone transfers to all supporting servers, regardless of whether they run Windows Server 2003 or Windows Server 2008. Here's how:
Open the DNS Management snap-in.
Right-click your server and select Properties from the context menu.
Navigate to the Advanced tab, and uncheck the box labeled BIND Secondaries.
Click OK to finish.
Now the server will use incremental zone transfers to all supporting servers, not just to those running Windows Server 2003 or Windows Server 2008.
Now, to further configure your server, let's create a forward lookup zone file. Inside the DNS snap-in, expand the server name in the lefthand pane. Then do the following:
Right-click Forward Lookup Zones and select New Zone. The New Zone Wizard appears.
Choose Primary Zone, and then click Next.
Enter the zone name. In this example, I'll use hasselltech.net. Click Next to continue.
Enter a name for the new zone file, which is stored in ASCII format. The default name is your domain with .DNS appended to the end—hasselltech.net.dns, for example. The zone files are stored in %SystemRoot%\system32\dns. Click Next.
On the Dynamic Update screen, choose to allow both insecure and secure dynamic updates. I'll discuss dynamic DNS updating in a later section. Click Next.
Click Finish to complete the zone creation process.
The hasselltech.net zone has now been created.
Inside the DNS snap-in, right-click the hasselltech.net node in the lefthand pane and choose New Host (A) from the context menu. The New Host dialog box appears, as shown in Figure 4-2.
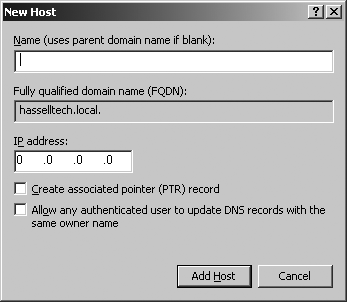
Enter the hostname of the machine for which you're entering the record, and then enter the IP address of the machine. As you enter the hostname, the fully qualified domain name (FQDN) will adjust to show the full hostname, including the domain, to check your work. You also can check the "Create associated pointer (PTR)" record checkbox, which enters a PTR record into the reverse lookup zone, if one is currently configured. (If none is set up, the process will throw an error.) Click OK.
You can enable or disable round-robin DNS balancing using the nameserver's Advanced Properties screen, which you'll find by right-clicking the nameserver name in the DNS Management Snap-in's lefthand pane and selecting Properties from the context menu. Figure 4-3 shows this screen, on the Advanced tab of the Properties sheet.

Check "Enable round robin" in the "Server options" box to enable round robin, and uncheck it to disable it.
Tip
DNS round-robin functionality is enabled on a per-server level, not on a per-zone level.
Also, if you want to turn off the subnet mask ordering feature, uncheck "Enable netmask ordering" in the "Server options" box, which is on the Advanced Properties screen, as shown in Figure 4-3.
A default SOA record is created when you create a new zone in Windows Server 2008. To modify an SOA record, double-click it in the DNS Management snap-in. The screen will look something like Figure 4-4.
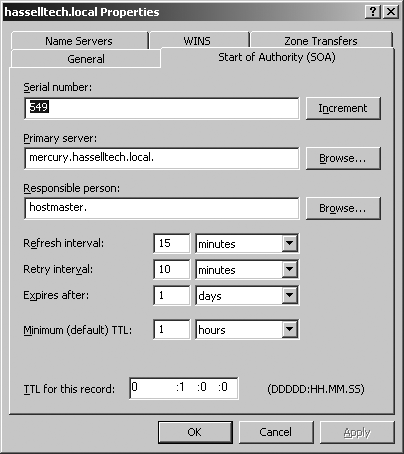
Here are descriptions of the various fields on this tab:
- Serial number
The serial number indicates whether the SOA record has changed since the last update on the part of a nonauthoritative nameserver. If you want to change this number, click the Increment button; you can't simply edit the field.
- Primary server
This field denotes the primary, authoritative nameserver for this zone.
- Responsible person
This field indicates the administrator responsible for configuring and editing this zone. This is the administrator's email address, but with a period in place of the normal at sign (@) and a period appended to the end of the string. For example, if your administrator is hostmaster@hasselltech.net, in this field you would enter hostmaster.hasselltech.net.
- Refresh interval
The refresh interval indicates to secondary nameservers how long they can keep their copies of the zones before being required to request a refresh.
- Retry interval
The retry interval indicates how long the secondary nameserver must wait before attempting to contact the authoritative nameserver again after a failed attempt to refresh its zone after the refresh interval has lapsed.
- Expires after
This value essentially indicates how long a zone file is valid for use in production environments. It dictates how long a secondary nameserver will continue attempting a zone transfer from its primary nameserver. When this expiration date is reached, the zone on the secondary nameserver expires, and that server stops responding to queries.
- Minimum (default) TTL
This value indicates to other nameservers how long they can use information they've previously retrieved from this nameserver before being required to consult the authoritative server again for updated or refreshed information. This is, by default, 60 minutes. You also can set TTL values for individual records that override this minimum default setting for a zone.
- TTL for this record
This value overrides the minimum (default) TTL as described earlier and is limited to only this SOA record.
NS records, as you learned earlier in this chapter, link the hostnames of nameservers to their IP addresses. To create these records, inside the DNS Management snap-in right-click the zone file in question and select Properties. Then select the Name Servers tab. You'll be greeted with the screen shown in Figure 4-5.
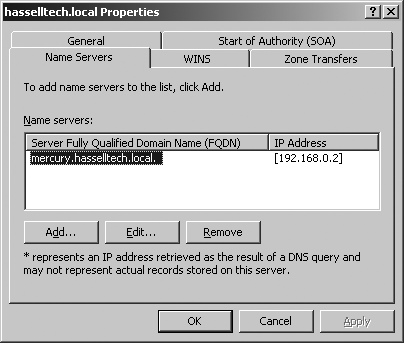
The primary NS record is displayed, as it was created by default when you first constructed the zone. Click the Add button to insert a new NS record—for example, for a secondary nameserver. In the box that appears, type in the new machine's fully qualified domain name and click the Resolve button. Windows Server 2008 uses a reverse lookup to determine the IP address of the hostname you entered. If you agree with its finding, click the Add button beside the IP address and the NS record will be entered. Click OK twice to close.
Recall that CNAME records map different hostnames to pre-existing A records, allowing multiple DNS names for a host. To create these records, right-click the hasselltech.net node in the lefthand pane of the DNS Management snap-in and choose New Alias (CNAME) from the context menu. The New Resource Record dialog box appears, as shown in Figure 4-6.
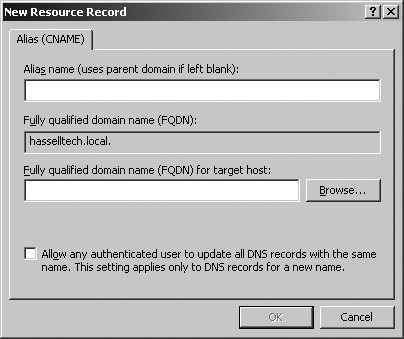
Enter the aliased name of the machine for which you're entering the record (this is the canonical name), and then enter the fully qualified domain name of the host you're aliasing. As you enter the CNAME, the fully qualified domain name field just below will adjust to show the full hostname, including the domain, to check your work.
Click OK to finish.
As you'll remember from earlier in this chapter, MX records dictate how mail is delivered to a specific DNS zone. To create these records, inside the DNS snap-in right-click the hasselltech.net node in the lefthand pane and choose New Mail Exchanger (MX) from the context menu. The New Resource Record dialog box appears, as shown in Figure 4-7.
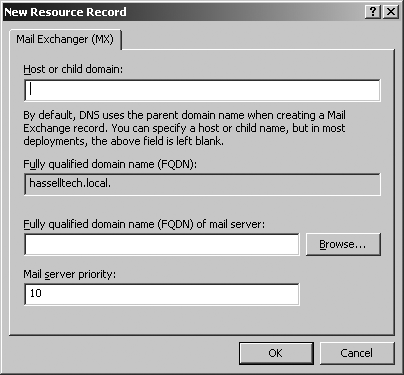
Enter the name of the domain or zone for which you're entering the record, and then enter the fully qualified domain name of the host to which mail for that domain or zone should be delivered. As you enter the CNAME, the fully qualified domain name field just below will adjust to show the full hostname, including the domain, to check your work. Finally, in the Mail server priority box, type the MX preference number that should apply to this record.
Click OK to close.
You learned earlier in this chapter that reverse lookup zones map IP addresses to their corresponding hostnames. To create these records, inside the DNS Management snap-in right-click the Reverse Lookup Zones folder and choose New Zone from the context menu. You'll be presented with the New Zone Wizard. Click Next to bypass the introductory screen, and you'll see Figure 4-8.
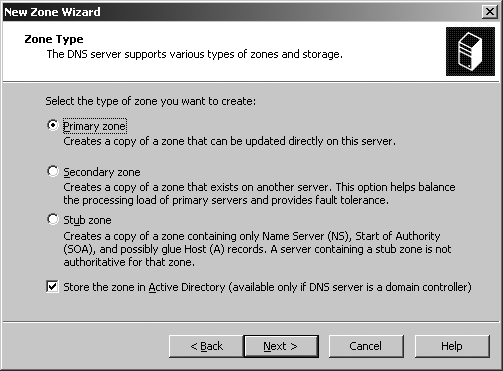
Then follow these steps:
Choose "Primary zone," and click Next.
Enter the network numbers for your network in the Network ID field—for example, 192.168.0.0—and then click Next.
The Dynamic Updates page appears. Select to allow both insecure and secure updates, and then click Next.
Click Finish to complete the wizard.
Your reverse lookup zone has been created.
Remember that PTR records map IP addresses to their hostnames and are vital within a reverse lookup zone. To create these records, right-click the appropriate reverse lookup zone within the DNS Management snap-in and select New Pointer (PTR) from the context menu. The New Resource Record dialog will appear, as shown in Figure 4-9.
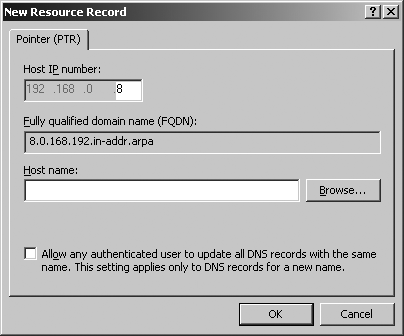
On this screen, all you need to do is enter the last dotted quad of a specific IP address, and then enter the hostname to which that address should refer. The FQDN for the reverse lookup record will fill in automatically.
Click OK to finish.
In this section, I'll cover creating a secondary nameserver to serve a zone. Some preliminary steps are necessary, though: first, the machine should be running Windows Server 2008, and it should have the DNS service installed, as mentioned before. The machine's network connection should be configured so that its preferred nameserver is itself. (Also, for the purposes of this section, the secondary nameserver will be called ns2.hasselltech.net at IP address 192.168.0.6.)
To proceed:
Open the DNS Management MMC snap-in.
Right-click Forward Lookup Zones and select New Zone from the context menu. The New Zone Wizard will appear; click Next to skip the introductory screen.
Choose Secondary to create a secondary lookup zone, which will indicate to Windows that this should be a secondary nameserver. Click Next.
Enter the name of an existing zone on the Zone Name screen, and click Next.
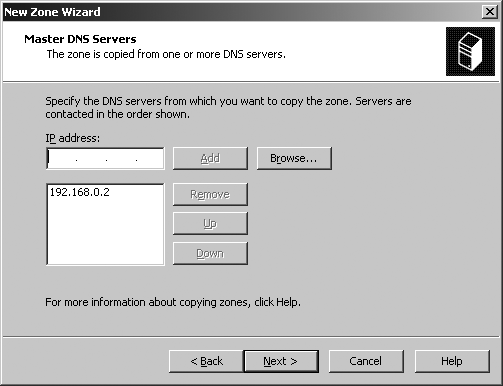
Specify the nameservers from which Windows can fetch the existing zone files. Simply enter the primary nameserver in the box, click Add, and then click Next, as shown in Figure 4-10.
Click Finish to create the zone.
Perhaps you decide, upon acquiring a new business into your organization, that you need more horsepower in responding to DNS queries. Or, perhaps eventually you'd like to cluster your DNS servers. In these cases, you would want to promote some secondary nameservers to primary status. It's an easy process to promote an existing secondary nameserver to a primary nameserver.
Open the DNS Management snap-in.
Right-click the zone folder that you want to convert, and select Properties from the context menu.
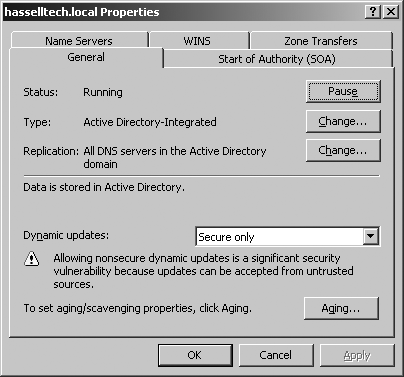
Navigate to the General tab, as shown in Figure 4-11.
To the right of the Type entry—it should now say either Primary or Secondary—click the Change button. The Change Zone Type screen will appear, as shown in Figure 4-12.
Click the "Primary zone" radio button to perform the promotion.
Click OK.
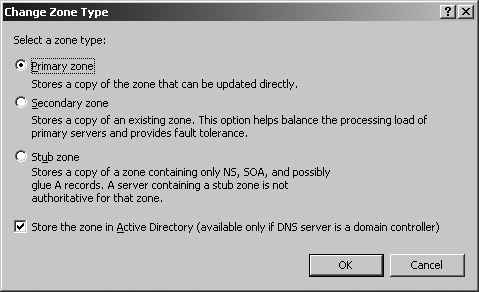
The server will now be a primary server for that zone.
All zone files are stored in %SystemRoot%\system32\dns. The files are stored in the format <domain>.dns (e.g., hasselltech.net.dns). You can edit them with your favorite text editor or with a script that you can write to perform large-scale and/or automated machine rollouts.
Warning
When you directly edit zone files, make sure you manually increment the serial number value in the zone's SOA record. You can increment by any value. Otherwise, the changes are likely to be missed by any secondary nameservers during a zone transfer.
For obvious reasons, you'll find it necessary to control which machines can perform a zone transfer from nameservers—after all, users at large on the Internet have no legitimate need to retrieve a full copy of your zones, and having a full record of your connected machines is a rather significant security breach. In Longhorn Server, this process is locked down by default. To verify this, open the DNS Management snap-in and expand the nameserver's name. Find a zone under Forward Lookup Zones, right-click it, and choose Properties. Click over to the Zone Transfers tab. You'll see the screen depicted in Figure 4-13.
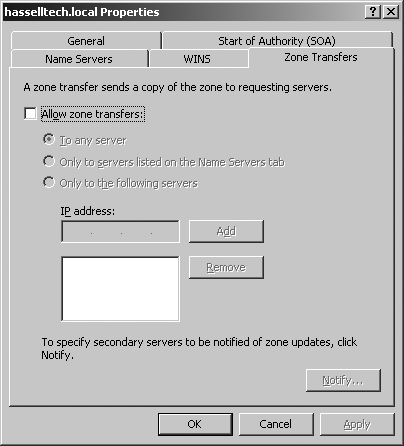
You see that you can disallow zone transfers wholesale by unchecking the box labeled "Allow zone transfers." However, if you choose to enable them to have secondary nameservers, you can lock down the access to those zone files a bit more granularly. The first option, "To any server," leaves the transfer process wide open. The second option, "Only to servers listed on the Name Servers tab," seems to be the most reasonable option by restricting transfer to the servers identified as authoritative for the domain on that tab. The third option, "Only to the following servers," can lock down that list even further. Simply select the option, enter an IP address into the box, and click Add when you're done. Make the list as long or short as it needs to be, and then finish the process by clicking OK.
Windows Server 2008 also supports a feature listed in RFC 1996 known as zone modification notification, which nearly contradicts what I wrote earlier about the zone transfer process being primarily a pull, rather than a push, process. Click the Notify button on the Zone Transfer tab to explore this feature; you'll be greeted with the screen in Figure 4-14.
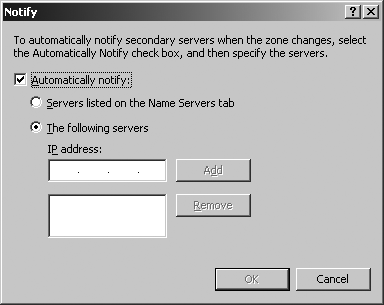
The notification feature will contact the servers listed on this Notify screen when changes are made to the zone file on the primary nameserver. You can have the server contact the authoritative nameservers for a zone or domain as listed on the Name Servers tab, or contact only the servers in the list that you create on this screen. (To create this list, simply enter an IP address and click Add. Repeat as necessary to build the list.) Click OK when you've configured or disabled this feature as you wish.
Get Windows Server 2008: The Definitive Guide now with the O’Reilly learning platform.
O’Reilly members experience books, live events, courses curated by job role, and more from O’Reilly and nearly 200 top publishers.

