Like it or not, good spelling is a crucial part of written communication. Spelling mistakes reflect poorly on the writer and can create barriers just by making a negative impression on the reader. Why not ease your users’ spelling worries by wiring a simple, powerful spellchecking utility into your applications?
NetSpell, written by Paul Welter of LoreSoft, is a lightweight spellchecking library that can be added quickly to your .NET applications. It comes with dictionaries for several different languages and built-in controls for Windows Forms and web apps. NetSpell was written on the 1.1 Framework but wraps nicely into 2.0 applications.
Tool | NetSpell |
Version covered | 2.1.7 |
Home page | |
Power Tools page | |
Summary | Lightweight, easy-to-set-up spelling tool for any .NET application |
License type | Not specified; compiled binaries and source code available |
Online resources | Forums, bug tracker, Code Project article at http://www.codeproject.com/csharp/NetSpell.asp |
Supported Frameworks | .NET 1.0, 1.1, 2.0 |
Related tools in this book | FreeTextBox |

Download the NetSpell assembly from the tool’s home page and reference it in your project (see the Appendix).
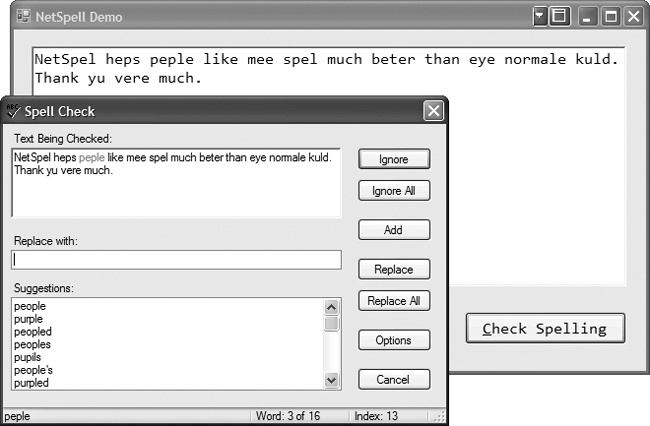
Straight out of the box, NetSpell’s distribution gives you user interfaces for both Windows Forms and ASP.NET pages. The interface is a separate dialog for managing spellchecking of your text with standard buttons for ignoring, replacing, or adding words to the dictionary. Figure 4-15 shows NetSpell’s dialog in front of a Windows Form demo app.
NetSpell has several components you’ll need to work with when tying it into your application. If you’re working on a web application, copy the NetSpell.SpellChecker.dll assembly to the bin folder. If you’re working on a Windows Forms app, just reference it in your project.
Three additional files are required for web applications: spell.css, spell.js, and the SpellCheck.aspx control. Copy these to the same folder as the control in which you’re enabling spellchecking.
Finally, for both web apps and Windows Forms apps, you’ll need to place the distribution’s dic folder (which contains NetSpell’s dictionaries) in an accessible location. You’ll also need to reference the dic folder’s location in the web.config file for web applications. (Windows Forms apps won’t need that reference—you’ll configure the spelling control itself.) For example, if you’ve placed the dictionary folder under the application’s bin folder, your web.config should look like this:
<appSettings>
   <add key="DictionaryFolder" value="bin\dic" />
</appSettings>
NetSpell uses two classes to provide spellchecking: Dictionary and Spelling. The Dictionary class deals with the physical dictionary files and creates word lists for use in checking text. The Spelling class manages the spellchecking process and allows you to configure things such as ignoring HTML or forcing all capital letters.
For Windows Forms apps, start by dropping NetSpell.SpellChecker.dll on the General toolbar tab, which adds the Word Dictionary and Spelling controls to the toolbox. Next, drag both controls onto your form’s design surface. The Dictionary needs to know where the physical dictionary files are located, so point the Dictionary.DictionaryFolder property to the folder holding the dictionary files (bin\dic in the web.config example).
The next step is to let the Spelling control know where its data source is. Open the Spelling object’s property tab and set the Dictionary property to the Dictionary object you just configured.
Now it’s time to wire things together in code. The following example is adapted straight from Welter’s WinForms demo in NetSpell’s distribution. Upon a button-click event, text from a RichTextBox is sent to the Spelling object, an instantiation of the SpellChecker class. The SpellCheck( ) method starts the checking process:
private void btnCheckSpelling_Click(object sender, EventArgs e)
{
    this.spelling.Text = this.richTextBox.Text;
    this.spelling.SpellCheck( );
}
NetSpell works from an event-driven approach, so you’ll need to implement several event handlers to deal with replacing or dropping words kicked out during the spellchecking. Pull up the property sheet for the Spelling object to see the exposed events.
At a minimum, you’ll need to implement handlers for the ReplacedWord and DeletedWord events. The ReplacedWord event occurs when a misspelled word is called out, a word is listed in the Replace With field, and the Replace button is clicked. You must deal with substituting the misspelled word in the original text with the contents of the replacement word. NetSpell’s example, included in the distribution, shows one way to accomplish this:
private void spelling_ReplacedWord(object sender,
                                   NetSpell.SpellChecker.ReplaceWordEventArgs e)
{
    int start = this.richTextBox.SelectionStart;
    int length = this.richTextBox.SelectionLength;

    this.richTextBox.Select(e.TextIndex, e.Word.Length);
    // Replace selection with word from Replace With field
    this.richTextBox.SelectedText = e.ReplacementWord;

    // Move selection point to next word
    if (start > this.richTextBox.Text.Length)
        start = this.richTextBox.Text.Length;
    if ((start + length) > this.richTextBox.Text.Length)
        length = 0;
    this.richTextBox.Select(start, length);
}
DeletedWord events are fired when a misspelled word is called out, the Replace With field is left blank, and the Replace button is clicked. You’ll need to clear the misspelled word from the original text:
private void spelling_DeletedWord(object sender,
                                  NetSpell.SpellChecker.SpellingEventArgs e)
{
    int start = this.richTextBox.SelectionStart;
    int length = this.richTextBox.SelectionLength;

    this.richTextBox.Select(e.TextIndex, e.Word.Length);
    this.richTextBox.SelectedText = "";

    // Move selection point to next word
    if (start > this.richTextBox.Text.Length)
        start = this.richTextBox.Text.Length;
    if ((start + length) > this.richTextBox.Text.Length)
        length = 0;
    this.richTextBox.Select(start, length);
}
Tip
The code to move the selection point is the same in all events and should be refactored out to a separate method. It’s left in this example for the sake of clarity.
Lastly, use the EndOfText event to perform any final steps. Notifying the user of the spellcheck’s completion is automatically handled by NetSpell, which launches a dialog box advising the user:
private void spelling_EndOfText(object sender, System.EventArgs e)
{
    // Perform any cleanup tasks you might need
}
Implementing NetSpell in ASP.NET is much the same. It’s even easier if you’re using FreeTextBox, an open source text-editing ASP control discussed in Chapter 1. NetSpell is integrated directly into FreeTextBox, saving you much of the implementation coding.
Support is available through dedicated forums on the tool’s home page as well as through a bug tracker available from SourceForge (http://sourceforge.net/projects/netspell/).
Get Windows Developer Power Tools now with the O’Reilly learning platform.
O’Reilly members experience books, live events, courses curated by job role, and more from O’Reilly and nearly 200 top publishers.

