It wouldn’t be a computer if it couldn’t play your tunes, right?
But the Music app, completely redesigned in Windows 8.1, is much more than a jukebox for songs you already own. It’s also the front end for one of Microsoft’s best-kept secrets: the Xbox Music service.
Tip
Don’t be thrown. When you open the app, you see that its official name is “xbox music,” and it lets you work with the Xbox Music service—but it has nothing at all to do with the Xbox game console. “Xbox” is simply the new word for “Microsoft.”
Within Microsoft’s collection of 30 million songs, Xbox Music combines elements of services like Pandora (plays endless free music in a style you choose), Spotify (you can listen to any song or any album or any performer, on command, for free), and iTunes (you can buy songs to download). And it’s a Windows 8 exclusive; none of your Windows 7 friends can use it.
And it’s all free. (If you’ve signed in with your Microsoft account, that is.)
Note
OK, it’s free with occasional interruptions by audio/video ads. Music streaming is free and unlimited for your first six months; after that, you can listen free for 10 hours a month. If you’re willing to pay $10 a month (or $100 a year), you can get an Xbox Music Pass, which lets you (a) also listen on a Windows 8 phone and your Xbox 360 (provided you also have a Gold membership), (b) download songs for offline listening, (c) sync your playlists across multiple gadgets, and (d) eliminate the ads.
The Music app serves three purposes. First, it’s a version of iTunes or Windows Media Player—a player and displayer of all the music files you have on the computer.
Second, it’s the face of the Xbox Music service, which plays music of the style you like—like a customized Internet radio station.
Finally, it’s Microsoft’s online music store. The following pages dispatch these three functions one at a time. In the app, they’re labeled “Collection,” “Radio,” and “Explore.”
When you select Collection—either on the startup screen or in the panel at the left side—you see something like Figure 4-24.
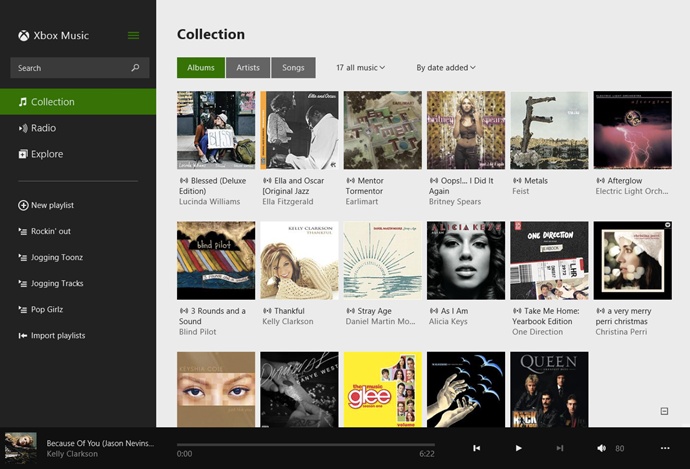
Figure 4-24. The complete list of your music. You can sort it by tapping
the criteria at top right—albums, artists, songs, and so on. In
Album and Artist view, you see cover art like this. In Songs view,
you see a simple table—a list—with columns for title, singer,
album name, length, and year of release. A ![]() button and
button and ![]() button (meaning “Add to a playlist”) also
appear.
button (meaning “Add to a playlist”) also
appear.
You can slice and dice this list of music in all the usual ways:
Albums, Artists, Songs. Use these three big buttons at the top to specify how you want your music displayed.
all music, on this PC, in the cloud. The pop-up menu (
 ) at top governs which music collection you’re seeing. “On this PC” refers to
music files actually on your machine, while “in the cloud” lists
songs you’ve bought from Microsoft’s online music store; they’re
held for you in an online locker, so that you can listen to them
from any Windows device with an Xbox Music connection. And “all music,” of course,
means both.
) at top governs which music collection you’re seeing. “On this PC” refers to
music files actually on your machine, while “in the cloud” lists
songs you’ve bought from Microsoft’s online music store; they’re
held for you in an online locker, so that you can listen to them
from any Windows device with an Xbox Music connection. And “all music,” of course,
means both.Note
If you choose “on this PC” and see a message that says, “It’s lonely here,” Windows is trying to say that it hasn’t found any music files on your computer to list. (It automatically lists whatever’s in your Music folder, but maybe that’s not where you’ve stashed your files.) Use “Choose where we look” to navigate to whatever folders hold your music files, or “Explore music” to go buy some from Microsoft.
By date added, by a to z, by artist… This pop-up menu lets you sort the list by date, alphabetically, by year, by musical genre, or performer.
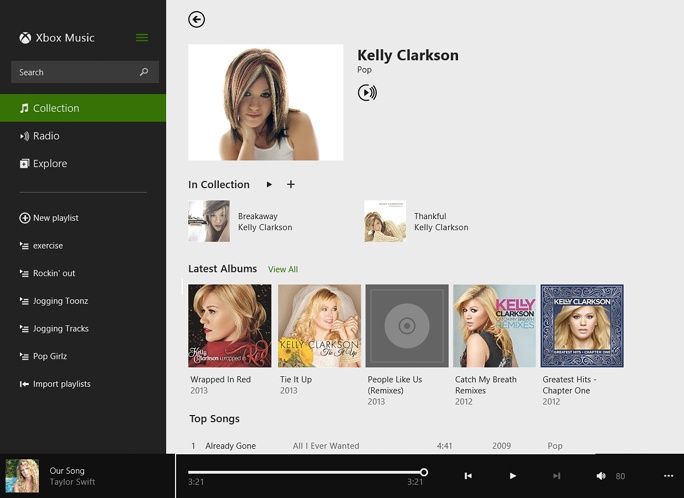
In Albums and Artists view, clicking or tapping takes you to further information screens. For example:
Albums. The screen fills with a lovely display of the album art and song titles. The round buttons at the top are Play (
 ), Add to Playlist (
 ), artist information (Figure 4-25), and
 . That last one’s a pop-up menu; its
commands include “Start radio” (start a stream of music that
sounds like this song), Delete, “Match album info” (fill in
missing details by consulting online databases), and “Buy
album” (no explanation necessary).
. That last one’s a pop-up menu; its
commands include “Start radio” (start a stream of music that
sounds like this song), Delete, “Match album info” (fill in
missing details by consulting online databases), and “Buy
album” (no explanation necessary).Artists. Here’s a screen (Figure 4-25) full of links pertaining to this particular performer: a list of that artist’s songs in your collection, latest albums, top songs, and related performers.
This is Microsoft’s version of Pandora. When you select “Start
a station,” you’re asked to enter the name of a band or a singer you
like. When you then hit the ![]() button, Music instantly starts playing songs by that artist
and songs that sound similar. It’s a great way
to discover new favorites based on what you know you like, and also
a great way to keep the mood going when you find a style you
like.
button, Music instantly starts playing songs by that artist
and songs that sound similar. It’s a great way
to discover new favorites based on what you know you like, and also
a great way to keep the mood going when you find a style you
like.
A tile for your new station appears, so that you’ll be able to recall it instantly. Just tap or click.
See the playback controls at the bottom? The Pause button does
what it says. Hit ![]() to hear the same song again. Use the
to hear the same song again. Use the
![]() button if the Smart DJ plays a song you don’t
like; it skips to the next song.
button if the Smart DJ plays a song you don’t
like; it skips to the next song.
To delete one of your stations, select its icon:
Touchscreen. Swipe briefly to the left across it.
Mouse. Right-click it.
The App bar appears; select Delete.
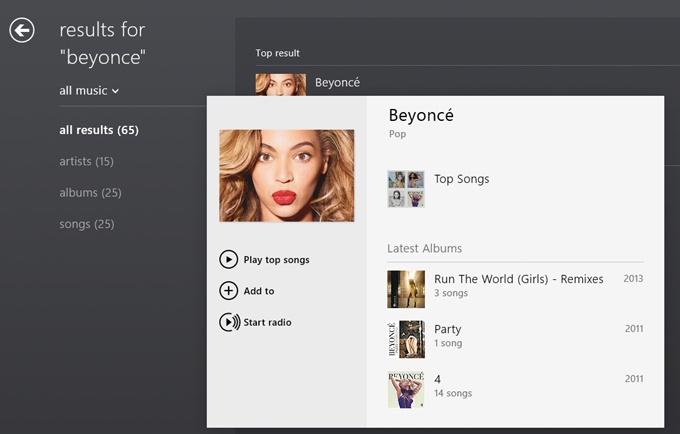
Microsoft isn’t kidding around with this amazing feature; you can immediately start listening to any band, song, or singer, right now, for free. When you choose this tile, you get a screen full of popular groups and new albums—and then there’s the magic search box at the top left.
GEM IN THE ROUGH: Universal Playback Controls
You can start music playing and then dive into other apps or programs; the music continues to play. You know—background music for your work session.
But what if you have to take a phone call or to speak sternly to a child? Do you have to muddle all the way back to the Music app to pause playback?
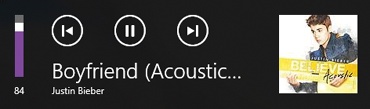
Don’t be silly. If you have a keyboard, just tap one of your volume keys. Up pops this audio palette, containing Previous Song, Next Song, Pause, and volume controls. The album cover appears, too—a nice touch.
Here you can type in whatever you like: coldplay, electric light orchestra, london philharmonic, whatever. Just beneath the search box, the app offers some common suggestions to save you typing.
When you hit Enter or tap the ![]() icon, the main screen shows the search
results, and boom: It’s all available to play right now, on demand,
for free (Figure 4-26).
icon, the main screen shows the search
results, and boom: It’s all available to play right now, on demand,
for free (Figure 4-26).
You’re welcome.
Whenever music is playing, no matter how far you’ve meandered
in Music, the “Now playing” button in the list at left
(![]() ) summons a full screen of information. It
shows the album art, the list of songs from that album, and a “Save
as a playlist” button.
) summons a full screen of information. It
shows the album art, the list of songs from that album, and a “Save
as a playlist” button.
Tip
You can’t shrink Music down to a tiny miniplayer, as you can most Windows music apps. But you can split the screen so that it huddles in a vertical strip while you do other work; see The Two Task Switchers.
A playlist is a group of songs you’ve placed together, in a sequence that makes sense to you. One might consist of party tunes; another might hold romantic dinnertime music; a third might be drum-heavy workout cuts.
To create a new playlist, select “New playlist”
(![]() ) in the list at left. Type a name for the
playlist (“Rockout Toonz,” “Makeout Music,” whatever), and hit
Save.
) in the list at left. Type a name for the
playlist (“Rockout Toonz,” “Makeout Music,” whatever), and hit
Save.
Now a playlist icon called “Rockout Toonz” (or whatever you called your latest list) appears in the list of playlists at left. All you have to do is add songs to it.
Just look for the ![]() symbol. It appears on the “Now playing”
screen, for example, next to any highlighted song name. It appears
on the Album and Artist pages for your collection.
symbol. It appears on the “Now playing”
screen, for example, next to any highlighted song name. It appears
on the Album and Artist pages for your collection.
Wherever it appears, it produces a pop-up menu of playlist names. Specify which playlist should be the new home for that song.
You can also work in reverse. Tap the new playlist’s name
and then hit “Explore music.” Microsoft opens its massive vault of
songs to you; search, browse, navigate to find the music you want,
hitting the ![]() button each time you see one worth
enshrining in your playlist.
button each time you see one worth
enshrining in your playlist.
To perform any kind of surgery to one of your playlists, select its name in the list at left.
The round buttons below its name at the top of the screen
let you add more songs (![]() ), rename the playlist (
), rename the playlist (![]() ), or delete it (
), or delete it (![]() ).
).
You can also operate on the individual songs inside it. Tap
one of the songs; the – button next to the ![]() means “Delete this song” (from the
playlist, not your collection).
means “Delete this song” (from the
playlist, not your collection).
If you open the App bar at this point, you also get “Move up” and “Move down” buttons (move the song up or down the list of songs).
In the Charms bar, the Settings item opens a panel of useful options:
Account. Here’s where you can sign up for a paid Xbox Music account or change the settings for it (and your regular Xbox account, if you have one). The buttons here let you redeem free-music codes, change your credit-card information, add or remove new Windows phones/tablets/computers on your account, and so on.
Preferences. Most of these switches have to do with the music you buy from Microsoft’s online store. Turn on “Cloud collection” if you want your own, purchased music files stored online so that you can listen to them from any Windows device with an Xbox Music connection. If you do that, then you’ll probably also want “When I buy songs from Xbox Music on other devices, automatically download them here”; it ensures that buying a song or an album on one Windows device sends it to the Music app on all of them.
Finally, there’s no good reason to turn off “Automatically retrieve and update album art and metadata.” This handy feature is responsible for the art and information that appear for each song, album, or musician in your collection.
Tip
Like many of Microsoft’s TileWorld apps, Music is intended to be bare bones and simple. It offers the basic functions and no more; for example, it doesn’t let you rip your audio CDs to your computer, edit song information, or create “smart playlists.”
If you’d prefer something a little fuller fledged, don’t forget that Windows Media Player is waiting for you back at the Windows desktop. Or you could download a nicer, more complete free program like MusicBee. It’s available from this book’s “Missing CD” page at www.missingmanuals.com. (Both of these two alternatives are for the full Windows, not Windows RT, alas.)
Get Windows 8.1: The Missing Manual now with the O’Reilly learning platform.
O’Reilly members experience books, live events, courses curated by job role, and more from O’Reilly and nearly 200 top publishers.

