TileWorld comes with its own email program—called Mail. In fact, it’s the only email program that comes with Windows 8; there’s no built-in desktop mail program. (Although you do get Outlook with Windows 8 RT, the stripped-down version of Windows.)
Mail is easy to use, it’s beautiful, and—especially if you have a touchscreen—it offers a fast, fluid way to work. And it’s not nearly as stripped down as it was in Windows 8. Now it has multiple windows, a way to flag messages for later, and drag-and-drop email folders.
Before you read another syllable, you need to confront one big piece of what could be bad news: Mail requires an IMAP account. It doesn’t work with POP accounts, which means you may not be able to use Mail at all. Read on.
There are three kinds of email accounts:
Web-based mail. Some email accounts are designed to be accessed on a Web site, like the free accounts offered by Gmail, Yahoo, Hotmail, or Outlook.com.
IMAP accounts (Internet message access protocol) are the latest type, and they’re surging in popularity. IMAP servers keep all your mail online, rather than storing it solely on your computer; as a result, you can access the same mail from any computer (or phone), and you’ll always see the same lists of mail. IMAP servers remember which messages you’ve read and sent, and they even keep track of how you’ve filed messages into mail folders. (Those free Yahoo email accounts are IMAP accounts, and so are Apple’s iCloud accounts and corporate Exchange accounts. Gmail and Outlook.com accounts can be IMAP, too.)
Windows 8 Mail works fine with IMAP accounts.
Note
Gmail no longer works with Exchange accounts (you’d know if you had one). There is, however, a workaround that involves signing up for a free Outlook.com account. Instructions are here: http://j.mp/V8hF9s.)
POP accounts are the oldest, most compatible, and most common type on the Internet. (POP stands for Post Office Protocol, but this won’t be on the test.) The big difference: A POP server transfers incoming mail to your computer; once it’s there, it’s no longer on the Internet. (If you try to check your email on your phone, you won’t see whatever new messages were downloaded by your computer back at home since you last checked.) Internet providers like Time Warner and Comcast usually provide email addresses as POP accounts.
Are you sitting down? Windows 8 Mail doesn’t work with POP accounts.
Now, if you do have a POP account and don’t want to ditch it, you have some options. You can use a different email program, of course, although Mail is integrated nicely into several Windows features (like notifications).
Some POP accounts can be converted into IMAP accounts, the type Windows 8 recognizes; ask your email provider. (There may be a fee.) And most Web-based email systems, like Gmail and Outlook.com, can also supply your mail as an IMAP account.
Finally, you can use a Web-based IMAP account (like Gmail or Outlook.com) as an intermediary that connects your POP account to Windows 8 Mail; see the box on How to Make Windows 8 Mail Work with POP Accounts for instructions.
All right, then. You’re ready to set up your IMAP or Exchange account. Here’s how to proceed:
Bring up the “Add an account” screen.
To get there, see Figure 4-16.
Specify the kind of account you want to add.
You’re supposed to choose Hotmail if you have a Hotmail, Live.com, or MSN email account; Outlook if you have an Exchange, Office 365, or Outlook.com account; Google if you have a Gmail account; Yahoo! or AOL if you have one of those free accounts; or Other account if you have any other kind of IMAP mail account.
Enter your email address and password.
That’s generally all Windows needs to set up your account for the big-name email services. (For “Other account,” you also have to select “Show more details” and specify your IMAP server address, SSL settings, authentication settings, and ports. This is all information you can get from whatever company provides your email service.)
Hit Connect.
If your settings were all correct, you get teleported directly into that account’s inbox, ready to start processing email.
If you’ve set up more than one account, then their names appear in the lower-left corner of the screen so that you can jump among them. The big number at the right end of each account’s name tells you how many new messages are waiting in that account.
If you open the Charms bar and visit Settings→Accounts, you’ll see its name appear, a testimony to your technological account-setting-up prowess.

Figure 4-16. The first time you open Mail, a link to the panel shown at top right appears by itself. To call it up yourself, open the Charms bar, choose Settings (top left), choose Accounts, and choose “Add an account” (top right). The “Add an account” screen (bottom) offers a list of all the major Web-based and IMAP email services: Hotmail, Outlook, Google, AOL, Yahoo, and “Other account.”
Tip
If you have multiple email accounts, you can switch among them by tapping their buttons at the lower-left corner of the Mail screen. But you can also pin one account’s inbox—or any other mail folder—to your Start screen, for instant access and step-saving. For example, if you have a folder called Stuff to Do, or a folder called Reply to These, you might want them pinned on your Start screen.
Tap the folder you want to pin. Then open the App bar and choose Pin to Start. A pop-up panel offers you the chance to change the folder’s name; do that, or not, and then hit Pin to Start. You’ll find the pinned folder at the far-right end of your Start screen (you may have to scroll a bit).
Each email account you set up offers some useful options that are worth a visit. To set up an account, open the Charms bar, open Settings→Accounts (see Figure 4-16); select the email account you want to change. In this panel, you can edit the account in deliciously geeky ways, like these:
Account name. It doesn’t have to say “Yahoo” or “Gmail” or whatever; you can change it to “My Work Mail,” “Robin’s Mail-O-Rama,” or whatever floats your boat.
Your name. Whatever name you type here is what will show up in other people’s inboxes when you write to them.
Download new mail. How often do you want Mail to check for new messages? Usually, “As items arrive” is what you want. Some account types offer only “Every 15 minutes,” “Every 30 minutes,” and so on.
(If you choose Manual, then Mail never checks unless you tap the Check Mail button.)
Content to sync. Some services, like Google and corporate Exchange servers, offer more than email; those account types also maintain online calendars and address books. Turn on the checkboxes of the data types you want your computer to display: Email, Contacts, and/or Calendar (although you can no longer sync with Google calendars).
Automatically download external images. Spammers, the vile undercrust of low-life society, have a famous trick. When they send you email that includes a picture, they don’t actually paste the picture into the message. Instead, they include a “bug”—a piece of code that instructs your email program to fetch the missing graphic from the Internet. Why? Because that gives the spammer the ability to track who has actually opened the junk mail, making their email addresses much more valuable for reselling to other spammers.
That’s a long explanation for a simple feature: If you turn this option off, then Mail does not fetch “bug” image files at all. You’re not flagged as a sucker by the spammers. You’ll see empty squares in the email where the images ought to be. The actual pictures don’t appear until you manually select the “Download all images in this message” link.
Use an email signature. A signature is a bit of text that gets stamped at the bottom of your outgoing email messages. It can be your name, a postal address, or a pithy quote. Here’s where you enter the signature you want to use for outgoing messages from this account. (Also choose Yes for “Use an email signature,” of course.)
Email address, password. This information is here in case you want to change it.
Show email notifications for this account. As described on Notifications, Windows’ notifications are pieces of message “toast” that pop quietly into the upper-right corner of the screen to get your attention. Here’s where you specify whether or not messages from this account should trigger that kind of notification.
Remove account. Use this button if you decide to get rid of this email account.
If your email account offers “As they arrive” mail checking, as described above, then new messages show up on your computer as they arrive, around the clock.
If you have any other kind of account, or if you didn’t turn that option on, then Mail checks for new messages automatically on a schedule—every 15, 30, or 60 minutes. It also checks for new messages each time you open the Mail program.
Tip
You can also force Mail to check for new messages and send
waiting ones on command. Open the App bar (swipe up from the
bottom of the screen), and choose the Sync icon
(![]() ). Or, if you have a keyboard, press
F5.
). Or, if you have a keyboard, press
F5.
When new mail arrives, you’ll know it at a glance. Mail can notify you with a little alert box (Notifications), complete with a little chime, even when you’re working in another app. And, of course, the Mail tile on the Start screen updates itself to show you the latest messages (a rotating display of their senders/subjects/first lines). That tile also sprouts a bold number in the corner that tells you how many new messages are waiting.
The Mail screen has three columns, as shown in Figure 4-17. At the lower left: the names of your other accounts. (There’s no unified inbox in Mail for the messages from multiple accounts.)
Tip
If you have a keyboard, you can hide or show the folder column by pressing Shift+Ctrl+F, or the Accounts pane by pressing Shift+Ctrl+A. Gets you a little extra reading space.
To see all the new messages in the current account, tap Inbox; the new messages appear with bold subject lines.
Tip
Mail offers message threading, in which back-and-forths on a particular subject appear clumped together in the list (shown in Figure 4-17). This is a feature you can turn off, if you find it confusing. (In the Charms bar, select Settings, then Options; there’s the “Group messages by conversation” on/off switch.
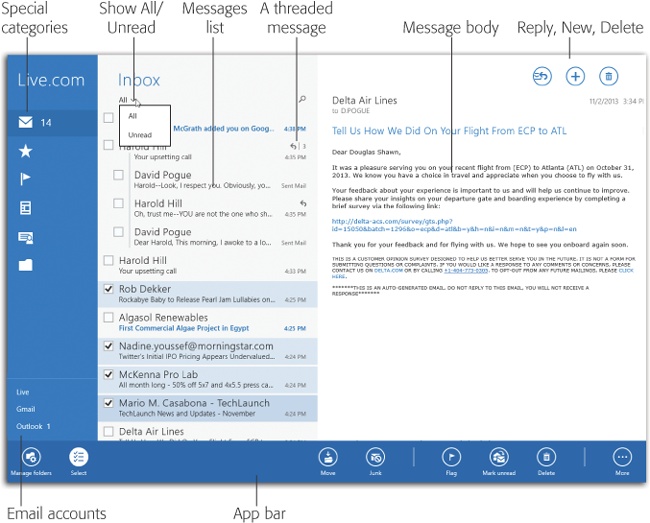
Figure 4-17. Far left: In Microsoft email accounts (Hotmail, Live, Outlook, and so on), this panel offers icons for Favorites, Flagged, Newsletters, Social Updates, and (at bottom) Folders. In the middle is the list of messages inside whatever folder or category you’ve tapped. At right are the contents of that message.
You can flick your finger to scroll the message list, if it’s long. Tap a message to read it in all its formatted glory.
Once you’ve read a message, you can respond to it, delete it, file it, and so on. Here’s the drill:
Read it. The type size in email messages can be pretty small. Fortunately, you have some great enlargement tricks at your disposal. For example, on a touchscreen, you can spread two fingers to enlarge the entire email message.
Next message. Once you’ve had a good look at a message and processed it to your satisfaction, you can move on to the next (or previous) message in the list. Touchscreen or mouse: Tap or click the message you want in the message list. Keyboard: Press the
 or
or  keys.
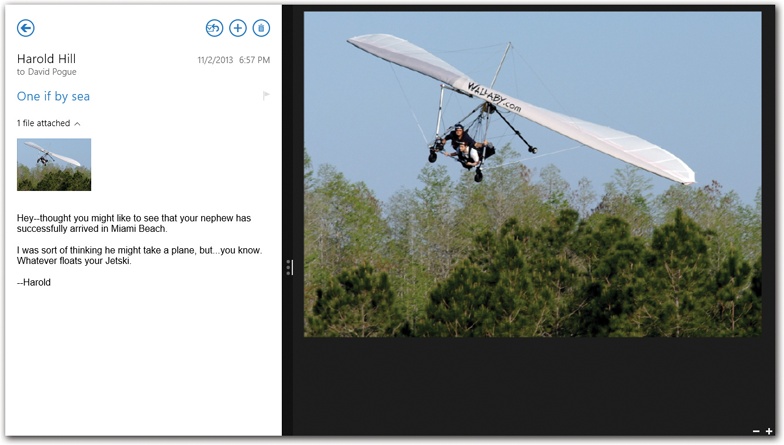
keys.Open an attachment. You’ll know when somebody has attached a file to a message you’ve received. A paper-clip icon (
 ) appears next to the message’s name in
the message list, and an icon for the attachment appears at the
top of the body. Tapping the attachment icon does something
delightful in Windows 8.1, as shown in Figure 4-18. (If
Windows isn’t sure which app to use for opening the file, it asks you.)
) appears next to the message’s name in
the message list, and an icon for the attachment appears at the
top of the body. Tapping the attachment icon does something
delightful in Windows 8.1, as shown in Figure 4-18. (If
Windows isn’t sure which app to use for opening the file, it asks you.)Reply to it. To answer a message, select the Reply/Forward icon (
 ) at the top of the message. Using the
shortcut menu, you can choose Reply. If the message was
originally addressed to multiple recipients, then “Reply all”
sends your reply to everyone simultaneously.
) at the top of the message. Using the
shortcut menu, you can choose Reply. If the message was
originally addressed to multiple recipients, then “Reply all”
sends your reply to everyone simultaneously.Tip
If you have a keyboard, you can save a couple of steps by pressing Ctrl+R for Reply, or Shift+Ctrl+R for Reply All.
A new message window opens, already addressed. As a courtesy to your correspondents, Mail places the original message at the bottom of the window. At this point, you can add or delete recipients, edit the subject line or the original message, and so on. When you’re finished, tap the Send icon (
 ) or press Ctrl+Enter.
Forward it. Instead of replying to the person who sent you a message, you may sometimes want to pass the note on to a third person. To do so, select the Reply/Forward icon (
) at the top of the message, and this
time, choose Forward in the shortcut menu. (Or just press
Ctrl+F.) A new message opens, looking a lot like the one that
appears when you reply; you’re expected to start by filling in
the To box. You may wish to precede the original message with a
comment of your own, like, “Frank: I thought you’d be interested
in this joke about your mom.”Delete it. Tap the Trash icon (
 ) at the top of the message. (There’s no
confirmation screen; on the other hand, you can recover the
message from the “Deleted items” folder if you change your
mind.)
) at the top of the message. (There’s no
confirmation screen; on the other hand, you can recover the
message from the “Deleted items” folder if you change your
mind.)File it. Some mail accounts let you create filing folders to help manage your messages. Once you’ve opened a message that’s worth keeping, you can move it into one of those folders.
To do that, open the App bar (swipe upward from the bottom edge of the screen, or right-click, or press
 +Z). See the Move icon? Tap or click it;
Mail dims everything on the screen except the folder list.
Choose the one you want.
+Z). See the Move icon? Tap or click it;
Mail dims everything on the screen except the folder list.
Choose the one you want.Figure 4-19. For the first time, you can drag emails into folders. Start by clicking the message you want to move. If you want to move more than one message, then turn on the checkboxes that appear to their left. Then drag any one of them toward the left pane (top). The list of folders appears automatically (bottom). Keep dragging until you reach the folder you want. When you release your mouse or finger, the dragged messages happily fall into their new home, and the folder list collapses.
Or use the new, improved Windows 8.1 method: drag-and-drop, as shown in Figure 4-19.
Mark as unread. In the inbox, a bold, blue subject line marks any message you haven’t yet read. Once you’ve opened the message, the boldness goes away. By opening the App bar and then choosing Mark as Unread (
 ), you make the boldface
reappear. It’s a great way to flag a
message for later, to call it to your own attention. The
boldface can mean not so much “unread” as “un–dealt
with.”
), you make the boldface
reappear. It’s a great way to flag a
message for later, to call it to your own attention. The
boldface can mean not so much “unread” as “un–dealt
with.”(This button changes to say “Mark as read” if you want to go the other way—to flag an unread message, or a bunch of them, as read; see below.)
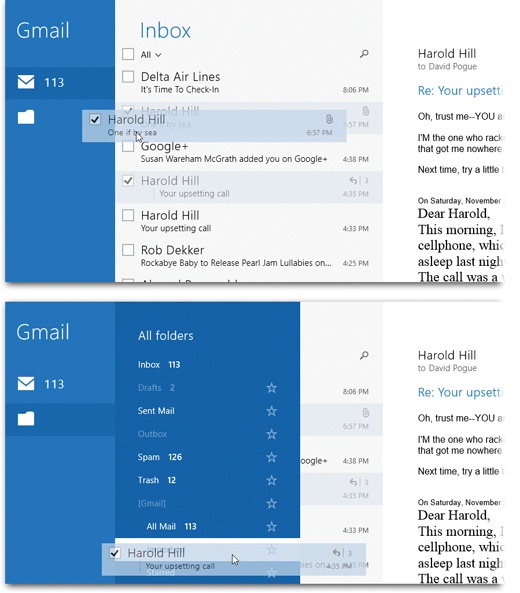
You can also file or delete a bunch of messages at once. In Windows 8.1, there’s a new way to select them first, so that all remain highlighted:
Touchscreen or mouse: Tap or click the first message in the message list; its checkbox appears. Select that checkbox to turn it on—and to make all the other messages’ checkboxes appear (you can see this effect in Figure 4-19).
Select the name of each message you want to include (you don’t have to tap the checkboxes themselves).
Keyboard: Once you’ve made the checkboxes appear, you can work down the list using the arrow keys; press Ctrl+Enter to add the checkmark to each message.
You can select as many messages as you like, scrolling as necessary. At that point, you can operate on them all at once—mark them as junk, flag them, delete them, or mark them as read or unread—using the buttons on the App bar.
When you first tiptoe into Mail, you may notice, aghast, that your mail folders—Sent, Deleted, Drafts, Important, Work Stuff, and so on—aren’t listed anywhere. Actually, they’re there, but the list doesn’t appear until you select Folders in the left-side panel. At that point, the folder list sprouts open (you can see it in Figure 4-20). Click a folder to see what’s in it.
It’s not especially convenient to have to open and close this pull-out drawer of folders, though. Fortunately, you can install the folders you use most often right onto the left-side pane; see Figure 4-20.
When your inbox or another folder is selected, you can open the App bar to find the “Manage folders” button at far left. Its pop-up menu offers some useful commands: “Empty folder” (deletes everything in the current folder), “Mark as read” (everything in it), “Create folder” (generates a new folder in the list), “Create subfolder” (creates a folder inside the current one), and “Pin to Start.”
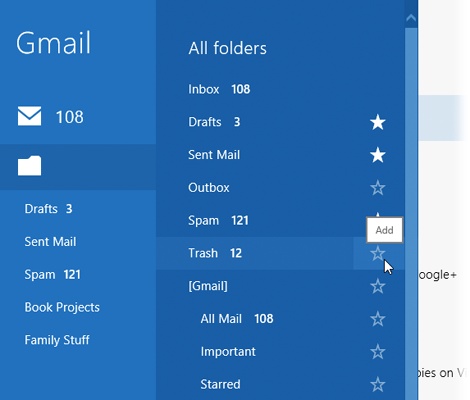
Figure 4-20. To install the most important folders’ names into the
far-left pane as shown here, start by opening the folder list
(click Folders). Then turn on the ![]() for each folder you want to access more
easily. Sure enough, their names now appear there on the
left-side pane. Turn off the star to remove the folder
name from the far-left list..
for each folder you want to access more
easily. Sure enough, their names now appear there on the
left-side pane. Turn off the star to remove the folder
name from the far-left list..
Here’s an especially juicy Windows 8.1 feature: You can install a mail folder onto your Start screen as a tile. The obvious candidate is, of course, your inbox; you’re free to install multiple tiles, one for the inbox of each account. One click on that tile, and boom: You’re in Mail, in that folder, reading the latest communiqués.
Praise be—there’s a search box in Mail. But be ye warned: You don’t use the Search
button in the Charms panel anymore, as you did in Windows 8.
Instead, you tap the ![]() above the message list.
above the message list.
As you type into the search box, Mail hides all but the matching messages in the current mail folder; tap any one of the results to open it.
Tip
Using the pop-up menu above the search box, you can specify that you want to search either the current folder only—or all folders.
Select any message in the list to read it. When you’re finished, tap the X above the message list. Your full list is restored, and the Search adventure is complete.
To compose a new piece of outgoing mail, use the
![]() icon in the top-right corner. A blank new
outgoing message appears (see Figure 4-21).
icon in the top-right corner. A blank new
outgoing message appears (see Figure 4-21).
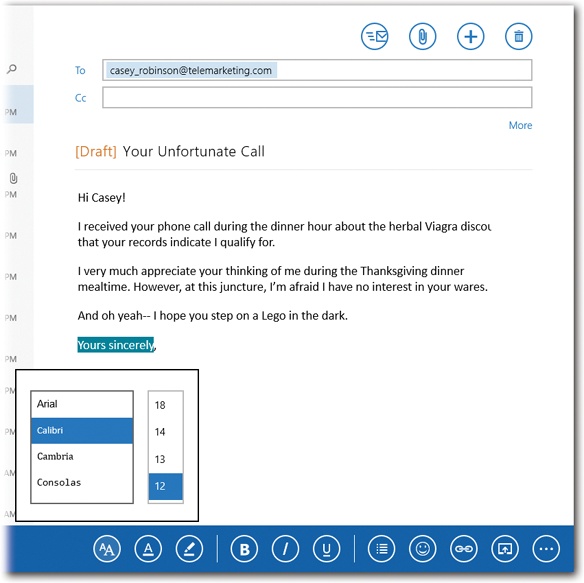
Figure 4-21. The controls you’d usually expect to find in an email
program—like bold, italic, and font controls—are lurking in the
App bar. Swipe up, or right-click, or press ![]() +Z, to see it. Here you’ve just selected the
Font button to get this pop-up control.
+Z, to see it. Here you’ve just selected the
Font button to get this pop-up control.
Here’s how you go about writing a message:
1. In the “To:” field, type the recipient’s email address—or grab it from Contacts.
Often, you won’t have to type much more than the first couple of letters of the name or email address. As you type, Mail displays all matching names and addresses so you can choose one from the list instead of typing.
You can add as many addressees as you like; just repeat the procedure.
2. To send a copy to other recipients, enter the address(es) in the “Cc:” or “Bcc:” fields.
Cc stands for carbon copy. Getting an email message where your name is in the Cc line implies: “I sent you a copy because I thought you’d want to know about this correspondence, but I’m not expecting you to reply.”
If you choose More, then the screen expands to reveal a new line beneath the “Cc:” line: “Bcc:”—which stands for blind carbon copy. It’s a copy that goes to a third party secretly—the primary addressee never knows who else received it. For example, if you send your coworker a message that says, “Chris, it bothers me that you’ve been cheating the customers,” you could Bcc your supervisor to clue her in without getting into trouble with Chris.
Each of these lines behaves exactly like the “To:” line. You fill each one up with email addresses in the same way.
Tip
Also hiding in the “Show more” panel: a pop-up menu for Priority. It lets you specify how important your message is, on a three-tiered scale.
The good part about this system is that it lets your recipient see that an email you’ve sent is, for example, urgent. The bad part is that not every email program displays the priority of email—and even if your recipient’s email program does display your message’s priority, there’s no guarantee that it’ll make him respond any faster.
3. Type the topic of the message in the “Add a subject:” box.
It’s courteous to put some thought into the subject line. (Use “Change in plans for next week,” for instance, instead of “Yo.”) Leaving it blank only annoys your recipient. On the other hand, don’t put the entire message into the subject line, either.
4. Type your message in the message area.
All the usual keyboard tricks apply (Chapter 3). Don’t forget that you can use Copy and Paste, within Mail or from other programs. Both text and graphics can appear in your message.
A wealth of formatting awaits on the App bar (Figure 4-21). There are your font and style controls, plus options to create bulleted or numbered lists, insert a Web link, drop in a smiley symbol, or—this is very cool—open the message you’re writing in its own split-screen window pane (press Ctrl+O). The pane on the left remains yours to play with; for example, you could open another email message in it for reference as you compose your own.
4. Attach a file, if you like.
Use the Attachments button (
 ) to open the file chooser described on The File Picker.
Tap the file you want to send—or several (they all remain selected, with checkmarks)—and then choose Attach. You return to your message in progress, with the files neatly inserted as icons.
4. To send the message, hit Send (
), or press
Ctrl+Enter. Or hit to back out of
it.If you tap
, Mail wants to know if you want to save the unsent
message—maybe because you want to finish it up later. If you tap
“Save draft,” then the message lands in your Drafts folder.
Later, you can open the Drafts folder, tap the aborted message,
finish it up, and send it.If you choose “Delete draft” instead, the message is either stuffed into the Deleted Items folder—or deleted forever, depending on the account type.
Over the years, Microsoft has offered various kinds of email services. There were Hotmail, Exchange, Live.com, and now Outlook.com.
When you’re using one of these account types, you get some special icons in the left-side panel (you can see them in Figure 4-17). They include Flagged (all the messages you’ve flagged for special attention later); Newsletters (auto-emailed commercial mail, which you might consider spam); and Social Updates (all of those auto-generated Twitter, LinkedIn, and Facebook messages like, “SnowBunny2838 is following you now” or “BobC commented on your post”). It’s awfully nice to have those sequestered in their own folders, out of your more important personal and work mail.
Maybe the most useful of all, however, is Favorites.
In Mail, a favorite means “somebody whose mail is important enough that I want it brought to my attention immediately when it arrives.” Your spouse, your boss, and your doctor come to mind.
To designate someone as a favorite, hit the ![]() at the left side of the screen. You may
discover that Mail has automatically suggested people who deserve to
be favorites because you correspond with them a lot (they’re listed
under a Frequent heading); just turn on the
at the left side of the screen. You may
discover that Mail has automatically suggested people who deserve to
be favorites because you correspond with them a lot (they’re listed
under a Frequent heading); just turn on the ![]() for each one you want to commemorate as a
favorite.
for each one you want to commemorate as a
favorite.
Whether you see a Frequent list or not, you can also hit
“Search contacts” to find someone in your master People app to
designate as a favorite (there’s a ![]() button on each person’s card in People,
too).
button on each person’s card in People,
too).
Each name you designate as a favorite shows up in the far-left panel of Mail. Choose that name to see all the corresponding correspondence with that person.
Get Windows 8.1: The Missing Manual now with the O’Reilly learning platform.
O’Reilly members experience books, live events, courses curated by job role, and more from O’Reilly and nearly 200 top publishers.

