Let’s start with the elephant in the room: Windows 8 is two operating systems in one. They have separate software programs, control panels, Help systems, Web browsers, application switchers—and separate ways of doing things.
For a single price, here’s what you get:
Windows desktop, which is basically Windows 7. It’s the familiar world of overlapping windows, the taskbar, and drop-down menus. It’s designed for use with a mouse and keyboard. In this environment, you can run any of the four million existing Windows programs (see Figure 1-1).
TileWorld, a new environment designed for touchscreens, like tablets and touchscreen laptops. This environment looks completely different—and works completely differently. There’s no taskbar, windows don’t overlap, and there are no drop-down menus. For TileWorld, you have to buy and install a completely new kind of app.
Note
Some inexpensive tablets run a version of Windows 8 called Windows RT, which is basically TileWorld alone. The Windows desktop is there, but it’s just a useless shell; apart from a couple of traditional built-in programs—Notepad and Calculator, for example, and sometimes Microsoft Office—it can’t run any other Windows apps.
Now, Microsoft doesn’t agree that Windows 8 is really two superimposed OSes. And it certainly doesn’t use the term “TileWorld” (see the box on About the Term “TileWorld”).
But there really are two environments. They look and feel very different. Each has its own techniques for customizing and organizing your stuff. Each requires different techniques.
On a given computer, you’ll probably use only one environment most of the time. If you have a regular desktop PC or a laptop, you’ll spend most of your time at the traditional Windows desktop. If you have a touchscreen tablet, on the other hand, you’ll use TileWorld most of the time. And that’s totally OK.
Even so, you still have to learn them both. You can’t use just one environment exclusively. Here and there, the two worlds bleed together.
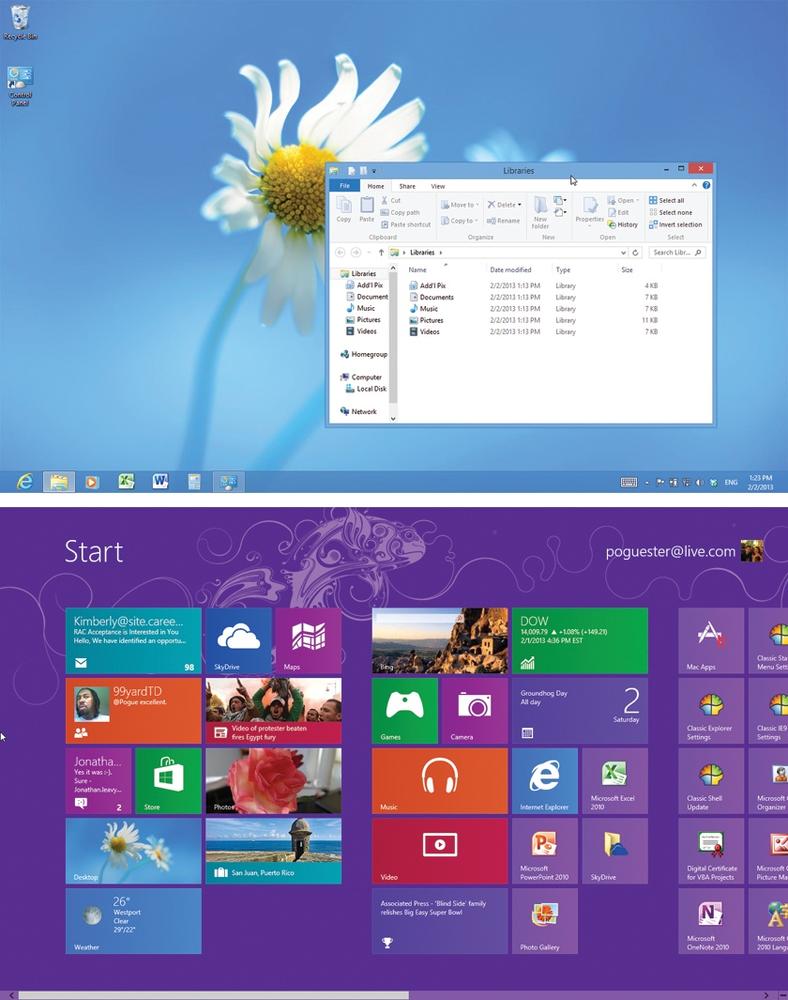
Figure 1-1. In Windows 8, you’ll encounter two different environments. Top: There’s Windows Desktop, which looks and works like Windows always has. It runs traditional Windows desktop programs. Bottom: And then there’s what this book calls TileWorld, a new environment geared toward touchscreens. It runs a new class of full-screen, colorful, touchscreen-friendly apps.
When you turn on a Windows 8 machine, you know right away that you’re not in Kansas anymore. The first thing you see is a new curtain that’s been drawn over the computer’s world. It’s the Lock screen (Figure 1-2).
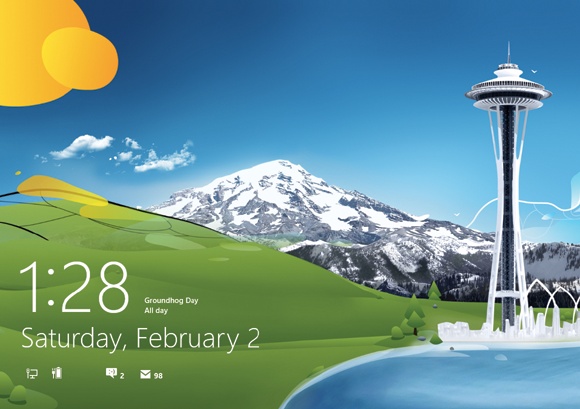
Figure 1-2. You can control which apps are allowed to add information to the Lock screen in PC Settings. You’re not stuck with the Lock screen as Mother Microsoft has installed it. You can change the picture, if you like, or you can eliminate it altogether. Chapter 2 has the details.
The Lock screen serves the same purpose it does on a smartphone: It gives a quick glance at the time, the date, your WiFi signal strength, the weather, and (on laptops and tablets) your battery charge. As you download and install new apps, they can add informational tidbits to this Lock screen, too.
The point is that sometimes you don’t really need to wake the machine up. You just want to know what time it is.
When you do want to go past the Lock screen to log in, there’s nothing to it:
Touchscreen: Swipe a finger upward.
Mouse: Click anywhere. Or turn the mouse wheel.
Keyboard: Press any key.
The Lock screen slides up and out of the way, revealing the Accounts screen (Figure 1-3).
As in any modern operating system, you have your own account in Windows 8. It’s your world of files, settings, and preferences. So the second thing you encounter in Windows 8 is the Accounts screen. Here you see the name and photo for each person who has an account on this machine. Choose yours.
Note
If your machine has only one account, you get to bypass this screen; as soon as you dismiss the Lock screen, you arrive at the Login screen described next.
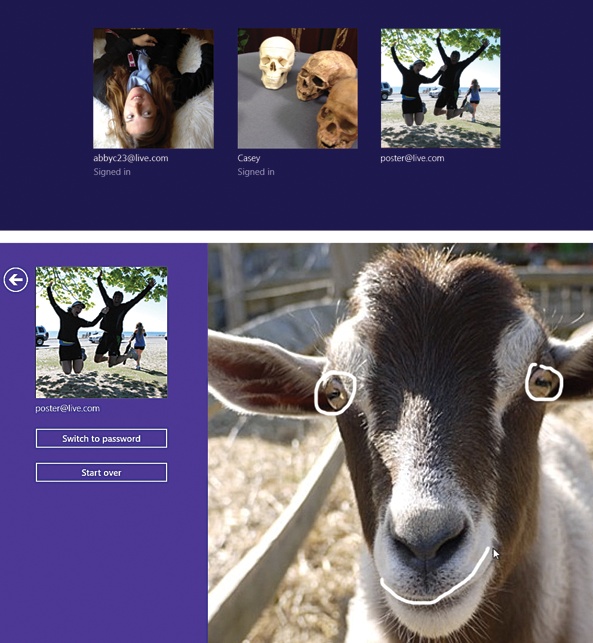
Figure 1-3. Top: If your machine has more than one account set up, tap or click your icon to sign in. Bottom: Typing is so 2009! In Windows 8, you can log into your account using any of several more touchscreen-friendly methods, like drawing three predetermined lines on a photograph. (You don’t actually see the lines show up; white lines are shown here so you get the point.)
Here you provide your account name and password.
But logging in no longer has to mean typing a password. One of Windows 8’s primary goals is to embrace touchscreens, and typing is a pain on tablets.
Therefore, you can log in using any of four techniques:
Draw three lines, taps, or circles on a photo you’ve selected (Figure 1-3).
Type in a four-digit number you’ve memorized.
Type a traditional password.
Skip the security altogether. Jump directly to the Start screen when you turn on the machine.
To choose which method you want, see Customizing the Login Process.
In any case, once you’ve gotten past the security barrier, you finally wind up at the hallmark of Windows 8: the new Start screen.
This page of colorful tiles is the biggest landmark in Windows 8—and the part that may take the most getting used to (Figure 1-4).
Tip
If you miss the old Start menu, it’s easy enough to bring it back. Just install the free Classic Menu app. It’s available on this book’s “Missing CD” page at www.missingmanuals.com.
You can think of the Start screen as an exploded view of the old Start menu. It’s the launcher for the programs, files, and settings you use most.
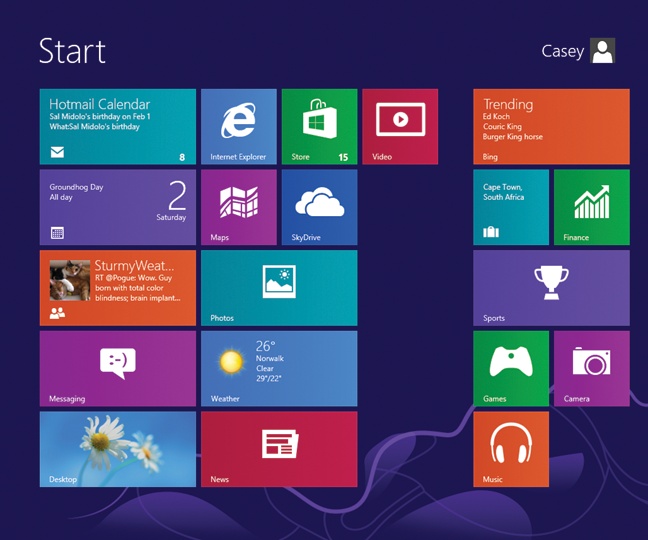
Figure 1-4. The old Start menu, which has served as the master list of your files and programs since Windows was a toddler, is gone. The Start screen is basically the Start menu, spread out.
But it’s more than just a launcher. It’s also a dashboard. Each tile isn’t just a button that opens the corresponding program; it’s also a little display—a live tile, as Microsoft calls it—that can show you real-time information from that program. The Calendar tile shows you your next appointment. Your Mail tile shows the latest incoming subject line. The People tile shows you Twitter and Facebook posts as they pour in.
Tip
Not all Start screen tiles display their own names. Some apps, like the ones for Calendar, People, and Mail, are meant to be visual dashboards only.
To find out such an app’s name, point to it with your cursor without clicking. A tinted, rectangular tooltip bar appears, identifying the name.
Here’s what you need to know about using the Start screen.
The Start screen is very obviously part of the new TileWorld environment: full screen, new fonts, brightly colored rectangles. But the tiles themselves can represent both kinds of software: Windows desktop programs and the new TileWorld apps.
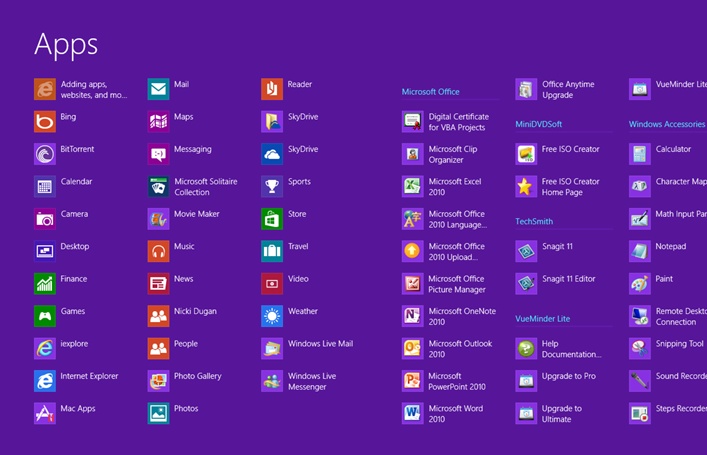
On Day One, most of the tiles here represent the TileWorld apps that Microsoft provides with Windows 8: Calendar, Mail, Weather, and so on. But you can (and should) install your older programs here, too.
Note
Any new programs you install will gain tiles on the Start screen. But if you’ve upgraded your PC from an earlier version of Windows, all your old apps appear only in the All Apps screen (The Rest of the Apps)—not as tiles on the Start screen.
Tiles can represent anything that used to be in the Start menu: programs, files, folders, Web sites, and so on. Chapter 2 describes how to edit the Start screen’s contents.
As you install more and more programs, the Start screen expands sideways. It can wind up being many screens wide. Here’s how you scroll through them:
Touchscreen: Swipe your finger horizontally across the screen—slowly to scroll with precision, quickly to whip through several pages at a time.
Mouse: Turn the scroll wheel on your mouse. (This works on most modern mice.) Or move the mouse until it bumps the right or left edge of the screen to scroll in that direction.
Keyboard: Press the Page Up or Page Down keys to scroll one screenful at a time.
No matter how you wind up scrolling, you’ll discover that the pages of the Start screen fly by smoothly and fluidly, as though they have a momentum all their own.
Every tile on the Start screen represents something—a program, a person, a Web site, a folder. If it’s a Live Tile—one that shows information right on the face of the tile—that’s great. You’ve saved a little time.
But if you want to open the program, file, or folder, tap or click once on its tile.
Remember: The Start screen is simply an exploded view of the old Start menu. In other words, it doesn’t list every program on your computer—only the ones whose icons you want to keep handy.
There’s still an All Programs listing, though, where you can
see a complete list of your apps. To see it,
open the App bar (swipe up from the bottom edge of the
screen or press ![]() +Z) and tap “All apps.” See Figure 1-5.
+Z) and tap “All apps.” See Figure 1-5.
Once the Start screen gets to be many screens wide, the scrolling business can get old. If your machine has a real keyboard, you’ll be grateful for the amazing type-selecting shortcut: Just start typing the name of the tile you want. The screen instantly changes to show you nothing but the icons of matching apps and programs, as shown in Figure 1-6.
Chapter 3 covers searching in much more detail.
Obviously, the most important things you’ll do with your Windows 8 machine involve leaving the Start screen. It’s a home base, sure, but it’s tough to get a lot of work done there.
Once you’ve done some work, however, you’ll probably want to return to the Start screen to begin another activity. You can use any of these shortcuts:
Touchscreen: Swipe inward from the right margin of the screen to make the Charms bar appear (Corners and Swipes). Tap Start.
Mouse: Point to the lower-left corner of the screen. Click the Start-screen miniature that appears.
In each case, the Start screen returns.
Tip
On many new computers and tablets (with Windows 8 preinstalled), there may also be a Windows button—just below the screen, for example. You can also press it to return to the Start screen.
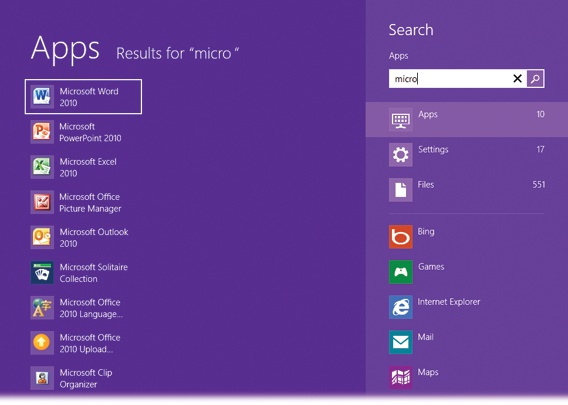
Figure 1-6. When you begin typing on the Start screen, you automatically enter the search mode. As you type, Windows narrows down the visible icons, showing only matching apps and programs. The first one is always highlighted, so you can just press the Enter key to open it. To back out, press the Esc key a couple of times.
To be completely blunt, the world of Windows 8 is tailored for touchscreens. You can do everything with a keyboard and a mouse, but Microsoft saved the choicest pleasures for tablets and touchscreens. For example, the Charms bar (right edge) and app switcher (left edge) are positioned where your thumbs are when you’re holding a tablet.
The proof is the long list of gestures (Figure 1-7) that do things in Windows 8—special finger-on-glass movements that open important panels and do important things. There are keyboard and mouse equivalents, but finger on glass is almost always quicker and easier.
You’ll need to know these techniques whether you have a touchscreen or not, because the panels and options they open are essential to using your computer.
Tip
Every laptop that came with Windows 8 also has a multitouch trackpad. All of the gestures described in this book for touchscreens (pinch, swipe, and so on)—you can also perform on the trackpad itself. (Some older models have multitouch trackpads, too.)
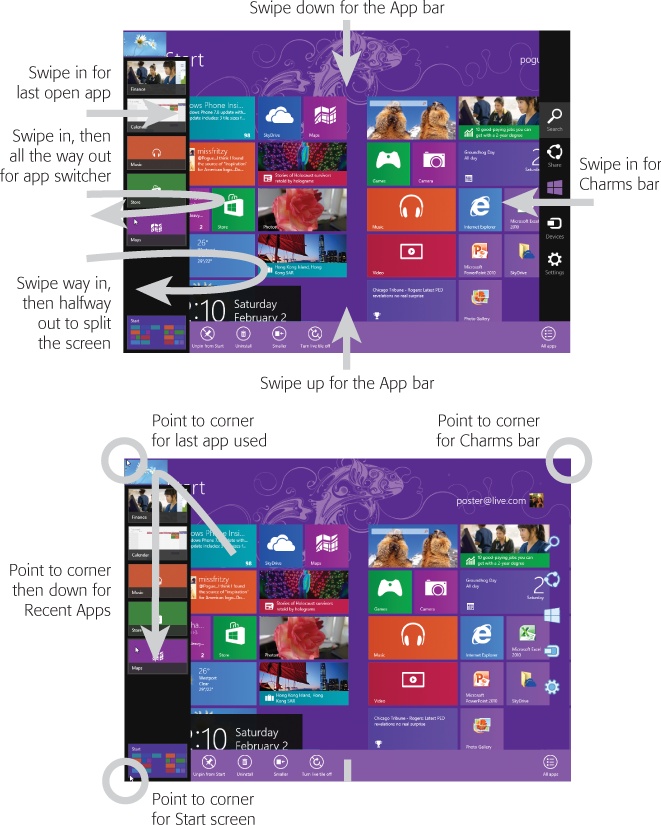
Figure 1-7. Top: Here’s a master diagram, showing all the different ways you can swipe on a touch screen, and all the different panels and options they produce. (Two of them—the app switcher and splitting the screen—are described in Chapter 3.) Bottom: And here’s a master diagram showing the equivalent gestures if you have a mouse instead of a touchscreen.
The Charms bar is new in Windows 8. It’s a vertical panel that pops out of the right side of the screen, no matter what you’re doing on the computer or what program is open.
Here’s how to open the Charms bar:
In each case, the Charms bar gracefully slides in from the right edge of the screen. As you can see in Figure 1-8, the five icons here provide direct access to some of the most important functions of your computer.
Tip
Whenever the Charms bar opens on the right side of the screen, you simultaneously get a pop-up panel at the lower-left side of the screen that shows today’s date, the current time, and your battery and WiFi status.
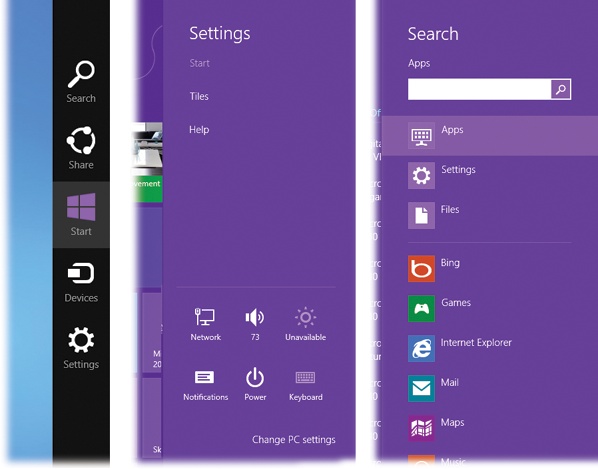
Here are the icons on the Charms bar:
Search. Tap this icon to begin a search of your computer—for anything: programs, documents, settings, email, calendar appointments, and so on. (Figure 1-8, right, shows the panel.) You can read all about searching in Chapter 3.
Figure 1-8. The Charms bar (left) is named after the jingly silver doodads that dangle from a charm bracelet. In this case, however, they’re more than decorative. They give you direct access to some of the most important functions in Windows. For example, the Settings button opens the Settings panel (middle); the Search button opens, of course, the Search panel (right).
Share. Tap this icon to send whatever is selected off to your adoring fans—by email or social network, for example.
The choices you see here vary by program. For example, if you’re on a Web page, you might get options like Mail, People (for sending by text message or Twitter), or Post to Facebook. If you’re looking at a photo, the options might include Mail or SkyDrive (Microsoft’s free online “hard drive”). You can send a location from the Maps app, a news item from the Finance app, or even a contact from the People app.
In each case, you’re now offered a new screen where you can tell Windows more about what you want to do. You can address the outgoing email message, or edit the Facebook post, or choose the name of the person you want to receive your shared item, and so on.
You’ll read more about the options here in the appropriate sections of this book.
Tip
In PC Settings (The Six Charms-Panel Settings), you can turn off individual Share options. For example, if you don’t use the SkyDrive, you can turn SkyDrive off here so that the option never appears in the Share panel.
Devices. This icon offers options that pertain to whatever is connected to your computer: TileWorld-compatible printers, projectors, phones, wireless TVs, and so on. For example, this is where you specify how you want a second monitor or external projector to behave—as an extension of your built-in screen, or as a mirror of it.
And if there aren’t any other gadgets connected to your computer, you won’t see any options at all here.
Settings. Settings, here, means “options for the TileWorld app you’re using at the moment.” You’ll find them on the panel that opens when you tap or click Settings (Figure 1-8, middle).
Note
App settings show up here only in TileWorld apps—not in Windows desktop programs. If you open the Settings panel when a Windows desktop program is open, then the top half always lists the same Control Panel shortcuts: Desktop, Control Panel, Personalization, PC Info, and Help.
Below the app settings, you’ll find a set of six handy settings icons for your entire computer: network, sound, screen brightness, notifications, power, and keyboard.
As you’ll eventually discover, Windows 8 has three control panels—different places where you can change settings. (Depending on the kind of computer you have, you might not see them all.) This set of six is only one of those control panels.
Below these, you’ll see a link called “Change PC settings” that takes you to a second window full of preferences settings. There’s also the traditional Windows Control Panel at the desktop.
Chapter 5 describes all three of the control panels and their settings in exhausting detail.
To hide the Charms bar without tapping any of its buttons, repeat whatever swipe, click, or keystroke you used to make it appear.
Suppose you’ve been using BeeKeeper Pro, and now you want to duck back into the last app you used, ProteinFolder Plus.
In the Windows of old, of course, you could press Alt+Tab to jump back and forth between the programs. That still works in Windows 8, but now there are other ways to do the same thing:
Touchscreen: Swipe into the screen from the left edge. With each swipe, you “turn the page” backward to the next older app.
Mouse: Point to the upper-left corner of the screen; when the other program’s icon appears, click. (This technique flips back and forth between two apps only.)
Keyboard: Press and release Alt+Tab or
 +Tab. (This technique flips back and forth
between two apps only.)
+Tab. (This technique flips back and forth
between two apps only.)
Note
The desktop, and all of its own programs, are represented as one app. In other words, if you had three programs open, their windows all appear simultaneously when you flip to the desktop.
See Chapter 3 for more on switching apps.
In the Windows of days gone by, you could click something with the right mouse button to open a shortcut menu. That’s a brief menu of options, appearing right at your cursor tip, that applies to whatever you just clicked.
At the Start screen, for example, the App menu contains an “All apps” button that displays a list of all your programs. (The Start screen shows only a subset of them.) In Internet Explorer, the App menu shows the icons of recently opened pages.
That idea is available in TileWorld, too—but the “shortcut menu” is a horizontal options bar at the bottom of the screen, called the app bar. It contains a few important options for whatever TileWorld program you’re using at the moment. In some apps, it pops in from the top of the screen; in others, from the bottom.
Note
The App bar doesn’t appear when you’re using traditional Windows desktop programs—just for TileWorld apps.
Tip
At the Start screen, the App bar has a few twists. To see the options for a single tile, swipe down on it with your finger, or right-click it. The resulting buttons apply to that tile: Unpin from Start (gets the tile off the screen), Uninstall, Smaller or Bigger (changes the tile size), and “Turn live tile off” (stops displaying real-time info from online).
What should you do when you’re finished using your computer for the moment?
Millions of people shut their PCs off, but they shouldn’t; it’s a colossal waste of time. When you shut down, you have to wait for all your programs to close—and then the next morning, you have to reopen everything, reposition your windows, and get everything back the way you had it.
You shouldn’t just leave your computer on all the time, either. That’s a massive waste of electricity, a security risk, and a black mark for the environment.
What you should do is put your machine to sleep. Usually, you do that by pressing the physical power button, and that’s that. If it’s a laptop, just close the lid.
If you really want to do the sleeping or shutting down thing using the onscreen commands, you’ll have to learn their new locations.
For years, Microsoft was ridiculed for a peculiarity of the Windows design: To shut down your PC, you had to click a button called Start.
Not anymore. The “Shut down” command is now on the right side of the screen, in the Charms bar. You can see the official procedure in Figure 1-9.
Tip
If you have a keyboard, you can save yourself some steps.
Press ![]() +I to open the Settings panel of the Charms
bar; then click Power, and then “Shut down.”
+I to open the Settings panel of the Charms
bar; then click Power, and then “Shut down.”
As shown in Figure 1-9, shutting down is only one of the options for finishing your work session. Here are your others.
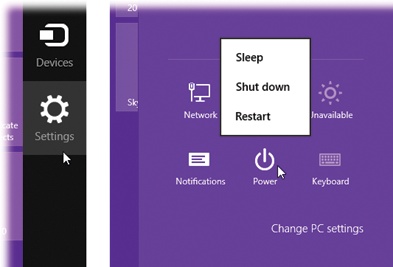
Figure 1-9. To shut down your computer, open the Charms bar (left).
(Swipe inward from the right side, or press ![]() +C.) Click Settings. Right: On the Settings
panel, select Power, and then “Shut down.”
+C.) Click Settings. Right: On the Settings
panel, select Power, and then “Shut down.”
In the olden days, Windows offered a command called Standby. This special state of PC consciousness reduced the amount of electricity the computer used, putting it in suspended animation until you used the mouse or keyboard to begin working again. Whatever programs or documents you were working on remained in memory.
When using a laptop on battery power, Standby was a real boon. When the flight attendant handed over your microwaved chicken teriyaki, you could take a break without closing all your programs or shutting down the computer.
Unfortunately, there were two big problems with Standby, especially for laptops. First, the PC still drew a trickle of power this way. If you didn’t use your laptop for a few days, the battery would silently go dead—and everything you had open and unsaved would be lost forever. Second, drivers or programs sometimes interfered with Standby, so your laptop remained on even though it was closed inside your carrying case. Your plane would land on the opposite coast, you’d pull out the laptop for the big meeting, and you’d discover that (a) the thing was roasting hot, and (b) the battery was dead.
The command is now called Sleep, and it doesn’t present those problems anymore. First, drivers and applications are no longer allowed to interrupt the Sleep process. No more Hot Laptop Syndrome.
Second, the instant you put the computer to sleep, Windows quietly transfers a copy of everything in memory into an invisible file on the hard drive. But it still keeps everything alive in memory—the battery provides a tiny trickle of power—in case you return to the laptop (or desktop) and want to dive back into work.
If you do return soon, the next startup is lightning-fast. Everything reappears on the screen faster than you can say, “Redmond, Washington.”
If you don’t return shortly, then Windows eventually cuts power, abandoning what it had memorized in RAM. (You control when this happens using the advanced power plan settings described on Windows Mobility Center.) Now your computer is using no power at all; it’s in hibernate mode.
Fortunately, Windows still has the hard drive copy of your work environment. So now when you tap a key to wake the computer, you may have to wait 30 seconds or so—not as fast as 2 seconds, but certainly better than the 5 minutes it would take to start up, reopen all your programs, reposition your document windows, and so on.
The bottom line: When you’re done working for the moment—or for the day—put your computer to sleep instead of shutting it down. You save power, you save time, and you don’t risk any data loss.
You can send a laptop to sleep just by closing the lid. On any kind of computer, you can trigger Sleep by clicking Sleep in the Charms bar (Figure 1-9), or by pushing the PC’s power button, if you’ve set it up that way.
POWER USERS’ CLINIC: Bringing Back the Hibernate Command
Hibernate mode is a lot like Sleep, except that it doesn’t offer a period during which the computer will wake up instantly. Hibernate equals the second phase of Sleep mode, in which your working world is saved to the hard drive. Waking the computer from Hibernate takes about 30 seconds.
In an effort to make life simpler, Microsoft has hidden the Hibernate command in Windows 8. You won’t find it in the pop-up menu shown in Figure 1-9.
You can bring it back, though.
To get there, open the Charms bar (swipe in from the right
edge, or press ![]() +C), click or tap Search, click or tap
Settings, and type power.
+C), click or tap Search, click or tap
Settings, and type power.
In the search results, click “Choose what the Power buttons do.” Now click “Change settings that are currently unavailable” and authenticate yourself, if necessary (Microsoft’s way of ensuring that only an administrator can change such important settings).
Finally, scroll down until you see “Shutdown settings.” Turn on the “Hibernate: Show in Power menu” checkbox. Click “Save changes.”
From now on, the Hibernate option appears in the menu shown in Figure 1-9, just like it did in the good old days.
This command quits all open programs and then quits and restarts Windows again automatically. The computer doesn’t actually turn off. (You might do this to “refresh” your computer when you notice that it’s responding sluggishly, for example.)
This is what most people would call “really, really off.” When you shut down your PC, Windows quits all open programs, offers you the opportunity to save any unsaved documents, exits Windows, and turns off the computer.
In Windows 8, starting up after a full shutdown is a lot faster than before, thanks to something Microsoft calls Hybrid Boot. (It combines element of Hibernation mode with the full shutdown mode, in an effort to save you time the next time you start up.)
Still, there’s almost no reason to shut down your PC anymore. Sleep is almost always better all the way around.
The only exceptions have to do with hardware installation. Anytime you have to open up the PC to make a change (installing memory, hard drives, or sound or video cards), or to connect something external that doesn’t just use a USB or FireWire (1394) port, you should shut the thing down first.
See your account name and picture in the upper-right corner of the Start screen (Figure 1-10)?
That’s not just helpful information. The picture is also a pop-up menu. And its commands all have to do with switching from one account to another. (In Windows’ accounts feature, each person who uses this PC gets to see her own desktop picture, email account, files, and so on. See Chapter 24.)
These commands used to be part of the standard Sleep/Restart/Shut Down menu, but they’ve moved to a new address. Here’s what they do.
Tip
Some keystrokes from previous Windows versions are still around. For example, you can still press Ctrl+Alt+Delete to summon the three commands described here: “Lock,” “Switch user,” and “Sign out”—plus a bonus link for the Task Manager (When Programs Die: The Task Manager).
When you choose “Sign out,” Windows closes all your open programs and documents (giving you an opportunity to save any unsaved documents first). It then presents a new Login screen so that somebody else can log in.
Whatever you had running remains open behind the scenes. When you log in again, you’ll find all your open programs and documents exactly as you left them.
What if somebody just wants to log into the computer with her own name and password—to do a quick calendar or email check, for example?
Yes, the “Sign out” command works fine. But the interloper can save a few steps by simply choosing her own account name from the pop-up menu that is your account icon. She’ll be asked for her password, of course.
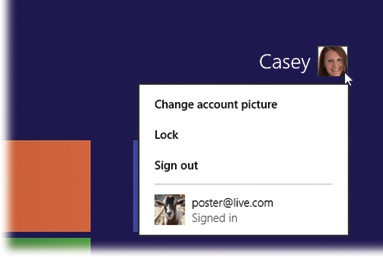
This command takes you back to the Lock screen described at the beginning of this chapter. In essence, it throws a sheet of inch-thick steel over everything you were doing, hiding your screen from view. This is an ideal way to protect your PC from nosy people who happen to wander by your desk while you’re away getting coffee or lunch.
You now know how to trigger the “Shut down” command using the Charms bar. But there are even faster ways.
If you have a laptop, just close the lid. If you have a desktop PC, just press its power button
(![]() ).
).
In all these cases, though—menu, lid, power button—you can decide whether the computer shuts down, goes to sleep, hibernates, or just ignores you.
To find the factory setting that controls what happens when you close the lid or hit the power
button, open the Charms bar (swipe in from the right edge, or press
![]() +C), click or tap Search, click or tap
Settings, and type power.
+C), click or tap Search, click or tap
Settings, and type power.
In the search results, the two relevant options are “Change what closing the lid does” and “Change what the power buttons do.”
For each of these options, you can choose “Sleep,” “Do nothing,” “Hibernate,” or “Shut down.” And you can set up different behaviors for when the machine is plugged in and when it’s running on battery power.
POWER USERS’ CLINIC: Shut Down/Restart Buttons on the Start Screen
Here it is again: In general, shutting down your computer is a waste of time. Just Sleep it.
But if you’re some oddball who feels better shutting down the computer completely every day, then you’ll be relieved to know that you can install a Shut Down button right on the Start screen. In other words, you don’t have to burrow into the Charms bar every time you want to shut down. It’s a lot of steps, but you have to perform them only once.
Begin at the desktop (click the Desktop tile or press
![]() +D). Right-click a blank spot on the
desktop; from the shortcut menu, choose New→Shortcut. In the “Type
the location of the item” box, type exactly this:
+D). Right-click a blank spot on the
desktop; from the shortcut menu, choose New→Shortcut. In the “Type
the location of the item” box, type exactly this:
shutdown.exe -s -t 00
Click Next. In the “Type a name for this shortcut” box, type Shut Down (or Goodnight, or Go Away, or whatever you like). Click Finish.
Now there’s a Shut Down shortcut on your desktop. (Optional:
Choose a cool icon for it, like the standard ![]() logo. To do that, right-click the icon;
from the shortcut menu, choose Properties. Click Change Icon;
click OK; choose a new image from the palette of icons; and then
click OK.)
logo. To do that, right-click the icon;
from the shortcut menu, choose Properties. Click Change Icon;
click OK; choose a new image from the palette of icons; and then
click OK.)
Finally, right-click your desktop shortcut; from the shortcut menu, choose Pin to Start. And presto: The Shut Down command now appears on your Start screen, at the far-right end.
You can also add Restart, Lock, Hibernate, and Sleep buttons to your Start screen, using pretty much the same steps. The only difference is the code you type in the first step:
Restart: shutdown.exe -r -t 00
Lock: rundll32.exe user32.dll,LockWorkStation
Hibernate: rundll32.exe powrProf.dll,SetSuspendState
Sleep: rundll32.exe powrprof.dll,SetSuspendState 0,1,0
For these commands, if you choose to add a custom icon as described above, navigate to Windows/System32/Shell32.dll to find the palette of available images.
Get Windows 8: The Missing Manual now with the O’Reilly learning platform.
O’Reilly members experience books, live events, courses curated by job role, and more from O’Reilly and nearly 200 top publishers.

