Windows 7 has the same audio subsystem as its predecessor, Windows Vista. Microsoft revamped Vista’s audio subsystem to solve a series of problems it maintains caused stability and quality shortcomings in earlier versions. If you skipped Vista and upgraded directly from XP, this is why your sound doesn’t work.
As a result, manufacturers of sound cards simply discontinued their older products rather than trying to make them compatible with Windows 7 and Vista. This is why you have to throw out your old sound card, and why you shouldn’t spend too much on a new one.
Sound in Windows 7 is quite a bit more complicated than it needs to be, so troubleshooting sound problems is a real chore. The best way to fix a PC that won’t play sound is with a systematic approach.
Start with the obvious. If you’re using external speakers, make sure they’re plugged in, turned on, and turned up. Try plugging your speakers into an iPod, home stereo, or other audio source to make sure they’re actually working.
Using a laptop with integrated speakers? Most laptops have their own independent volume controls, and some are unlucky enough to have two or three. The first type is the old-school Walkman-esque dial, usually found near the headphone/speaker jack (sometimes these dials only control external audio, but not always). The second type is usually found on the keyboard, accessed by holding the Fn key while pressing another key decorated with a speaker icon. The third type is found on newer laptops, in the group of media quick-access buttons. Make your best effort to turn all these controls up.
Note
Sometimes the push-button volume controls on laptops operate the system volume directly, and sometimes they merely send signals to a Windows application that, in turn, controls the volume. If your laptop’s volume controls don’t seem to be working, the application with which they communicate may not be installed or running. If there’s no Windows 7-compatible media access software on the PC manufacturer’s website, then you probably won’t be able to use those keys to control your PC’s volume.
If hardware volume controls are a dead end, open the Volume Mixer, sndvol.exe—not sndvol32.exe, as it was on some earlier versions—and click the little down arrow in the Device section. If there’s more than one device listed, make sure the little dot is next to the one you want to use. Turn up the Device volume control as high as it will go. Also check the subordinate volume controls to the right, one for each open sound-enabled application and one for Windows itself, and make sure they’re all turned up.
Next, go to Control Panel→ Sound, and choose the Playback tab (Figure 4-9). If, again, there’s more than one device listed here, highlight the one you want to use and click the Set Default button; a green checkmark icon marks the default playback device.
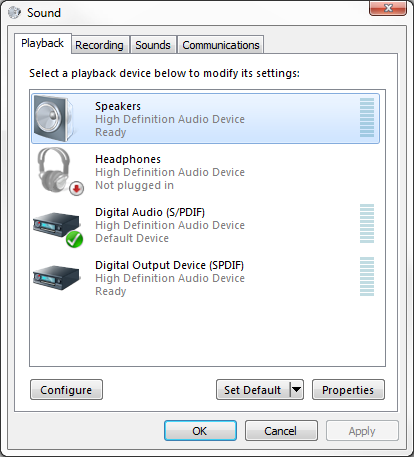
Figure 4-9. More than one sound device on your PC? If so, you may have been setting the volume on the wrong card all this time
Note
Note that a single hardware device, such as a sound card, may be responsible for multiple sound devices shown in Control Panel. For instance, most higher-end audio cards have both analog (headphone jack) and digital (coax or optical/SPDIF) outputs, so make sure the one you’re using is set as the default, and is marked with the little green checkmark.
With the sound device you want to use highlighted in the Playback window, click the Properties button, choose the Levels tab, and make sure all the volume controls here are turned up, and none are muted. (Muted levels have small red symbols on the blue speaker buttons).
Next, choose the Advanced tab. Click Test to play three tones in the left channel, followed by three in the right (more if you have a 5.1 or 6.1 setup).
If you don’t hear anything, and you don’t see an error message at this point, there’s likely a problem with your speaker jack, cable, or speakers.
If you hear only one set of three tones, it means only one stereo channel is working; either the left or right channel (or speaker) is out. The left channel tones decrease in frequency (higher to lower), while the right channel tones increase (lower to higher).
If you have more than two speakers, but don’t hear sound out of all of them, close the Properties window and click Configure to show the Speaker Setup page. Follow the prompts to tell Windows how many speakers you have.
If you hear sound in some applications and not others, it could be the fault of the Exclusive Mode options in the Properties window. Try turning off one or both of the options here, click Apply, and try again.
If you hear the tones, but you can’t hear music played from an audio CD, the analog audio cable that typically connects CD drives in desktop PCs to sound cards might be missing, or plugged into the wrong connector. (Laptops and newer SATA drives don’t usually use these cables.) It’s a thin cable with small, plastic, three- or four-conductor plugs, and is found inside your PC case. Unless you’re using an add-on sound card, this cable should be plugged into your motherboard; if there’s more than one port, try the others until you get sound.
If you see the message, “Failed to play test tone,” it means there’s a problem with the driver. Either it’s the wrong driver for the device, or the driver (or device) isn’t compatible with Windows 7.
Note
Can’t find a Windows 7 driver for your sound card? Try the Windows Vista driver. If there’s only a driver for XP, it might be time for a new sound card.
If you’re using your motherboard’s built-in sound outputs (all laptops and most modern desktops), and they’re not working, check your BIOS settings and make sure the adapter is enabled, as described in Appendix A. If Windows won’t support your built-in sound, try an add-on sound card.
Likewise, if you’re using an add-on sound card that won’t work with Windows 7, try taking it out and using the sound outputs built into your motherboard.
Still no luck? Time to start digging around in Device Manager (Control Panel→Device Manager or run devmgmt.msc). Expand the Sound, video and game controllers branch; if your device isn’t listed, then Windows hasn’t detected it, and hasn’t loaded a driver for it. If it’s listed, but its icon is covered with a red X, then it’s just disabled; right-click the device and select Enable.
If the device icon is covered with a yellow exclamation point, then there’s something wrong with the driver or the device. The first course of action is to right-click the device and select Uninstall. Check the Delete the driver software for this device option, and click OK. When the uninstallation is complete, restart Windows, and it should redetect the device and install new drivers by itself when it reboots. If this doesn’t work, visit the sound card manufacturer’s website and download the latest drivers for your card. (Or, if the problem appeared just after a recent driver update, try using the Roll Back Driver feature in Device Manager; see Chapter 6 for more on troubleshooting hardware.)
Want to transfer those old vinyl LPs to MP3s? Want to use voice dictation software? Want to record video, and need to send the audio track through your sound card? Want to use your PC as a makeshift karaoke machine? Because modern sound devices often have multiple audio inputs, and Windows lets you use only one at a time, you may have to jump through a few hoops to record sound.
Note
Want an easy way to record sound? Check out HarddiskOgg, free from http://www.fridgesoft.de/, which lets you record any audio your PC can receive (coming in from a microphone or line-in device) or produce (going out from an application or game).
A single audio device may have two or three audio inputs: an analog (mono) microphone input, an analog stereo “line-In” or auxiliary input, and sometimes a digital S/PDIF input. And special devices, like voice dictation headsets and TV tuner cards, have their own inputs. All the inputs for all your audio devices are listed in the Recording tab, on the Sound page in Control Panel, shown in Figure 4-10. (Most desktop sound cards also have internal inputs for CD audio, discussed in the previous section, but these almost never show up in Control Panel.)
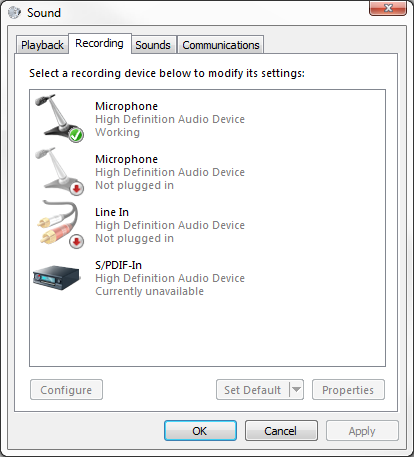
To choose the default audio source, highlight the device you want to use and click Set Default. Most applications will automatically use the default device to record sound, but some (particularly voice-dictation software) require that you choose a source separately in the application itself.
Note
If you have a USB audio device, such as a voice-dictation headset, Windows may set it as the default recording and playback device each time you plug it in. This will make it look like your sound stops working each time you use the headset; of course, all you have to do is change the default playback device, as described in the previous section.
Next, you’ll need to set the recording level (volume) of the
device; most of the time, the default level is 0 (off), which won’t produce any sound at all.
With the device highlighted, click Properties, choose the Levels tab and move the slider to the right
until the level is at least 50. (You
won’t see a Levels tab if the status
for the device reads “Not plugged in.”)
Next, choose the Listen tab, and select the Continue running when on battery power option. To confirm the microphone, line-in jack, etc. is working, turn on the Listen to this device option, choose Default Playback Device from the list below, and click Apply to start listening. If you hear something through your speakers, the device works; turn off Listen to this device and click OK.
If you’re setting up a voice-dictation microphone, you may have to complete a separate wizard in the software itself to set the input source and its recording level. For instance, if you’re using Windows’ built-in speech recognition feature, go to Control Panel→Ease of Access→Speech Recognition Options→Set up microphone (or with the device still highlighted in the Recording tab, click Configure).
Note
For best results using voice-dictation software or recording voice, use a USB microphone/headset instead of the conventional type that plugs directly into your sound card. Not only will the quality and clarity improve, but you’ll effectively bypass the often troublesome sound card drivers in favor of a more direct link.
Your music not sounding its best? The most likely candidate is an “enhancement” in your music player; sometimes these just don’t play nice with Windows’ audio drivers.
In Windows Media Player, press Ctrl-3 to switch to the Now Playing window. Then right-click the center of the player and from the Enhancements menu, select Graphic Equalizer. (Or, if you’re using Skin mode, press the Alt key to open the menu, and select View→Enhancements→Graphic Equalizer.) In the Enhancements window that appears, click the Turn off link that appears (if the link says Turn On, the equalizer is already turned off). Next, return to the Enhancements menu, select SRS WOW Effects, and click the Turn off link there as well.
If you’re having this problem in iTunes, select View→Show Equalizer, and clear the checkbox next to the On option. Next, select Edit→Preferences, choose the Playback tab, and turn off the Sound Enhancer option. Click OK when you’re done.
Or, in WinAmp, select Options→ Equalizer, and if there’s a checkbox next to EQ enabled, turn it off.
If this doesn’t fix the problem, open the Sound page in Control Panel and choose the Playback tab. Select your speakers in the list, and then click Properties. Choose the Enhancements tab, turn on the Disable all enhancements option, and click OK.
Whether or not this adjustment fixes the problem, this is not a problem a fully functional sound card should have. Make sure you have the latest drivers, and consider replacing the card if nothing else seems to work.
Crossfading is a feature present in Windows Media Player and other music players that eliminates the gaps between songs by gradually overlapping adjacent tracks. (Radio DJs do this, but they undoubtedly have better equipment than you do.)
In Windows Media Player, press Ctrl-3 to switch to the Now Playing window. Then right-click the center of the player and from the Enhancements menu, select Crossfading and Auto Volume Leveling. (Or, if you’re using Skin mode, press the Alt key to open the menu, and select View→Enhancements→Crossfading and Auto Volume Leveling.) In the Enhancements window that appears, click the Turn on Crossfading link (Figure 4-11), and then adjust the amount of overlap to your liking.
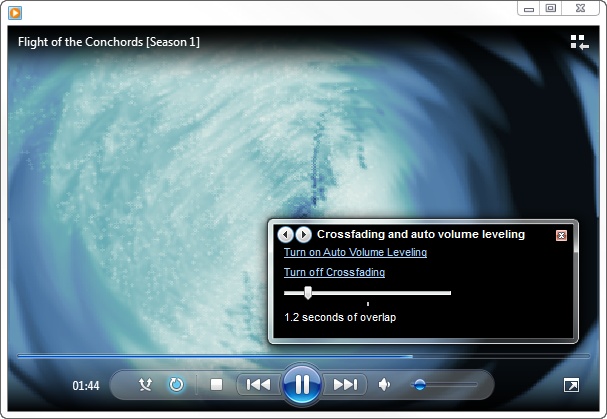
Figure 4-11. Crossfading, which overlaps songs to reduce dead air, works only in certain circumstances
Crossfading only works on data files (such as MP3 or WMA), and then only when the two songs are encoded with the same sampling rate (e.g., 192 Kbps or 256 Kbps). Crossfades won’t work if you are playing an ordinary audio CD, or, for some reason, a data CD that was originally burned with Windows Media Player.
Note
Now, it’s possible that crossfading is actually working, but you can’t tell because your music files have more than a few seconds of silence at the beginning or end. To test the feature, try playing a few songs that don’t begin or end in a fade. And try increasing the amount of overlap by moving the crossfade slider to the right.
To enable crossfading in iTunes (which, ironically, is not something you can do on an iPod), select Edit→Preferences, choose the Playback tab, and turn on the Crossfade playback option.
Warning
Crossfading is really annoying when you’re listening to spoken-word tracks or dialog from movie soundtracks. Try it; you’ll see what I mean.
Want to listen to the literal video of Journey’s Separate Ways without having to literally watch the video?
The Windows Media Stream Editor, a component of the free Windows Media Encoder (available at http://www.microsoft.com/windows/windowsmedia/forpros/encoder/default.mspx), can extract the audio from a .wmv video file and save it into a standalone Windows Media Audio (.wma) file:
First, open the Windows Media Stream Editor and click Add Source. Locate a .wmv or .asf file, and click Open.
Expand the branches by highlighting the file in the list and pressing the asterisk (*) key, place a checkmark next to the Audio entry, and then click Add.
Then, click Create File, specify an output filename, and click Save.
When you’re ready, click Start to begin the extraction.
When the process is complete, you’ll have a standard .wma file; see the next section for ways to convert it to MP3 or any other format.
To yank out the audio track from non-Microsoft video formats, you’ll need a different program. A full-blown video editing application like Adobe Premiere can do this handily, as can Blaze Media Pro, but if you want to do it for free, try the AoA Audio Extractor.
You’d think after all these years, the tech industry would learn its lesson. They put us through the Beta versus VHS battle in the ’80s, the Netscape versus Internet Explorer battle in the ’90s, and the HD DVD versus Blu-Ray battle in the naughts. On the computer front, the battle of the formats is everywhere, including digital music.
It wasn’t always this way. At the beginning of the digital music revolution, it was the compact file size and passably good quality of the MP3 file format that popularized portable digital players like the iPod (not to mention P2P filesharing and the like, but that’s a different story). But now we have Apple’s M4A, M4P, and lossless AAC formats; Microsoft’s various versions of the WMA format; OGG Vorbis; Sony’s bygone ATRAC; and so on. Granted, most of these formats have risen from the need to copy-protect downloadable music, as well as offer audiophiles better fidelity, but the lack of a single standard is nothing more than a pain in the neck to music lovers everywhere.
Protected music purchased from Apple’s iTunes music store can only be played by Apple iPods (and some Motorola phones). Very few players are compatible with audio files from Microsoft’s URGE music store; even some of Microsoft’s own Zune players can’t play URGE files! And there’s no music player that’ll play all the commercially available protected formats.
So, in order to play all the music you have on any particular player, you may have to convert some of it to the proper format, and that’s easier said than done.
For one, converting anything other than lossless audio to your desired format will reduce the quality of the music. (Examples of lossless audio include WAV files, Apple’s lossless AAC, and, of course, audio CD tracks.) Also, most music purchased online is distributed in protected formats (like iTunes’ M4P and Microsoft’s protected WMA), although many stores, including iTunes, are selling more unprotected files. And converting protected media isn’t exactly encouraged by these large companies.
Windows Media Player doesn’t convert audio files at all. But Apple’s iTunes software (http://www.apple.com/itunes/), which is free even if you don’t have an iPod or any intention of buying music from the iTunes Music Store, can convert songs easily and quickly. It supports MP3 (all bitrates), AAC (.m4p, .m4a, and .m4b), AIFF, lossless AAC, WMA (read-only), and even .wav files. Here’s how to do it:
Start iTunes, and select Music from the Library section on the left.
If all your music isn’t already in the iTunes library, drag-drop your music files onto the iTunes window.
Note
If you move the files into your iTunes music folder before dragging them into the iTunes application, iTunes will, by default, organize them into folders based on their embedded tag information. If the files are located elsewhere, they’ll be left in their current locations. Of course, if the Copy files to iTunes Media folder when adding to library option is turned on, and you drag files from another location, you’ll end up with two copies of each file…plus a third after you’ve converted.
Next, select Edit→ Preferences, choose the General tab, and then click Import Settings. Select the file format you want to use from the Import Using listbox (e.g., choose MP3 Encoder to convert to the MP3 format), and then select a compression level from the Setting listbox. (If you don’t know which settings to use, MP3 at 192kbps is a good compromise among quality, flexibility, and resulting file size, and the files you create can be played anywhere.) Click OK when you’re done.
Finally, highlight one or more songs in your music library, right-click, and select Convert Selection to MP3 (or AAC, or whatever). Shortly thereafter, iTunes will place the newly converted file alongside the original—both in the library and in same folder on your hard disk—while leaving the original file intact.
Of course, neither iTunes nor Windows Media Player will let you convert protected files, but they’ll both let you burn protected music to an audio CD. Then, all you have to do is rip the CD back into an unprotected format. In fact, NoteBurner creates a virtual CD-RW drive on your system specifically for this purpose, allowing you to burn and rip your protected songs without wasting any discs. Unfortunately, the burn-rip process will completely obliterate the embedded tags (meaning that you’ll have to retype the track names and other information by hand).
Note
By default, Windows Media Player adds DRM copy protection to all music files you rip from CDs. To turn this off, open Windows Media Player, press the Alt key to open the menu, select Tools→ Options, choose the Rip Music tab, and turn off the Copy protect music option.
To convert protected files and preserve your tags, you’ll need one of the dozens of different DRM removal tools available, such as Tunebite or MyFairTunes.
Of course, no matter how you do it, there will always be a loss in quality when you’re converting from one compressed format to another. The exception is when you convert a protected file to an unprotected file of the same format, such as .m4p to .m4a or protected .wma to unprotected .wma, provided the software you use supports lossless conversion.
Most music players, including both Windows Media Player and Apple iTunes, pay no attention to the filenames of your music files, but rather read the information (called tags) embedded therein. Most audio formats support tags for the artist, track, album, year, genre, and about a hundred other things. To get your music player to display and organize your music properly, the tags in your music files must be correct, and unless all your music came from the same source, some tag cleaning is often in order.
Most music library programs allow you to edit the tags of your music files. Windows Media Player (via the Advanced Tag Editor feature) as well as iTunes (discussed earlier in this chapter) even let you modify the tags of several files at once. You can also edit tags for individual files right in Windows Explorer (see Chapter 2), or multiple files if you install the free AudioShell extension.
Note
Also available for free from http://softpointer.com/ is a plugin for Windows Media Player that adds tag support for M4a, Flac, Ogg, Ape, and Mpc files. To make use of it, you’ll also need to install the appropriate DirectShow filters. To play M4a files in Media Player, get the 3ivx filter from http://www.3ivx.com/. To play Ogg Vorbis, Speex, Theora, and Flac files in Media Player, use the Xiph filter from http://www.xiph.org/dshow/. And to play Mpc files, use the Radlight filter from http://www.radlight.com/.
But what if you have a lot of music files without any tags at all? Try to import those files into a program like iTunes, and you’ll just end up with countless tracks labeled “Unknown Artist.” The solution is to use the filenames to generate the tags, and for this, you can use Ultra Tag Editor:
Open Ultra Tag Editor, use the tree to navigate to the folder containing your files, and place checkmarks next to the specific files you want to fix.
Below, choose the Ultra Tagger tab, and then, from the Action listbox, select Generate Tag from Filename (Figure 4-12).

Now, Ultra Tag Editor needs you to tell it where in your songs’ filenames to find the artist name, track title, track number, album name, and so on, so you’ll need to examine the filename of a typical music file on your hard disk, which might look something like Artist-Album-Title.mp3.
Note
Although programs like Ultra Tag Editor are flexible, they do require that your filenames be uniform (e.g., all using the “Artist-Track.mp3” format, for instance). Since you likely have a mish-mash of different filenames, you’ll need a program like Power Rename (part of Creative Element Power Tools, http://www.creativelement.com/powertools/) to fix up your filenames with ease, without resorting to manually renaming individual files.
First, determine the delimiter used to separate the information in your filenames (a hyphen,
−, in this case), and type it into the Delimiters field. Next, type%1into the field containing the first piece of information (e.g., Artist),%2into the field containing the second (e.g., Album),%3for the third (e.g., Title), and so on. (Imagine your files look like%1-%2-%3-%4...mp3).When you’re done, click the Generate button to preview the new tags, and click Write Tags to commit your changes.
Ultra Tag Editor can also go the other direction—that is, to generate filenames based on tags. Better yet, both Windows Media Player and Apple iTunes can organize your music into folders (e.g., \Music\Artist\Album) and rename the files based on the embedded tag information.
Another tool that does the same thing as Ultra Tag Editor is Tag&Rename, available at http://softpointer.com/.
Get Windows 7 Annoyances now with the O’Reilly learning platform.
O’Reilly members experience books, live events, courses curated by job role, and more from O’Reilly and nearly 200 top publishers.

