Earlier in this chapter, you learned how to create section headers, and to format text as bold or italic (see Figure 1-4). Such formatting is called wiki markup. As you continue through this book, youâll learn about every type of markup youâre likely to encounter. As a new editor, though, you need to learn three things right away: to recognize the types of markup, how templates are used, and how to create links between articles.
Besides headings, bold, and italic text, youâll encounter the following types of markup as you edit articles:
{{pagename}} or {{pagename | info1 | info2 }} or {{pagename | this= info 1 | that= info2}}.The double curly brackets indicate a template. An example of a template appeared in Figure 1-3 and was discussed immediately thereafter (see page 7). Templates are discussed in more detail later in this chapter (Understanding and Using Templates).
[[Article name]] or [[Article name| other name]]. Double square brackets create internal links (wikilinks), which are hyperlinks between pages in Wikipedia. Theyâre described in the next section.
[http:url] or [http:url some text]. Single square brackets around a URL create external links. This formatting is discussed in Chapter 2, âDocumenting Your Sourcesâ (Chapter 2 to page 43).
<ref> text possibly with a URL </ref> and <references />. These are footnote tagsâthe text between the tags is the footnote itselfâplus the instruction to Wikipedia as to where to display the footnotes. Footnotes are also described in detail in Chapter 2 (Two Styles of Footnotes).
<blockquote> text </blockquote> and <math> numbers and symbols</math>. In articles, youâll find a few other types of paired tags besides the <ref> tags for footnotes; blockquote and math tags are among the more common. Tags normally come in pairs, and the ending tag must have a slash character (â/â) as its second character if it is to work properly.
<!-- Your comment text goes here -->. This markup turns the text inside into an invisible comment; an example appears in Figure 1-3. âInvisibleâ means that the text doesnât display in normal viewing mode; you can see it only in edit mode.
{| bunch of stuff with lots of vertical lines |}. This formatting creates a table. Chapter 14 goes into the details.
One or more rows starting with an â*â or a â#â. These characters create lists within an article (the â#â numbers the list, while the â*â just puts a bullet at the beginning of a line). Chapter 14 goes into the details.
[[Category:Name]]. This markup looks like a wikilink, and it is, in a way, but it puts a category link at the bottom of a page. Chapter 19 goes into the details.
Linking one article to another is very easyâwith good reason. Links to other articles can add a lot of value to an article because readers can follow the links whenever they come across a word they donât know a lot about. Good places to add internal links include the lead sections of articles and at the beginning of new sections within articles. A reader should always be able to get to important, related articles via a link.
In the edit box, just place paired square brackets around the name of the article you want to link to, for example: [[Winston Churchill]]. Figure 1-10 shows the sandbox again, in preview mode with some internal links sprinkled in.
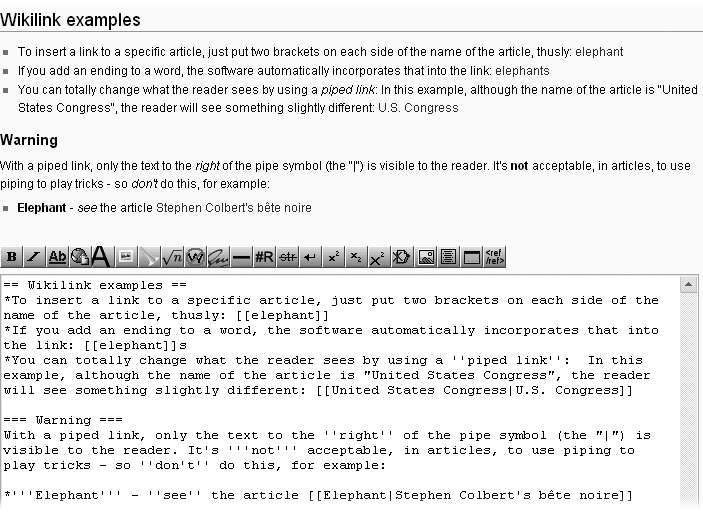
Figure 1-10. Compare whatâs been typed into the edit box (bottom) to whatâs in the preview portion of the page (top).
Another kind of internal linkâa piped linkâis extremely useful for situations where naming varies by country. For example, youâve typed the following sentence in your article: âSan Francisco has an extensive public transportation system,â and you want to link the words âpublic transportationâ to the relevant article. Trouble is, thereâs no article in Wikipedia named âpublic transportation.â There is, however, an article named âpublic transport,â which was probably written by someone who speaks British English. You donât care what itâs called, you just want your readers to be able to go to that article. Hereâs how to create the link while having the article read âpublic transportationâ: San Francisco has an extensive [[public transport|public transportation]] system.
As mentioned on 3, if you go into edit mode and see some text surrounded by two curly brackets, like this: {{pagename}}, youâre looking at a template. A template tells the software to get text and formatting instructions from another place and insert that formatted text into the article when the article is displayed.
Hereâs a common example: If you see the {{fact}} template in the edit box when youâre editing an article, itâs telling the software to go to the page [[Template:Fact]], get the text there (including formatting), and insert that text into the article when the article is displayed for readers. The {{fact}} template, displays the following text: [citation needed].
Templates are widespread for a number of reasons:
Consistency. Every cleanup template looks the same, each type of infobox (???) looks the same, and so on. Editors donât have to constantly figure out how to present a particular type of information in an article.
Time savings. You donât have to type out standard information, and you donât have to know how to format information in standard ways (such as superscript or message boxes). You just have to find out the name of the template and put it in double curly brackets. The software does the rest.
Automatic updating. If the Wikipedia community decides to change a template, changing just one pageâthe template page itselfâautomatically changes whatâs displayed on every other page that uses the template. (High-use templates are protected from being changed by normal editors, to prevent easily-done extensive vandalism.)
Categorization. Templates can include text that puts a page into a category (see Chapter 18). Then you and other editors can go to the category page to find, for example, all articles that have been categorized as needing copyediting.
Templates are everywhere in Wikipedia. In this book, youâll find discussions about templates in a number of chapters, for example:
Formatting footnotes (smaller font size, multiple columns) (Chapter 2, Creating a Simple Footnote)
Putting information about yourself, using userboxes, on your user page (Chapter 3, Creating Your User Page)
Marking a new article as needing categories (Chapter 4, Tutorial: Creating a New Article)
Posting warnings to users about vandalism and spam, and reporting vandalism (Chapter 7, Choosing the Warning and Warning Level and 3)
Using an archive box to neatly organize links to archived talk pages (Chapter 8, 2)
Indicating that an article is within a topic being worked on by a group of editors (a WikiProject) (Chapter 9, ???)
Marking text as needing a source, and notifying the editor who posted the unsourced information about her mistake (Chapter 10, ??? and When no source is given)
Posting warnings about personal attacks (Chapter 11, page 198)
Thatâs a lot of uses of templates, and thatâs just in the first 11 chapters. At the moment, you just need to know these two main principles of templates:
Templates add text and formatting, which are stored on another page. To add a template to an article, you type its name between double curly brackets, at the place in the wikitext where you want the template to appear.
If the template contains parameters, you can edit the text that has been added to those parameters just like you can edit other text in the article, without understanding any of the complexities of templates. For example, take a look at Figure 1-11, which shows a template with a lot of parameters:
Figure 1-11. A common use for templates is infoboxes. Hereâs the infobox template for the article Winnowill, viewed in edit mode, on the top, and what it actually looks like in the article, on the bottom. The template has 15 parameters; the first two are for putting an image into the infobox, and are not being used here.
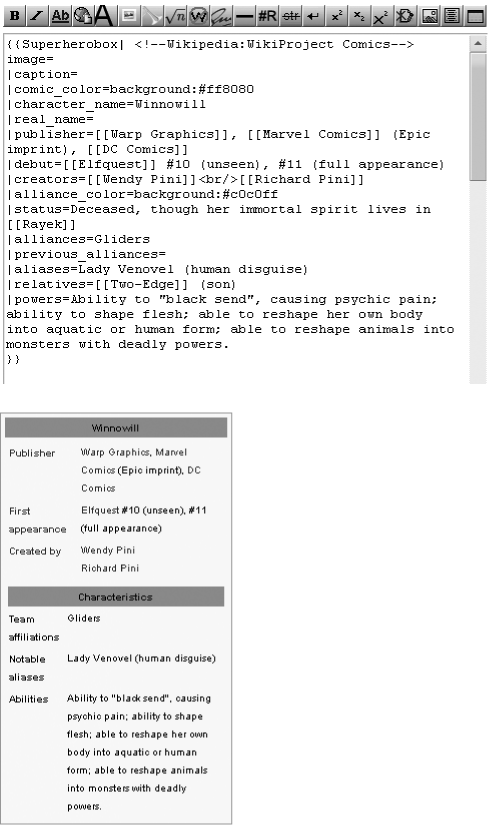
In Figure 1-11, each parameter has a name that ends with an equal sign. The infobox will display only the text that follows the equal signs. You can edit text that appears after the equal signs, including adding text, but donât mess around with a parameter name. Also, be careful not to delete or add a parameter separator (the vertical bar symbol â|â), which marks the beginning of each parameter.
Get Wikipedia: The Missing Manual now with the O’Reilly learning platform.
O’Reilly members experience books, live events, courses curated by job role, and more from O’Reilly and nearly 200 top publishers.

