A system policy can be used in a Windows NT domain as a remote administration tool for implementing a similar computing environment on all clients and limiting the abilities of users to change configuration settings on their systems or allowing them to run only a limited set of programs. One application of system policies is to use them along with mandatory profiles to implement a collection of computers for public use, such as in a library, school, or Internet cafe.
A system policy is a collection of registry settings that is stored in a file on the PDC and is automatically downloaded to the clients when users log on to the domain. The file containing the settings is created on a Windows system using the System Policy Editor. Because the format of the registry is different between Windows 95/98/Me and Windows NT/2000/XP, it is necessary to make sure that the file that is created is in the proper format. This is a very simple matter because when the System Policy Editor runs on Windows 95/98/Me, it will create a file in the format for Windows 95/98/Me, and if it is run on Windows NT/2000/XP, it will use the format needed by those versions. After the policy file is created with the System Policy Editor, it is stored on the primary domain controller and is automatically downloaded by the clients during the logon process, and the policies are applied to the client system.
On Windows NT 4.0 Server, you can run the System Policy Editor by
logging in to the system as Administrator or another user in the
Administrators group, opening the Start menu, and selecting Programs,
then Administrative Tools, then System Policy Editor. On Windows 2000
Advanced Server, open the Start menu and click Run . . . . In the
dialog box that comes up, type in
C:\winnt\poledit.exe, and click the OK button.
If you are using a Windows version other than NT Server or Windows
2000 Advanced Server, you must install the System Policy Editor, and
getting a copy of it can be a little tricky. If you are running
Windows NT 4.0 Workstation or Windows 2000 Professional and have a
Windows NT 4.0 Server installation CD-ROM, you can run the file
\Clients\Svrtools\Winnt\Setup.bat from that CD
to install the Client-based Network Administration Tools, which
includes poledit.exe. Then open the Start menu,
click Run..., type C:\winnt\system32\poledit.exe
into the text area, and click the OK button.
If you are using Windows 95/98, insert a Windows 95 or Windows 98 distribution CD-ROM[24] into your CD-ROM drive, then open the Control Panel and double-click the Add/Remove Programs button.
Click the Windows Setup tab, and then click the Have Disk... button. In the new dialog box that appears, click the Browse... button, then select the CD-ROM drive from the Drives drop-down menu. Then:
If you are using a Windows 95 installation CD-ROM, double-click the admin, then apptools, then poledit folder icons.
If you are using a Windows 98 installation CD-ROM, double-click the tools, then reskit, then netadmin, then poledit folder icons.
You should see "grouppol.inf” appear in
the File name: text area on the left of the dialog box. Click the OK
buttons in two dialog boxes, and you will be presented with a dialog
box in which you should select both the Group Policies and System
Policy Editor checkboxes. Then click the Install button. Close the
remaining dialog box, and you can now run the System Policy Editor by
opening the Start menu and selecting Programs, then Accessories, then
System Tools, then System Policy Editor. Or click the Run... item in
the Start Menu, and enter C:\Windows\Poledit.
When the System Policy Editor starts up, select New Policy from the File menu, and you will see a window similar to that in Figure 4-14.

The next step is to make a selection from the File menu to add policies for users, groups, and computers. For each item you add, you will be asked for the username, or name of the group or computer, and a new icon will appear in the window. Double-clicking one of the icons will bring up the Properties dialog box, such as the one shown in Figure 4-15.
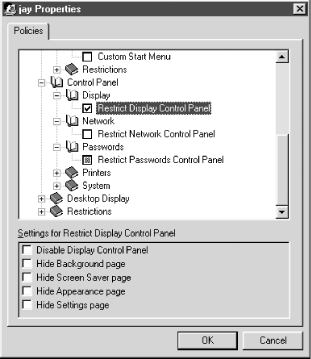
The upper window in the dialog shows the registry settings that can be modified as part of the system policy, and the lower window shows descriptive information or more settings pertaining to the one selected in the upper window. Notice in the figure that there are three checkboxes and that they are all in different states:
- Checked
Meaning that the registry setting is enabled in the policy
- White (unchecked)
Which clears the registry setting
- Gray
Which causes the registry setting on the client to be unmodified
Basically, if all the items are left gray (the default), the system policy will have no effect. The registry of the logged-on client will not be modified. However, if any of the items are either checked or unchecked (white), the registry on the client will be modified to enable the setting or clear it.
Warning
In this section, we are giving you enough information on using the System Policy Editor to get you started—or, should we say, enough rope with which to hang yourself. Remember that a system policy, once put into action, will be modifying the registries of all clients who log on to the domain. The usual warnings about editing a Windows registry apply here with even greater importance. Consider how difficult (or even impossible) it will be for you to restore the registries on all those clients if anything happens to go wrong. As with roaming profiles, casual or careless implementation of system policies can easily lead to domain-wide disaster.
Creating a good system policy file is a complex topic, which we cannot cover in detail here. It would take a whole book, and yes, there happens to be an O’Reilly book on the subject, Windows System Policy Editor. Another definitive source of documentation on Windows NT system policies and the System Policy Editor is the Microsoft white paper Implementing Policies and Profiles for Windows NT 4.0, which can be found at http://www.microsoft.com/ntserver/techresources/management/prof_policies.asp.
Once you have created a policy, click the OK button and use the Save
As... item from the File menu to save it. Use the filename
config.pol
for a Windows 95/98 system policy and
ntconfig.pol
for a policy that will be used on Windows
NT/2000/XP clients. Finally, copy the .pol file
to the directory used for the [netlogon] share on
the Samba PDC. The config.pol and
ntconfig.pol files must go in this
directory—unlike roaming profiles and logon scripts, there is
no way to specify the location of the system policy files in
smb.conf. If you want to have different system
policies for different users or computers, you must perform that part
of the configuration within the System Policy Editor.
Tip
If you have, or will have, any
Windows Me clients on your network,
be careful. Microsoft has stated that Windows Me does not support
system policies. The odd thing about this is that it will download
the policy from a config.pol file on the PDC,
but there is no guarantee that the results will be what was intended.
Check the effect of your system policy carefully on your Windows Me
clients to make sure it is working how you want.
When a user logs on to the domain, her Windows client will download
the .pol file from the server, and the settings
in it (that is, the items either checked or cleared in the System
Policy Editor) will override the client’s settings.
If things “should work” but
don’t, try shutting down the Windows client and
restarting, rather than just logging off and on again. Windows
sometimes will hold the [netlogon] share open
across logon sessions, and this can prevent the client from getting
the updated .pol file from the server.
[24] The version of the System Policy Editor distributed with Windows 98 is an update of the version shipped with Windows 95. Use the version from the Windows 98 distribution if you can.
Get Using Samba, Second Edition now with the O’Reilly learning platform.
O’Reilly members experience books, live events, courses curated by job role, and more from O’Reilly and nearly 200 top publishers.

