Chapter 1. SQL Fundamentals
In this chapter, you will see some familiar SQL commands with some surprising variations. SQL includes many subtleties that the discerning programmer can exploit. With better SQL, you can do more processing at the database and less processing in your application. By and large, this redistribution of labor will be better for the application and better for the database; it should also reduce the traffic between these components. In addition, by improving your SQL, you will make your queries easier to read.
Each main SQL engine has a command-line interface. Although such interfaces appear ancient, they are still essential utilities for all SQL hackers. Each interface has its own peculiarities, but they all do essentially the same job. You can find details of the command-line interfaces for SQL Server, Oracle, MySQL, Access, DB2, and PostgreSQL in “Run SQL from the Command Line” [Hack #1].
Run SQL from the Command Line
The command-line processor is the lowest common denominator when it comes to running SQL, but you’ll find plenty of times when it comes in handy.
All of the popular SQL engines (except Access) have serviceable command prompt utilities that are installed by default, and all provide roughly the same benefits:
You can type in SQL and see the results or error messages displayed immediately.
You can start them up from an operating system prompt.
You can specify the username and password that you want to use.
You can pipe SQL statements in from another process.
This provides a flexible mechanism that is ideal for executing ad hoc SQL statements or developing queries that will eventually be used in applications.
The examples in this hack connect to a database on localhost called dbname with user scott and password tiger.
Pipe into SQL
One of the useful features of a command-line interface is
the pipe, which chains a sequence
of commands so that the output of one is the input for the next. You
can use a pipe on Windows under the command prompt or on Linux/Unix
using a shell. If you put your SQL command-line utility at the end of
a pipe, the result is processed as SQL. For example, a common
operation is to use a pipe to send a sequence of INSERT statements to your SQL command-line
utility. Here’s an example that runs on the Windows command prompt,
but could also work on a Unix or Linux system if you used the
appropriate SQL command-line utility (these are described later in
this hack).
You must type this entire command on one line. On Unix or Linux,
you could put a \ character (the line-continuation character)
before the line break:
C:>perl -pe "s/DATE //g; " < cmnd.sql | sqlcmd -Uscott -P tiger -d dbname -n(1 row affected) (1 row affected)
The preceding code takes a file of SQL commands, cmnd.sql, as input; it redirects it into a
Perl script using the < operator, then pipes the output to
sqlcmd.
The file cmnd.sql contains the following SQL statements:
INSERT INTO test(d,txt) VALUES (DATE '2007-01-01','row one');
INSERT INTO test(d,txt) VALUES (DATE '2007-01-02','row two');
The system will not accept input as it stands because date literals in SQL Server should be formatted as
'2007-01-01' rather than DATE '2007-01-01'. The Perl used here performs a
search and replace to remove the keyword DATE from the cmnd.sql input.
Switches
To use the command line you will need to know how to use the
switches on the operating system command line. In the example shown in
the preceding section, you have to specify the username and password using the –U and –P
switches; without them the first two lines from the file cmnd.sql would be used as the username and
password. You also need to specify the database to use with the –d switch; without it you would have to have
the lines use dbname and go as the first two lines of the input file.
The -n switch is there to suppress
the >1 prompt that you normally see when using
sqlcmd interactively.
Microsoft SQL Server
The basic command prompt editor is
sqlcmd (osql on older systems). You need to use
either the –U switch to specify the
username or the –E switch if you
are using Windows authentication.
Tip
If you want to get your own copy of SQL Server, check out the SQL Server Express edition, which is available for free from Microsoft (http://msdn.microsoft.com/vstudio/express/sql).
A peculiar thing about sqlcmd is that it requires that you enter
the word GO after every command (there is an implicit
GO at the end of the file when you
run in batch mode, as shown earlier). You can edit the current line
and use the up and down arrow keys to access previous statements. Here
are some common tasks you can perform using sqlcmd:
- Get into SQL Server
A variation of this command should work under many SQL Server installations:
C:>
                           sqlcmd –U scott –P tiger
If you are using Microsoft SQL Server Express edition or a version of SQL Server that was bundled with development tools, you may need to specify an instance name. For example, under the Express edition, the default instance is
SQLEXPRESS(note also the use of-Efor integrated authentication, which is the default configuration for SQL Server Express):C:>
sqlcmd –E –S (local)\SQLEXPRESSIf your SQL Server came with another product, such as Visual Studio, you should check the documentation.
- List your tables in SQL Server
If you want to see which tables are available in a given database, run these commands from within the sqlcmd utility:
1>
usedbnameGOChanged database context to 'dbname'. 1>sp_help2>GOThe format of the output of
sp_helpis difficult to read on an 80×24 command window, so the followingSELECTmight be more useful:1>
SELECT name FROM sysobjects WHERE type='U'2>GO- Import a file of SQL into SQL Server
You can do this from the Windows command prompt with the
–iswitch:C:>
sqlcmd –Uscott–ddbname–ic:\file.sql
Oracle
The Oracle command-line interface is called SQL*Plus. Use the program sqlplus on the operating system command line.
List your tables in Oracle
To list your tables, use:
SQL> SELECT * FROM cat; sqlplus tends to display wide columns,
which makes it difficult to see the output from even a two-column
view such as cat. You can set the
column widths to be used for a session if you know the name of the
columns. The two columns of the cat view are TABLE_NAME and TABLE_TYPE:
SQL>COL table_name FORMAT a20;SQL>COL table_type FORMAT a20;SQL>SELECT * FROM cat;TABLE_NAME TABLE_TYPE -------------------- -------------------- AGENCY_TRADE TABLE AGENCY_TRADE1 TABLE INCORRECT TABLE beatles TABLE CORRECT TABLE TMP TABLE EMP_VIEW VIEW EMPVIEW VIEW SUITOR TABLE HAS TABLE
Import a file of SQL into Oracle
Use the start command
from the sqlplus prompt. If
your file includes ampersand (&)
characters, they may cause you problems, unless you issue SET DEF
OFF first:
SQL>SET DEF OFF;SQL>START file.sql
An alternative approach is to use the @ command. It automatically adds the
extension .sql to the
filename:
@file
MySQL
The MySQL command-line utility is a joy to use. You can use
the up arrow key to get to previous commands and the system will
display the results sensibly. There are masses of useful switches to
change the default behavior of the client. Use mysql --help to see some of these options.
List your tables in MySQL
The show tables command does what you would
expect:
$mysql -uscott -ptiger dbnameReading table information for completion of table and column names You can turn off this feature to get a quicker startup with -A Welcome to the MySQL monitor. Commands end with ; or \g. Your MySQL connection id is 39097 to server version: 5.0.18-standard Type 'help;' or '\h' for help. Type '\c' to clear the buffer. mysql>show tables;+------------------+ | Tables_in_dbname | +------------------+ | Perm | | Table1 | | aToA | | access_log | | actor |
Access
Many Access users rely exclusively on the graphical interface for querying and database design tasks. You can also use more or less standard SQL for building queries, creating tables, and so on. If you can’t figure out how to do something from the GUI, start a new query and do it in SQL.
Getting into SQL in Access
To get to the SQL interface you first need to create a new
query from the database pane. If the Show Table dialog pops up while
you are doing this, close it without selecting anything. Once you’ve
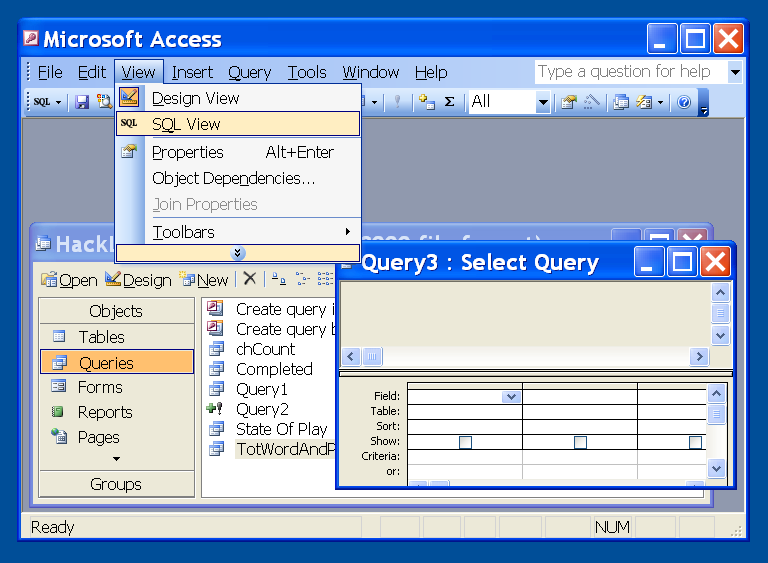
created and opened a query, choose SQL View from the View menu, as
shown in Figure
1-1. Access supports most standard SQL statements, including
all the CREATE and DROP commands, as well as subqueries.
Choose Query→Run to execute the query you’ve typed into the SQL view
window. If you’ve issued a query that generates results (for
example, a SELECT statement
rather than an INSERT or UPDATE), you’ll need to choose View→SQL
View to return to the SQL view window.
Import a file of SQL commands
This vital tool is missing from Access, but a handful of lines of Visual Basic will do the job:
DoCmd.SetWarnings False
Open "c:\ch01Access.sql" For Input As 1
Dim sql As String
Dim txt As String
While Not EOF(1)
  Line Input #1, txt
  sql = sql & txt & vbCrLf
  If Len(txt) > 0 And Right(txt, 1) = ";" Then
    DoCmd.RunSQL sql
    sql = ""
  End If
Wend
Close 1
To run this code, you could insert it into an event handler, such as the On Click event of a button.
PostgreSQL
To work with PostgreSQL, you’ll be using the psql utility.
Getting into SQL in PostgreSQL
The Postgres command-line utility is called psql. It uses up and down arrows to recover previous commands and will pause long lists in the more style:
$psql -ddbname-Uscott
List your tables in Postgres
The \dt (directory of
tables) command will list your tables. \? shows you all the other slash commands:
$psql -d dbname -U scottPassword: Welcome to psql 7.3.2, the PostgreSQL interactive terminal. Type: \copyright for distribution terms \h for help with SQL commands \? for help on internal slash commands \g or terminate with semicolon to execute query \' to quit dbname=>\dtList of relations Schema | Name | Type | Owner --------+-------------------------------+-------+------- public | INT | table | scott public | TBL_CALLS | table | scott public | a | table | scott public | a1 | table | scott public | a401478 | table | scott public | a_test | table | scott public | aaa | table | scott public | aad_casos_especiales | table | scott
The \ commands include some
useful options. Only the first few are given here:
dbname=> \?
 \a             toggle between unaligned and aligned output mode
 \c[onnect] [DBNAME|- [USER]]
                connect to new database (currently "scott")
 \C [STRING]    set table title, or unset if none
 \cd [DIR]      change the current working directory
 \copy ...      perform SQL COPY with data stream to the client host
 \copyright     show PostgreSQL usage and distribution terms
 \d [NAME]      describe table, index, sequence, or view
 \d{t|i|s|v|S} [PATTERN] (add "+" for more detail)
                list tables/indexes/sequences/views/system tables
 \da [PATTERN]  list aggregate functions
 \dd [PATTERN]  show comment for object
 \dD [PATTERN]  list domains
\df [PATTERN] list functions (add "+" for more detail)DB2
DB2’s command-line utility is a command-line processor (CLP) and you can start it with db2. You should not use semicolons to separate SQL statements when using DB2.
Tip
The db2 system has an astonishing parser. It has no need for statement separators and it seems to accept almost anything as a table name or column name.
With db2 you can create a
table called from with columns
called select and from. Incredibly, the parser deals with
every one of the perfectly legal SQL statements; can you figure out
what they do?
SELECT FROM FROM FROMSELECT FROM FROM FROM FROMSELECT 'FROM' FROM FROM, FROM FROMSELECT 'FROM' FROM FROM FROM, FROM FROM SELECT FROM MORF FROM FROM MORF
It is probably best not to use these names.
You can base authentication and authorization on your operating system account, so you may not need a username or password:
$db2(c) Copyright IBM Corporation 1993,2002 Command Line Processor for DB2 SDK 8.1.2 You can issue database manager commands and SQL statements from the command prompt. For example: db2 => connect to sample db2 => bind sample.bnd For general help, type: ?. For command help, type: ? command, where command can be the first few keywords of a database manager command. For example: ? CATALOG DATABASE for help on the CATALOG DATABASE command ? CATALOG for help on all of the CATALOG commands. To exit db2 interactive mode, type QUIT at the command prompt. Outside interactive mode, all commands must be prefixed with 'db2'. To list the current command option settings, type LIST COMMAND OPTIONS. For more detailed help, refer to the Online Reference Manual. db2 =>connect to scottDatabase Connection Information Database server = DB2/LINUX 8.1.2 SQL authorization ID = ANDREW Local database alias = SCOTT db2 =>list tablesTable/View Schema Type Creation time --------------------------- --------------- ----- -------------------------- TEST1 ANDREW T 2006-07-17-14.13.35.844330 1 record(s) selected.
Connect to SQL from a Program
You can access an SQL database from most programming languages, including Perl, PHP, Ruby, Java, and C#.
Working with a database from a programming language commonly involves a database connection and a statement cursor. In each language demonstrated here, you do the following:
- Connect to the server
You specify the location of the server and name of the database. You also supply a username and password. In return, you obtain a connection handle that represents the connection. If you have several SQL commands to send you can reuse this connection. This process can fail if the server is not available or if your credentials are not accepted.
- Execute an SQL
SELECTcommand This involves sending the SQL statement to the server via the connection handle. In return, you obtain a cursor. This process can fail if the
SELECTstatement includes a syntax error or your permissions are inadequate.- Retrieve the data
Typically you will loop until the cursor indicates that it is exhausted. At each iteration, your cursor points to a single row of data. You can get individual fields of the row from the cursor and then move on to the next row. Failure at this stage is uncommon but not unheard of (for example, your network may go down while you are in the middle of processing a result set).
- Close the cursor and close the connection
Do this when you have finished issuing all your queries and are ready to disconnect from the database.
This pattern is a reasonable compromise between efficiency and utility, and there are many variations. If the data set is of a reasonable size, you might prefer to get the entire data set into a suitable data structure in one go. Each language given here will support that.
If your SQL statement does not return any data (it might be an
INSERT or an UPDATE or a CREATE statement), there is no need for a
cursor. Instead, you get a simple response that indicates whether an
error occurred.
Each example shows a simple command-line program connecting to MySQL or SQL Server. You can connect to any database from any language.
Tip
The Nobel Prize data set used in this hack is available from http://sqlzoo.net/h.htm#data.
C#
In this example, the connection is to the SQLEXPRESS instance of SQL Server running on
the local machine:
using System;
using System.Data.SqlClient;

namespace SQLHacks
{
  class Sample
  {
    static void Main(string[] args)
    {
      try{
        SqlCommand comm = new SqlCommand();
        comm.Connection = new SqlConnection(
                  "Data Source=(local)\\SQLEXPRESS;"
                            + "Initial Catalog=dbname;"
                            + "user=username;password=password;");
        comm.CommandText = "SELECT winner,subject FROM nobel WHERE yr=1962";
        comm.Connection.Open();
        SqlDataReader cursor = comm.ExecuteReader();
        while (cursor.Read())
          Console.Write("{0}\t{1}\n",cursor["winner"],cursor["subject"]);
        comm.Connection.Close();
      }catch (Exception e){
        Console.WriteLine(e.ToString());
      }
    }
  }
}
The Read method advances the
cursor to the next line; it returns false when it reaches the end of the data
set.
Tip
If you are connecting to a database other than SQL Server, you
will need to use System.Data.Odbc
rather than System.Data.SqlClient. You will obtain an
OdbcCommand in place of SqlCommand. Your data reader will be an
OdbcDataReader rather than an
SqldataReader.
The cursor is an instance of a DataReader. The connection handle is the
Connection property of the
SqlCommand.
Compiling C#
You will need the .NET framework installed, which includes csc.exe, the C# compiler. You will find it
in C:\WINDOWS\Microsoft.NET\Framework\v2.0.50727\
or a similar directory, so make sure that the directory is in your
PATH environment variable:
C:>csc Sample.csMicrosoft (R) Visual C# .NET Compiler version 7.10.6001.4 for Microsoft (R) .NET Framework version 1.1.4322 Copyright (C) Microsoft Corporation 2001-2002. All rights reserved. C:>sampleJohn C. Kendrew Chemistry Max F. Perutz Chemistry John Steinbeck Literature Francis Crick Medicine James Watson Medicine Maurice Wilkins Medicine Linus Pauling Peace Lev Landau Physics
Other C# considerations
The .NET framework includes an impressive collection of data adapters and containers intended to make life easier for the applications programmer. You can “wire up” controls on your forms (desktop application or web-based forms) so that they update the database or are updated by the database with scarcely a line of program code. You can use the Visual Studio range of products to build database-backed applications for the Web or for the desktop.
Java
You will need a JDBC driver for the SQL vendor that you are using. All of the popular systems have such connectors. You also have the option of using an ODBC/JDBC bridge. This example shows MySQL’s Connector/J driver, which is available from http://www.mysql.com:
import java.sql.*;

public class Sample{
  public static void main(String[] args){
    try{
      Class.forName("com.mysql.jdbc.Driver").newInstance();
      Connection conn = DriverManager.getConnection(
              "jdbc:mysql://localhost/dbname",
              "username","password");
      ResultSet cursor = conn.createStatement().executeQuery(
         "SELECT winner,subject FROM nobel WHERE yr=1962");
      while (cursor.next()){
        System.out.println(cursor.getString("winner")+"\t"+
                           cursor.getString("subject"));
      }
      conn.close();
    }
    catch (Exception e){
      System.err.println(e);
    }
  }
}
Running Java
You compile Java to bytecode with
javac (the Java compiler) and then execute
the bytecode from java (this
loads the Java Virtual Machine). You need to specify the
location of the JDBC connector .jar file at runtime using the -cp (classpath) switch:
$javac Sample.java$java -cp ../mysql-connector-java-3.1.13-bin.jar:. SampleJohn C. Kendrew Chemistry Max F. Perutz Chemistry John Steinbeck Literature Francis Crick Medicine James Watson Medicine Maurice Wilkins Medicine Linus Pauling Peace Lev Landau Physics
If you are executing Java on a Windows platform you need to use a semicolon in place of the colon:
C:>javac Sample.javaC:>java -cp C:\mysql-connector-java-3.1.13-bin.jar;. Sample
Perl
You can connect to a database using the DBI interface (see http://dbi.perl.org), which will help make your code vendor neutral:
#!/usr/bin/perl
use strict;
use warnings;
use DBI;

my $conn = DBI->connect("dbi:mysql:dbname:localhost",
                        "username", "password") or die "Cannot connect\n";
my $cursor = $conn->prepare("SELECT winner, subject
                             FROM nobel WHERE yr=1962")
                            or die $conn->errstr;
$cursor->execute or die $conn->errstr;
while (my ($name,$region) = $cursor->fetchrow_array()){
  print "$name\t$region\n";
}
$conn->disconnect;
Running Perl
And to run Perl:
$ perl Sample.pl
John C. Kendrew Chemistry
Max F. Perutz   Chemistry
John Steinbeck  Literature
Francis Crick   Medicine
James Watson    Medicine
Maurice Wilkins Medicine
Linus Pauling   Peace
Lev Landau      Physics
See “Filter Rows and Columns” [Hack #8] for more Perl syntax.
PHP
The following example uses the
mysql_ functions. If you are using the MySQL
extensions there is no need to explicitly create a variable to hold
the connection, unless you have more than one connection or you prefer
to make it more visible:
<?
mysql_connect('localhost','
                  user
               ','
                  password
               ') or die(mysql_error());
mysql_select_db('dbname')                    or die(mysql_error());
$query = "SELECT winner,subject FROM nobel WHERE yr=1962";
$cursor = mysql_query($query)                or die(mysql_error());
while ($line = mysql_fetch_array($cursor,MYSQL_ASSOC)) {
   echo $line{winner} . "\t" . $line{subject}."\n";
}
mysql_close();
?>Ruby
You can iterate over every row either using fetch_hash or each_hash as shown here:
require "mysql"
begin
  # connect to the MySQL server
  conn = Mysql.real_connect('localhost', 'scott', 'tiger', 'dbname')
  cursor = conn.query("SELECT winner,subject FROM nobel WHERE yr=1962")
  cursor.each_hash do |row|
      printf "%s\t%s\n", row['winner'], row['subject']
  end
rescue MysqlError => e
  print e.error(), "\n"
endPerform Conditional INSERTs
The humble INSERT statement is a masterpiece of declarative language design. With only two main variations, it can handle a host of different behaviors.
You can use INSERT
INTO table
( list
) VALUES (
list ) to
add a single row to a table. You can also use INSERT INTO
table (
list )
SELECT
stmt to insert several rows.
INSERT ... VALUES
You can include expressions and literal
expressions in the VALUES list.
Suppose you want to record the fact that member jim01 has borrowed the book bk002 from your library. This book is due
back in 14 days. Add the number 14 to today’s date to get the due
date:
INSERT INTO libraryLoan(member,book,dueDate)
  VALUES ('jim01', 'bk002', CURRENT_DATE + 14);
Tip
In SQL Server, you must use the function GetDate() in place of CURRENT_DATE. For Access, you can use Date().
You might prefer to use the ANSI standard method in your database. With the ANSI
method you use the phrase CURRENT_DATE + INTERVAL '14' DAY in place of CURRENT_DATE+14. Oracle, PostgreSQL, and
MySQL will allow that.
The VALUES list can include
more complex calculations, and these calculations may involve
subqueries. Let’s say that when the book is returned you must impose a
fine of 20 cents if the book is overdue. You can use a single INSERT statement to apply this fine:
INSERT INTO libraryReturn(member,book,returnDate,fine)
  VALUES ('jim01','bk002',CURRENT_DATE,
          (SELECT 0.20 fine
             FROM libraryLoan
           WHERE member='jim01' AND book='bk002'
           GROUP BY member, book
           HAVING MAX(dueDate)<CURRENT_DATE))
Tip
SQL Server does not allow a SELECT statement inside the VALUES list. Instead, you can use this
(see the following section, “INSERT ... SELECT,” for more
details):
INSERT INTO
libraryReturn(member,book,returnDate,fine)
   SELECT 'jim01','bk002',GetDate(),
          (SELECT 0.20
             FROM libraryLoan
           WHERE member='jim01' AND book='bk002'
           GROUP BY member,book
           HAVING MAX(dueDate)<GetDate())
The SELECT statement deserves some explanation.
SELECT will return either a single
row with the number 0.20, or no rows. If no rows are returned, a
NULL will be put in the fine column for the new libraryReturn row.
Let’s take this statement one step at a time. First, look at the loan records for this borrower and this book:
mysql>SELECTmember, book, dueDate->FROM libraryLoan->WHERE member='jim01' AND book='bk002';+--------+-------+------------+ | member | book | dueDate | +--------+-------+------------+ | jim01 | bk002 | 2005-03-22 | | jim01 | bk002 | 2005-09-21 | | jim01 | bk002 | 2006-07-28 | +--------+-------+------------+
Borrower jim01 really loves
that book; he’s borrowed it three times! But you are interested in
only the most recent lending, so you use a GROUP BY
with MAX to get the one record of
interest:
mysql>SELECTmember, book, MAX(dueDate)->FROM libraryLoan->WHERE member='jim01' AND book='bk002'->GROUP BY member, book;+--------+-------+--------------+ | member | book | MAX(dueDate) | +--------+-------+--------------+ | jim01 | bk002 | 2006-07-28 | +--------+-------+--------------+
Now you can be sure that at most, one row will be returned. A
returned row will generate a fine only if dueDate was prior to today’s date. You can
use a HAVING clause to filter the
result of a GROUP BY. Also, the important data is the fine.
There is no need for the other values in the SELECT clause. What you actually need is the
value of the fine:
mysql>SELECT 0.20 fine->FROM libraryLoan->WHEREmember='jim01' AND book='bk002'->GROUP BY member, book->HAVING MAX(dueDate)<CURRENT_DATE;Empty set (0.00 sec)
jim01 escapes a fine because
the due date is today or some time in the future. However, ann02 is returning book bk005 late and she is going to have to
pay:
mysql>SELECT 0.20 fine->FROM libraryLoan->WHERE member='ann02' AND book='bk005'->GROUP BY member, book->HAVING MAX(dueDate)<CURRENT_DATE;+------+ | fine | +------+ | 0.20 | +------+
INSERT ... SELECT
You can use the INSERT ... SELECT statement to copy data from one table
to another, but it has other uses as well. For instance, you can use
it to insert a single row as an alternative to the VALUES option. In MySQL and SQL Server, you
can omit the FROM clause to get a
single row result. These two statements are equivalent:
INSERT INTO roomBooking(whn,wht,who)VALUES('2006-07-13','Ballroom','Col. Mustard'); INSERT INTO roomBooking(whn,wht,who)SELECT'2006-07-13','Ballroom','Col. Mustard';
Tip
In Oracle, you can do the same thing, but you need to
reference the dual table. Also,
Oracle insists that you use the ANSI standard DATE keyword. Turn to [Hack #19] to see samples
of date literals that you may use on each of the popular engines.
Here’s an example that attempts to book the ballroom for a customer
named Col. Mustard on July 13, 2006:
INSERT INTO roomBooking(whn,wht,who) SELECT DATE '2006-07-13','Ballroom','Col. Mustard' FROM dual;
MySQL also has the dual
table. You do not usually need it, but you must reference dual if your SELECT statement includes a WHERE clause.
This approach is fine if you always want to insert the row. But
suppose you want to insert the booking only if the room is free. That
means you want the SELECT statement
to return one row if the room is free and zero rows if the room is
occupied.
Look at the line that shows “rows affected” in the following two attempts at booking. Prof. Plum’s booking is successful and one row is added. Miss Scarlet’s booking results in zero rows being added because Col. Mustard has already booked the ballroom on that date:
mysql>INSERT INTO roomBooking(whn,wht,who)->SELECT DATE '2006-07-13','Billiard Room','Prof. Plum'->FROM dual->WHERE NOT EXISTS (SELECT who FROM roomBooking->WHERE whn = DATE '2006-07-13'->AND wht='Billiard room');Query OK, 1 row affected (0.00 sec) Records: 1 Duplicates: 0 Warnings: 0 mysql>INSERT INTO roomBooking(whn,wht,who)->SELECT DATE '2006-07-13','Ballroom','Miss Scarlet'->FROM dual->WHERE NOT EXISTS (SELECT who FROM roomBooking->WHERE whn = DATE '2006-07-13'->AND wht='Ballroom');Query OK, 0 rows affected (0.00 sec) Records: 0 Duplicates: 0 Warnings: 0
The first statement adds a new row to the roomBooking table. In Miss Scarlet’s
booking, the clause WHERE whn =
DATE '2006-07-13' AND wht='Ballroom' matched Col. Mustard’s
booking, so the NOT EXISTS expression filtered out all results.
As a result, the SELECT clause
returns zero rows and the INSERT
does nothing.
The queries work without the dual table in PostgreSQL:
INSERT INTO roomBooking(whn,wht,who)
  SELECT DATE '2006-07-13','Billiard Room','Prof. Plum'
    WHERE NOT EXISTS (SELECT who FROM roomBooking
                       WHERE whn = DATE '2006-07-13'
                         AND wht='Ballroom')
In SQL Server, you leave out the word DATE
and don’t need to reference dual:
INSERT INTO roomBooking(whn,wht,who)SELECT '2006-07-13','Billiard Room','Prof. Plum'WHERE NOT EXISTS (SELECT who FROM roomBookingWHERE whn = '2006-07-13'AND wht='Billiard room')
UPDATE the Database
The behavior of UPDATE can seem confusing to people accustomed to procedural programming languages such as Perl and Java. Learn how UPDATE works, and why.
In most programming languages, you need a temporary variable if you want to swap the values of two variables. Suppose you want to move the players around in your netball team. Let the wing attack have a go as goal shooter and put the goal shooter on wing attack:
/* The original lineup */
goalShooter = 'Camelia';
wingAttack  = 'Rosie';

/* Swap goalShooter with wingAttack */
tmp         = goalShooter;
goalShooter = wingAttack;
wingAttack  = tmp;
In an SQL UPDATE statement, you
don’t need the temporary variable. The values on the right of the
= are consistent throughout the whole
UPDATE statement; it is as though all
of the updates happened simultaneously rather than one after another.
Here is the result of swapping the two positions in Oracle; you will get the same result if you try it on SQL
Server or on PostgreSQL (read on for MySQL):
SQL>SELECT goalShooter,goalAttack,wingAttack FROM offenceTeam;GOALSHOOTER GOALATTACK WINGATTACK --------------------- --------------------- --------------------- Camelia Demi Rosie SQL>UPDATE offenceTeam2SET goalShooter = wingAttack,3wingAttack = goalShooter;1 row updated. SQL>SELECT goalShooter,goalAttack,wingAttack FROM offenceTeam;GOALSHOOTER GOALATTACK WINGATTACK --------------------- --------------------- --------------------- Rosie Demi Camelia
This is rather like the Perl construct that allows you to assign a list of variables in a single statement:
($goalShooter,$wingAttack) = ($wingAttack,$goalShooter);
When a relational database performs an update it has to maintain a
copy of all of the original values in some place to ensure isolated transactions. A single UPDATE statement might involve thousands of
rows and might take several minutes to complete. If there were a failure
during the update (if someone switched off the computer, for example),
the system is guaranteed to roll back and none of the changes will be
committed.
The system has access to all of the values prior to the first change happening. Also, you cannot normally predict the order in which the updates take place, so the sensible behavior is to apply changes relative to the original values and not take account of changes that take place during execution of the command.
MySQL Differences
MySQL is the exception to the rule. In MySQL, the updates are done in sequence from left to right, so the preceding SQL query produces a different result in MySQL:
mysql>SELECT goalShooter,goalAttack,wingAttack FROM offenceTeam;+-------------+------------+------------+ | goalShooter | goalAttack | wingAttack | +-------------+------------+------------+ | Camelia | Demi | Rosie | +-------------+------------+------------+ 1 row in set (0.00 sec) mysql>UPDATE offenceTeam->SET goalShooter = wingAttack,->wingAttack = goalShooter;Query OK, 1 row affected (0.00 sec) Rows matched: 1 Changed: 1 Warnings: 0 mysql>SELECT goalShooter,goalAttack,wingAttack FROM offenceTeam;+-------------+------------+------------+ | goalShooter | goalAttack | wingAttack | +-------------+------------+------------+ | Rosie | Demi | Rosie | +-------------+------------+------------+ 1 row in set (0.00 sec)
This causes a problem. In a procedural programming language, you
would simply use a temporary variable, but you do not have a temporary
variable in an UPDATE statement in
SQL. Fortunately, there is an algorithm that will swap two numeric
fields without a temporary variable. To swap x and y,
for instance, you can use SET
x=x+y, y=x-y, x=x-y. It’s easier to see what is going on
by looking at an example (see Table 1-1). Suppose
x is 100 and y is 1.
Let’s change from using named players to using numbers (for instance, Camelia becomes 101):
mysql>SELECT * FROM offenceTeamN;+----------+-------------+------------+------------+ | teamName | goalShooter | goalAttack | wingAttack | +----------+-------------+------------+------------+ | A | 101 | 102 | 103 | +----------+-------------+------------+------------+ 1 row in set (0.00 sec) mysql>UPDATE offenceTeamN->SET goalShooter = goalShooter+wingAttack->, wingAttack = goalShooter-wingAttack->, goalShooter = goalShooter-wingAttack;Query OK, 1 row affected (0.00 sec) Rows matched: 1 Changed: 1 Warnings: 0 mysql> mysql>SELECT * FROM offenceTeamN;+----------+-------------+------------+------------+ | teamName | goalShooter | goalAttack | wingAttack | +----------+-------------+------------+------------+ | A | 103 | 102 | 101 | +----------+-------------+------------+------------+ 1 row in set (0.00 sec)
You can apply this idea to strings as well. However, instead of adding and
subtracting, you need to use CONCAT and SUBSTRING_INDEX, making sure to use a
separator that does not appear in the values:
UPDATE offenceTeam
   SET goalshooter = CONCAT(goalShooter,':',wingAttack)
     , wingAttack  = SUBSTRING_INDEX(goalShooter,':',1)
     , goalShooter = SUBSTRING_INDEX(goalShooter,':',-1)
Solve a Crossword Puzzle Using SQL
You can use SQL to solve the kinds of pattern-matching riddles that are typical of crossword puzzles. But first you have to load in a dictionary.
Suppose you have a table called words that contains a few thousand words. If
you know some characters in some positions, you can use the underscore (_)
wildcard. For example, say you are looking for an eight-letter word with
the following pattern:
| Second letter: a |
| Fourth letter: l |
| Seventh letter: o |
An underscore means “any character” in LIKE:
mysql> SELECT * FROM words WHERE word LIKE '_a_l__o_';
+------+----------+
| id   | word     |
+------+----------+
| 3823 | ballroom |
| 3826 | ballyhoo |
| 7255 | Carleton |
| 7480 | cauldron |
+------+----------+
4 rows in set (0.04 sec)
Tip
The ANSI standard allows % and _ as
the two wildcards. % is used to
represent a string of any length and _ represents any single character. In
Access, you use * and ?, respectively.
Here’s how to find words in your dictionary that have the same three letters at the beginning and at the end:
mysql>SELECT word FROM words->WHERE word LIKE CONCAT('%',SUBSTR(word,1,3))->AND LENGTH(word) > 3;+---------------+ | word | +---------------+ | Ababa | | antiformant | | booboo | | Einstein | | entertainment | | Giorgio | | Ionicization | | murmur | | Oshkosh | | redeclared | | restores | | restructures | | Tsunematsu | | underground | +---------------+ 14 rows in set (0.09 sec)
SQL Server Variation
SELECT word FROM words
  WHERE (word LIKE '%' + SUBSTRING(word,1,3))
  AND LEN(word) > 3
PostgreSQL Variation
PostgreSQL will accept the ANSI standard syntax:
SELECT word FROM words
WHERE word LIKE '%' || SUBSTR(word,1,3)
AND LENGTH(word) > 3
Filling a Table with Words
To perform word searches you need to build the words table. You can create it with a
statement such as CREATE TABLE WORDS (word VARCHAR(255)). If you start with a
plain-text file and you want to put it into the database, you have
many options. Perhaps the simplest is to “top and tail” each line to
make it into an INSERT statement. You need to go from
this:
Aarhus
Aaron
Ababa
aback
O'Brien
to this:
INSERT INTO words VALUES ('Aarhus')
INSERT INTO words VALUES ('Aaron')
INSERT INTO words VALUES ('Ababa')
INSERT INTO words VALUES ('aback')
INSERT INTO words VALUES ('O''Brien')
Notice that the single quote must be “escaped.” The name O'Brien becomes O''Brien. The following Perl one-liner will
take care of that (you could pipe it into your SQL command-line
utility [Hack #1] if you
want):
$perl –pe "s/'/''/g;s/.*/INSERT INTO words VALUES ('$&');/"words
This command assumes
is a text file
containing a list of words, such as /usr/share/dict/words found on most Linux,
Unix, and Mac OS X systems. Various word lists are available from
http://wordlist.sourceforge.net.words
Another approach is to use a spreadsheet such as Excel to manipulate the data, as shown in Figure 1-2.
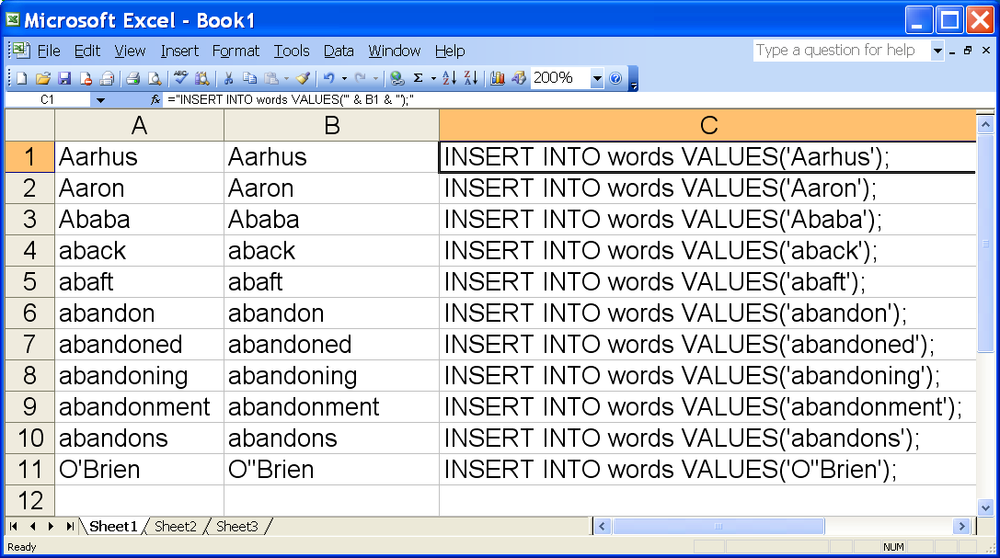
The first column, A, contains
the original data from a text file. You can enter this data using the
copy and paste tools or by selecting File→Open. Column B uses the
SUBSTITUTE function to escape the single
quotes:
=SUBSTITUTE(A1,"'","''")
Column C uses the append
operator, &, to construct the required SQL INSERT statement:
="INSERT INTO words VALUES ('" & B1 & "');"When you’ve copied both formulas down the whole word list, you
can copy and paste column C into
your SQL command prompt or into a .sql file for later use.
Don’t Perform the Same Calculation Over and Over
The FROM clause of a SELECT statement may include other SELECT statements. This feature can simplify a complex statement.
Sometimes using a derived table statement is the only way to get the results that you want. But you can also use a derived table to make a query shorter and easier to read. When you have the same complicated expression cropping up in several places in your output you can use a derived table to provide a kind of local variable.
The contract table contains two
columns: income and overhead. You want to produce five more
columns calculated from these two values. The output would look like
Table 1-2.
| Income | Overhead | Residual:grant minus overheads | Est:20% of residual | Admin:10% of residual | Rsrv:5% of residual |
| $1,000 | 20% | 800 | 160 | 80 | 40 |
| $2,000 | 10% | 1,800 | 360 | 180 | 90 |
| $1,000 | 50% | 500 | 100 | 50 | 25 |
The SQL to generate this table is not complicated, but it is rather lengthy:
mysql>SELECT income,->overhead,->(income-income*overhead/100) AS residual,->0.20*(income-income*overhead/100) AS Est,->0.10*(income-income*overhead/100) AS Admin,->0.05*(income-income*overhead/100) AS Rsrv->FROM contract;+--------+----------+----------+------+-------+------+ | income | overhead | residual | Est | Admin | Rsrv | +--------+----------+----------+------+-------+------+ | 1000 | 20 | 800 | 160 | 80 | 40 | | 2000 | 10 | 1800 | 360 | 180 | 90 | | 1000 | 20 | 500 | 100 | 50 | 25 | +--------+----------+----------+------+-------+------+
It would be neater if you didn’t have to keep repeating that
residual calculation (income-income*overhead/100) over and over
again.
You can calculate the residual in a derived table and then refer to it in the outer query. With indentation and a consistent method for naming columns, a derived table can improve the appearance of the SQL:
mysql>SELECT income,->overhead,->residual,->0.20*residual AS Est,->0.10*residual AS Admin,->0.05*residual AS Rsrv->FROM->(SELECT income, overhead, (income-income*overhead/100) AS residual->FROM contract) subquery;+--------+----------+----------+------+-------+------+ | income | overhead | residual | Est | Admin | Rsrv | +--------+----------+----------+------+-------+------+ | 1000 | 20 | 800 | 160 | 80 | 40 | | 2000 | 10 | 1800 | 360 | 180 | 90 | | 1000 | 20 | 500 | 100 | 50 | 25 | +--------+----------+----------+------+-------+------+
In this case, the query with the subquery is not shorter than the original, but it is easier to understand, and if the residual calculation changes it will be easier to update the query.
This technique can turn a completely unreadable query into a relatively compact, maintainable format.
Use a VIEW
Another alternative is to turn the derived table into a VIEW:
CREATE VIEW residual1 AS
  SELECT income, overhead, (income-income*overhead/100) AS residual
    FROM contract;

SELECT income,
       overhead,
       residual,
       0.20*residual AS Est,
       0.10*residual AS Admin,
       0.05*residual AS Rsrv
  FROM residual1;
Without the right precautions, this approach can lead to
difficulty in managing the collection of views that clutter your
workspace. When you have a chain of views that lead to a final result
you should name them so that they are listed together with the main
result. You could call the final query residual and ensure that the queries that
residual depend on are called
residual1, residual2, and so on.
Hacking the Hack
In some cases, the base table has many columns that need to
appear in the outer query. The following example contains only two
columns: income and overhead. But if it contained five or ten
columns, having to list every column name in the derived table would
cause more hassle than the hack eliminates.
SQL allows you to use the * wildcard to include all of the columns from
a specified table. You can use it in the subquery and in the outer
query. If your goal is more readable SQL, you should use it
sparingly:
mysql>SELECT subquery.*,->0.20*residual AS Est,->0.10*residual AS Admin,->0.05*residual AS Rsrv->FROM->(SELECT contract.*, (income-income*overhead/100) AS residual->FROM contract) subquery;+--------+----------+----------+------+-------+------+ | income | overhead | residual | Est | Admin | Rsrv | +--------+----------+----------+------+-------+------+ | 1000 | 20 | 800 | 160 | 80 | 40 | | 2000 | 10 | 1800 | 360 | 180 | 90 | | 1000 | 40 | 500 | 100 | 50 | 25 | +--------+----------+----------+------+-------+------+
Get SQL Hacks now with the O’Reilly learning platform.
O’Reilly members experience books, live events, courses curated by job role, and more from O’Reilly and nearly 200 top publishers.

