Chapter 12. Sensors
12.0. Introduction
In this chapter, you will look at recipes for using sensors of various types that will allow the Raspberry Pi to measure temperature, light, and more.
Compared to a board like the Arduino, the Raspberry Pi lacks analog inputs. This means that for many sensors, it is necessary to use additional analog-to-digital (ADC) converter hardware. Fortunately, this is relatively easy to do. It is also possible to use resistive sensors with a capacitor and a couple of resistors.
Most of the recipes will require the use of a solderless breadboard and male-to-female jumper wires (see Recipe 8.10).
12.1. Using Resistive Sensors
Note
Be sure to check out the accompanying video for this recipe at http://razzpisampler.oreilly.com.
Problem
You want to connect a variable resistor to a Raspberry Pi and measure the position of its rotation.
Solution
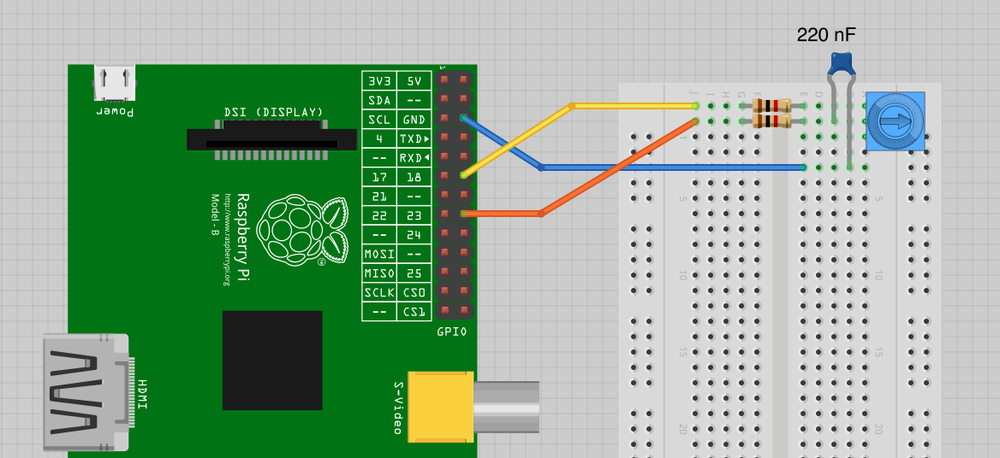
You can measure resistance on a Raspberry Pi using nothing more than a capacitor, a couple of resistors, and two GPIO pins. In this case, you will be able to read the position of the knob on a small variable resistor (trimpot).
To make this recipe, you will need:
- Breadboard and jumper wires (see Prototyping Equipment)
- 10kΩ trimpot (see Resistors and Capacitors)
- Two 1kΩ resistors (see Resistors and Capacitors)
- 220 nF capacitor (see Resistors and Capacitors)
Figure 12-1 shows the arrangement of components on the breadboard.
Get Raspberry Pi Cookbook now with the O’Reilly learning platform.
O’Reilly members experience books, live events, courses curated by job role, and more from O’Reilly and nearly 200 top publishers.

