Chapter 1. Introduction to Zendesk
Zendesk is a customer service solution that is designed to be beautifully simple, and is used by many of the world’s largest organizations to provide support to their customers. It’s a Software-as-a-Service (SaaS) product, which means that your organization will pay a monthly fee for every registered member of your support team using the product. Zendesk will take care of the hosting for you, as well as the other logistics of running a complex website, which allows you to focus on the important tasks—such as providing great support to your customers.
In this book we use the phrase Zendesk instance, which refers to the Zendesk environment of your organization, and presumably the environment you’ll be administering. Unless your organization is very large, you will typically have one Zendesk instance. The domain name of the instance will be something like mycompany.zendesk.com. That is one Zendesk instance, and all of the settings discussed in this book can be applied to that instance.
Explanation of the Zendesk Plans
There are five different Zendesk plans, the features of which will be applied to your entire Zendesk instance:
- Starter
- The name of this plan suggests that it’s well suited to customers just getting started with Zendesk, which is true, but it’s also a great fit for smaller shops with limited customization needs for the product. The total cost for this plan is $1/month for each agent (if billed annually) or $2/month for each agent (if billed monthly). It allows for up to three agent accounts. The best part is that a very deserving nonprofit organization gets a donation equal to your first year’s subscription. Donations from the Starter plan have benefited the UCSF Benioff Children’s Hospital and charity:water (a nonprofit organization that brings clean and safe drinking water to people in developing nations).
- Regular
- The Regular plan is designed for customers that don’t need the bells and whistles of the higher plans. The cost for this plan is $25/month for each agent (if billed annually) or $29/month for each agent (if billed monthly). Unlike the Starter plan, there is no limit on the number of agents that can be included on this plan. The Regular plan is particularly well suited to customers who are satisfied with basic reporting functionality, and who are running Zendesk for customers in a single language and time zone. The support offered by Zendesk on this plan is limited to email support only.
- Plus
- This is the most popular option, and is the perfect plan for midsize to large organizations. Features of this plan include advanced business analytics with GoodData, as well as complete internationalization features and a number of tools to improve team collaboration. The cost of this plan is $59/month for each agent (if billed annually) or $69/month for each agent (if billed monthly). Similar to the Regular plan, there is no restriction on the number of agents that can be included on this plan. We highly recommend this plan to customers, and it provides the added benefit of both email and phone support from Zendesk.
- Enterprise
- For larger organizations, the Enterprise plan adds further security and compliance features, as well as the ability to maintain multiple connected Zendesk instances with separate branding for each. These features will not be necessary for everyone. On the other hand, a feature that is available only on the Enterprise plan—agent roles—is one of the most useful pieces of the entire product (see Enterprise Agent Roles and Light Agents for further details). This feature alone can be worth the extra cost for some customers. I recommend that all Zendesk customers take a second glance at this plan (don’t be scared by the “Enterprise” label, because it’s something of a misnomer). The Enterprise plan is $125/month for each agent (if billed annually) or $139/month for each agent (if billed monthly), but when you consider that Light Agents are free accounts, it doesn’t necessarily have to be more expensive than the other plans. As a bonus, this plan offers 24/7 support from the Zendesk support team.
- Enterprise Elite
- This plan is for large organizations who need or appreciate a higher level of support that is catered specifically to their needs. Elite customers receive support from a dedicated Zendesk Customer Success Manager who provides on-boarding assistance, special training, and regular check-ins, and advises on technical best practices, beta news, and opportunities to participate in by-invitation-only customer advisory events. This plan is available to Zendesk customers who purchase a contract of $100,000 or more per year.
For further information about the set of plans and the features contained in each one, visit the plan comparison page. Throughout this book we specifically state if a feature is available only on one of the more expensive plans. It’s up to you to decide whether such features are necessary for your use case.
Tip
Once you select a plan, all of the agents in the system will be on that plan. It’s not possible to pick and choose plan features to delegate to certain agents in the system. If you have 100 agents on the Regular plan and you’d like to upgrade to the Plus plan, the additional cost will be for every agent currently enabled in the system.
Terms and Definitions
Rather than explaining all of the product terms up front, we’ll explain only the most important concepts here. We’ll wait until the individual chapters to introduce the terms more comprehensively. The following terms are so fundamental to Zendesk that many of the topics in this book won’t make sense until you understand them:
- Ticket
- A support request submitted by a customer to ask for assistance. The term is selected to be as generic as possible, to capture the broad range of requests submitted to your customer service team.
- Field
- Before a ticket is submitted, the user will provide details about her request by entering values into the ticket fields. Examples of default system fields are Subject, Description, and Priority. It’s also possible for administrators to add custom fields, which capture more specific information in the ticket.
- Comment
- These are pieces of text that are added to a ticket and form the conversation that will help solve it. Comments can be public, which means that they’re visible to end users who have access to the ticket. Comments can also be private, which means that only members of your internal support team and administrators will be able to read them.
- User
- A user is anyone with an account in the Zendesk instance. All users are classified as one of three types: end users, agents, and administrators.
- End user
- An end user account is usually one that has been created by a customer when he submits a ticket. End users typically have access to their own tickets and sometimes tickets requested by other people at their organization, but never tickets requested by other user accounts. End users are also restricted as to the fields that they can view or edit, unless an administrator has enabled access to those fields.
- Agent
- An agent is typically a person who works for the support organization, providing assistance to customers. Agent access to tickets will vary according to permissions set up by administrators, but agents can typically access a wide range of tickets submitted by customers.
- Administrator
- Administrators are the users who have complete access to the Zendesk instance. They can control all settings and are able to read all tickets reported by all users. Administrator users are also classified as agents in the system, meaning that their access includes all of the agent functions, and that every administrator user is billed by Zendesk as an agent account. For the purposes of this book, we’re assuming that you’ll have full administrative privileges in your Zendesk instance.
- Group
- Groups are used to collect your agents together for the purpose of applying business rules or restricting visibility of a Zendesk feature. Groups can contain only agent or administrator accounts and cannot contain end users. Tickets in your Zendesk instance may be assigned to groups, which indicates the team of agents who are currently working on the ticket.
- Organization
- To collect your end users, you use organizations. Doing so allows you to apply different support processes to different sets of customers. For example, you’re able to automatically assign a ticket from a user in a specific organization (from a specific company) to the agent group that provides support to that company.
- Assignee
- When an individual member of your support team is working on a ticket, she will be set as the assignee of a ticket. The assignee of a ticket must always be an agent, although in rare circumstances the assignee may be an administrator. This is because administrators typically set up and manage Zendesk instances but are not involved in solving tickets. But there’s nothing preventing administrators from doing so, of course.
- Requester
- The person who is seeking assistance on the specific ticket. Requesters are typically end users, and will receive email notifications when the ticket is updated.
- Channel
- There are nine different ways for customers to create a ticket in Zendesk, and these are referred to as channels. The options include the Help Center, email, chat, phone, the Feedback Tab, Facebook, Twitter, ticket sharing, and the API. The various channels are one of the great advantages of Zendesk, because allowing customers to contact your support team using the method in which they’re most comfortable is the first step to creating a positive customer service experience.
- Views
- Part of the agent business process will involve checking a specific list of tickets every day to find tickets to work on. Views are configurable saved searches that make it possible for agents to repeatedly find tickets according to the same criteria. Zendesk starts with a number of default views, but as an administrator, you can add new views according to the specific business process of your organization. Agents can also create personal views that only they can see.
- Macros
- When your agents solve tickets, they’ll probably find that the same processes or questions are often repeated. Agents and administrators are able to create macros that capture a specific set of actions and store them in the form of a shortcut. The use of macros can save agents considerable time when solving support requests.
- Help Center
- Your customer-facing support portal is the Help Center, which includes both the Knowledge Base and the Community. It’s where your customers go to find answers, participate in your community, request support, and track the support requests that they’ve already created. It’s a separate application in your Zendesk instance, meaning that it exists in a separate browser window from the agent and administrator part of your Zendesk instance. The design is based on themes and is easily customizable so that you can change it to match your branding.
- Knowledge Base
- The Knowledge Base, one half of the customer-facing Help Center, is designed to support a self-service customer workflow by anticipating requests from customers and providing articles that answer these questions in advance. Providing a knowledge base for your customers may be one of the best first steps you can take when setting up Zendesk to provide support. A question answered via a search of your knowledge base means one fewer ticket in your queue or one fewer phone call for your agents. Research clearly indicates that customers prefer to find answers themselves.
- Community
- The other half of the Help Center is Community. If you’re familiar with sites such as Stack Overflow, you already have some idea of what the Community feature in Help Center provides. Your customers can post questions into discussion topics (e.g., a topic about a specific product), and members of your user community provide answers. The best or correct answer is marked as such and moved to the top of the answer thread. The Community feature in Help Center is an invaluable companion to your knowledge base and allows your customers to create their own discussion threads and to help each other learn and use your products and services.
- Triggers
- When tickets are created or updated, triggers will be fired to execute a specific set of actions. Typically the actions will include sending an email notification to users about the update, but other triggers might be used to change a field on a ticket according to certain criteria.
- Automations
- Automations are similar to triggers in that their function is to automatically execute a set of actions, but the difference is that automations will be executed after a certain amount of time passes. Typically automations are useful for setting reminders or defining escalations.
- Email notifications
- These are simply emails that are sent from Zendesk to your users. Zendesk uses email notifications to keep in touch with users in a number of contexts; for example, notifications will be sent when users are created or when knowledge base articles are added. They can also be configured in triggers and automations. The template for all of these email notifications is consistent, which will be explained later in this book.
- Business process
- Generally we use the term business process to refer to a process that is followed or defined by your organization. The business processes of organizations are usually what makes them so unique. Some processes are less tangible, and will involve a set of instructions being provided to your support agents. Other processes can be defined in Zendesk more tangibly, and when this happens, they are termed business rules.
- Business rules
- These are the automated processes that are defined in Zendesk. Business rules can be agent rules (such as views and macros) or global rules (such as triggers and automations). Other rules can also be configured through the administrator interface of Zendesk.
User Interface Experience
The Zendesk user interface is separated into three distinct experiences, each representing one of the types of user profiles (i.e., end users, agents, and administrators).
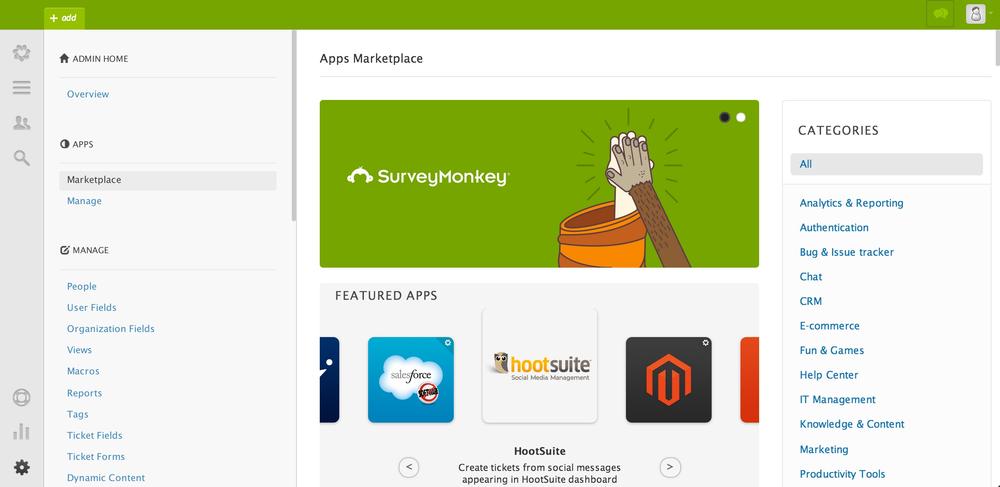
After signing in as an administrator, you can open the product administration section directly by clicking the Admin icon in the lower-left corner of every screen. This icon looks like a cog, and is visible in Figure 1-1. Once inside the administration console, you will see a list of the administration menu options, grouped by category, on the lefthand side of the screen. After opening one of the administration menu items, you’ll see the options for that section of the product on the righthand side of the menu. Figure 1-1 shows an example of the Zendesk administration screen. The toolbar appears on the lefthand side of the screen, the administration navigation is beside it, and the Apps Marketplace page occupies the rest of the screen.
When agents are signed in to Zendesk, they have a slightly different experience than administrators. Their experience is focused on the toolbar icons in the upper left, including the buttons to view a list of tickets or to create new tickets. The end user experience also differs because end users only use the Help Center.
Examples of the ticket screens from the agent and end user interfaces are shown in the section Data Capture Lifecycle.
Tip
Administrators can use the “Assume identity” feature (explained in more detail ) to sign in as an end user and see what that user sees in her view of the Help Center. This can be very useful in troubleshooting issues end users may have when using the Help Center.
Most of the user interface design elements in Zendesk use standard conventions, with a tendency on the side of simplicity. There are two unconventional design elements worth mentioning:
- Deleting items
- In some software products, when you see a list of items, a Delete button will often appear beside the item that you want to delete. This allows you to delete the item from a list directly. However, in Zendesk, this Delete button is hidden on the Edit page, so you’ll first need to click the Edit link for the item (a macro, for example), then click the Delete button (located beside the button to submit the form). You can also delete a ticket through the Delete command in the “Ticket options” menu of a ticket. However, while it might be common practice to make it easy to delete information, it’s not really best practice—especially when it comes to tickets. Maintaining the historical integrity of items such as tickets is important in customer service tools, and you really should only delete a ticket if it is junk (not a real support issue from a real customer that needs to be solved).
- Secondary hover operations
- When you read a list of items in Zendesk, the edit operation will usually be available via an Edit link on the far right column of the list. If you hover your mouse over an item in the list, you may also notice some secondary operations visible only when you’re hovering. The most common example is the Deactivate link, which is a hover operation, or the Clone function, which is also visible only when hovering the mouse over an item in a list. To execute these operations, you’ll need to hover the mouse over the item in the list and then click the link. There’s no way to make these hover operations visible on the page permanently.
Steps to Administer Zendesk
There’s no single set of steps that every Zendesk administrator must follow, and there is no specific order in which you must take the steps to configure your Zendesk instance successfully. Your Zendesk instance might leverage the default, out-of-the-box configuration with only minor changes before your agents sign in and get started. It’s also possible that you’ll change every one of the settings in the product or find ways to configure the product to do something new and creative, just because it suits the needs and processes of your organization.
We’ve tried to order the topics in this book in a logical sequence that works for most administrators. We recommend that you follow along with the topics in the order in which they are presented, and configure the product in the same order. By the time you’ve finished the book, you will have fully configured your Zendesk instance. This is not a requirement, though, and if you’d like to jump, say, to Chapter 5 because you’re curious specifically about the topics in that chapter, that might work as well.
Internal Versus External Customer Service
Most of this book is dedicated to the idea that you’ll be providing support to your customers. In the section Terms and Definitions, we defined end users as your customers, and your agents as your support staff. This is the most common usage of the product. It’s not the only usage of the product, though. As a customer service tool, Zendesk can also be used internally within your organization. For example, it could be used by your IT Operations team to provide support to the rest of your organization. If you’re using Zendesk in this way, you’ll need to do some mental translations as you’re reading this book. When we describe the “customers,” we’ll be referring to people at your organization who will be getting support. When we refer to your “support team,” we’re referring to the agents in Zendesk, who would be your IT Operations team in this example. In general, it doesn’t hurt to still consider the team members at your organization as “customers,” because in a way, anyone who submits a ticket deserves outstanding customer service from the team that is using Zendesk.
If you decide to use Zendesk to support a team internally within your organization, and all of the people at your organization are end users and your support team are the only agents in Zendesk, there’s not really going to be a big difference from the standard use of the product. On the other hand, if you give your employees—who are the people submitting tickets—agent profiles in your Zendesk instance (instead of end-user profiles), there are a few configuration items that you might want to customize:
- The automated actions that move a ticket from the Pending or Solved statuses into Open (as described in Ticket Status) will not be fired if the email is from an agent account. The workaround will be that your business process should monitor updates to tickets on a regular basis.
- If the requester is forwarding an email and the Agent Forwarding feature (described ) is enabled, the most recent comment on the email will be removed from the ticket. Zendesk will also request the ticket on behalf of someone else. To avoid this, you might want to consider disabling the Agent Forwarding feature.
- Agents cannot provide feedback using the Customer Satisfaction feature (described ).
Many organizations run Zendesk very successfully as an internal customer service tool, but it is important to take these items under consideration to determine how they will impact your particular Zendesk instance.
Get Practical Zendesk Administration, 2nd Edition now with the O’Reilly learning platform.
O’Reilly members experience books, live events, courses curated by job role, and more from O’Reilly and nearly 200 top publishers.

