This section provides information about using the GUI elements to perform tasks.
The following instructions cover all that you need to do to load users into your system. The Name field is the only mandatory field. Every other field described in this chapter is optional, depending upon the rules that govern your workplace.
To add new users without assigning attributes or permissions:
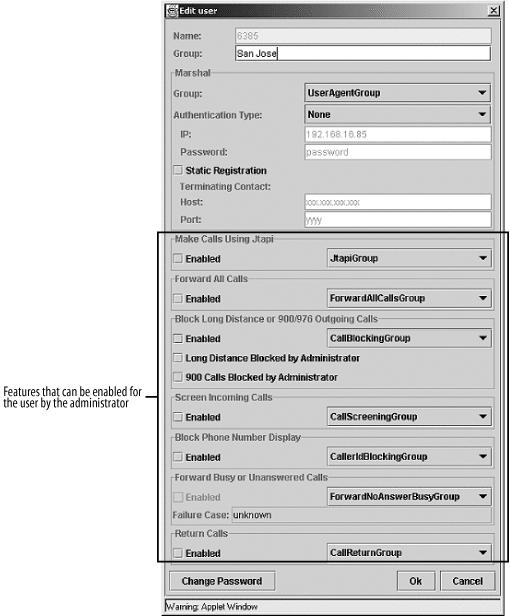
Figure 4-5 illustrates the Edit User screen that appears when the Show Admin Data option box is checked. A section of the screen is labeled “Features that can be enabled for the user by the administrator.” The administrator simply enables or disables the availability of these features. The specific configuration, such as listing screened numbers, is done on a different screen. See "Editing Users: User Controlled,” later, for more information. One exception, Return Calls, does not require any further configuration from the user.
The fields in this screen are explained next.
This field specifies the name of the user in alphanumeric characters. A unique name must be specified for each user.
This field includes the following options:
- Group
This field allows you to select a User Agent Marshal server group from the pull-down menu. The list of Marshal server groups in the pull-down menu corresponds to the Marshal server groups provisioned under
servers/marshalServer/serverType UserAgent.Server groups are a legacy attribute from an early design of VOCAL. They really serve no purpose in Version 1.3.0, and there is no plan to add any significance to them in the near future.
- Authentication Type
This field allows you to select the type of authentication to use:
- None
Users are not authenticated by the User Agent Marshal server.
- Access List
Users are authenticated by comparing the user’s IP address with the address stored in the IP field.
- Digest
Users are authenticated by comparing their password to data stored in the Password field.
- IP
Specifies the IP address of the user. This IP address is used to authenticate the user during registration. Used only for Access List authentication.
- Password
Specifies the user’s password. Used only for Digest authentication.
With static registration, the user agent or gateway can be located via a fixed hostname or IP address. The user agent does not have to register with the Marshal server. Static registration is primarily used for devices that do not support the SIP REGISTER message. The option box enables static registration.
- Terminating Contact: Host
Specifies the IP address of the User Agent or gateway.
- Terminating Contact: Port
Specifies the port number of the User Agent or gateway. You can specify the two previous fields only if the Static Registration option box is checked.
This Feature server is no longer being supported in VOCAL. See Chapter 6 for more information about the JTAPI server.
This field includes:
- Option box
- Pull-down menu
Lets you select a Feature server group from the pull-down menu. The list of Feature server groups in the pull-down menu corresponds to the Feature server groups provisioned under
servers/featureServer/serverType ForwardAllCalls.
- Option box
Enables the Call Blocking feature , which allows:
Long Distance Blocked by Administrator
900 Calls Blocked by Administrator
- Pull-down menu
Lets you select a Feature server group from the pull-down menu. The list of Feature server groups in the pull-down menu corresponds to the Feature server groups provisioned under
servers/featureServer/serverType CallBlocking.
- Option box
Enables the Call Screening feature, which allows the user to screen specific phone numbers or names. Screened calling parties hear a busy signal when they attempt to call.
- Pull-down menu
Lets you select a Feature server group from the pull-down menu. The list of Feature server groups in the pull-down menu corresponds to the Feature server groups provisioned under
servers/ featureServer/serverType CallScreening.
This field includes:
- Option box
Enables the Caller ID Blocking feature, which allows the user to prevent her caller ID from being displayed on the called party’s call display device.
- Pull-down menu
Lets you select a Feature server group from the pull-down menu. The list of Feature server groups in the pull-down menu corresponds to the Feature server groups provisioned under
servers/featureServer/serverType CallerIDBlocking.
This field includes:
- Option box
Lets the user forward calls to a configured number after a configured number of rings. This feature is also known as
sequential forking; see Chapter 11 for more information.- Pull-down menu
Lets you select a Feature server group from the pull-down menu. The list of Feature server groups in the pull-down menu corresponds to the Feature server groups provisioned under
servers/featureServer/serverType ForwardNoAnswer.- Failure case
Users can specify a number to which calls are forwarded when they have turned on Call Forward No Answer or Call Forward Busy.
The administrator can specify a failure case number or address. Incoming calls will be forwarded to this failure case number or address if the system receives a failure message instead of busy messages or no-answer signals.
- Option box
Check the Enabled option box to allow the user to return calls by pressing *69 . This feature is enabled by a Call Processing Language script implemented in the Feature server.
Some SIP/IP phones provide lists of missed calls that enable the user to return calls to specific numbers that are not necessarily the most recently missed calls.
- Pull-down menu
The pull-down menu allows you to select a Feature server group from the pull-down menu. The list of Feature server groups in the pull-down menu corresponds to the Feature server groups provisioned under
servers/featureServer/serverType CallReturn.
This field allows you to change the password for the user. This password is for the end user to gain access to his feature screen, as shown in Figure 4-8. For more information, see "Editing Users: User Controlled" later in this chapter.
This section describes how to view records for individual users. If you have thousands of users loaded into your system, you will find that it is faster to load the data for individual users, or small groups of users, as required, rather than loading the data for all users every time you log in as Administrator.
Viewing individual records requires using the right-click menu, as you will see in the following instructions.
To view data fields for users:
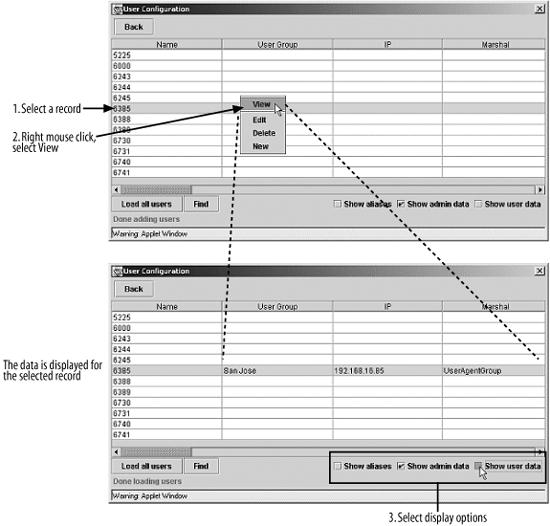
To select a user, click a table row. To select consecutive multiple users, hold down the Shift key while clicking the table rows. To select nonconsecutive multiple users, hold down the Ctrl key while clicking the table rows.
Right-click anywhere over the user listings. A menu appears.
Select View. Data fields with information will appear in the table. To sort the table by data type, check one or more of the option boxes:
Figure 4-6 illustrates selecting the data for a single user.
To view information for all users, select the Load all users button. If you are working with a few test users, this function completes itself in a few seconds. If you have a live system with thousands of users, this function may take several minutes or hours to complete, depending on the population size and network speed.
Different data fields appear in the User Configuration screen, depending on the option boxes selected.
Some of these fields permit either the user or administrator to set up call blocking for long distance, 1-900 numbers, or caller ID. The administrator permits or restricts user access to call blocking. The users, if permitted, set up the specific details about what phone numbers are to be blocked from use in their accounts.
When none of the option boxes is checked, the User Configuration screen displays the default data fields (Table 4-5).
Table 4-5. Default data fields
|
Field |
Description |
|---|---|
|
Name |
Specifies the unique name of the user. |
|
User Group |
The User Group names are not used by the system but allow the administrator to logically organize the users. |
|
IP |
Optional: specifies the IP address of the user. If Access List is selected for Authentication Type, the IP address is used to validate the user. If None or Digest is selected for Authentication Type, the IP address is not used. |
|
Marshal |
Specifies the name of the Marshal server group. |
When the Show admin data option box is checked, the data fields in Table 4-6 appear in addition to the default data fields.
Table 4-6. Admin data fields
|
Field |
Description |
|---|---|
|
Forward All Calls Enabled |
Indicates whether all calls can be forwarded for the user: Deselected indicates that this feature is disabled for the user. Selected indicates that this feature is enabled for the user. |
|
Forward All Group |
Indicates the name of the ForwardAll Feature server group. |
|
Forward Busy/No Ans. Enabled |
Indicates whether the calls can be forwarded when the phone is busy or not answered: Deselected indicates that this feature is disabled for the user. Selected indicates that this feature is enabled for the user. |
|
Forward Busy/No Ans. Group |
Indicates the name of the ForwardBusyNoAnswer Feature server group. |
|
Failure Case |
Indicates the number or address to forward calls to if there is a problem with contacting the called party. |
|
Call Screen Enabled |
Indicates whether calls can be screened before reaching the user: Deselected indicates that this feature is disabled for the user. Selected indicates that this feature is enabled for the user. |
|
Call Screen Group |
Indicates the name of the Call Screen Feature server group. |
|
Call Block Enabled |
Indicates whether the user can be prevented from calling certain numbers: Deselected indicates that this feature is disabled for the user. Selected indicates that this feature is enabled for the user. |
|
Call Block Group |
Indicates the name of the Call Block Feature server group. |
|
Long Distance Admin Block |
Indicates whether the long-distance-blocking feature is enabled by the administrator: Deselected indicates that the user can control this feature if call blocking is also enabled. Selected indicates that the administrator controls long-distance call blocking. |
|
900 # Admin Block |
Indicates whether the 900-number-blocking feature is enabled by the administrator: Deselected indicates that the user can control this feature if call blocking is also enabled. Selected indicates that the administrator controls 900-number call blocking. |
|
JTAPI Enabled |
This is not supported in VOCAL 1.3.0. |
|
JTAPI Group |
This is not supported in VOCAL 1.3.0. See Chapter 6 for more information about the JTAPI Feature server. |
|
Call Return Enabled |
Indicates whether the user can use *69 to return calls: Deselected indicates that this feature is disabled for the user. Selected indicates that this feature is enabled for the user. |
|
Call Return Group |
Indicates the name of the CallReturn Feature server group. |
|
Caller ID Block Enabled |
Indicates whether the user can be blocked from dialing specific phone numbers: Deselected indicates that this feature is disabled for the user. Selected indicates that this feature is enabled for the user. |
|
Caller ID Group |
Indicates the name of the CallerID Feature server group. |
|
Authentication Type |
Indicates the authentication type used to authenticate the user: None. Access List: the IP address is required. Digest: a password is required. |
|
Password |
Indicates the user’s password when digest authentication is used. |
|
Static Reg Enabled |
Indicates whether static registration is enabled. |
|
Terminating Host |
Indicates the IP address of the terminating host when static registration is used. |
|
Terminating Port |
Indicates the port number on the termination host when static registration is used. |
When the Show user data option box is checked, the data fields in Table 4-7 appear in addition to the default data fields.
Table 4-7. User data fields
|
Field |
Description |
|---|---|
|
Forward All Set |
Indicates whether calls can be forwarded by the user: Off indicates that call forwarding is off. On indicates that call forwarding is on and all calls are forwarded to a number specified by the user. |
|
Forward All To |
Indicates the address or number where all calls are forwarded when Forward All feature is set to on or enabled. |
|
Forward Busy Set |
Indicates whether Forward Busy feature is set by the user: Deselected indicates that calling parties receive a busy signal if the phone is busy. Selected indicates that Call Forwarding Busy is on and all calls are forwarded to a number specified by the user when the user is busy. |
|
Forward Busy To |
Indicates the address or number where all calls are forwarded when Forward Busy Set is enabled. |
|
Forward No Ans. Set |
Indicates whether Forward No Answer feature is set by the user: Deselected indicates that, if the phone is not answered, it will ring until the calling party hangs up. Selected indicates that Call Forwarding No Answer is on and all calls are forwarded to a number specified by the user when the user does not answer. |
|
Forward No Ans. To |
Indicates the address or number where calls are forwarded when the user does not answer the call and Forward No Ans. Set is enabled. |
|
Long Distance User Block |
Indicates whether Long Distance User Block feature is set by the user: Deselected indicates that long-distance calling is allowed. Selected indicates that long-distance block is on and that the user cannot make long-distance calls. |
|
900 # User Block |
Indicates whether 900 Number Block feature is set by the user: Deselected indicates that 900 numbers are not blocked and user can dial 900 numbers. Selected indicates that 900 numbers are blocked and users cannot dial 900 numbers. |
|
JTAPI Set |
Not supported by VOCAL Version 1.3.0. See Chapter 6 for more information. |
|
Caller ID Blocking Set |
Indicates whether the Caller ID Blocking feature is set by the user: Deselected indicates that the Caller ID is sent during calls. Selected indicates that the Caller ID is not sent during calls. |
This section explains how to use the Load all users button and the option boxes to view user data.
For situations in which you need to compare the data between users, you can click the Load all users button. This button activates a program that reads a flat file on the Provisioning server that contains all user data and displays it in the GUI.
To load and view the data:
Click Load all users. The user records are filled with data.
Select one or any combination of the following options:
Show Aliases (must be combined with either or both of the other checkboxes)
Show Admin Data
Show User Data
Use the horizontal scrollbar to view the data.
You can highlight any user by clicking her record. If you have thousands of users, the Find User utility will make your search easier.
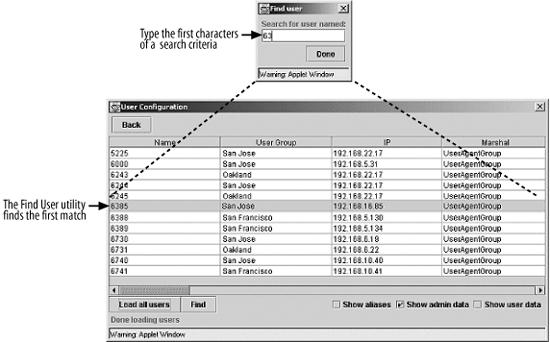
The Find button activates a program that automatically searches the Name column for the first match of your criteria as you type it in. For example, if you type a 6, the first name that starts with 6 will be highlighted. If you type 63, the first name that starts with 63 will be highlighted. You can continue typing in the username until the desired name appears on the screen.
To find users:
Click Find. The Find User dialog box appears.
Type the first characters of the name. The first instance of each character will be automatically selected in the list.
When you are finished searching, click Done.
Figure 4-7 shows the use of the Find User utility.
To delete a user or multiple users:
Select one or more users.
To select a user, click a row in the table.
To select multiple users, hold down the Shift key while clicking the rows in the table.
Right-click anywhere over the user listings. A menu appears.
Select Delete.
This section describes how to edit users.
To edit a user:
Select the Show Admin Data option box.
Select a user.
Right-click anywhere over the user listings. A menu appears.
Select Edit. The Edit User screen appears.
Edit the fields and option boxes as required.
Click OK to submit the entry.
To edit multiple users:
Select the Show Admin Data option box.
Press and hold Shift, and click multiple table rows.
Right-click anywhere over the user listings. A menu appears.
Select Edit. The Edit User screen appears.
Edit the fields and option boxes as required.
Click OK to submit the entry.
When you edit multiple users, only one Edit User screen will appear. All changes made to multiple users will be applied after you click OK.
An alias is an alternate address or phone number by which a user can be reached. In the early designs of VOCAL, subscribers were identified by a single name, a master user , which was normally the phone number but could also be any string of digits or letters. The concept of aliases was introduced to allow more than one name to correspond to the same user. This enabled a variety of different methods for calling the same user including SIP URL dialing, traditional analog phone dialing, and other forms of addressing.
With aliases, calls involving either the master user or one of its aliases are treated the same. In terms of maintenance, if aliases are deleted from the Provisioning server, this activity does not affect the master user. However, if a master user is deleted, all corresponding aliases are deleted from the Provisioning server as well.
The alias names associated with each user can be displayed using the Show Alias option box . If you select Show Aliases, you must also select Show Admin Data, or Show User Data as well. Selecting Show Aliases by itself returns an error.
The VOCAL system provides a web page for users to maintain some of their features. These features are called user-controlled features and they include:
JTAPI
Forward all calls
Call blocking
Call screening
Caller ID blocking
Forward unanswered
Forward busy
Features that are not enabled by the administrator appear grayed out.
To edit a user:
Select the Show User Data option box.
Select a user.
Right-click anywhere over the user listings. A menu appears.
Select Edit. The Edit User screen appears.
Edit the fields and option boxes as required.
Click OK to submit the entry.
To edit multiple users:
Tip
When you edit multiple users, only one Edit User screen will appear. All selected users will have the same field and option box settings.
Select the Show Admin Data option box.
Press and hold Shift, and click multiple table rows.
Right-click anywhere over the user listings. A menu appears.
Select Edit. The Edit User screen appears.
Edit the fields and option boxes as required.
Click OK to submit the entry for all selected users.
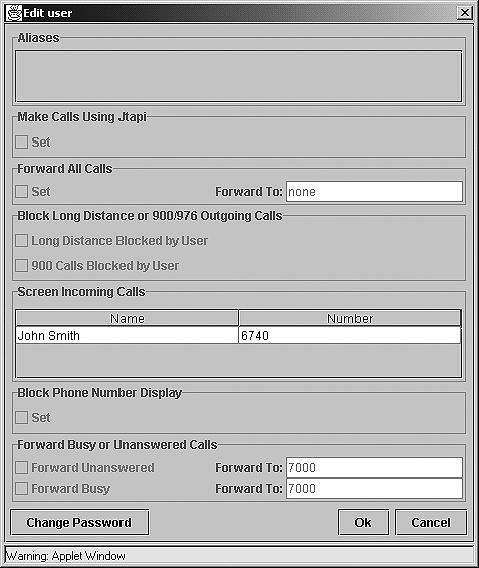
Figure 4-8 illustrates the Edit User screen that appears when the Show User Data option box is checked and the Edit option is selected from the right-click menu. This screen displays features that can be enabled by the user and is provided for the administrator to view the user’s settings. If required, the administrator can modify the user’s setting.
Users can access this screen (for their user ID only) by going to http://<localhost>/vocal/user_configuration.html and entering their user ID (Name field) and password. Naturally, the web server administrator could set up a hyperlink from a web page that points to this address or make it accessible through a redirected alias URL.
The fields in this screen are explained here.
This field displays aliases associated with this user. To add aliases:
Right-click over the Aliases area. A menu appears.
Select Add. A dialog box appears.
Type the alias name for the user.
Click OK to submit the alias.
To remove aliases:
Right-click over the Aliases area. A menu appears.
Select Remove. A dialog box appears.
Type the alias name to be removed.
Click OK to remove the alias.
JTAPI is not supported in VOCAL 1.3.0. See Chapter 6 for more information.
The user can turn on call blocking for:
Long distance numbers
900 numbers
If the Long Distance Blocked by User and 900 Calls Blocked by User option boxes are grayed out, this means that the administrator has not enabled these features for the user.
The user can screen a call by name and number. To add numbers for screening:
Right-click near the Name and Number box. A menu appears.
Select Add. A dialog box appears.
Enter the name and number to screen and click OK. The format is the user ID; for example, 7000.
If you enter 6 in the Number field, all numbers beginning with 6 will be screened. Entering a specific phone number, such as 555-1000, will screen only that phone number.
To remove a screened number:
Right-click near the Name and Number box. A menu appears.
Select Remove. A dialog box appears.
Enter the name and number to be removed and click OK.
If the call-screening table is grayed out, the administrator has not enabled this feature for the user.
The user can set caller ID blocking to prevent the caller’s number or address from being delivered and displayed to the called party.
If the Caller ID Blocking option box is grayed out, the administrator has not enabled this feature for the user.
The user can set Forward All Calls to redirect all incoming calls to a specific number. To turn on this feature for Forward Unanswered:
Check the Set option box.
Enter the user ID in the Forward To field; for example, 7000.
If the Set option box and the Forward To field are grayed out, the administrator has not enabled the Forward All Calls feature for the user.
The user can set Forward No Answer Busy to forward all incoming calls to another number if:
The user is busy—Forward Busy
The user does not answer the call—Forward No Answer
To turn on this feature for Forward Busy:
Check the Set option box.
Enter the number in the Forward To text box; for example, 7000.
This completes the tour of the GUI screens used for provisioning users. To gain a better understanding about using these fields, you need to look deeper into the system design. A large portion of this information is offered in the latter half of the book.
Get Practical VoIP Using VOCAL now with the O’Reilly learning platform.
O’Reilly members experience books, live events, courses curated by job role, and more from O’Reilly and nearly 200 top publishers.

