Since the first day mod_perl was available, users have adopted various techniques that make the best of mod_perl by deploying it in combination with other modules and tools. This chapter presents the theory behind these useful techniques, their pros and cons, and of course detailed installation and configuration notes so you can easily reproduce the presented setups.
This chapter will explore various ways to use mod_perl, running it in parallel with other web servers as well as coexisting with proxy servers.
There are several different ways to build, configure, and deploy your mod_perl-enabled server. Some of them are:
One big binary (for mod_perl) and one configuration file.
Two binaries (one big one for mod_perl and one small one for static objects, such as images) and two configuration files.
One DSO-style Apache binary and two configuration files. The first configuration file is used for the plain Apache server (equivalent to a static build of Apache); the second configuration file is used for the heavy mod_perl server, by loading the mod_perl DSO loadable object using the same binary.
Any of the above plus a reverse proxy server in httpd accelerator mode.
If you are new to mod_perl and just want to set up your development server quickly, we recommend that you start with the first option and work on getting your feet wet with Apache and mod_perl. Later, you can decide whether to move to the second option, which allows better tuning at the expense of more complicated administration, to the third option (the more state-of-the-art DSO system), or to the fourth option, which gives you even more power and flexibility. Here are some of the things to consider.
The first option will kill your production site if you serve a lot of static data from large (4-15 MB) web server processes. On the other hand, while testing you will have no other server interaction to mask or add to your errors.
The second option allows you to tune the two servers individually, for maximum performance. However, you need to choose whether to run the two servers on multiple ports, multiple IPs, etc., and you have the burden of administering more than one server. You also have to deal with proxying or complicated links to keep the two servers synchronized.
With DSO, modules can be added and removed without recompiling the server, and their code is even shared among multiple servers.
You can compile just once and yet have more than one binary, by using different configuration files to load different sets of modules. The different Apache servers loaded in this way can run simultaneously to give a setup such as that described in the second option above.
The downside is that you are dealing with a solution that has weak documentation, is still subject to change, and, even worse, might cause some subtle bugs. It is still somewhat platform-specific, and your mileage may vary.
Also, the DSO module (mod_so) adds size and complexity to your binaries.
The fourth option (proxy in httpd accelerator mode), once correctly configured and tuned, improves the performance of any of the above three options by caching and buffering page results. This should be used once you have mastered the second or third option, and is generally the preferred way to deploy a mod_perl server in a production environment.
If you are going to run two web servers, you have the following options:
- Two machines
Serve the static content from one machine and the dynamic content from another. You will have to adjust all the links in the generated HTML pages: you cannot use relative references (e.g., /images/foo.gif) for static objects when the page is generated by the dynamic-content machine, and conversely you can’t use relative references to dynamic objects in pages served by the static server. In these cases, fully qualified URIs are required.
Later we will explore a frontend/backend strategy that solves this problem.
The drawback is that you must maintain two machines, and this can get expensive. Still, for extremely large projects, this is the best way to go. When the load is high, it can be distributed across more than two machines.
- One machine and two IP addresses
If you have only one machine but two IP addresses, you may tell each server to bind to a different IP address, with the help of the
BindAddressdirective in httpd.conf. You still have the problem of relative links here (solutions to which will be presented later in this chapter). As we will show later, you can use the 127.0.0.1 address for the backend server if the backend connections are proxied through the frontend.- One machine, one IP address, and two ports
Finally, the most widely used approach uses only one machine and one NIC, but binds the two servers to two different ports. Usually the static server listens on the default port 80, and the dynamic server listens on some other, nonstandard port.
Even here the problem of relative links is still relevant, since while the same IP address is used, the port designators are different, which prevents you from using relative links for both contents. For example, a URL to the static server could be http://www.example.com/images/nav.png, while the dynamic page might reside at http://www.example.com:8000/perl/script.pl. Once again, the solutions are around the corner.
The first and simplest scenario uses a straightforward, standalone, mod_perl-enabled Apache server, as shown in Figure 12-1. Just take your plain Apache server and add mod_perl, like you would add any other Apache module. Continue to run it at the port it was using before. You probably want to try this before you proceed to more sophisticated and complex techniques. This is the standard installation procedure we described in Chapter 3.
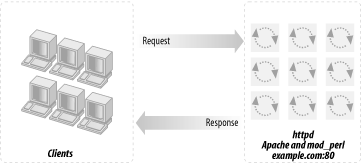
A standalone server gives you the following advantages:
- Simplicity
You just follow the installation instructions, configure it, restart the server, and you are done.
- No network changes
You do not have to worry about using additional ports, as we will see later.
- Speed
You get a very fast server for dynamic content, and you see an enormous speedup compared to mod_cgi, from the first moment you start to use it.
The disadvantages of a standalone server are as follows:
The process size of a mod_perl-enabled Apache server might be huge (maybe 4 MB at startup and growing to 10 MB or more, depending on how you use it) compared to a typical plain Apache server (about 500 KB). Of course, if memory sharing is in place, RAM requirements will be smaller.
You probably have a few dozen child processes. The additional memory requirements add up in direct relation to the number of child processes. Your memory demands will grow by an order of magnitude, but this is the price you pay for the additional performance boost of mod_perl. With memory being relatively inexpensive nowadays, the additional cost is low—especially when you consider the dramatic performance boost mod_perl gives to your services with every 100 MB of RAM you add.
While you will be happy to have these monster processes serving your scripts with monster speed, you should be very worried about having them serve static objects such as images and HTML files. Each static request served by a mod_perl-enabled server means another large process running, competing for system resources such as memory and CPU cycles. The real overhead depends on the static object request rate. Remember that if your mod_perl code produces HTML code that includes images, each of these will produce another static object request. Having another plain web server to serve the static objects solves this unpleasant problem. Having a proxy server as a frontend, caching the static objects and freeing the mod_perl processes from this burden, is another solution. We will discuss both later.
Another drawback of this approach is that when serving output to a client with a slow connection, the huge mod_perl-enabled server process (with all of its system resources) will be tied up until the response is completely written to the client. While it might take a few milliseconds for your script to complete the request, there is a chance it will still be busy for a number of seconds or even minutes if the request is from a client with a slow connection. As with the previous drawback, a proxy solution can solve this problem. We’ll discuss proxies more later.
Proxying dynamic content is not going to help much if all the clients are on a fast local net (for example, if you are administering an Intranet). On the contrary, it can decrease performance. Still, remember that some of your Intranet users might work from home through slow modem links.
If you are new to mod_perl, this is probably the best way to get yourself started.
And of course, if your site is serving only mod_perl scripts (and close to zero static objects), this might be the perfect choice for you!
Before trying the more advanced setup techniques we are going to talk about now, it’s probably a good idea to review the simpler straightforward installation and configuration techniques covered in Chapter 3 and Chapter 4. These will get you started with the standard deployment discussed here.
As mentioned earlier, when running scripts under mod_perl you will notice that the httpd processes consume a huge amount of virtual memory—from 5 MB-15 MB, and sometimes even more. That is the price you pay for the enormous speed improvements under mod_perl, mainly because the code is compiled once and needs to be cached for later reuse. But in fact less memory is used if memory sharing takes place. Chapter 14 covers this issue extensively.
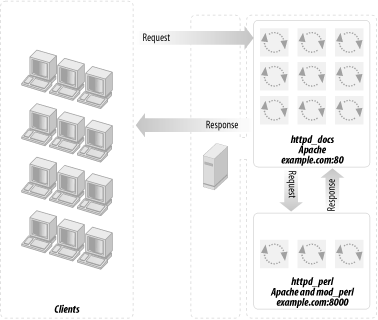
Using these large processes to serve static objects such as images and HTML documents is overkill. A better approach is to run two servers: a very light, plain Apache server to serve static objects and a heavier, mod_perl-enabled Apache server to serve requests for dynamically generated objects. From here on, we will refer to these two servers as httpd_docs (vanilla Apache) and httpd_perl (mod_perl-enabled Apache). This approach is depicted in Figure 12-2.
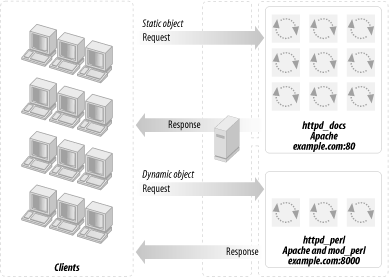
The advantages of this setup are:
The heavy mod_perl processes serve only dynamic requests, so fewer of these large servers are deployed.
MaxClients,MaxRequestsPerChild, and related parameters can now be optimally tuned for both the httpd_docs and httpd_perl servers (something we could not do before). This allows us to fine-tune the memory usage and get better server performance.Now we can run many lightweight httpd_docs servers and just a few heavy httpd_perl servers.
The disadvantages are:
The need for two configuration files, two sets of controlling scripts (startup/shutdown), and watchdogs.
If you are processing log files, you will probably have to merge the two separate log files into one before processing them.
Just as in the one-server approach, we still have the problem of a mod_perl process spending its precious time serving slow clients when the processing portion of the request was completed a long time ago. (Deploying a proxy, covered in the next section, solves this problem.)
As with the single-server approach, this is not a major disadvantage if you are on a fast network (i.e., an Intranet). It is likely that you do not want a buffering server in this case.
Note that when a user browses static pages and the base URL in the
browser’s location window points to the static
server (for example
http://www.example.com/index.html), all relative
URLs (e.g., <a href="/main/download.html">)
are being served by the plain Apache server. But this is not the case
with dynamically generated pages. For example, when the base URL in
the location window points to the dynamic server (e.g.,
http://www.example.com:8000/perl/index.pl), all
relative URLs in the dynamically generated HTML will be served by
heavy mod_perl processes.
You must use
fully qualified URLs, not relative
ones. http://www.example.com/icons/arrow.gif is
a full URL, while /icons/arrow.gif is a relative
one. Using <base
href="http://www.example.com/"> in the
generated HTML is another way to handle this problem. Also, the
httpd_perl server could rewrite the requests
back to httpd_docs (much slower) and you still
need the attention of the heavy servers.
This is not an issue if you hide the internal port implementations, so the client sees only one server running on port 80, as explained later in this chapter.
If you’re going to run two Apache servers, you’ll need two complete (and different) sets of configuration, log, and other files. In this scenario we’ll use a dedicated root directory for each server, which is a personal choice. You can choose to have both servers living under the same root, but this may cause problems since it requires a slightly more complicated configuration. This decision would allow you to share some directories, such as include (which contains Apache headers), but this can become a problem later, if you decide to upgrade one server but not the other. You will have to solve the problem then, so why not avoid it in the first place?
First let’s prepare the sources. We will assume that all the sources go into the /home/stas/src directory. Since you will probably want to tune each copy of Apache separately, it is better to use two separate copies of the Apache source for this configuration. For example, you might want only the httpd_docs server to be built with the mod_rewrite module.
Having two independent source trees will prove helpful unless you use dynamically shared objects (covered later in this chapter).
Make two subdirectories:
panic% mkdir /home/stas/src/httpd_docs
panic% mkdir /home/stas/src/httpd_perl
Next, put the Apache source into the /home/stas/src/httpd_docs directory (replace 1.3.x with the version of Apache that you have downloaded):
panic% cd /home/stas/src/httpd_docs
panic% tar xvzf ~/src/apache_1.3.x.tar.gz
Now prepare the httpd_perl server sources:
panic% cd /home/stas/src/httpd_perl
panic% tar xvzf ~/src/apache_1.3.x.tar.gz
panic% tar xvzf ~/src/modperl-1.xx.tar.gz

panic% ls -l
drwxr-xr-x  8 stas  stas 2048 Apr 29 17:38 apache_1.3.x/
drwxr-xr-x  8 stas  stas 2048 Apr 29 17:38 modperl-1.xx/
We are going to use a default Apache directory layout and place each server directory under its dedicated directory. The two directories are:
/home/httpd/httpd_perl/
/home/httpd/httpd_docs/
We are using the user httpd, belonging to the group httpd, for the web server. If you don’t have this user and group created yet, add them and make sure you have the correct permissions to be able to work in the /home/httpd directory.
Now we proceed to configure and compile the sources using the directory layout we have just described.
The first step is to configure the source:
panic% cd /home/stas/src/httpd_docs/apache_1.3.x
panic%  ./configure --prefix=/home/httpd/httpd_docs \
    --enable-module=rewrite --enable-module=proxy
We need the mod_rewrite and mod_proxy modules, as we will see later, so we tell ./configure to build them in.
You might also want to add —layout, to see the resulting directories’ layout without actually running the configuration process.
Next, compile and install the source:
panic% make
panic# make install
Rename httpd to httpd_docs:
panic% mv /home/httpd/httpd_docs/bin/httpd \
    /home/httpd/httpd_docs/bin/httpd_docs
Now modify the apachectl utility to point to the renamed httpd via your favorite text editor or by using Perl:
panic% perl -pi -e 's|bin/httpd|bin/httpd_docs|' \
    /home/httpd/httpd_docs/bin/apachectl
Another approach would be to use the —target option while configuring the source, which makes the last two commands unnecessary.
panic% ./configure --prefix=/home/httpd/httpd_docs \
    --target=httpd_docs \
    --enable-module=rewrite --enable-module=proxy
panic% make
panic# make install
Since we told ./configure that we want the executable to be called httpd_docs (via —target=httpd_docs), it performs all the naming adjustments for us.
The only thing that you might find unusual is that apachectl will now be called httpd_docsctl and the configuration file httpd.conf will now be called httpd_docs.conf.
We will leave the decision making about the preferred configuration and installation method to the reader. In the rest of this guide we will continue using the regular names that result from using the standard configuration and the manual executable name adjustment, as described at the beginning of this section.
Now we proceed with the source configuration and installation of the httpd_perl server.
panic% cd /home/stas/src/httpd_perl/mod_perl-1.xx

panic% perl Makefile.PL \
    APACHE_SRC=../apache_1.3.x/src \
    DO_HTTPD=1 USE_APACI=1 EVERYTHING=1 \
    APACHE_PREFIX=/home/httpd/httpd_perl \
    APACI_ARGS='--prefix=/home/httpd/httpd_perl'
If you need to pass any other configuration options to Apache’s ./configure, add them after the —prefix option. For example:
APACI_ARGS='--prefix=/home/httpd/httpd_perl \
            --enable-module=status'
Notice that just like in the httpd_docs
configuration, you can use
—target=httpd_perl. Note that this option
has to be the very last argument in APACI_ARGS;
otherwise make test tries to run
httpd_perl, which fails.
Now build, test, and install httpd_perl.
panic% make && make test
panic# make install
Upon installation, Apache puts a stripped version of httpd at /home/httpd/httpd_perl/bin/httpd. The original version, which includes debugging symbols (if you need to run a debugger on this executable), is located at /home/stas/src/httpd_perl/apache_1.3.x/src/httpd.
Now rename httpd to httpd_perl:
panic% mv /home/httpd/httpd_perl/bin/httpd \
    /home/httpd/httpd_perl/bin/httpd_perl
and update the apachectl utility to drive the renamed httpd:
panic% perl -p -i -e 's|bin/httpd|bin/httpd_perl|' \
/home/httpd/httpd_perl/bin/apachectlWhen we have completed the build process, the last stage before running the servers is to configure them.
Configuring the httpd_docs server is a very easy task. Open /home/httpd/httpd_docs/conf/httpd.conf in your favorite text editor and configure it as you usually would.
Now you can start the server with:
/home/httpd/httpd_docs/bin/apachectl start
Now we
edit the /home/httpd/httpd_perl/conf/httpd.conf
file. The first thing to do is to set a Port
directive—it should be different from that used by the plain
Apache server (Port 80), since we cannot bind two
servers to the same port number on the same IP address. Here we will
use 8000. Some developers use port 81, but you can bind to ports
below 1024 only if the server has root
permissions. Also, if you are running on a multiuser machine, there
is a chance that someone already uses that port, or will start using
it in the future, which could cause problems. If you are the only
user on your machine, you can pick any unused port number, but be
aware that many organizations use firewalls that may block some of
the ports, so port number choice can be a controversial topic.
Popular port numbers include 80, 81, 8000, and 8080. In a two-server
scenario, you can hide the nonstandard port number from firewalls and
users by using either mod_proxy’s
ProxyPass directive or a proxy server such as
Squid.
Now we proceed to the mod_perl-specific directives. It’s a good idea to add them all at the end of httpd.conf, since you are going to fiddle with them a lot in the early stages.
First, you need to specify where all the mod_perl scripts will be located. Add the following configuration directive:
# mod_perl scripts will be called from
Alias /perl /home/httpd/httpd_perl/perl
From now on, all requests for URIs starting with /perl will be executed under mod_perl and will be mapped to the files in the directory /home/httpd/httpd_perl/perl.
Now configure the /perl location:
PerlModule Apache::Registry

<Location /perl>
    #AllowOverride None
    SetHandler perl-script
    PerlHandler Apache::Registry
    Options ExecCGI
    PerlSendHeader On
    Allow from all
</Location>
This configuration causes any script that is called with a path
prefixed with /perl to be executed under the
Apache::Registry module and as a CGI script (hence
the ExecCGI—if you omit this option, the
script will be printed to the user’s browser as
plain text or will possibly trigger a “Save
As” window).
This is only a very basic configuration. Chapter 4 covers the rest of the details.
Once the configuration is complete, it’s a time to start the server with:
/home/httpd/httpd_perl/bin/apachectl start
If the only requirement from the light server is for it to serve static objects, you can get away with non-Apache servers, which have an even smaller memory footprint and even better speed. Most of these servers don’t have the configurability and flexibility provided by the Apache web server, but if those aren’t required, you might consider using one of these alternatives as a server for static objects. To accomplish this, simply replace the Apache web server that was serving the static objects with another server of your choice.
Among the small memory-footprint and fast-speed servers, thttpd is one of the best choices. It runs as a multithreaded single process and consumes about 250K of memory. You can find more information about this server at http://www.acme.com/software/thttpd/. This site also includes a very interesting web server performance comparison chart (http://www.acme.com/software/thttpd/benchmarks.html).
Another good choice is the kHTTPd web server for Linux. kHTTPd is different from other web servers in that it runs from within the Linux kernel as a module (device-driver). kHTTPd handles only static (file-based) web pages; it passes all requests for non-static information to a regular user space web server such as Apache. For more information, see http://www.fenrus.demon.nl/.
Boa is yet another very fast web server, whose primary design goals are speed and security. According to http://www.boa.org/, Boa is capable of handling several thousand hits per second on a 300-MHz Pentium and dozens of hits per second on a lowly 20-MHz 386/SX.
We have already presented a solution with two servers: one plain Apache server, which is very light and configured to serve static objects, and the other with mod_perl enabled (very heavy) and configured to serve mod_perl scripts and handlers. We named them httpd_docs and httpd_perl, respectively.
In the dual-server setup presented earlier, the two servers coexist at the same IP address by listening to different ports: httpd_docs listens to port 80 (e.g., http://www.example.com/images/test.gif) and httpd_perl listens to port 8000 (e.g., http://www.example.com:8000/perl/test.pl). Note that we did not write http://www.example.com:80 for the first example, since port 80 is the default port for the HTTP service. Later on, we will change the configuration of the httpd_docs server to make it listen to port 81.
This section will attempt to convince you that you should really deploy a proxy server in httpd accelerator mode. This is a special mode that, in addition to providing the normal caching mechanism, accelerates your CGI and mod_perl scripts by taking the responsibility of pushing the produced content to the client, thereby freeing your mod_perl processes. Figure 12-3 shows a configuration that uses a proxy server, a standalone Apache server, and a mod_perl-enabled Apache server.
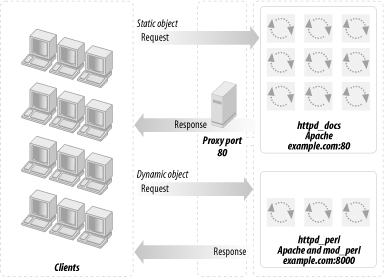
The advantages of using the proxy server in conjunction with mod_perl are:
You get all the benefits of the usual use of a proxy server that serves static objects from the proxy’s cache. You get less I/O activity reading static objects from the disk (the proxy serves the most “popular” objects from RAM—of course you benefit more if you allow the proxy server to consume more RAM), and since you do not wait for the I/O to be completed, you can serve static objects much faster.
You get the extra functionality provided by httpd accelerator mode, which makes the proxy server act as a sort of output buffer for the dynamic content. The mod_perl server sends the entire response to the proxy and is then free to deal with other requests. The proxy server is responsible for sending the response to the browser. This means that if the transfer is over a slow link, the mod_perl server is not waiting around for the data to move.
This technique allows you to hide the details of the server’s implementation. Users will never see ports in the URLs (more on that topic later). You can have a few boxes serving the requests and only one serving as a frontend, which spreads the jobs between the servers in a way that you can control. You can actually shut down a server without the user even noticing, because the frontend server will dispatch the jobs to other servers. This is called load balancing—it’s too big an issue to cover here, but there is plenty of information available on the Internet (refer to Section 12.16 at the end of this chapter).
For security reasons, using an httpd accelerator (or a proxy in httpd accelerator mode) is essential because it protects your internal server from being directly attacked by arbitrary packets. The httpd accelerator and internal server communicate only expected HTTP requests, and usually only specific URI namespaces get proxied. For example, you can ensure that only URIs starting with /perl/ will be proxied to the backend server. Assuming that there are no vulnerabilities that can be triggered via some resource under /perl, this means that only your public “bastion” accelerating web server can get hosed in a successful attack—your backend server will be left intact. Of course, don’t consider your web server to be impenetrable because it’s accessible only through the proxy. Proxying it reduces the number of ways a cracker can get to your backend server; it doesn’t eliminate them all.
Your server will be effectively impenetrable if it listens only on ports on your localhost (127.0.0.1), which makes it impossible to connect to your backend machine from the outside. But you don’t need to connect from the outside anymore, as you will see when you proceed to this technique’s implementation notes.
In addition, if you use some sort of access control, authentication, and authorization at the frontend server, it’s easy to forget that users can still access the backend server directly, bypassing the frontend protection. By making the backend server directly inaccessible you prevent this possibility.
Of course, there are drawbacks. Luckily, these are not functionality drawbacks—they are more administration hassles. The disadvantages are:
You have another daemon to worry about, and while proxies are generally stable, you have to make sure to prepare proper startup and shutdown scripts, which are run at boot and reboot as appropriate. This is something that you do once and never come back to again. Also, you might want to set up the crontab to run a watchdog script that will make sure that the proxy server is running and restart it if it detects a problem, reporting the problem to the administrator on the way. Chapter 5 explains how to develop and run such watchdogs.
Proxy servers can be configured to be light or heavy. The administrator must decide what gives the highest performance for his application. A proxy server such as Squid is light in the sense of having only one process serving all requests, but it can consume a lot of memory when it loads objects into memory for faster service.
If you use the default logging mechanism for all requests on the front- and backend servers, the requests that will be proxied to the backend server will be logged twice, which makes it tricky to merge the two log files, should you want to. Therefore, if all accesses to the backend server are done via the frontend server, it’s the best to turn off logging of the backend server.
If the backend server is also accessed directly, bypassing the frontend server, you want to log only the requests that don’t go through the frontend server. One way to tell whether a request was proxied or not is to use mod_proxy_add_forward, presented later in this chapter, which sets the HTTP header
X-Forwarded-Forfor all proxied requests. So if the default logging is turned off, you can add a customPerlLogHandlerthat logs only requests made directly to the backend server.If you still decide to log proxied requests at the backend server, they might not contain all the information you need, since instead of the real remote IP of the user, you will always get the IP of the frontend server. Again, mod_proxy_add_forward, presented later, provides a solution to this problem.
Let’s look at a real-world scenario that shows the importance of the proxy httpd accelerator mode for mod_perl.
First let’s explain an abbreviation used in the networking world. If someone claims to have a 56-kbps connection, it means that the connection is made at 56 kilobits per second (~56,000 bits/sec). It’s not 56 kilobytes per second, but 7 kilobytes per second, because 1 byte equals 8 bits. So don’t let the merchants fool you—your modem gives you a 7 kilobytes-per-second connection at most, not 56 kilobytes per second, as one might think.
Another convention used in computer literature is that 10 Kb usually means 10 kilo-bits and 10 KB means 10 kilobytes. An uppercase B generally refers to bytes, and a lowercase b refers to bits (K of course means kilo and equals 1,024 or 1,000, depending on the field in which it’s used). Remember that the latter convention is not followed everywhere, so use this knowledge with care.
In the typical scenario (as of this writing), users connect to your site with 56-kbps modems. This means that the speed of the user’s network link is 56/8 = 7 KB per second. Let’s assume an average generated HTML page to be of 42 KB and an average mod_perl script to generate this response in 0.5 seconds. How many responses could this script produce during the time it took for the output to be delivered to the user? A simple calculation reveals pretty scary numbers:
(42KB)/(0.5sx7KB/s) = 12
Twelve other dynamic requests could be served at the same time, if we could let mod_perl do only what it’s best at: generating responses.
This very simple example shows us that we need only one-twelfth the number of children running, which means that we will need only one-twelfth of the memory.
But you know that nowadays scripts often return pages that are blown up with JavaScript and other code, which can easily make them 100 KB in size. Can you calculate what the download time for a file that size would be?
Furthermore, many users like to open multiple browser windows and do several things at once (e.g., download files and browse graphically heavy sites). So the speed of 7 KB/sec we assumed before may in reality be 5-10 times slower. This is not good for your server.
Considering the last example and taking into account all the other advantages that the proxy server provides, we hope that you are convinced that despite a small administration overhead, using a proxy is a good thing.
Of course, if you are on a very fast local area network (LAN) (which means that all your users are connected from this network and not from the outside), the big benefit of the proxy buffering the output and feeding a slow client is gone. You are probably better off sticking with a straight mod_perl server in this case.
Two proxy implementations are known to be widely used with mod_perl: the Squid proxy server and the mod_proxy Apache module. We’ll discuss these in the next sections.
To give you an idea of what Squid is, we will reproduce the following bullets from Squid’s home page (http://www.squid-cache.org/):
Squid is...
A full-featured web proxy cache
Designed to run on Unix systems
Free, open source software
The result of many contributions by unpaid volunteers
Funded by the National Science Foundation
Squid supports...
Proxying and caching of HTTP, FTP, and other URLs
Proxying for SSL
Cache hierarchies
ICP, HTCP, CARP, and Cache Digests
Transparent caching
WCCP (Squid v2.3)
Extensive access controls
httpd server acceleration
SNMP
Caching of DNS lookups
The advantages of using Squid are:
Caching of static objects. These are served much faster, assuming that your cache size is big enough to keep the most frequently requested objects in the cache.
Buffering of dynamic content. This takes the burden of returning the content generated by mod_perl servers to slow clients, thus freeing mod_perl servers from waiting for the slow clients to download the data. Freed servers immediately switch to serve other requests; thus, your number of required servers goes down dramatically.
Nonlinear URL space/server setup. You can use Squid to play some tricks with the URL space and/or domain-based virtual server support.
The disadvantages are:
Buffering limit. By default, Squid buffers in only 16 KB chunks, so it will not allow mod_perl to complete immediately if the output is larger. (
READ_AHEAD_GAP, which is 16 KB by default, can be enlarged in defines.h if your OS allows that.)Speed. Squid is not very fast when compared with the plain file-based web servers available today. Only if you are using a lot of dynamic features, such as with mod_perl, is there a reason to use Squid, and then only if the application and the server are designed with caching in mind.
Memory usage. Squid uses quite a bit of memory. It can grow three times bigger than the limit provided in the configuration file.
HTTP protocol level. Squid is pretty much an HTTP/1.0 server, which seriously limits the deployment of HTTP/1.1 features, such as
KeepAlives.HTTP headers, dates, and freshness. The Squid server might give out stale pages, confusing downstream/client caches. This might happen when you update some documents on the site—Squid will continue serve the old ones until you explicitly tell it which documents are to be reloaded from disk.
Stability. Compared to plain web servers, Squid is not the most stable.
The pros and cons presented above indicate that you might want to use Squid for its dynamic content-buffering features, but only if your server serves mostly dynamic requests. So in this situation, when performance is the goal, it is better to have a plain Apache server serving static objects and Squid proxying only the mod_perl-enabled server. This means that you will have a triple server setup, with frontend Squid proxying the backend light Apache server and the backend heavy mod_perl server.
You will find the installation details for the Squid server on the Squid web site (http://www.squid-cache.org/). In our case it was preinstalled with Mandrake Linux. Once you have Squid installed, you just need to modify the default squid.conf file (which on our system was located at /etc/squid/squid.conf), as we will explain now, and you’ll be ready to run it.
Before working on Squid’s configuration, let’s take a look at what we are already running and what we want from Squid.
Previously we had the httpd_docs and httpd_perl servers listening on ports 80 and 8000, respectively. Now we want Squid to listen on port 80 to forward requests for static objects (plain HTML pages, images, and so on) to the port to which the httpd_docs server listens, and dynamic requests to httpd_perl’s port. We also want Squid to collect the generated responses and deliver them to the client. As mentioned before, this is known as httpd accelerator mode in proxy dialect.
We have to reconfigure the httpd_docs server to listen to port 81 instead, since port 80 will be taken by Squid. Remember that in our scenario both copies of Apache will reside on the same machine as Squid. The server configuration is illustrated in Figure 12-4.

A proxy server makes all the magic behind it transparent to users. Both Apache servers return the data to Squid (unless it was already cached by Squid). The client never sees the actual ports and never knows that there might be more than one server running. Do not confuse this scenario with mod_rewrite, where a server redirects the request somewhere according to the rewrite rules and forgets all about it (i.e., works as a one-way dispatcher, responsible for dispatching the jobs but not for collecting the results).
Squid can be used as a straightforward proxy server. ISPs and big
companies generally use it to cut down the incoming traffic by
caching the most popular requests. However, we want to run it in
httpd accelerator mode. Two configuration
directives, httpd_accel_host and
httpd_accel_port, enable this mode. We will see
more details shortly.
If you are currently using Squid in the regular proxy mode, you can extend its functionality by running both modes concurrently. To accomplish this, you can extend the existing Squid configuration with httpd accelerator mode’s related directives or you can just create a new configuration from scratch.
Let’s go through the changes we should make to the default configuration file. Since the file with default settings (/etc/squid/squid.conf ) is huge (about 60 KB) and we will not alter 95% of its default settings, our suggestion is to write a new configuration file that includes the modified directives.[1]
First we want to enable the redirect feature, so we can serve
requests using more than one server (in our case we have two: the
httpd_docs and httpd_perl
servers). So we specify httpd_accel_host as
virtual. (This assumes that your server has
multiple interfaces—Squid will bind to all of them.)
httpd_accel_host virtual
Then we define the default port to which the requests will be sent, unless they’re redirected. We assume that most requests will be for static documents (also, it’s easier to define redirect rules for the mod_perl server because of the URI that starts with /perl or similar). We have our httpd_docs listening on port 81:
httpd_accel_port 81
And Squid listens to port 80:
http_port 80
We do not use icp (icp is used
for cache sharing between neighboring machines, which is more
relevant in the proxy mode):
icp_port 0
hierarchy_stoplist defines a list of words that,
if found in a URL, cause the object to be handled directly by the
cache. Since we told Squid in the previous directive that we
aren’t going to share the cache between neighboring
machines, this directive is irrelevant. In case you do use this
feature, make sure to set this directive to something like:
hierarchy_stoplist /cgi-bin /perl
where /cgi-bin and /perl are aliases for the locations that handle the dynamic requests.
Now we tell Squid not to cache dynamically generated pages:
acl QUERY urlpath_regex /cgi-bin /perl
no_cache deny QUERY
Please note that the last two directives are controversial ones. If
you want your scripts to be more compliant with the HTTP standards,
according to the HTTP specification, the headers of your scripts
should carry the caching directives: Last-Modified
and Expires.
What are they for? If you set the headers correctly, there is no need to tell the Squid accelerator not to try to cache anything. Squid will not bother your mod_perl servers a second time if a request is (a) cacheable and (b) still in the cache. Many mod_perl applications will produce identical results on identical requests if not much time has elapsed between the requests. So your Squid proxy might have a hit ratio of 50%, which means that the mod_perl servers will have only half as much work to do as they did before you installed Squid (or mod_proxy).
But this is possible only if you set the headers correctly. Refer to Chapter 16 to learn more about generating the proper caching headers under mod_perl. In the case where only the scripts under /perl/caching-unfriendly are not caching-friendly, fix the above setting to be:
acl QUERY urlpath_regex /cgi-bin /perl/caching-unfriendly
no_cache deny QUERY
If you are lazy, or just have too many things to deal with, you can leave the above directives the way we described. Just keep in mind that one day you will want to reread this section to squeeze even more power from your servers without investing money in more memory and better hardware.
While testing, you might want to enable the debugging options and watch the log files in the directory /var/log/squid/. But make sure to turn debugging off in your production server. Below we show it commented out, which makes it disabled, since it’s disabled by default. Debug option 28 enables the debugging of the access-control routes; for other debug codes, see the documentation embedded in the default configuration file that comes with Squid.
# debug_options 28
We need to provide a way for Squid to dispatch requests to the correct servers. Static object requests should be redirected to httpd_docs unless they are already cached, while requests for dynamic documents should go to the httpd_perl server. The configuration:
redirect_program /usr/lib/squid/redirect.pl
redirect_children 10
redirect_rewrites_host_header off
tells Squid to fire off 10 redirect daemons at the specified path of
the redirect daemon and (as suggested by Squid’s
documentation) disables rewriting of any Host:
headers in redirected requests. The redirection daemon script is
shown later, in Example 12-1.
The maximum allowed request size is in kilobytes, which is mainly
useful during PUT and POST
requests. A user who attempts to send a request with a body larger
than this limit receives an “Invalid
Request” error message. If you set this parameter to
0, there will be no limit imposed. If you are
using POST to upload files, then set this to the
largest file’s size plus a few extra kilobytes:
request_body_max_size 1000 KB
Then we have access permissions, which we will not explain here. You might want to read the documentation, so as to avoid any security problems.
acl all src 0.0.0.0/0.0.0.0
acl manager proto cache_object
acl localhost src 127.0.0.1/255.255.255.255
acl myserver src 127.0.0.1/255.255.255.255
acl SSL_ports port 443 563
acl Safe_ports port 80 81 8080 81 443 563
acl CONNECT method CONNECT

http_access allow manager localhost
http_access allow manager myserver
http_access deny manager
http_access deny !Safe_ports
http_access deny CONNECT !SSL_ports
# http_access allow all
Since Squid should be run as a non-root user, you need these settings:
cache_effective_user squid
cache_effective_group squid
if you are invoking Squid as root. The user squid is usually created when the Squid server is installed.
Now configure a memory size to be used for caching:
cache_mem 20 MB
The Squid documentation warns that the actual size of Squid can grow to be three times larger than the value you set.
You should also keep pools of allocated (but unused) memory available for future use:
memory_pools on
(if you have the memory available, of course—otherwise, turn it off).
Now tighten the runtime permissions of the cache manager CGI script (cachemgr.cgi, which comes bundled with Squid) on your production server:
cachemgr_passwd disable shutdown
If you are not using this script to manage the Squid server remotely, you should disable it:
cachemgr_passwd disable all
Put the redirection daemon script at the location you specified in
the redirect_program parameter in the
configuration file, and make it executable by the web server (see
Example 12-1).
Example 12-1. redirect.pl
#!/usr/bin/perl -p
BEGIN { $|=1 }
s|www.example.com(?::81)?/perl/|www.example.com:8000/perl/|;
The regular expression in this script matches all the URIs that
include either the string
“www.example.com/perl/” or the
string “www.example.com:81/perl/”
and replaces either of these strings with
“www.example.com:8080/perl”. No
matter whether the regular expression worked or not, the
$_ variable is automatically printed, thanks to
the -p switch.
You must disable buffering in the redirector script.
$|=1; does the job. If you do not disable
buffering, STDOUT will be flushed only when its
buffer becomes full—and its default size is about 4,096
characters. So if you have an average URL of 70 characters, only
after about 59 (4,096/70) requests will the buffer be flushed and
will the requests finally reach the server. Your users will not wait
that long (unless you have hundreds of requests per second, in which
case the buffer will be flushed very frequently because
it’ll get full very fast).
If you think that this is a very ineffective way to redirect, you should consider the following explanation. The redirector runs as a daemon; it fires up N redirect daemons, so there is no problem with Perl interpreter loading. As with mod_perl, the Perl interpreter is always present in memory and the code has already been compiled, so the redirect is very fast (not much slower than if the redirector was written in C). Squid keeps an open pipe to each redirect daemon; thus, the system calls have no overhead.
Now it is time to restart the server:
/etc/rc.d/init.d/squid restart
Now the Squid server setup is complete.
If on your setup you discover that port 81 is showing up in the URLs of the static objects, the solution is to make both the Squid and httpd_docs servers listen to the same port. This can be accomplished by binding each one to a specific interface (so they are listening to different sockets). Modify httpd_docs/conf/httpd.conf as follows:
Port 80
BindAddress 127.0.0.1
Listen 127.0.0.1:80
Now the httpd_docs server is listening only to requests coming from the local server. You cannot access it directly from the outside. Squid becomes a gateway that all the packets go through on the way to the httpd_docs server.
Modify squid.conf as follows:
http_port example.com:80
tcp_outgoing_address 127.0.0.1
httpd_accel_host 127.0.0.1
httpd_accel_port 80
It’s important that http_port specifies the external hostname, which doesn’t map to 127.0.0.1, because otherwise the httpd_docs and Squid server cannot listen to the same port on the same address.
Now restart the Squid and httpd_docs servers (it doesn’t matter which one you start first), and voilà—the port number is gone.
You must also have the following entry in the file /etc/hosts (chances are that it’s already there):
127.0.0.1 localhost.localdomain localhost
Now if your scripts are generating HTML including fully qualified self references, using 8000 or the other port, you should fix them to generate links to point to port 80 (which means not using the port at all in the URI). If you do not do this, users will bypass Squid and will make direct requests to the mod_perl server’s port. As we will see later, just like with httpd_docs, the httpd_perl server can be configured to listen only to requests coming from localhost (with Squid forwarding these requests from the outside). Then users will not be able to bypass Squid.
The whole modified squid.conf file is shown in Example 12-2.
Example 12-2. squid.conf
http_port example.com:80
tcp_outgoing_address 127.0.0.1
httpd_accel_host 127.0.0.1
httpd_accel_port 80

icp_port 0

acl QUERY urlpath_regex /cgi-bin /perl
no_cache deny QUERY

# debug_options 28

redirect_program /usr/lib/squid/redirect.pl
redirect_children 10
redirect_rewrites_host_header off

request_body_max_size 1000 KB

acl all src 0.0.0.0/0.0.0.0
acl manager proto cache_object
acl localhost src 127.0.0.1/255.255.255.255
acl myserver src 127.0.0.1/255.255.255.255
acl SSL_ports port 443 563
acl Safe_ports port 80 81 8080 8081 443 563
acl CONNECT method CONNECT

http_access allow manager localhost
http_access allow manager myserver
http_access deny manager
http_access deny !Safe_ports
http_access deny CONNECT !SSL_ports
# http_access allow all

cache_effective_user squid
cache_effective_group squid

cache_mem 20 MB

memory_pools on

cachemgr_passwd disable shutdown
When one of the authors was first told about Squid, he thought: “Hey, now I can drop the httpd_docs server and have just Squid and the httpd_perl servers. Since all static objects will be cached by Squid, there is no more need for the light httpd_docs server.”
But he was a wrong. Why? Because there is still the overhead of loading the objects into the Squid cache the first time. If a site has many static objects, unless a huge chunk of memory is devoted to Squid, they won’t all be cached, and the heavy mod_perl server will still have the task of serving these objects.
How do we measure the overhead? The difference between the two servers is in memory consumption; everything else (e.g., I/O) should be equal. So you have to estimate the time needed to fetch each static object for the first time at a peak period, and thus the number of additional servers you need for serving the static objects. This will allow you to calculate the additional memory requirements. This amount can be significant in some installations.
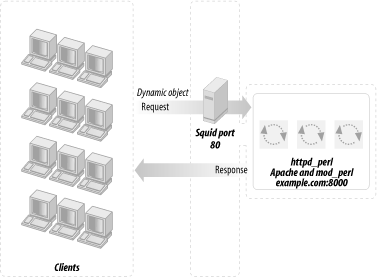
So on our production servers we have decided to stick with the Squid, httpd_docs, and httpd_perl scenario, where we can optimize and fine-tune everything. But if in your case there are almost no static objects to serve, the httpd_docs server is definitely redundant; all you need are the mod_perl server and Squid to buffer the output from it.
If you want to proceed with this setup, install mod_perl-enabled
Apache and Squid. Then use a configuration similar to that in the
previous section, but without httpd_docs (see
Figure 12-5). Also, you do not need the redirector
any more, and you should specify httpd_accel_host
as a name of the server instead of virtual.
Because you do not redirect, there is no need to bind two servers on
the same port, so you also don’t need the
Bind or Listen directives in
httpd.conf.
The modified configuration for this simplified setup is given in Example 12-3 (see the explanations in the previous section).
Example 12-3. squid2.conf
httpd_accel_host example.com
httpd_accel_port 8000
http_port 80
icp_port 0

acl QUERY urlpath_regex /cgi-bin /perl
no_cache deny QUERY

# debug_options 28

# redirect_program /usr/lib/squid/redirect.pl
# redirect_children 10
# redirect_rewrites_host_header off

request_body_max_size 1000 KB

acl all src 0.0.0.0/0.0.0.0
acl manager proto cache_object
acl localhost src 127.0.0.1/255.255.255.255
acl myserver src 127.0.0.1/255.255.255.255
acl SSL_ports port 443 563
acl Safe_ports port 80 81 8080 8081 443 563
acl CONNECT method CONNECT

http_access allow manager localhost
http_access allow manager myserver
http_access deny manager
http_access deny !Safe_ports
http_access deny CONNECT !SSL_ports
# http_access allow all

cache_effective_user squid
cache_effective_group squid

cache_mem 20 MB

memory_pools on

cachemgr_passwd disable shutdown
Apache’s mod_proxy module implements a proxy and cache for Apache. It implements proxying capabilities for the following protocols: FTP, CONNECT (for SSL), HTTP/0.9, HTTP/1.0, and HTTP/1.1. The module can be configured to connect to other proxy modules for these and other protocols.
mod_proxy is part of Apache, so there is no need to install a separate server—you just have to enable this module during the Apache build process or, if you have Apache compiled as a DSO, you can compile and add this module after you have completed the build of Apache.
A setup with a mod_proxy-enabled server and a mod_perl-enabled server is depicted in Figure 12-6.
We do not think the difference in speed between Apache’s mod_proxy and Squid is relevant for most sites, since the real value of what they do is buffering for slow client connections. However, Squid runs as a single process and probably consumes fewer system resources.
The trade-off is that mod_rewrite is easy to use if you want to spread parts of the site across different backend servers, while mod_proxy knows how to fix up redirects containing the backend server’s idea of the location. With Squid you can run a redirector process to proxy to more than one backend, but there is a problem in fixing redirects in a way that keeps the client’s view of both server names and port numbers in all cases.
The difficult case is where you have DNS aliases that map to the same IP address, you want them redirected to port 80 (although the server is on a different port), and you want to keep the specific name the browser has already sent so that it does not change in the client’s browser’s location window.
The advantages of mod_proxy are:
No additional server is needed. We keep the plain one plus one mod_perl-enabled Apache server. All you need is to enable mod_proxy in the httpd_docs server and add a few lines to the httpd.conf file.
ProxyPass        /perl/ http://localhost:81/perl/
ProxyPassReverse /perl/ http://localhost:81/perl/
The
ProxyPassdirective triggers the proxying process. A request for http://example.com/perl/ is proxied by issuing a request for http://localhost:81/perl/ to the mod_perl server. mod_proxy then sends the response to the client. The URL rewriting is transparent to the client, except in one case: if the mod_perl server issues a redirect, the URL to redirect to will be specified in aLocationheader in the response. This is whereProxyPassReversekicks in: it scansLocationheaders from the responses it gets from proxied requests and rewrites the URL before forwarding the response to the client.It buffers mod_perl output like Squid does.
It does caching, although you have to produce correct
Content-Length,Last-Modified, andExpiresHTTP headers for it to work. If some of your dynamic content does not change frequently, you can dramatically increase performance by caching it with mod_proxy.ProxyPasshappens before the authentication phase, so you do not have to worry about authenticating twice.Apache is able to accelerate secure HTTP requests completely, while also doing accelerated HTTP. With Squid you have to use an external redirection program for that.
The latest mod_proxy module (for Apache 1.3.6 and later) is reported to be very stable.
In the following explanation, we will use www.example.com as the main server users access when they want to get some kind of service and backend.example.com as the machine that does the heavy work. The main and backend servers are different; they may or may not coexist on the same machine.
We’ll use the mod_proxy module built into the main server to handle requests to www.example.com. For the sake of this discussion it doesn’t matter what functionality is built into the backend.example.com server—obviously it’ll be mod_perl for most of us, but this technique can be successfully applied to other web programming languages (PHP, Java, etc.).
You can
use the ProxyPass
configuration directive to map remote hosts into the URL space of the
local server; the local server does not act as a proxy in the
conventional sense, but appears to be a mirror of the remote server.
Let’s explore what this rule does:
ProxyPass /perl/ http://backend.example.com/perl/
When a user initiates a request to http://www.example.com/perl/foo.pl, the request is picked up by mod_proxy. It issues a request for http://backend.example.com/perl/foo.pl and forwards the response to the client. This reverse proxy process is mostly transparent to the client, as long as the response data does not contain absolute URLs.
One such situation occurs when the backend server issues a redirect.
The URL to redirect to is provided in a Location
header in the response. The backend server will use its own
ServerName and Port to build
the URL to redirect to. For example, mod_dir will redirect a request
for http://www.example.com/somedir/ to
http://backend.example.com/somedir/ by issuing a
redirect with the following header:
Location: http://backend.example.com/somedir/
Since ProxyPass forwards the response unchanged to
the client, the user will see
http://backend.example.com/somedir/ in her
browser’s location window, instead of
http://www.example.com/somedir/.
You have probably noticed many examples of this from real-life web sites you’ve visited. Free email service providers and other similar heavy online services display the login or the main page from their main server, and then when you log in you see something like x11.example.com, then w59.example.com, etc. These are the backend servers that do the actual work.
Obviously this is not an ideal solution, but since users don’t usually care about what they see in the location window, you can sometimes get away with this approach. In the following section we show a better solution that solves this issue and provides even more useful functionalities.
This
directive lets Apache adjust the URL
in the Location header on HTTP redirect responses.
This is essential when Apache is used as a reverse proxy to avoid
bypassing the reverse proxy because of HTTP redirects on the backend
servers. It is generally used in conjunction with the
ProxyPass directive to build a complete frontend
proxy server.
ProxyPass          /perl/  http://backend.example.com/perl/
ProxyPassReverse   /perl/  http://backend.example.com/perl/
When a user initiates a request to
http://www.example.com/perl/foo, the request is
proxied to http://backend.example.com/perl/foo.
Let’s say the backend server responds by issuing a
redirect for
http://backend.example.com/perl/foo/ (adding a
trailing slash). The response will include a
Location header:
Location: http://backend.example.com/perl/foo/
ProxyPassReverse on the frontend server will
rewrite this header to:
Location: http://www.example.com/perl/foo/
This happens completely transparently. The end user is never aware of the URL rewrites happening behind the scenes.
Note that this ProxyPassReverse directive can also
be used in conjunction with the proxy pass-through feature of
mod_rewrite, described later in this chapter.
Whenever
you
use mod_proxy you need to make sure that your server will not become
a proxy for freeriders. Allowing clients to issue proxy requests is
controlled by the ProxyRequests directive. Its
default setting is Off, which means proxy requests
are handled only if generated internally (by
ProxyPass or RewriteRule...[P]
directives). Do not use the ProxyRequests
directive on your reverse proxy servers.
Let’s say that you have a frontend server running mod_ssl, mod_rewrite, and mod_proxy. You want to make sure that your user is using a secure connection for some specific actions, such as login information submission. You don’t want to let the user log in unless the request was submitted through a secure port.
Since you have to proxypass the request between the frontend and backend servers, you cannot know where the connection originated. The HTTP headers cannot reliably provide this information.
A possible solution for this problem is to have the mod_perl server
listen on two different ports (e.g., 8000 and 8001) and have the
mod_rewrite proxy rule in the regular server redirect to port 8000
and the mod_rewrite proxy rule in the SSL virtual host redirect to
port 8001. Under the mod_perl server, use
$r->connection->port or the environment
variable PORT to tell if the connection is secure.
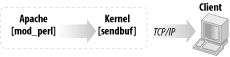
In addition to correcting the URI on its way back from the backend server, mod_proxy, like Squid, also provides buffering services that benefit mod_perl and similar heavy modules. The buffering feature allows mod_perl to pass the generated data to mod_proxy and move on to serve new requests, instead of waiting for a possibly slow client to receive all the data.
Figure 12-7 depicts this feature.

mod_perl streams the generated response into the kernel send buffer, which in turn goes into the kernel receive buffer of mod_proxy via the TCP/IP connection. mod_proxy then streams the file into the kernel send buffer, and the data goes to the client over the TCP/IP connection. There are four buffers between mod_perl and the client: two kernel send buffers, one receive buffer, and finally the mod_proxy user space buffer. Each of those buffers will take the data from the previous stage, as long as the buffer is not full. Now it’s clear that in order to immediately release the mod_perl process, the generated response should fit into these four buffers.
If the data doesn’t fit immediately into all buffers, mod_perl will wait until the first kernel buffer is emptied partially or completely (depending on the OS implementation) and then place more data into it. mod_perl will repeat this process until the last byte has been placed into the buffer.
The kernel’s receive buffers (recvbuf) and send buffers (sendbuf) are used for different things: the receive buffers are for TCP data that hasn’t been read by the application yet, and the send buffers are for application data that hasn’t been sent over the network yet. The kernel buffers actually seem smaller than their declared size, because not everything goes to actual TCP/IP data. For example, if the size of the buffer is 64 KB, only about 55 KB or so can actually be used for data. Of course, the overhead varies from OS to OS.
It might not be a very good idea to increase the kernel’s receive buffer too much, because you could just as easily increase mod_proxy’s user space buffer size and get the same effect in terms of buffering capacity. Kernel memory is pinned (not swappable), so it’s harder on the system to use a lot of it.
The user space buffer size for mod_proxy seems to be fixed at 8 KB,
but changing it is just a matter of replacing
HUGE_STRING_LEN with something else in
src/modules/proxy/proxy_http.c under the Apache
source distribution.
mod_proxy’s receive buffer is configurable by the
ProxyReceiveBufferSize parameter. For example:
ProxyReceiveBufferSize 16384
will create a buffer 16 KB in size.
ProxyReceiveBufferSize must be bigger than or
equal to 512 bytes. If it’s not set or is set to
0, the system default will be used. The number
it’s set to should be an integral multiple of 512.
ProxyReceiveBufferSize cannot be bigger than the
kernel receive buffer size; if you set the value of
ProxyReceiveBufferSize larger than this size, the
default value will be used (a warning will be printed in this case by
mod_proxy).
You can modify the source code to adjust the size of the
server’s internal read-write buffers by changing the
definition of IOBUFSIZE in
include/httpd.h.
Unfortunately, you cannot set the kernel buffers’ sizes as large as you might want because there is a limit to the available physical memory and OSes have their own upper limits on the possible buffer size. To increase the physical memory limits, you have to add more RAM. You can change the OS limits as well, but these procedures are very specific to OSes. Here are some of the OSes and the procedures to increase their socket buffer sizes:
- Linux
For 2.2 kernels, the maximum limit for receive buffer size is set in /proc/sys/net/core/rmem_max and the default value is in /proc/sys/net/core/rmem_default. If you want to increase the rcvbuf size above 65,535 bytes, the default maximum value, you have to first raise the absolute limit in /proc/sys/net/core/rmem_max. At runtime, execute this command to raise it to 128 KB:
panic# echo 131072 > /proc/sys/net/core/rmem_max
You probably want to put this command into /etc/rc.d/rc.local (or elsewhere, depending on the operating system and the distribution) or a similar script that is executed at server startup, so the change will take effect at system reboot.
For the 2.2.5 kernel, the maximum and default values are either 32 KB or 64 KB. You can also change the default and maximum values during kernel compilation; for that, you should alter the
SK_RMEM_DEFAULTandSK_RMEM_MAXdefinitions, respectively. (Since kernel source files tend to change, use the grep(1) utility to find the files.)The same applies for the write buffers. You need to adjust /proc/sys/net/core/wmem_max and possibly the default value in /proc/sys/net/core/wmem_default. If you want to adjust the kernel configuration, you have to adjust the
SK_WMEM_DEFAULTandSK_WMEM_MAXdefinitions, respectively.
This buffering technique applies only to downstream
data (data coming from the origin server to the proxy),
not to upstream data. When the server gets an incoming stream,
because a request has been issued, the first bits of data hit the
mod_perl server immediately. Afterward, if the request includes a lot
of data (e.g., a big POST request, usually a file
upload) and the client has a slow connection, the mod_perl process
will stay tied, waiting for all the data to come in (unless it
decides to abort the request for some reason). Falling back on
mod_cgi seems to be the best solution for specific scripts whose
major function is receiving large amounts of upstream data. Another
alternative is to use yet another mod_perl server, which will be
dedicated to file uploads only, and have it serve those specific URIs
through correct proxy
configuration.
Because of some technical complications in TCP/IP, at the end of each client connection, it is not enough for Apache to close the socket and forget about it; instead, it needs to spend about one second lingering (waiting) on the client.[2]
lingerd is a daemon (service) designed to take
over the job of properly closing network connections from an HTTP
server such as Apache and immediately freeing it to handle new
connections.
lingerd can do an effective job only if HTTP
KeepAlives are turned off. Since
Keep-Alives are useful for images, the recommended
setup is to serve dynamic content with mod_perl-enabled Apache and
lingerd, and static content with plain Apache.
With a lingerd setup, we don’t
have the proxy (we don’t want to use
lingerd on our httpd_docs
server, which is also our proxy), so the buffering chain we presented
earlier for the proxy setup is much shorter here (see Figure 12-8).
Hence, in this setup it becomes more important to have a big enough kernel send buffer.
With lingerd, a big enough kernel send buffer, and
KeepAlives off, the job of spoonfeeding the data
to a slow client is done by the OS kernel in the background. As a
result, lingerd makes it possible to serve the
same load using considerably fewer Apache processes. This translates
into a reduced load on the server. It can be used as an alternative
to the proxy setups we have seen so far.
For more information about lingerd, see
http://www.iagora.com/about/software/lingerd/.
Apache does caching as well. It’s relevant to mod_perl only if you produce proper headers, so your scripts’ output can be cached. See the Apache documentation for more details on the configuration of this capability.
To enable caching, use the CacheRoot directive,
specifying the directory where cache files are to be saved:
CacheRoot /usr/local/apache/cache
Make sure that directory is writable by the user under which httpd is running.
The CacheSize directive sets the desired space
usage in kilobytes:
CacheSize 50000 # 50 MB
Garbage collection, which enforces the cache size, is set in hours by
the CacheGcInterval. If unspecified, the cache
size will grow until disk space runs out. This setting tells
mod_proxy to check that your cache doesn’t exceed
the maximum size every hour:
CacheGcInterval 1
CacheMaxExpire specifies the maximum number of
hours for which cached documents will be retained without checking
the origin server:
CacheMaxExpire 72
If the origin server for a document did not send an expiry date in
the form of an Expires header, then the
CacheLastModifiedFactor will be used to estimate
one by multiplying the factor by the time the document was last
modified, as supplied in the Last-Modified header.
CacheLastModifiedFactor 0.1
If the content was modified 10 hours ago, mod_proxy will assume an expiration time of 10 × 0.1 = 1 hour. You should set this according to how often your content is updated.
If neither Last-Modified nor
Expires is present, the
CacheDefaultExpire directive specifies the number
of hours until the document is expired from the cache:
CacheDefaultExpire 24
In the mod_proxy and
mod_perl servers scenario, ProxyPass was used to
redirect all requests to the mod_perl server by matching the
beginning of the relative URI (e.g., /perl).
What should you do if you want everything, except files with
.gif, .cgi, and similar
extensions, to be proxypassed to the mod_perl server? (These other
files are to be served by the light Apache server, which carries the
mod_proxy module.)
The following example locally handles all requests for files with extensions .gif, .jpg, .png, .css, .txt, and .cgi and relative URIs starting with /cgi-bin (e.g., if you want some scripts to be executed under mod_cgi), and rewrites everything else to the mod_perl server. That is, first handle locally what you want to handle locally, then hand off everything else to the backend guy. Notice that we assume that there are no static HTML files. If you have any of those, adjust the rules to handle HTML files as well.
RewriteEngine On
# handle static files and traditional CGIs directly
RewriteRule \.(gif|jpg|png|css|txt|cgi)$ - [last]
RewriteRule ^/cgi-bin - [last]
# pass off everything but images to the heavy-weight server via proxy
RewriteRule ^/(.*)$ http://localhost:4077/$1 [proxy]
This is the configuration of the logging facilities:
RewriteLogLevel 1
RewriteLog "| /home/httpd/httpd_docs/bin/rotatelogs \
/home/httpd/httpd_docs/logs/r_log 86400"
It says to log all the rewrites through the Unix process pipe to the rotatelogs utility, which will rotate the logs every 24 hours (86,400 seconds).
As another example, here’s how to redirect all those Internet Explorer 5 (IE5) requests for favicon.ico to a central image:
RewriteRule .*favicon.ico /wherever/favicon.ico [passthrough]
The passthrough flag tells mod_rewrite to set the
URI of the request to the value of the rewritten filename
/whatever/favicon.ico, so that any other
rewriting directives, such as Alias, still apply.
Here’s a quick way to make dynamic pages look static:
RewriteRule ^/wherever/([a-zA-Z]+).html /perl/$1.pl [passthrough]
passthrough is used again so that the URI is
properly rewritten and any ScriptAlias or other
directives applying to /perl will be carried
out.
Instead of keeping all your Perl scripts in /perl and your static content everywhere else, you could keep your static content in special directories and keep your Perl scripts everywhere else. You can still use the light/heavy Apache separation approach described earlier, with a few minor modifications.
In the light Apache’s httpd.conf file, turn rewriting on:
RewriteEngine On
Now list all directories that contain only static objects. For
example, if the only directories relative to
DocumentRoot are /images and
/style, you can set the following rule:
RewriteRule ^/(images|style) - [last]
The [last] flag means that the rewrite engine
should stop if it has a match. This is necessary because the very
last rewrite rule proxies everything to the heavy server:
RewriteRule ^/(.*) http://www.example.com:8080/$1 [proxy]
This line is the difference between a server for which static content is the default and one for which dynamic (Perlish) content is the default.
You should also add the reverse rewrite rule, as before:
ProxyPassReverse / http://www.example.com/
so that the user doesn’t see the port number :8000 in the browser’s location window in cases where the heavy server issues a redirect.
It is possible to use localhost in the
RewriteRule above if the heavy and light servers
are on the same machine. So if we sum up the above setup, we get:
RewriteEngine On
RewriteRule ^/(images|style) - [last]
RewriteRule ^/(.*) http://www.example.com:8000/$1 [proxy]
ProxyPassReverse / http://www.example.com/
In the next example, we use mod_rewrite’s
env flag to set an environment variable only for
proxied requests. This variable can later be used by other
directives.
RewriteRule ^/(images|style) - [last]
RewriteRule ^/(.*) http://www.example.com:8000/$1 [env=dyn:1,proxy]
ProxyPassReverse / http://www.example.com/
We could use this environment variable to turn off logging for dynamic requests:
LogFormat "%h %l %u %t \"%r\" %>s %b" common
CustomLog logs/access_log common env=!dyn
This comes in handy when using an authentication module on the
mod_perl server, such as Apache::AuthenDBI.
Authenticated user credentials we’re interested in
logging are available only in the backend server. This technique is
most useful when virtual hosts are used: logging can be turned on in
the mod_perl server for this specific virtual host only.
When using
the proxy setup to boost
performance, you might face the problem that the remote IP always
seems to be 127.0.0.1, which is your proxy’s IP. To
solve that issue, Ask Bjoern Hansen has written the
mod_proxy_add_forward module,[3] which can be aded to the frontend Apache server. It sets
the X-Forwarded-For header when doing a
ProxyPass, similar to what Squid can do. This
header contains the IP address of the client connecting to the proxy,
which you can then access in the mod_perl-enabled server. You
won’t need to compile anything into the backend
server.
To enable this module you have to recompile the frontend server with the following options:
panic% ./configure \
     --with-layout=Apache \
     --activate-module=src/modules/extra/mod_proxy_add_forward.c \
     --enable-module=proxy_add_forward \
     ... other options ...
Adjust the location of mod_proxy_add_forward.c if needed.
In the backend server you can use the handler in Example 12-4 to automatically correct
$r->connection->remote_ip.
Example 12-4. Book/ProxyRemoteAddr.pm
package Book::ProxyRemoteAddr;

use Apache::Constants qw(OK);
use strict;

sub handler {
    my $r = shift;

    # we'll only look at the X-Forwarded-For header if the request
    # comes from our proxy at localhost
    return OK unless ($r->connection->remote_ip eq "127.0.0.1") &&
        $r->header_in('X-Forwarded-For');

    # Select last value in the chain -- original client's IP
    if (my ($ip) = $r->headers_in->{'X-Forwarded-For'} =~ /([^,\s]+)$/) {
        $r->connection->remote_ip($ip);
    }

    return OK;
}
1;
Next, enable this handler in the backend’s httpd.conf file:
PerlPostReadRequestHandler Book::ProxyRemoteAddr
and the right thing will happen transparently for your scripts: for
Apache::Registry or
Apache::PerlRun scripts, you can access the remote
IP through $ENV{REMOTE_ADDR}, and for other
handlers you can use
$r->connection->remote_ip.
Generally, you shouldn’t trust the
X-Forwarded-For header. You should only rely on
the X-Forwarded-For header from proxies you
control yourself—this is why the recommended handler we have
just presented checks whether the request really came from 127.0.0.1
before changing remote_ip. If you know how to
spoof a cookie, you’ve probably got the general idea
of making HTTP headers and can spoof the
X-Forwarded-For header as well. The only address
you can count on as being a reliable value is the one from
$r->connection->remote_ip.
This section explains a configuration setup for proxying your backend mod_perl servers when you need to use virtual hosts.
Apache supports three flavors of virtual hosts:
- IP-based virtual hosts
In this form, each virtual host uses its own IP address. Under Unix, multiple IP addresses are assigned to the same network interface using the ifconfig utility. These additional IP addresses are sometimes called virtual addresses or IP aliases. IP-based virtual hosting is the oldest form of virtual hosting. Due to the supposed increasing scarcity of IP addresses and ensuing difficulty in obtaining large network blocks in some parts of the world, IP-based virtual hosting is now less preferred than name-based virtual hosting.
- Name-based virtual hosts
Name-based virtual hosts share a single IP address. Apache dispatches requests to the appropriate virtual host by examining the
Host: HTTP header field. This field’s value is the hostname extracted from the requested URI. Although this header is mandatory for HTTP 1.1 clients, it has also been widely used by HTTP 1.0 clients for many years.- Port-based virtual hosts
In this setup, all virtual hosts share the same IP address, but each uses its own unique port number. As we’ll discuss in the next section, port-based virtual hosts are mostly useful for backend servers not directly accessible from Internet clients.
- Mixed flavors
It is perfectly possible to mix the various virtual host flavors in one server.
In the dual-server setup, which virtual host flavor is used on the frontend (reverse proxy) server is irrelevant. When running a large number of virtual hosts, it is generally preferable to use name-based virtual hosts, since they share a single IP address. HTTP clients have been supporting this since 1995.
SSL-enabled sites cannot use this scheme, however. This is because
when using SSL, all HTTP traffic is encrypted, and this includes the
request’s Host: header. This
header is unavailable until the SSL handshake has been performed, and
that in turn requires that the request has been dispatched to the
appropriate virtual host, because the SSL handshake depends on that
particular host’s SSL certificate. For this reason,
each SSL-enabled virtual host needs its own, unique IP address. You
can still use name-based virtual hosts along with SSL-enabled virtual
hosts in the same configuration file, though.
For the backend mod_perl-enabled server, we recommend using port-based virtual hosts using the IP address 127.0.0.1 (localhost). This enforces the fact that this server is accessible only from the frontend server and not directly by clients.
When using virtual hosts, any configuration directive outside
of a <VirtualHost> container is applied to a
virtual host called the main server, which plays
a special role. First, it acts as the default host when
you’re using name-based virtual hosts and a request
can’t be mapped to any of the configured virtual
hosts (for example, if no Host: header is
provided). Secondly, many directives specified for the main server
are merged with directives provided in
<VirtualHost> containers. In other words,
virtual hosts inherit properties from the main server. This allows us
to specify default behaviors that will apply to all virtual hosts,
while still allowing us to override these behaviors for specific
virtual hosts.
In the following example, we use the PerlSetupEnv
directive to turn off environment population for all virtual hosts,
except for the www.example.com virtual host,
which needs it for its legacy CGI scripts running under
Apache::Registry:
PerlSetupEnv Off

Listen 8001
<VirtualHost 127.0.0.1:8001>
    ServerName www.example.com
    PerlSetupEnv On
</VirtualHost>The following example illustrates the use of name-based virtual hosts. We define two virtual hosts, www.example.com and www.example.org, which will reverse-proxy dynamic requests to ports 8001 and 8002 on the backend mod_perl-enabled server.
Listen            192.168.1.2:80
NameVirtualHost   192.168.1.2:80
Replace 192.168.1.2 with your server’s public IP address.
LogFormat "%v %h %l %u %t \"%r\" %s %b \"%{Referer}i\" \"%{User-agent}i\""The log format used is the Common Log Format prefixed with
%v, a token representing the name of the virtual
host. Using a combined log common to all virtual hosts uses fewer
system resources. The log file can later be split into seperate files
according to the prefix, using splitlog or an
equivalent program.
The following are global options for mod_rewrite shared by all virtual hosts:
RewriteLogLevel       0
RewriteRule \.(gif|jpg|png|txt|html)$ - [last]
This turns off the mod_rewrite module’s logging feature and makes sure that the frontend server will handle files with the extensions .gif, .jpg, .png, .txt, and .html internally.
If your server is configured to run traditional CGI scripts (under
mod_cgi) as well as mod_perl CGI programs, it would be beneficial to
configure the frontend server to run the traditional CGI scripts
directly. This can be done by altering the
(gif|jpg|png|txt|html) rewrite rule to add
cgi if all your mod_cgi scripts have the
.cgi extension, or by adding a new rule to
handle all /cgi-bin/* locations internally.
The virtual hosts setup is straightforward:
##### www.example.com
<VirtualHost 192.168.1.2:80>
    ServerName      www.example.com
    ServerAdmin     webmaster@example.com
    DocumentRoot    /home/httpd_docs/htdocs/www.example.com

    RewriteEngine       on
    RewriteOptions      'inherit'
    RewriteRule         ^/(perl/.*)$     http://127.0.0.1:8001/$1    [P,L]
    ProxyPassReverse    /  http://www.example.com/
</VirtualHost>

##### www.example.org
<VirtualHost 192.168.1.2:80>
    ServerName      www.example.org
    ServerAdmin     webmaster@example.org
    DocumentRoot    /home/httpd_docs/htdocs/www.example.org

    RewriteEngine       on
    RewriteOptions      'inherit'
    RewriteRule         ^/(perl/.*)$     http://127.0.0.1:8002/$1    [P,L]
    ProxyPassReverse    /  http://www.example.org/
</VirtualHost>
The two virtual hosts’ setups differ in the
DocumentRoot and
ProxyPassReverse settings and in the backend ports
to which they rewrite.
This section describes the configuration of the backend server.
The backend server listens on the loopback (localhost) interface:
BindAddress 127.0.0.1
In this context, the following directive does not specify a listening port:
Port 80
Rather, it indicates which port the server should advertise when issuing a redirect.
The following global mod_perl settings are shared by all virtual hosts:
##### mod_perl settings
PerlRequire                   /home/httpd/perl/startup.pl
PerlFixupHandler              Apache::SizeLimit
PerlPostReadRequestHandler    Book::ProxyRemoteAddr
PerlSetupEnv                  Off
As explained earlier, we use the
Book::ProxyRemoteAddr handler to get the
real remote IP addresses from the proxy.
We can then proceed to configure the virtual hosts themselves:
##### www.example.com
Listen 8001
<VirtualHost 127.0.0.1:8001>
The Listen directive specifies the port to listen
on. A connection to that port will be matched by this
<VirtualHost> container.
The remaining configuration is straightforward:
ServerName  www.example.com
ServerAdmin webmaster@example.com

<Location /perl>
    SetHandler perl-script
    PerlHandler Apache::Registry
    Options +ExecCGI
</Location>

<Location /perl-status>
    SetHandler perl-script
    PerlHandler Apache::Status
</Location>

  </VirtualHost>
We configure the second virtual host in a similar way:
##### www.example.org
Listen 8002
<VirtualHost 127.0.0.1:8002>
    ServerName  www.example.org
    ServerAdmin webmaster@example.org

    <Location /perl>
        SetHandler perl-script
        PerlHandler Apache::Registry
        Options +ExecCGI
    </Location>

</VirtualHost>
You may need to specify the DocumentRoot setting
in each virtual host if there is any need for it.
In a setup with one frontend server that proxies to a backend mod_perl server, authentication should be performed entirely on one of the servers: don’t mix and match frontend- and backend-based authentication for the same URI.
File-based basic authentication (performed by mod_auth) is best done
on the frontend server. Only authentication implemented by mod_perl
handlers, such as Apache::AuthenDBI, should be
performed on the backend server. mod_proxy will proxy all
authentication headers back and forth, making the frontend Apache
server unaware of the authentication process.
Imagine a scenario where you start your business as a small service providing a web site. After a while your business becomes very popular, and at some point you realize that it has outgrown the capacity of your machine. Therefore, you decide to upgrade your current machine with lots of memory, a cutting-edge, super-expensive CPU, and an ultra-fast hard disk. As a result, the load goes back to normal—but not for long. Demand for your services keeps on growing, and just a short time after you’ve upgraded your machine, once again it cannot cope with the load. Should you buy an even more powerful and very expensive machine, or start looking for another solution? Let’s explore the possible solutions for this problem.
A typical web service consists of two main software components: the database server and the web server.
A typical user-server interaction consists of accepting the query parameters entered into an HTML form and submitted to the web server by a user, converting these parameters into a database query, sending it to the database server, accepting the results of the executed query, formatting them into a nice HTML page, and sending it to a user’s Internet browser or another application that created the request (e.g., a mobile phone with WAP browsing capabilities). This process is depicted in Figure 12-9.
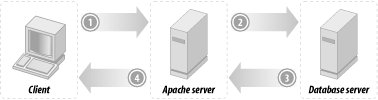
This schema is known as a three-tier architecture in the computing world. In a three-tier architecture, you split up several processes of your computing solution between different machines:
- Tier 1
The client, who will see the data on its screen and can give instructions to modify or process the data. In our case, an Internet browser.
- Tier 2
The application server, which does the actual processing of the data and sends it back to the client. In our case, a mod_perl-enabled Apache server.
- Tier 3
The database server, which stores and retrieves all the data for the application server.
We are interested only in the second and the third tiers; we don’t specify user machine requirements, since mod_perl is all about server-side programming. The only thing the client should be able to do is to render the generated HTML from the response, which any simple browser will do.
Let’s first look at what kind of software the web and database servers are, what they need to run fast, and what implications they have on the rest of the system software.
The three important machine components are the hard disk, the amount of RAM, and the CPU type. Typically, the mod_perl server is mostly RAM-hungry, while the SQL database server mostly needs a very fast hard disk. Of course, if your mod_perl process reads a lot from the disk (a quite infrequent phenomenon) you will need a fast disk too. And if your database server has to do a lot of sorting of big tables and do lots of big table joins, it will need a lot of RAM too.
If we specified average virtual requirements for each machine, that’s what we’d get.
An “ideal” mod_perl machine would have:
- HD
Low-end (no real I/O, mostly logging)
- RAM
The more, the better
- CPU
Medium to high (according to needs)
An “ideal” database server machine would have:
- HD
High-end
- RAM
Large amounts (for big joins, sorting of many records), small amounts otherwise
- CPU
Medium to high (according to needs)
With the database and the web server on the same machine, you have conflicting interests.
During peak loads, Apache will spawn more processes and use RAM that the database server might have been using, or that the kernel was using on its behalf in the form of a cache. You will starve your database of resources at the time when it needs those resources the most.
Disk I/O contention produces the biggest time issue. Adding another disk won’t cut I/O times, because the database is the only thing that does I/O—mod_perl processes have all their code loaded in memory (we are talking about code that does pure Perl and SQL processing). Thus, it’s clear that the database is I/O- and CPU-bound (it’s RAM-bound only if there are big joins to make), while mod_perl is mostly CPU- and memory-bound.
There is a problem, but it doesn’t mean that you cannot run the application and the web servers on the same machine. There is a very high degree of parallelism in modern PC architecture. The I/O hardware is helpful here. The machine can do many things while a SCSI subsystem is processing a command or the network hardware is writing a buffer over the wire.
If a process is not runnable (that is, it is blocked waiting for I/O or something else), it is not using significant CPU time. The only CPU time that will be required to maintain a blocked process is the time it takes for the operating system’s scheduler to look at the process, decide that it is still not runnable, and move on to the next process in the list. This is hardly any time at all. If there are two processes, one of which is blocked on I/O and the other of which is CPU-bound, the blocked process is getting 0% CPU time, the runnable process is getting 99.9% CPU time, and the kernel scheduler is using the rest.
The solution is to add another machine, which allows a setup where both the database and the web server run on their own dedicated machines.
This solution has the following advantages:
- Flexible hardware requirements
It allows you to scale two requirements independently.
If your httpd processes are heavily weighted with respect to RAM consumption, you can easily add another machine to accommodate more httpd processes, without changing your database machine.
If your database is CPU-intensive but your httpd doesn’t need much CPU time, you can get a low-end machine for the httpd and a high-end machine with a very fast CPU for the database server.
- Scalability
Since your web server doesn’t depend on the database server location any more, you can add more web servers hitting the same database server, using the existing infrastructure.
- Database security
Once you have multiple web server boxes, the backend database becomes a single point of failure, so it’s a good idea to shield it from direct Internet access—something that is harder to do when the web and database servers reside on the same machine.
It also has the following disadvantages:
- Network latency
A database request from a web server to a database server running on the same machine uses Unix sockets, not the TCP/IP sockets used when the client submits the query from another machine. Unix sockets are very fast, since all the communications happen within the same box, eliminating network delays. TCP/IP socket communication totally depends on the quality and the speed of the network that connects the two machines.
Basically, you can have almost the same client-server speed if you install a very fast and dedicated network between the two machines. It might impose a cost of additional NICs, but that cost is probably insignificant compared to the speed improvement you gain.
Even the normal network that you have would probably fit as well, because the network delays are probably much smaller than the time it takes to execute the query. In contrast to the previous paragraph, you really want to test the added overhead here, since the network can be quite slow, especially at peak hours.
How do you know what overhead is a significant one? All you have to measure is the average time spent in the web server and the database server. If either of the two numbers is at least 20 times bigger than the added overhead of the network, you are all set.
To give you some numbers, if your query takes about 20 milliseconds to process and only 1 millisecond to deliver the results, it’s good. If the delivery takes about half of the time the processing takes, you should start considering switching to a faster and/or dedicated network.
The consequences of a slow network can be quite bad. If the network is slow, mod_perl processes remain open, waiting for data from the database server, and eat even more RAM as new child processes pop up to handle new requests. So the overall machine performance can be worse than it was originally, when you had just a single machine for both servers.
Since we are talking about using a dedicated machine for each server, you might consider adding a third machine to do the proxy work; this will make your setup even more flexible, as it will enable you to proxypass all requests not just to one mod_perl-running box, but to many of them. This will enable you to do load balancing if and when you need it.
Generally, the proxy machine can be very light when it serves just a little traffic and mainly proxypasses to the mod_perl processes. Of course, you can use this machine to serve the static content; the hardware requirement will then depend on the number of objects you have to serve and the rate at which they are requested.
Figure 12-10 illustrates the three machine model.

Let’s assume that you have two
different sets of code that have little or nothing in
common—different Perl modules, no code sharing. Typical numbers
can be 4 MB of unshared[4] and 4
MB of shared memory for each code set, plus 3 MB of shared basic
mod_perl stuff—which makes each process 17 MB in size when the
two code sets are loaded. Let’s also assume that we
have 251 MB of RAM dedicated to the web server
(Total_RAM):
Shared_RAM_per_Child :  11MB
Max_Process_Size     :  17MB
Total_RAM            : 251MB
According to the equation developed in Chapter 11:
We see that we can run 40 processes, using the given memory and the two code sets in the same server.
Now consider this practical decision. Since we have recognized that the code sets are very distinct in nature and there is no significant memory sharing in place, the wise thing to do is to split the two code sets between two mod_perl servers (a single mod_perl server actually is a set of the parent process and a number of the child processes). So instead of running everything on one server, now we move the second code set onto another mod_perl server. At this point we are talking about a single machine.
Let’s look at the figures again. After the split we will have 20 11-MB processes (4 MB unshared + 7 MB shared) running on one server and another 20 such processes running on the other server.
How much memory do we need now? From the above equation we derive:
Using our numbers, this works out to a total of 174 MB of memory required:
But hey, we have 251 MB of memory! That leaves us with 77 MB of free
memory. If we recalculate MaxClients, we will see
that we can run almost 60 more servers:
So we can run about 19 more servers using the same memory size—that’s almost 30 servers for each code set instead of 20. We have enlarged the server pool by half without changing the machine’s hardware.
Moreover, this new setup allows us to fine-tune the two code sets—in reality the smaller code base might have a higher hit rate—so we can benefit even more.
Let’s assume that, based on usage statistics, we know that the first code set is called in 70% of requests and the other is called in the remaining 30%. Now we assume that the first code set requires only 5 MB of RAM (3 MB shared + 2 MB unshared) over the basic mod_perl server size, and the second set needs 11 MB (7 MB shared + 4 MB unshared).
Let’s compare this new requirement with our original 50:50 setup (here we have assigned the same number of clients for each code set).
So now the first mod_perl server running the first code set will have all its processes using 8 MB (3 MB server shared + 3 MB code shared + 2 MB code unshared), and the second server’s process will each be using 14 MB of RAM (3 MB server shared + 7MB code shared + 4 MB code unshared). Given that we have a 70:30 hit relation and that we have 251 MB of available memory, we have to solve this set of equations:
where X is the total number of processes the first code set can use and Y the second. The first equation reflects the 70:30 hit relation, and the second uses the equation for the total memory requirements for the given number of servers and the shared and unshared memory sizes.
When we solve these equations, we find that X = 63 and Y = 27. So we have a total of 90 servers—two and a half times more than in the original setup using the same memory size.
The hit-rate optimized solution and the fact that the code sets can be different in their memory requirements allowed us to run 30 more servers in total and gave us 33 more servers (63 versus 30) for the most-wanted code base, relative to the simple 50:50 split used in the first example.
Of course, if you identify more than two distinct sets of code based on your hit rate statistics, more complicated solutions may be required. You could even make more splits and run three or more mod_perl servers.
However, you shouldn’t get carried away. Remember that having too many running processes doesn’t necessarily mean better performance, because all of them will contend for CPU time slices. The more processes that are running, the less CPU time each gets and the slower overall performance will be. Therefore, after hitting a certain load you might want to start spreading your servers over different machines.
When you have different components running on different servers, in addition to the obvious memory saving, you gain the power to more easily troubleshoot problems that occur. It’s quite possible that a small change in the server configuration to fix or improve something for one code set might completely break the second code set. For example, if you upgrade the first code set and it requires an update of some modules that both code bases rely on, there is a chance that the second code set won’t work with the new versions of those modules.
If you need SSL functionality, you can get it by adding the mod_ssl or equivalent Apache-SSL to the light frontend server (httpd_docs) or the heavy backend mod_perl server (httpd_perl). The configuration and installation instructions are given in Chapter 3.
The question is, is it a good idea to add mod_ssl to the backend mod_perl-enabled server? If your internal network is secured, or if both the frontend and backend servers are running on the same machine and you can ensure a safe communication between the processes, there is no need for encrypted traffic between them.
If this is the situation, you don’t have to put mod_ssl into the already heavy mod_perl server. You will have the external traffic encrypted by the frontend server, which will proxypass the unencrypted request and response data internally. This is depicted in Figure 12-11.
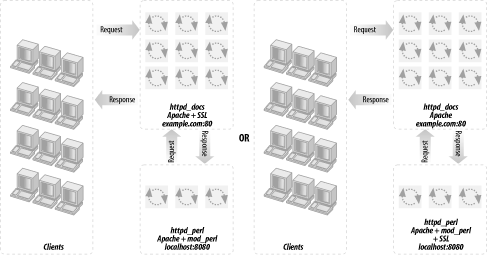
Another important point is that if you put mod_ssl on the backend server, you have to tunnel back your images to it (i.e., have the backend serve the images), defeating the whole purpose of having the lightweight frontend server.
You cannot serve a secure page that includes nonsecure information.
If you fetch over SSL an HTML page containing an
<img> tag that fetches an image from the
nonsecure server, the image is shown broken. This is true for any
other nonsecure objects as well. Of course, if the generated response
doesn’t include any embedded objects (e.g., images)
this isn’t a problem.
Giving the SSL functionality to the frontend machine also simplifies
configuration of mod_perl by eliminating
VirtualHost duplication for SSL. mod_perl
configuration files can be plenty difficult without the mod_ssl
overhead.
Also, assuming that your frontend machine is underworked anyway, especially if you run a high-volume web service deploying a cluster of machines to serve requests, you will save some CPU, as it’s known that SSL connections are about 100 times more CPU-intensive than non-SSL connections.
Of course, caching session keys so you don’t have to set up a new symmetric key for every single connection improves the situation. If you use the shared-memory session-caching mechanism that mod_ssl supports, the overhead is actually rather small, except for the initial connection.
But then, on the other hand, why even bother to run a full-scale mod_ssl-enabled server in front? You might as well just choose a small tunnel/port-forwarding application such as Stunnel or one of the many others mentioned at http://www.openssl.org/related/apps.html.
Of course, if you do heavy SSL processing, ideally you should really be offloading it to a dedicated cryptography server. But this advice can be misleading, based on the current status of crypto hardware. If you use hardware, you get extra speed now, but you’re locked into a proprietary solution; in six months or a year software will have caught up with whatever hardware you’re using, and because software is easier to adapt, you’ll have more freedom to change whatever software you’re using and more control of things. So the choice is in your hands.
You don’t want to tie up your precious mod_perl backend server children doing something as long and simple as transferring a file, especially a big one. The overhead saved by mod_perl is typically under one second, which is an enormous savings for scripts whose runtimes are under one second. However, the user won’t really see any important performance benefits from mod_perl, since the upload may take up to several minutes.
If some particular script’s main functionality is the uploading or downloading of big files, you probably want it to be executed on a plain Apache server under mod_cgi (i.e., performing this operation on the frontend server, if you use a dual-server setup as presented earlier).
This of course assumes that the script requires none of the functionality of the mod_perl server, such as custom authentication handlers.
Chapter 9 (“Tuning Apache and mod_perl”) in mod_perl Developer’s Cookbook, by Geoffrey Young, Paul Lindner, and Randy Kobes (Sams Publishing).
mod_backhand, which provides load balancing for Apache: http://www.backhand.org/mod_backhand/.
The High-Availability Linux Project, the definitive guide to load-balancing techniques: http://www.linux-ha.org/.
lbnamed, a load-balancing name server written in Perl: http://www.stanford.edu/~riepel/lbnamed/, http://www.stanford.edu/~riepel/lbnamed/bof.talk/, or http://www.stanford.edu/~schemers/docs/lbnamed/lbnamed.html.The Linux Virtual Server Project: http://www.linuxvirtualserver.org/.
The latest IPFilter: http://coombs.anu.edu.au/~avalon/.
This filter includes some simple load-balancing code that allows a round-robin distribution onto several machines via ipnat. This may be a simple solution for a few specific load problems.
The
lingerdserver and all the documentation are available from http://www.iagora.com/about/software/lingerd/.The mod_proxy_add_forward Apache module, complete with instructions on how to compile it, is available from one of these URLs: http://modules.apache.org/search?id=124 or http://develooper.com/code/mpaf/mod_proxy_add_forward.c .
Apache::Proxy::Info, a friendly mod_perl counterpart to mod_proxy_add_forward.Solaris 2.x—Tuning Your TCP/IP Stack and More: http://www.sean.de/Solaris/soltune.html.
This page talks about the TCP/IP stack and various tricks of tuning your system to get the most out of it as a web server. While the information is for the Solaris 2.x OS, most of it will be relevant of other Unix flavors. At the end of the page, an extensive list of related literature is presented.
splitlog , part of the wwwstat distribution, is available at http://www.ics.uci.edu/pub/websoft/wwwstat/.
[1] The configuration directives we use are correct for Squid Cache Version 2.4STABLE1. It’s possible that the configuration directives might change in new versions of Squid.
[2] More details can be found at http://httpd.apache.org/docs/misc/fin_wait_2.html.
[3] See Section 12.16 at the end of this chapter for download information.
[4] 4 MB of unshared memory is a pretty typical size, especially when connecting to databases, as the database connections cannot be shared. Databases like Oracle can take even more RAM per connection on top of this.
Get Practical mod_perl now with the O’Reilly learning platform.
O’Reilly members experience books, live events, courses curated by job role, and more from O’Reilly and nearly 200 top publishers.

