Chapter 1. Finding Your Way Around Elements
Photoshop Elements lets you do practically anything you want to your digital images. You can colorize black-and-white photos, remove demonic red-eye stares, or distort the facial features of people who’ve been mean to you. The downside is that all those options can make it tough to find your way around Elements, especially when you’re new to the program.
This chapter helps get you oriented in Elements. You’ll learn about what to expect when you launch the program, how to use Elements to fix photos with just a couple of keystrokes, and how to sign up for and connect to all the goodies that await you on Photoshop.com. You’ll also learn how to use Guided Edit mode to help get started editing your photos. Along the way, you’ll find out about some of Elements’ basic controls, and how to get hold of the program’s Help files if you need them.
The Welcome Screen
When you launch Elements for the first time, you get a slew of options, all neatly laid out on the Welcome screen (Figure 1-1).
Interestingly, the Welcome screen isn’t actually Elements. It’s a launching pad that, depending on the button you click, starts up one of two different programs:
The Organizer, which lets you store and organize your image files.
The Editor, which lets you edit your images.
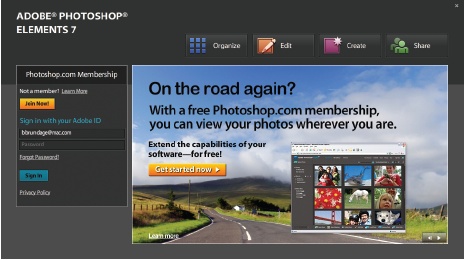
Figure 1-1. The Elements Welcome screen gives you four main activities to choose from, as well as the area on the left for signing onto Photoshop.com and seeing information about your account there. You can’t bypass the Welcome screen just by clicking the upper-right Close button. When you do, the screen goes away—but so does Elements. Fortunately, you’ve got options: The box on Organizing Your Photos tells you how to permanently say goodbye to the Welcome screen.You can quite easily go back and forth between the Editor and the Organizer—which you might call the two different faces of Elements—and you probably won’t do much in one without eventually needing to get into the other. But in some ways, they still function as two separate programs. In any case, the Welcome screen offers you no fewer than four choices for getting into Elements:
Organize takes you to the Organizer, where you can store and sort all your images.
Edit takes you to the Editor, which is the digital darkroom/art studio where you edit photos, and create artwork from scratch.
Create starts you up in the Organizer, and gives you a choice of making a photo book, calendar, collage, online gallery, or slideshow from your photos.
Share also takes you to the Organizer, only this time you can choose to create an online gallery, email photos, order prints, or create a CD or DVD.
If you start in the Organizer, then once you’ve located a photo to edit, you have to wait a few seconds while the Editor loads. And when you have both the Editor and the Organizer running, just quitting the Editor doesn’t close the Organizer. You have to close both programs independently. When both programs are running, you can switch back and forth by clicking the button at the upper right of the screen. The button reads “Organizer” when you’re in the Editor and “Editor” when you’re in the Organizer. (The Organizer button just takes a click, but the Editor button includes a pull-down menu where you choose the editing mode you want.) You can also just click the Editor or the Organizer icon in the Windows taskbar to switch from one to the other.
Adobe has built Elements around the assumption that most people work on their photos in the following way: First, you bring photos into the Organizer to sort and keep track of them. Then, you open photos in the Editor to work on them, and save them back to the Organizer when you’ve finished making changes. You can work differently, of course, like opening photos directly in the Editor and bypassing the Organizer altogether, but you may feel like you’re always swimming against the current if you choose a different way of working. The next chapter has a few hints for disabling some Elements features if you really find they’re getting in your way.
In addition, the Welcome screen in Elements 7 serves as your connecting point for creating or signing onto Photoshop.com. Photoshop.com has more about Photoshop.com, but for now you just need to know that a basic account is free if you’re in the US (it’s not available yet in other countries), and it gives you access to all the interesting new features in Elements 7 that require an Internet connection.
Organizing Your Photos
The Organizer is where your photos come into Elements and go out again (when it’s time to print or email them). The Organizer stores and catalogs your photos, and you automatically come back to it for any activities that involve sharing your photos, like printing a photo package or making a slideshow. The Organizer’s main window (Figure 1-2) is sometimes called the Photo Browser. It lets you view your photos, sort them into albums, and assign keyword labels to them.
The Organizer has lots of really cool features you’ll learn about throughout this book when they’re relevant to the task at hand. The next chapter shows you how to use the Organizer to import and organize your photos, and Appendix A covers all the Organizer’s different menu options. What’s more, in Elements 7, if you sign up for a Photoshop.com account (Photoshop.com), then you can access and organize your photos from any computer, not just at home.
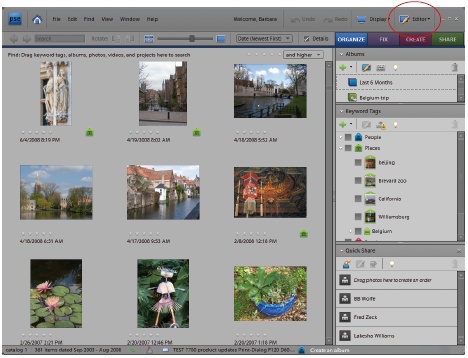
Photo Downloader
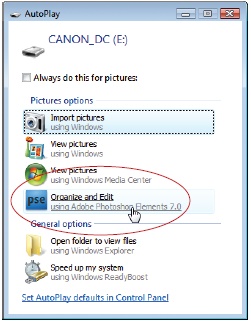
Actually, Elements has yet another component, which you may have seen already if you’ve plugged a camera into your computer after installing Elements: the Photo Downloader (Figure 1-3), which helps get photos straight into the Organizer directly from your camera’s memory card.
If you’ve used Elements before, then you’ll be pleased to know that one of the new features in Elements 7 is a politer version of the Downloader. In previous versions of Elements, the Downloader ran constantly as a separate program (whether Elements was running or not), racing to be first on the scene whenever it detected any newly-connected device that might have photos on it, and popping up its own window before the standard Windows dialog box could appear. For a few people, this was mighty convenient. But for the majority of folks who didn’t want the Downloader every time they plugged some photo-bearing device into their computer, it was a big nuisance. If you have an iPod, for instance, then you know how aggravating this was.
So in Elements 7, the Downloader appears as only one of your options in the regular Windows dialog box that you see when you connect a device. If you want to use the Downloader, then just choose it from the list. No more interference with your iPod, and no extra dialog box to close every time you don’t want to use the Downloader. It’s a major improvement.
You can read more about the Downloader in Chapter 2. If you plan to use the Organizer to catalog photos and assign keywords to them, then reading the section on the Downloader can help you avoid hair-pulling moments.
Photoshop.com
Adobe’s new Photoshop.com service is the star feature in Elements 7. A basic account is free, and it’s nicely integrated into Elements, making it very easy to use. The things you can do with a Photoshop.com account include:
Create your own Web site. You can make beautiful online albums that display your photos in elaborate slideshows—all accessible via your own Photoshop.com URL (Web address). Great for dazzling friends and family. They can even download your photos or order prints, if you choose to let them. (See Online Albums.)
Automatically back up and sync your photos. Frequent worriers and travelers, prepare to be amazed. You can set Elements to sync your PC-based photos to storage space on Photoshop.com, providing you with a backup, just in case. What’s more, you can upload photos to your albums from other computers, and they automatically appear in the Organizer the next time you start Elements. See Online Syncing and Backups for more about how to use this nifty feature.
Access your photos from other computers. When you’re not at home, pop over to your Photoshop.com account to see and even organize your photos. That way, when you visit friends, you don’t need to lug your own computer along—just log into your account from their computers.
Download lots of extra goodies. In Elements 7, the Content palette (Online Albums) displays thumbnails for additional backgrounds, frames, graphics, and so on, that you can download right from Photoshop.com.
Get lots of great free advice. Install the Photoshop Inspiration Browser (Photoshop Inspiration Browser), and you can choose from a whole range of helpful tutorials for all sorts of Elements tasks and projects.
The bad news is that for Elements 7, the Photoshop.com features are initially available only in the US. Adobe says it plans to expand this offering worldwide later on. (For now, you get some of the same features, like the ability to create online albums and galleries, at Adobe’s Photoshop Showcase site. See What’s New in Elements 7 for more about the regional differences.) To sign up for a free account:
Tell Adobe you want an account.
Just click the Join button on the Welcome screen (The Welcome Screen) or at the top of either the Organizer or the Editor’s main window.
In the window that opens, fill in your information to create your Adobe ID.
You need to give the usual address, phone, email, and so on, and also pick what you’d like for your unique Adobe Web address (Hint: something like http://johnspictures.photoshop.com is probably already taken, so you may need to try a few alternatives. When you click Create Account, you get a message if the Web address you chose is already in use.) Turn on the checkbox that says you agree to Adobe’s terms and conditions. Finally, for security purposes you need to enter the text you see in a box on the sign-up screen.
Create your account.
Click the Create Account button. Adobe tells you if it finds any errors in what you submitted, giving you a chance to go back and fix them.
Confirm your account.
You’ll get an email from Adobe. Just click the link in the email to confirm that you want to create an account, and you’re all set. You need to click the link within 24 hours of creating your account, or you may have to start the whole process all over again.
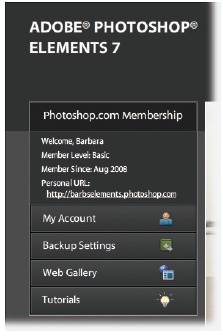
Once you have an account, you can get to it from the left side of the Welcome screen, as shown in Figure 1-4. You can also click Sign In at the top of the Editor or Organizer. Once you’re signed in, you see “Welcome <your name>” instead of Sign In, and you can click that to go to your account settings.
A free Photoshop.com account is a pretty amazing deal. It even gives you 5 GB of space on Adobe’s servers for backing up and storing your photos. However, you can also upgrade to a paid account (called Plus), which gives you more of everything: more template designs for Online Albums, more downloads from the Content palette, more tutorials, and more storage space: 20 to 100 GB (depending on what level membership you choose). However, the Plus account costs $49.99 for 20 GB and more as your storage amount increases, so you might want to try the free account first to see whether you’ll really use it enough to justify the price.
Once you sign into your account, you get logged in automatically every time you start Elements. If you don’t want that to happen, just click your Account settings, and then, in the window that opens, choose Sign Out.
Note
Photoshop.com replaces the now-retired Photoshop Express. Both services actually do the same thing; Adobe is simply changing the name. If you forget your personalized Photoshop.com URL when you want to log in away from home, you can always just go to www.photoshop.com, and log in that way.
Editing Your Photos
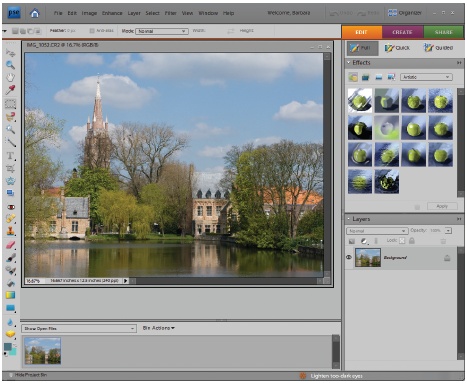
In addition to the Organizer, the Editor is the other main component of Elements (Figure 1-5). This is the fun part of Elements, where you get to edit, adjust, transform, and generally glamorize your photos, and where you can create original artwork from scratch with the drawing tools and shapes.
You can operate the Editor in any of three different modes:
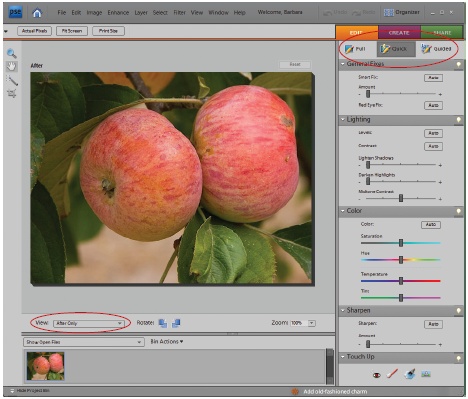
Quick Fix. For many beginners, Quick Fix (Figure 1-6) ends up as your main workspace. Adobe has gathered together the basic tools you need to improve most photos. It’s also one of the two places in Elements where you can choose to have a before-and-after view while you work. (Guided Edit, described below, is the other.) Chapter 4 gives you all the details on using Quick Fix.
Full Edit. The Full Edit window gives you access to Elements’ most sophisticated tools. You have far more ways to work on your photo in Full Edit than in Quick Fix, and if you’re fussy, it’s where you’ll do most of your retouching work. Most of the Quick Fix commands are also available via menus in the Full Edit window.
Guided Edit. This window can be enormously helpful if you’re a newcomer to Elements. Basically, it provides a step-by-step walkthrough for popular projects such as cropping your photos, and removing blemishes from them. Like Quick Fix, Guided Edit offers a before-and-after view of your photo as you work on it. Guided Edit is explained on Getting Help. In Elements 7, Guided Edit also features some advanced activities, like the new Actions Player (Using Actions in Elements).
The rest of this chapter covers some of the basic concepts and key tools in the Editor.
Note
If you leave a photo open in the Editor, then when you switch back to the Organizer, you see a red band with a padlock across the photo’s Organizer thumbnail as a reminder. To get rid of the lock and free up your image for Organizer projects, go back to the Editor and close the photo there.
Your Elements Tools
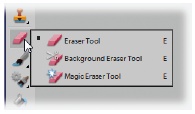
Elements gives you an amazing array of tools to use when working on your photo. You get almost two dozen primary tools to help select, paint on, and otherwise manipulate photos, and many of the tools have as many as six subtools hiding beneath them (see Figure 1-7). Bob Vila’s workshop probably isn’t any better stocked than Elements’ virtual toolbox.
Tip
When you want to explore every cranny of Elements, you need to open a photo (in the Editor, choose File → Open). Lots of the menus are grayed out if you have no file opened.
The long, skinny strip on the left side of the Full Edit window is the main Elements Toolbox, as you can see in Figure 1-7. It stays perfectly organized so that you can always find what you want without ever having to lift a finger to tidy it. And what’s more, if you forget what a particular tool does, then hold your mouse over the tool’s icon, and a label (called a tooltip) appears. To activate a tool, click it. Any tool that you select comes with its own collection of options, as shown in Figure 1-8.

Incidentally, your screen size determines the number of columns in the Toolbox. In Elements 7, if you meet the minimum screen size requirements, then you start with a single column Toolbox, but if you reduce the height of the Elements window too much, then it becomes a double columned one. If you prefer a more compact Toolbox, see the box “Doubling Up.”
Other windows in Elements, like Quick Fix and the Raw Converter (see Using the Raw Converter), also have toolboxes, but none is as complete as the one in Full Edit.
Note
If you’ve used Elements 5 or earlier, you’ll find an important difference in getting to subtools in Elements 7. Now you can choose a tool from a group only by using the tool’s pop-out menu in the Toolbox. You can’t switch from one tool in a subgroup to another in the Options bar anymore.
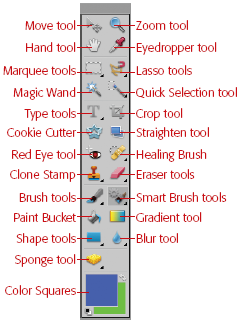
Don’t worry about learning the names of every tool right now, but if you want to see them all, they’re all on display in Figure 1-9. It’s easier to remember what a tool is once you’ve used it. And don’t be concerned about how many tools you have available. You probably have a bunch of Allen wrenches in your garage toolbox that you don’t use more than a couple of times a year. Likewise, you’ll find that you tend to use certain Elements tools more than others.
Tip
You can activate any tool with a keyboard shortcut, thereby saving a ton of time, since you don’t have to interrupt what you’re doing to trek over to the Toolbox. To see a tool’s shortcut key, hover your mouse over the icon. A label pops up indicating the shortcut key (it’s the letter in parentheses).
Panels, Bins, and Palettes
Whether you’re in the Editor or the Organizer, the right side of your screen is always pretty busy. Adobe calls this area the Task panel. Use it to select different modes, like whether to organize photos or share them by email (in the Organizer), or whether to edit a photo or use it in a project (in the Editor).
Note
You can collapse the main part of the Task panel to get it out of your way by clicking its left edge, but the main tabs are always visible. Click the edge again to bring the panel back.
The Project bin
In the Editor, the long narrow photo tray hogging the bottom of your screen is called the Project bin. It shows you what photos you currently have open, as explained in Figure 1-10, but it does a lot more than that.
At the upper left of the Project bin are two pull-down menus:
Show Open Files. This menu lets you determine what the Project bin is going to display: the photos currently open in the Editor, selected photos from the Organizer, or any of the albums (Albums and Smart Albums) you’ve made. If you send a bunch of photos over from the Organizer at once, then you may think something went awry because no photo appears on your desktop or in the Project bin. If you switch the menu over to “Show Files from Organizer”, then you see your photos waiting for you in the bin.
Bin Actions. This is where the Project bin gets really useful. You can choose to use the photos in the bin in a project (via the Create tab), share them by any of the means listed under the Task Panel’s Share tab, print them out, or make an album right there in the bin without ever going to the Organizer.

Tip
If you don’t use the Organizer, then the Project bin is a particularly great feature, because it lets you create groups of photos you can call up all together. Just put them in an album (Albums and Smart Albums), and then, from the Show Open Files menu, choose the name of the album when you want to see that group again.
You can drag your photos’ thumbnails in the bin to rearrange them if you want to use the photos in a project.
The Project bin is a useful feature, but if you have a small monitor, sometimes you may prefer to have the space for your editing work. You can choose to make the bin collapse and hide until you move your mouse down to the bottom of the screen, causing it to jump back into view. Go to Editor → Edit → Preferences → General → "Project Bin auto-hide”. This method works well only on a fast and powerful computer, though—if you don’t have a lot of horsepower, the bin can take a while to reappear.
If you find auto-hide too slow but don’t want to see the bin all the time, then go ahead and collapse and expand it manually. To close the bin, click the Hide Project Bin arrow at the lower left of your screen. Click the arrow again when you want the Project bin to reappear.
The Palette bin
When you’re in Full Edit, the Task panel displays the Palette bin. These palettes let you do things like keep track of what you’ve done to your photo (Undo History palette) and apply special effects to your images (Effects palette and Content palette).
You might like the Palette bin, but many people don’t. If you don’t have a large monitor, you may find it wastes too much desktop acreage, and in Elements, you need all the working room you can get. Fortunately, you don’t have to keep your palettes in the bin; you can close the bin and just keep your palettes floating around on your desktop, or you can minimize them.
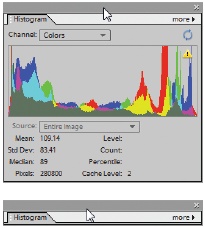
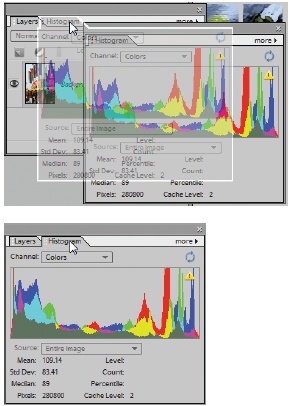
Open and close the bin by clicking the Palette bin’s left edge (anywhere along the thin vertical bar). You can also pull palettes out of the bin by dragging the name bar of any palette. Figure 1-11 shows how to make palettes even smaller once they’re out of the bin. You can also combine freestanding palettes with each other, as shown in Figure 1-12.
At first, the Palette bin contains only two palettes: Layers and Effects. To see how many more palettes Elements actually gives you, check out the Editor’s main Window menu (the one at the top of your screen). When you select a new palette, it appears floating on the desktop. If you want to put a palette into the bin, click the little double arrow at the upper right of the palette, choose “Place in Palette Bin when Closed”, and then click the Close button. The palette jumps into the bin. To take a palette out of the bin, drag it out, go back to the menu, and then deselect “Place in Palette Bin when Closed”. The next time you close the palette, it disappears, and you have to choose it from the Window menu to see it again.
Tip
If you’ve been going crazy trying to get rid of one of the bin’s original palettes (either the Layers or Effects palette), but every time you close it, it just hops back into the bin, in the upper-right corner of the palette, click the More button (the double arrows), and then turn off “Place in Palette bin when Closed”. Next time you close the palette, it goes away and doesn’t return til you choose it again from the Window menu.
Note
Elements has one palette-related quirk. In the Window menu, visible palettes should have checks next to their names. (Palettes that are open in another tab but not currently visible have dashes next to their names.) But if you collapse a palette, even though the palette’s name stays on your desktop, it remains unchecked in the Window menu. If you lose a collapsed palette (they occasionally get hidden behind the Options bar when you switch back and forth from Full Edit to Quick Fix or the Organizer), then just select the palette’s name in the list again to bring it back to the front where you can reach it. If all else fails, choosing Reset Palette Locations in the Window menu puts everything back in its original position.
Getting Help
Wherever Adobe found a stray corner in Elements, they stuck some help into it. You can’t move anywhere in this program without being offered some kind of guidance. Here are some of the ways you can summon assistance if you need it:
Help menu. Choose Help → Photoshop Elements Help, or simply press F1. Elements launches your Web browser, and you see the Elements Help files displayed there. In the Help window, you can search or browse a topic list and glossary.
Tooltips. When it’s blue, the text that pops up under your mouse as you move around Elements is linked to the appropriate section in Elements Help. Click a tooltip for more information about whatever your mouse is hovering over.
Dialog box links. Most dialog boxes have a few words of bright blue text somewhere in them. That text is actually a link to Elements Help. If you get confused about what the settings for a filter do, for instance, then, in the settings dialog box, click the blue text for a reminder.
Guided Edit
If you’re a beginner, your biggest help in Elements may be Guided Edit, shown in Figure 1-13. It walks you through a variety of popular editing tasks, like cropping, sharpening, correcting colors, and removing blemishes. It also includes some features that are useful even if you’re an old Elements hand, like the Actions Player (Using Actions in Elements) and the new Scene Cleaner (Tidying Up with Scene Cleaner).
Guided edit is really easy to use:
Go to Guided Edit.
Click the Edit tab → Guided.
Open a photo.
Press Ctrl+O, and then, from the window that appears, choose your photo. If you already have a photo open, it appears in the Guided Edit window automatically. If you have several photos in the Project bin, then you can switch images by double-clicking the thumbnail of the one you want to work on.
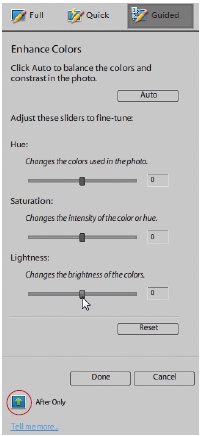
Figure 1-13. Guided Edit gives you step-by-step help with basic photo editing. Just use the tools that appear in the task panel once you choose an activity. After you’ve selected a task, you can change the view of your photo to “Before and After”. Keep clicking the little blue button (circled) at the bottom of the window to toggle views between “After Only”, “Before & After—Horizontal”, and “Before & After—Vertical”.Your options are grouped into major categories like Basic Photo Edits and Color Correction, with a variety of individual projects under each heading. Just click the task you want in the list on the right side of the window. The Task panel displays the relevant buttons and/or sliders for your task.
Make your adjustments.
Just move the sliders and click the buttons till you like what you see. If you want to start over, click Reset. If you change your mind about the whole project, click Cancel.
If several steps are involved, then Elements shows you just what you need to use for the current step, and then switches to a new set of choices for the next step as you go along.
Click Done to finish.
If there are more steps, then you may see another set of instructions. If you see the main list of topics again, you’re all through. Don’t forget to save your changes (Saving Your Work). To close your photo, press Ctrl+W, or leave it open and switch to another tab to share it or use it in a project.
If you need to adjust your view of your photo while you work on it, Guided Edit has a little toolbox with the Hand (The Zoom Tool) and Zoom (The Hand Tool) tools to help you out.
Note
Guided Edit shows you quick and easy ways to change your image, but you don’t always get the best possible results. It’s a great tool for starting out, but don’t make the mistake of thinking what you see here is the best you can possibly do for your images. Once you’re more comfortable in Elements, Quick Fix (Chapter 4) is a good next step.
Photoshop Inspiration Browser
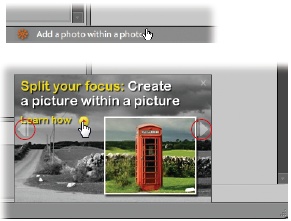
You’ve probably noticed the little text alerts that zip in and out at the bottom of both the Editor and the Organizer windows, as shown in Figure 1-14. If you click one, then you get a pop-up window that suggests a tutorial explaining how to do whatever the text suggested. Click the arrow where it says “Learn how”, and, if you haven’t already done so, Adobe offers to install the Photoshop Inspiration Browser. The Browser is a dedicated mini-program that lets you view tutorials. Viewing material in the Browser requires a Photoshop.com account (available only for US residents; see Photoshop.com), but if you have an account, it’s well worth installing, because the Browser is a direct connection to a slew of tutorials for things you might want to do with Photoshop Elements or Premiere Elements (Adobe’s movie editing program).
To get started, just click through the screens to install the Inspiration Browser. If you don’t already have it, then you have to install yet another Adobe program: Adobe AIR, which lets other programs show you content stored online without using a Web browser.
This process may seem like a lot of work, but it’s well worth the effort, since you can find tutorials on everything from beginner topics like creating albums to advanced subjects like working with Displacement Maps (a sophisticated technique used for things like making your photo look like it’s painted on a brick wall, letting the brick texture show through, or making a page of text look like a crumpled newspaper). The tutorials are all in either PDF or video format. You’ll see tutorials from well-known Elements gurus here, but anyone can submit a tutorial for the Inspiration Browser. So if you figure out how to do a project you think might be useful to others, you can create a tutorial yourself and send it in for approval. (You need to create your tutorial as either a PDF or, for a video tutorial, in the Flash FLV format; submit by clicking the Submit button and entering the requested information in the window that appears.)
Search the tutorials using the box on the left, or, after clicking All Tutorials, filter them by category or product (so you don’t have to see Premiere Elements topics if you have only Photoshop Elements, for example). You can also click on one of the column headings to see the available tutorials arranged by Title, Author, Difficulty, Date Posted, Category, Type (video or PDF), or the average star rating given it by the people who’ve tried it. Use the buttons at the upper right of the window to change the view from a list to a larger thumbnail view; information about each tutorial appears below the thumbnail.
The Inspiration Browser is a wonderful resource and may well give you most of the help you need with Elements beyond this book.
Tip
If the author of a tutorial has a Web site, then the tutorial’s page has a link to it. Exploring these links can bring you to a great many useful Elements-related learning resources, as well as useful add-on tools that extend Elements’ capabilities (see Chapter 19).
Escape Routes
Photoshop Elements has a couple of really wonderful features to help you avoid making permanent mistakes: the Undo command and the Undo History palette. After you’ve gotten used to them, you’ll probably wish it were possible to use these tools in all aspects of your life, not just Elements.
Undo
No matter where you are in Elements, you can almost always change your mind about what you just did. Press Ctrl+Z, and the last change you made goes away. Pressing Ctrl+Z works even if you’ve just saved your photo—but only while it’s still open. (If you close your picture, your changes are permanent.) Keep pressing Ctrl+Z and you keep undoing your work, step by step.
If you want to redo what you just undid, just press Ctrl+Y. These keystroke commands are great for toggling changes on and off while you decide whether you really want to keep them. The Undo/Redo keystroke combinations work in the Organizer as well as the Editor.
Undo History palette
In the Full Edit window, you get even more control over the actions you can undo, thanks to the Undo History palette (Figure 1-15); open it by choosing Window → Undo History.
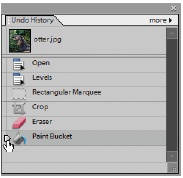
This palette holds a list of the changes you’ve made since you opened your image. Just push the slider up and watch your changes disappear one by one as you go. Undo History even works if you’ve saved your file: As long as you haven’t closed your file, the palette tracks every action you take. You can also slide the other way to redo changes that you’ve undone.
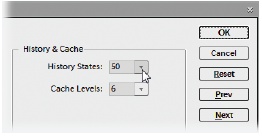
Be careful, though. You can back up only as many steps as you’ve set Elements to remember. Elements lets you keep track of as many as 1,000 steps. You can regulate this number in Preferences, as explained in Figure 1-16.
The one rule of Elements
As you’re probably beginning to see, Elements lets you work in lots of different ways. What’s more, most people who use Elements approach projects in different ways. What works for your neighbor with her pictures may be quite different from how you would choose to work on the very same shots.
However, you’ll hear one suggestion from almost every Elements veteran, and it’s an important one: Never ever work on your original. Always, always, always make a copy of your image and work on that.
The good news is that if you store your photos in the Organizer, you don’t need to worry about accidentally trashing your original. Elements automatically creates a copy when you edit a photo that’s cataloged in the Organizer, so that you can always revert to your original.
Note
The Organizer’s version sets provide another great safety net. They let you make as many different editions of your photo as you like without compromising your original. Saving Your Work has full details.
If you’re determined not to use the Organizer, then follow these steps to make a copy of your image:
Right-click the title bar of the Image window, and then choose Duplicate, or go to File → Duplicate.
The Image window is the smaller window within the Editor where your photo appears.
Name the duplicate, and then click the close button (the X at the upper right of the image window) on the original.
Now the original is safely tucked out of harm’s way.
Save the duplicate using Ctrl+S.
Choose Photoshop (.psd) as the file format when you save it. (You may want to choose another format after you’ve read Chapter 3, and understand more about your different format options.)
Now you don’t have to worry about making a mistake or changing your mind, because you can always start over if you want to.
Note
Elements doesn’t have an autosave feature, so you should get into the habit of saving frequently as you work. Read more about saving on Saving Your Work.
Getting Started in a Hurry
If you’re the impatient type, and you’re starting to squirm because you want to be up and doing something to your photos, here’s the quickest way to get started in Elements: Adjust the brightness and color balance all in one step.
While you’re in the Editor, open a photo.
Press Ctrl+O and navigate to the image you want, and then click Open.
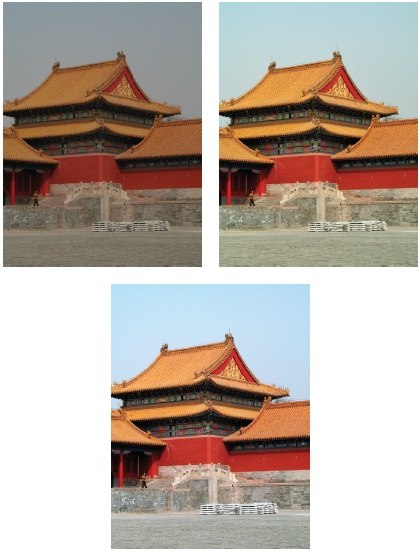
Press Alt+Ctrl+M.
You’ve just applied Elements’ Auto Smart Fix tool (Figure 1-17).
Voilá! You should see quite a difference in your photo, unless the exposure, lighting, and contrast were almost perfect before. The Auto Smart Fix tool is one of the many easy-to-use features in Elements. (Of course, if you don’t like what just happened to your photo, no problem—simply press Ctrl+Z to undo it.)
If you’re the really impatient type, jump right to Chapter 4 to learn about using the Quick Fix commands. But it’s worth taking the time to read the next two chapters so you understand which file formats to choose, and how to make some basic adjustments to your images, like rotating and cropping them.
Don’t forget to give Guided Edit a try if you see what you want to do in the list of topics. Guided Edit can be a big help when you’re first learning your way around.
Get Photoshop Elements 7: The Missing Manual now with the O’Reilly learning platform.
O’Reilly members experience books, live events, courses curated by job role, and more from O’Reilly and nearly 200 top publishers.

