Chapter 4. Selections: Choosing What to Edit
Life is all about making choices, and the time you spend in Photoshop is no exception. Perhaps the biggest decision you’ll make is which part of an image to edit—after all, your edits don’t have to affect the whole thing. Using a variety of Photoshop tools, you can tell the program exactly which portion of the image you want to tinker with, right down to the pixel, if you so desire. This process is called making a selection.
As you’ll learn in this chapter, Photoshop has a bunch of tools that you can use to create selections based on shape, color, and other attributes. You can also draw selections by hand, although that requires a bit of mouse prowess. True selection wisdom lies in learning which selection tool to start with, how to use the tools together, and how to fine-tune your selections quickly and efficiently. The following pages will help you with all that and then some.
Selection Basics
What’s so great about selections, anyway? Lots. After you make a selection, you can do all kinds of neat things with it, like:
Fill it with color or pixels from the image’s background. Normally, the Edit→Fill command (Filling a Layer with Color) floods an entire layer with color, but by creating a selection first, you can color just that area. In CS5, you can use the Fill command in conjunction with a selection to delete a person from your photo as if they were never there (see Filling a Selection with Color).
Add an outline. You can add a stroke (Photoshop’s term for an outline) to any selection. For instance, you can use selections to give your photo a black border (Stroking (Outlining) a Selection) or to circle yourself in a group photo (Stroking (Outlining) a Selection).
Move it around. To move part of an image, you need to select it first. You can even move selections from one document to another, as discussed on Moving Selections. For example, a little head swapping is great fun after family reunions and breakups. If you want to stick your ex’s head onto a ballerina’s body, hop on over to Moving Selections.
Resize or transform it. Need to change the size or shape of your selection? No problem: Just make a selection and then transform it into whatever size or shape you need (Transforming a Selection). Photoshop won’t reshape any pixels that are in your selected area, just the selection itself.
Use it as a mask. When you create a selection, Photoshop protects the area outside it—anything you do to the image affects only the selected area. For example, if you move the Eraser tool (Fading Images Together) across the edge of a selection, it erases only the area inside the selection. Likewise, if you create a selection before adding a layer mask (Layer Masks: Digital Masking Tape), Photoshop loads the selected area into the mask automatically, letting you adjust only that part of the image. So selections are crucial when you need to correct the lighting in just one area (Chapter 9), or change the color of an object (Changing Color).
This chapter discusses all these options and more. But, first, you need to understand how Photoshop marks selections.
Meet the Marching Ants
When you create a selection, Photoshop calls up a lively army of animated “marching ants” (shown in Figure 4-1). These tiny soldiers dutifully march around the edge of the selected area, awaiting your command. You can select part of an image, everything on a single layer, or a whole document. Whenever you have an active selection (that is, whenever you see marching ants), Photoshop has eyes only for that portion of your document—any tool you use (except the Type and Shape tools) will affect only the area inside the selection.
Note
Selections don’t hang around forever—when you click somewhere else on your screen (outside the selection) with a selection tool, your original selection disappears, forcing you to redraw it. If you want to save a selection to use again later, flip to Saving a Selection.
Here are the commands you’ll use most often when you make selections:
Select All. This command selects your whole document and places marching ants around the perimeter, which is helpful when you want to copy and paste an entire image into another program or create a border around a photo (see Stroking (Outlining) a Selection). To run this command, go to Select→All or press ⌘-A (Ctrl+A on a PC).
Deselect. To get rid of the marching ants after you’ve finished working with the selection, choose Select→Deselect or press ⌘-D (Ctrl+D). Alternatively, if you’ve got one of the selection tools activated in the Tools panel, you can click once outside the selection to get rid of your selection.
Reselect. To resurrect your last selection, choose Select→Reselect or press ⌘-Shift-D (Ctrl-Shift-D). This command reactivates the last selection you made, even if it was five filters and 20 brushstrokes ago (unless you’ve used the Crop and Type tools, which render the Reselect command powerless). Reselecting is helpful if you accidentally deselect a selection you’ve been working on for a long time. (The Undo command [⌘-Z or Ctrl+Z] can also help you in that situation.)
Inverse. This command, which you run by going to Select→Inverse or pressing ⌘-Shift-I (Ctrl-Shift-I), lets you flip-flop a selection to select everything you didn’t select before. You’ll often find it easier to select what you don’t want and then inverse the selection to get what you do want (see the box on Selecting the Opposite).
Load a layer as a selection. When talking to people about Photoshop, you’ll often hear the phrase “load as a selection,” which is (unavoidable) Photoshop-speak for activating a layer that contains the object you want to work with and then summoning the marching ants so they run around that object; that way, whatever you do next affects only that object. To load everything that lives on a single editable layer as a selection, mouse over to the Layers panel and ⌘-click (Ctrl+click) the layer’s thumbnail (The Layers Panel); you don’t need to have the layer selected. Photoshop responds by putting marching ants around everything on that layer. Alternatively, you can Ctrl-click (right-click on a PC) the layer’s thumbnail and then choose Select Pixels from the resulting shortcut menu.
Tip
Although you can find most of the commands in this list in the Select menu at the top of your screen (except for loading a layer as a selection), you should memorize their keyboard shortcuts if you want to be smokin’ fast in Photoshop.
These next three items live in the Select menu, but they don’t actually call up marching ants. Instead, they tell Photoshop to select entire layers (for the lowdown on layers, see Chapter 3):
All Layers. Use this command if you want to select every layer in your document (so you can move several layers at once, for example). To select all layers, choose Select→All Layers or press ⌘-Option-A (Ctrl+Alt+A).
Deselect Layers. This command does the exact opposite of the previous one: It deselects all the layers in your Layers panel, leaving nary a layer highlighted. To run it, choose Select→Deselect Layers.
Similar Layers. Choose this command if you want to select all layers of the same kind (Layer Basics lists the different types of layers). For example, say you want to change the font in all the Type layers in your document. Just select a Type layer and then choose Select→Similar. Photoshop selects all your Type layers and highlights them in the Layers panel so you can modify them all at once. (See Chapter 14 for more on Type layers.)
Tip
When you move objects around with the Move tool, you can enlist Photoshop’s help in selecting individual layers by turning on Auto-Select in the Options bar. With this setting on, as you click an object in your document, Photoshop tries to guess which layer it’s on and select that layer for you.
Now it’s time to discuss the tools you can use to make selections. Photoshop has a ton of ‘em, so in the next several pages, you’ll find them grouped according to which kind of selections they’re best at making.
Selecting by Shape
Selections based on shape are probably the easiest ones to make. Whether the object you need to grab is rectangular, elliptical, or rectangular with rounded corners, Photoshop has just the tool for you. You’ll use the first couple of tools described in this section often, so think of them as your bread and butter when it comes to making selections.
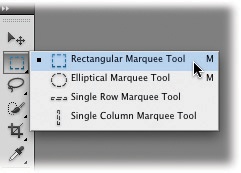
The Rectangular and Elliptical Marquee Tools
Photoshop’s most basic selection tools are the Rectangular and Elliptical Marquees. Anytime you need to make a selection that’s squarish or roundish, reach for these little helpers, which live at the top of the Tools panel, as shown in Figure 4-2.
To make a selection with either marquee tool, just grab the tool by clicking its icon in the Tools panel or by pressing M and then mouse over to your document. When your cursor turns into a tiny + sign, drag across the area you want to select (you’ll see the marching ants appear as soon as you start to drag). Photoshop starts the selection where you clicked and continues it in the direction you drag as long as you hold down the mouse button. When you’ve got marching ants around the area you want to select, release the mouse button.
You can use a variety of tools and techniques to modify your selection, most of which you can find in the Options bar (Figure 4-3). For example, you can:
Move the selection. Click anywhere within the selected area and drag to another part of your document (your cursor turns into a tiny arrow) to move the selection where you want it.
Add to the selection. When you click the “Add to selection” button in the Options bar (see Figure 4-3) or press and hold the Shift key, Photoshop puts a tiny + sign beneath your cursor to let you know it’ll add whatever you select to your current selection. This mode is handy when you’ve selected most of what you want but notice that you missed a spot. Instead of starting over, you can switch to this mode and draw around that area as if you were creating a new selection. You can also use this mode to select areas that don’t touch each other, like the irises in your dog’s eyes (see Fixing Animal White Eye).
Figure 4-3. Using the buttons in the Options bar, you can add to or subtract from a selection, as well as create a selection from two intersecting areas. Since all selections begin at the point where you first click, you can easily select one of these doors by dragging diagonally from the top-left corner to the bottom right as shown here. You can tell from the tiny + sign next to the crosshair-shaped cursor that you’re in “Add to selection” mode, so this figure now has two selections: the blue door and the red door.Subtract from the selection. Clicking the Options bar’s “Subtract from selection” button (also shown in Figure 4-3) or pressing and holding the Option key (Alt on a PC) has the opposite effect. You see a tiny – sign beneath your cursor to let you know you’re in this mode. Mouse over to your document and draw a box (or oval) around the area you want to deselect.
Intersect one selection with another. If you click the “Intersect with selection” button after you draw a selection, Photoshop lets you draw another selection that overlaps the first; the marching ants then surround only the area where the two selections overlap. It’s a little confusing, but don’t worry because you’ll rarely use this mode (if at all). The keyboard shortcut is Shift-Option (Shift+Alt on a PC). Photoshop puts a tiny multiplication sign (x) beneath your cursor when you use this mode.
Feather. If you want to soften the edges of your selection so that it blends into the background or another image, use feathering. You can enter a value in pixels in this field before you create the selection. As you’ll learn later in this chapter, feathering a selection lets you gently fade one image into another. See the box on The Softer Side of Selections for more on feathering.
Anti-alias. Turn on the Anti-alias checkbox to make Photoshop smooth the color transition between the pixels around the edges of your selection and the pixels in the background. Like feathering, anti-aliasing softens your selection’s edges slightly so that they blend better, though you can’t control the amount of softening Photoshop applies. It’s a good idea to leave this checkbox turned on unless you want your selection to have super crisp—and possibly jagged and blocky—edges.
Style. If you want to constrain your selection to a fixed size or aspect ratio (so that the relationship between its width and height stays the same), you can select Fixed Width or Fixed Ratio from the Style pop-up menu and then enter the size you want in the resulting width and height fields. (Be sure to enter a unit of measurement into each field, such as px for pixels.) If you leave the Normal option selected, you can draw any size selection you want.
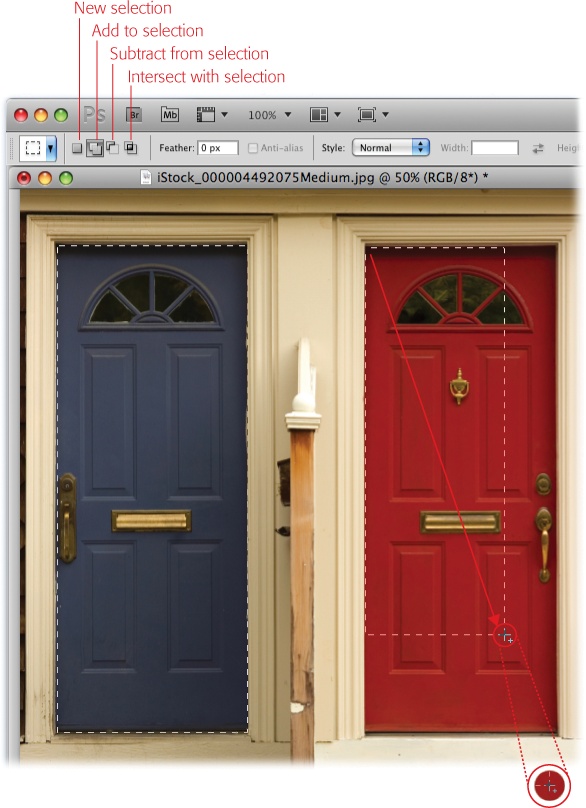
Here’s how to select two doors in the same photo, as shown in Figure 4-3:
Click the marquee tool icon in the Tools panel and choose the Rectangular Marquee from the pop-up menu (shown in Figure 4-2).
The Tools panel remembers which marquee tool you last used, so you’ll see that tool’s icon on top of the selection tools pop-up menu. If that’s the one you want to use, just press M to activate it. If not, in the Tools panel, click and hold whichever marquee tool is showing until the pop-up menu appears and then choose the tool you want.
Tip
To cycle between the Rectangular and Elliptical Marquee tools, press M to activate the marquee toolset and then press Shift-M to activate each one in turn. If that doesn’t work, make sure that a gremlin hasn’t turned off the preference that makes this trick possible. Choose Photoshop→Preferences→General (Edit→Preferences→General on a PC) and make sure the “Use Shift Key for Tool Switch” checkbox is turned on.
Drag to draw a box around the first door.
To select the blue door shown in Figure 4-3, click its top-left corner and drag diagonally toward its bottom-right corner. When you get the whole door in your selection, release the mouse button. Don’t worry if you don’t get the selection in exactly the right spot; you can move it around in the next step.
Move your selection into place if necessary.
If you need to move the selection, just click inside the selected area (your cursor turns into a tiny arrow) and drag the selection box where you want it. You can also use the arrows on your keyboard to nudge the selection in one direction or another (you don’t need to click it first).
Press the “Add to selection” button in the Options bar and then select the second door by drawing a selection around it.
Photoshop lets you know that you’re in “Add to selection” mode by placing a tiny + sign beneath your cursor. Once you see it, mouse over to the second door and drag diagonally from its top-left corner to its bottom right, as shown in Figure 4-3.
If you need to move this second selection around, do that before you release the mouse button or you’ll end up moving both selections instead of just one. To move a selection while you’re drawing it, hold down your mouse button, press and hold the space bar, and then move your mouse to move the selection. When you’ve got the selection in the right place, release the space bar—but keep holding the mouse button—and continue dragging to draw the selection. This maneuver feels a bit awkward at first, but you’ll get used to it with practice.
Congratulations! You’ve just made your first selection and added to it. Way to go!
Tip
To draw a perfectly square or circular selection, press and hold the Shift key as you drag with the Rectangular or Elliptical Marquee tool, respectively. If you want to draw the selection from the center outward (instead of from corner to corner), press and hold the Option key (Alt on a PC). If you want to draw a perfectly square or circular selection from the center outward, press and hold Shift-Option (Shift+Alt) as you drag with either tool. Whew—that’s a lot of keys! Be sure to use this trick only on new selections—if you’ve already got a selection, the Shift key pops you into “Add to selection” mode.
Creating a soft vignette
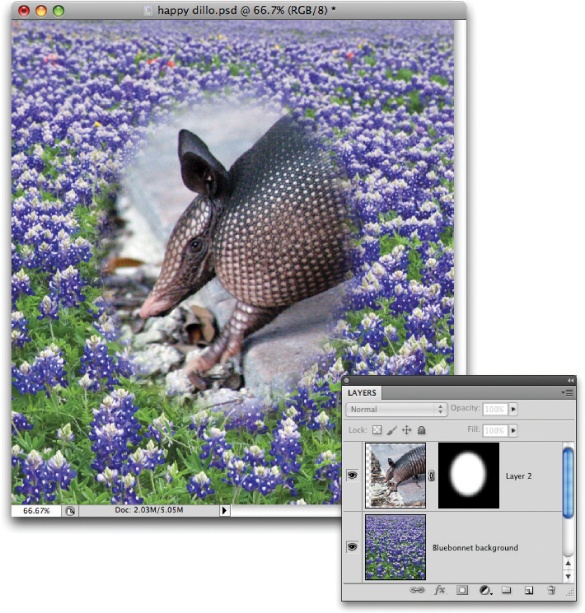
The Elliptical Marquee tool works just like the Rectangular Marquee tool except that it draws round or oval selections. It’s the perfect tool for selecting eyes, circling yourself in a group photo (Stroking (Outlining) a Selection), or creating the ever-popular, oh-so-romantic, soft oval vignette shown in Figure 4-4.
Here’s how to create a soft oval vignette:
Open two images and combine them into one document.
Simply drag one image from its Layers panel into the other document’s window, as shown on Managing Layers.
Reposition the layers so the soon-to-be-vignetted photo is at the top of the Layers panel.
Over in the Layers panel, make sure that both layers are editable so you can change their stacking order. If you see a tiny padlock to the right of either layer’s name, double-click that layer in the Layers panel to make it editable. Then drag the layer containing the photo you want to vignette (in Figure 4-4, that’s the picture of the armadillo) to the top of the Layers panel.
Grab the Elliptical Marquee tool and select the part of the image you want to vignette (here, the armadillo’s head).
Peek at your Layers panel to make sure the correct photo layer is selected (the armadillo) and position your mouse near the center of the image. Press and hold the Option key (Alt on a PC), mouse over to the image, and drag to draw an oval-shaped selection from the inside out. When you’ve got the selection big enough, release the Option (or Alt) key and your mouse button.
Feather the selection’s edges by clicking the Refine Edge button in the Options bar.
In the resulting dialog box, make sure all the sliders are set to 0 and then drag the Feather slider to the right. If you want to see what the feathered edge will look like, release your mouse button and take a peek at your document—you’ll see the newly softened edge against a temporary white background. If you want to preview the feather against a different background, click any of the other preview buttons toward the bottom of the dialog box. (Creating Selections with Channels covers the Refine Edge dialog box in greater detail.) When it looks good, click OK to close the dialog box.
Hide the area outside the selection with a layer mask.
You could simply inverse the selection (The Color Range Command) and then press the Delete key (Backspace on a PC) to zap the area outside the selection, but that’d be mighty reckless. What if you changed your mind? You’d have to undo several steps or—curses—start over completely! A less destructive and more flexible approach, which you learned about back on Layer Masks: Digital Masking Tape, is to hide the area outside the selection with a layer mask. Over in the Layers panel, make sure you have the correct layer selected (in this case, the armadillo) and then add a layer mask by clicking the tiny circle-within-a-square icon at the bottom of the Layers panel (you can also use the Mask panel’s Feather slider to soften the mask’s edge, if you happened to skip the previous step of feathering the selection). Photoshop hides everything outside the selection area, letting you see through to the bluebonnet layer below. Beautiful!
That armadillo looks right at home, doesn’t he? You’ll want to memorize these steps because this method is perhaps the easiest—and most romantic!—way to combine two images into a new and unique piece of art (although starting on The Vector Shape Tools you’ll learn how to use the vector Shape tools to do the same thing).
The Single Row and Column Marquee Tools
The Marquee toolset also contains the Single Row Marquee and Single Column Marquee tools, which can select exactly one row or one column’s worth of pixels, spanning either the width or the height of your document. You don’t need to drag with your mouse to create a selection with these tools; just click once in your document and the marching ants appear.
Now, you may be asking, “When would I want to do that?” Not often, it’s true, but consider these circumstances:
Mocking up a web page design. If you need to simulate a column or row of space between certain areas in a web page, you can use either tool to create a selection that you fill with the website’s background color, or you can just delete the existing pixels by pressing the Delete key (Backspace on a PC).
Stretching an image to fill a space. If you’re designing a web page, for example, you can use these tools to extend the image by a pixel or two. Use either tool to select a row of pixels at the bottom or side of the image, grab the Move tool by pressing V, and tap the arrow keys on your keyboard while holding the Option key (Alt on a PC) to nudge the selection in the direction you need and duplicate it at the same time. However, a better option might be to use Content-Aware Scale (see The Content-Aware Scale Tool).
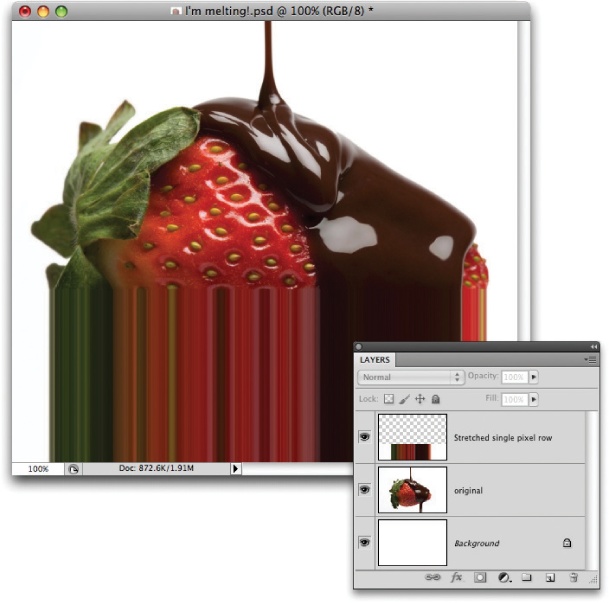
Making an image look like it’s melting or traveling through space at warp speed. You can use either tool to create a selection and then stretch it with the Free Transform tool (see Figure 4-5).
The Vector Shape Tools
Okay, technically, vector shapes aren’t selection tools at all, but you can use them to create selections (turn to Drawing with the Shape Tools to learn more about vector shapes). Once you get the hang of using them (as this section shows you) you’ll be reaching for ‘em all the time.
Perhaps the most useful of this bunch is the Rounded Rectangle tool. If you ever need to select an area that’s rectangular but has rounded corners, the Rounded Rectangle tool is your best bet. If you’re creating an ad for a digital camera, say, you can use this technique in a product shot to swap the image shown on the camera’s display screen with a different image. Or more practically, you can use it to give your photos rounded corners, as shown in Figure 4-6.
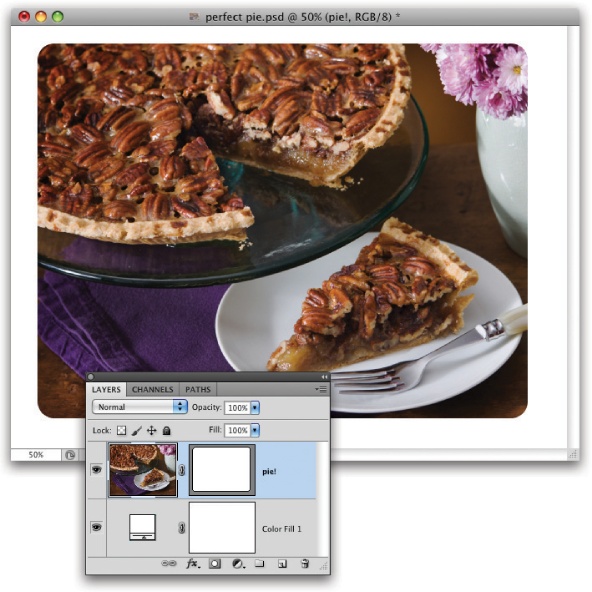
Here’s how to round the corners of your photos:
Open a photo and double-click the Background layer to make it editable.
Because you’ll add a mask to the photo layer in step 6, you need to make sure the Background layer is unlocked or Photoshop won’t let you add the mask.
Select the Rounded Rectangle tool from the Tools panel.
Near the bottom of the Tools panel is the Vector Shape toolset. Unless you’ve previously selected a different tool, you’ll see the Rectangle tool’s icon. Click the icon and hold down your mouse button until the pop-up menu appears and then choose the Rounded Rectangle tool.
In the Options bar, click the Paths mode button and change the Radius field to 40 pixels.
As you’ll learn on Drawing with the Shape Tools, the vector Shape tools can operate in various modes, which you set in the Options bar. For this particular technique, you need to make sure that the Rounded Rectangle tool is in Paths mode (the button looks like a square with a tiny dot on each corner with a pen in the center). Next, change the number in the Options bar’s Radius field, which controls how rounded the image’s corners will be: the lower the number, the less rounded; the higher the number, the more rounded. This field was set to 40 pixels to create the corners shown in Figure 4-6.
Draw a box around the image.
Mouse over to your image and, starting in one corner, drag diagonally to draw a box around it. When you let go of the mouse button, Photoshop creates a thin gray line that appears atop your image called a path (you’ll learn more about paths in Chapter 13). If you need to move the box, while you’re drawing it, press and hold the space bar. If you want to move it after you’ve drawn it, press A to grab the Path Selection tool (it looks like a black arrow and lives below the Type tool in the Tools panel), click the path to select it, and then drag to move it wherever you want.
Hide the area outside the path by adding a layer mask.
Over in the Layers panel, click the photo layer once to select it and then add a vector layer mask by ⌘-clicking (Ctrl-clicking) the tiny circle-within-a-square icon at the bottom of the Layers panel. Photoshop hides the old, boring square photo edges. Why a vector mask, you ask? Because the path you drew with the Shape tool is vector in nature, not pixel-based. As you learned on Opening an Existing Document, you can resize a vector without losing quality anytime you want by selecting it and using Free Transform (The Transformers). Sweet! For more on vector masks, skip ahead to Using Vector Masks.
Who knew that giving your photo rounded corners was so simple?
Selecting by Color
In addition to giving you tools to select areas by shape, Photoshop lets you select areas by color. This option is helpful when you want to select a chunk of an image that’s fairly uniform in color, like someone’s skin, the sky, or the paint job on a car. Photoshop has lots of tools to choose from, and in the next several pages, you’ll learn how to pick the one that best suits your needs.
The Quick Selection Tool
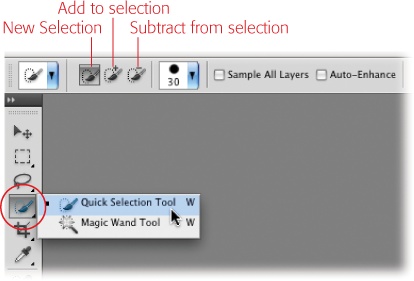
The Quick Selection tool is shockingly easy to use and lets you create complex selections with a few strokes of an adjustable brush. As you paint with the Quick Selection tool, your selection expands outward to encompass pixels similar in color to the ones you’re brushing across. It works insanely well if there’s a fair amount of contrast between what you want to select and everything else. This tool lives in the same toolset as the Magic Wand (The Magic Wand), as you can see in Figure 4-7.
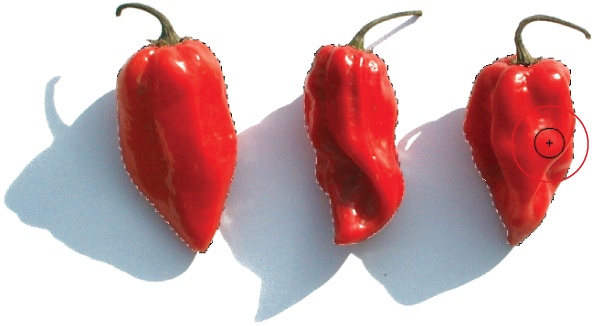
To use this wonderfully friendly tool, click anywhere in the area you want to select or drag the brush cursor across it, as shown in Figure 4-8. When you do that, Photoshop thinks for a second and then creates a selection based on the color of the pixels you clicked or brushed across. The size of the area Photoshop selects is proportional to the size of the brush you’re using: a larger brush creates a larger selection. You can adjust the Quick Selection tool’s brush size just like any other brush: by choosing a new size from the Brush Preset picker in the Options bar, or by using the keyboard shortcut discussed in the Tip on Tip. (Chapter 12 covers brushes in detail.) For the best results, use a hard-edged brush to produce defined edges (instead of the slightly transparent edges produced by a soft-edge brush) and turn on the Auto-Enhance setting shown in Figure 4-7 and discussed in the box on Smart Auto-Enhancing.
When you activate the Quick Selection tool, the Options bar offers three modes (see Figure 4-7):
New selection. When you first grab the Quick Selection tool, it’s automatically set to create a brand-new selection, which is helpful since creating a new selection is sort of the whole point.
Add to selection. Once you’ve clicked or made an initial brushstroke, the Quick Selection tool automatically goes into “Add to selection” mode (indicated by the tiny + sign inside the cursor, as shown in Figure 4-8). Now Photoshop adds any additional areas you brush over or click to your current selection. If you don’t like the selection Photoshop has created and want to start over, press ⌘-Z (Ctrl+Z on a PC) to undo it, or click the Options bar’s “New selection” button and then brush across the area again. (The old selection disappears as soon as you start to make a new one.) To get rid of the marching ants altogether, choose Select→Deselect.
Subtract from selection. Adding to a selection can make Photoshop select more than you really want it to. If you have this problem, click the “Subtract from selection” button (a tiny – sign appears in your cursor) and then simply paint across the area you don’t want selected to make Photoshop exclude it.
Note
To get the most out of the Quick Selection tool, you’ll probably need to do a fair amount of adding to and subtracting from your selections. Keyboard shortcuts can help speed up the process: Press and hold the Shift key to enter “Add to selection” mode. Press and hold the Option key (Alt on a PC) to enter “Subtract from selection” mode. If these shortcuts sound familiar, they should—they’re identical to the marquee tools’ keyboard shortcuts.
Brush Size. Use a larger brush to select big areas and a smaller brush to select small or hard-to-reach areas. As explained earlier, you’ll get better results with this tool by using a hard-edged brush instead of a soft-edged one.
Sample All Layers. This setting is initially turned off, which means Photoshop examines only the pixels on the active layer (the one that’s selected in your Layers panel). If you turn on this setting, Photoshop examines the whole enchilada—everything in your document—and grabs all similar pixels no matter which layer they’re on.
Auto-Enhance. Because the Quick Selection tool makes selections extremely fast, their edges can end up looking blocky and imperfect. To tell Photoshop to take its time and think more carefully about the selections it makes, turn on the Options bar’s Auto-Enhance checkbox. This feature gives your selections smoother edges, but if you’re working with a really big file, you could do your taxes while it’s processing. The box below has tips for using this feature.
The Magic Wand
The Magic Wand lets you select areas of color by clicking (rather than dragging). It’s in the same toolset as the Quick Selection tool, and you can grab it by pressing Shift-W (it looks like a wizard’s wand, as shown back in Figure 4-7). Use the Magic Wand to select solid-colored backgrounds or large bodies of similar color, like a cloudless sky, with just a couple of clicks. The Quick Selection tool, in contrast, is better at selecting objects rather than big swaths of color.
When you click once with the Magic Wand in the area you want to select, Photoshop magically (hence the name) selects all the pixels on the currently selected layer that are both similar in color and touching one another (see Expanding your selection to learn how to tweak this behavior). If the color in the area you want to select varies a bit, Photoshop may not select all of it. In that case, you can add to the selection either by pressing and holding the Shift key as you click nearby areas or by modifying the Magic Wand’s tolerance in the Options bar as described later in this section and shown in Figure 4-9. To subtract from your selection, just press and hold the Option key (Alt on a PC) while you click the area you don’t want included.
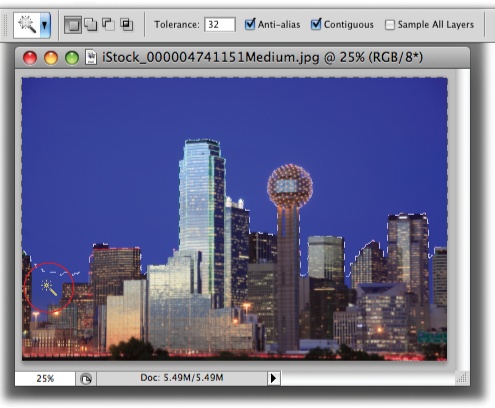
When you activate the Magic Wand, the Options bar lets you adjust the following settings:
Tolerance. This setting controls the Magic Wand’s sensitivity—how picky the tool is about which pixels it considers similar in color. If you increase this setting, Photoshop gets less picky (in other words, more tolerant) and selects every pixel that could possibly be described as similar to the one you originally clicked. If you decrease this setting, Photoshop gets pickier and selects only pixels that closely match the original.
Out of the box, the tolerance is set to 32, but it can go all the way up to 255. (If you set it to 0, Photoshop selects only pixels that exactly match the one you clicked; if you set it to 255, the program selects every color in the image.) It’s usually a good idea to keep the tolerance set fairly low (somewhere between 12 and 32); you can always click an area to see what kind of selection you get, increase the tolerance if you need to, and then click the area again (or add to the selection using the Shift key, as described above).
Anti-alias. Leave this setting turned on to make Photoshop soften the edges of your selection ever so slightly. If you want a super-crisp edge, turn it off.
Contiguous. You’ll probably want to leave this checkbox turned on; it makes the Magic Wand select pixels that are adjacent to one another. If you turn this setting off, Photoshop goes hog wild and selects all similar-colored pixels no matter where they are.
Sample all layers. If your document has multiple layers and you leave this checkbox turned off, Photoshop examines only pixels on the active layer and ignores the pixels on other layers. If you turn this setting on, Photoshop examines the whole image and selects all pixels that are similar in color, no matter which layer they’re on.
Expanding your selection
Sometimes the Magic Wand makes a nearly perfect selection, leaving you with precious few pixels to add to it. If this happens, it simply means that the elusive pixels are just a little bit lighter or darker in color than what the Magic Wand’s tolerance setting allows for. You could Shift-click the elusive areas to add them to your selection, but the Select menu has a couple of options that can quickly expand the selection for you:
Choose Select→Grow to make Photoshop expand your selection to all similar-colored pixels adjacent to the selection (see Figure 4-10, top).
Choose Select→Similar to make Photoshop select similar-colored pixels through-out the whole image even if they’re not touching the original selection (see Figure 4-10, bottom).
Note
Because both these commands base their calculations on the Magic Wand’s tolerance setting (The Magic Wand), you can adjust their sensitivity by adjusting that setting in the Options bar. You also can run these commands more than once to get the selection you want.

The Color Range Command
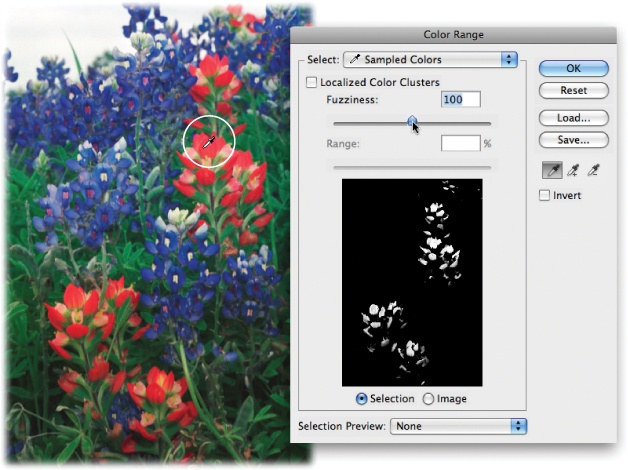
The Color Range command is similar to the tools in this section in that it makes selections based on colors, but it’s much better at selecting areas that contain lots of details (for example, the flower bunches in Figure 4-11). The Magic Wand tends to select whole pixels, whereas Color Range is more fine-tuned and tends to select more partial pixels than whole ones. This fine-tuning lets Color Range produce selections with smoother edges (less blocky and jagged than the ones you get with the Magic Wand) and get in more tightly around areas with lots of details. As a bonus, you also get a handy preview in the Color Range dialog box, showing you which pixels it’ll select before you commit to the selection (unlike the Grow and Similar commands discussed on The Color Range Command).
Open the Color Range dialog box by choosing Select→Color Range, either before or after you make a selection. If you already have a selection, Photoshop looks only at the pixels within the selected area, which is helpful if you want to isolate a certain area. For example, you could throw a quick selection around the red flower shown in the center of Figure 4-11 and use Color Range’s subtract from selection capabilities (explained later in this section) to carve out just the red petals. By contrast, if you want to use Color Range to help expand your selection, press and hold the Shift key while you choose Select→Color Range. If you haven’t yet made a selection, Color Range examines your entire image.
Use the Select pop-up menu at the top of the Color Range dialog box to tell Photoshop which colors to include in your selection. The menu is automatically set to Sampled Colors, which lets you mouse over an image (your cursor turns into a tiny eyedropper; see Figure 4-11) and click the color you want to select. If you change the Select menu’s setting to Reds, Blues, Greens, or whatever, Color Range will examine your image and grab that range of colors all by itself—once you click OK.
Note
As mentioned in the box on Selecting the Opposite, it’s sometimes easier to select what you don’t want in order to get the selection you need. The Color Range dialog box lets you select what you don’t want by turning on the Invert checkbox.
If you’re trying to select adjacent pixels, turn on Localized Color Clusters. You can tweak the area Photoshop selects by adjusting the Fuzziness setting. Its factory setting is 40, but you can change this number to anything between 0 and 200. If you increase it, Photoshop includes more colors and makes larger selections. If you lower it, Photoshop creates a smaller selection because it gets pickier about matching colors. As you move the Fuzziness slider (or type a number in the text box), keep an eye on the dialog box’s preview area—all the parts of the image that Photoshop will include in your selection appear white (see Figure 4-11).
Use the eyedroppers on the dialog box’s right side to add or subtract colors from your selection; the eyedropper with the tiny + sign adds to your selection and the one with the – sign subtracts from it. (Use the plain eyedropper to make your initial selection.) When you click one of the eyedroppers, mouse over to your image, and then click the color you want to add or subtract, Photoshop updates the Color Range dialog box’s preview area to show what the new selection looks like. It sometimes helps to keep the Fuzziness setting fairly low (around 50 or so) while you click repeatedly with the eyedropper.
Tip
You can use the radio buttons beneath the Color Range dialog box’s preview area to see either the selected area (which appears white) or the image itself. But there’s a better, faster way to switch between the two views: With Selection turned on, press the ⌘ key (Ctrl on a PC) to switch temporarily to Image preview. When you let go of the key, you’re back to Selection preview.
The Selection Preview pop-up menu at the bottom of the dialog box lets you display a selection preview on the image itself so that, instead of using the dinky preview in the dialog box, you can see your proposed selection right on your image. But you’ll probably want to leave this menu set to None because the preview options that Photoshop offers (Grayscale, Black Matte, and so on) get really distracting!
The Background and Magic Erasers
These two tools let you erase parts of your image based on the color you touch with your cursor. You’re probably thinking, “Hey, I want to create a selection, not go around erasing stuff!” And you have a valid point except that, after you’ve done a little erasing, you can always load that area as a selection. All you have to do is think ahead and create a duplicate layer before you start erasing, as this section explains.
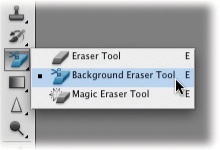
Say you have an image with a decent amount of contrast between the item you want to keep and its background, like a dead tree against the sky. In that case, Photoshop has a couple of eraser tools that can help you erase the sky super fast (see Figure 4-12). Sure, you could use the Magic Wand or Quick Selection tool to select the sky and then delete or mask it (Layer Masks: Digital Masking Tape), but using the Background Eraser lets you erase more carefully around the edges and then add a layer mask to hide the rest of it.
Tip
The Eraser tool’s keyboard shortcut is the E key. To switch among the various eraser tools, press Shift-E repeatedly.
The Background Eraser
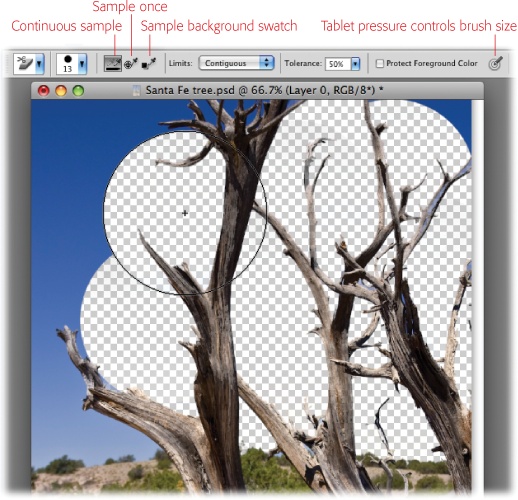
This tool lets you delete an image’s background by painting (dragging) across the pixels you want to delete. When you activate the Background Eraser by choosing it from the Tools panel, your cursor turns into a circle with a tiny crosshair in its center. This crosshair controls which pixels Photoshop deletes, so be extra careful and let it touch only the pixels you want to erase. Up in the Options bar, you can tweak the following settings for this tool (see Figure 4-13):
Brush Preset picker. This is where you choose the shape and size of your brush. For best results, stick with a soft-edged brush. Just click the down-pointing triangle next to this menu to grab one.
Figure 4-13. Even though the Background Eraser is destructive because it erases pixels, you can use it in a nondestructive way by remembering to duplicate the soon-to-be-erased layer first. Then load the erased layer as a selection and use it as a layer mask on the original layer. As you can see here, Photoshop pays attention only to the color you touch with the crosshair in the center of the brush; even though the tree’s branches are within the brush area (the circle), Photoshop deletes only the blue pixels. If you want to practice erasing this background, download DeadTree.jpg from this book’s Missing CD page at www.missingmanuals.com/cds.Sampling. Made up of three buttons whose icons all include eyedroppers, this setting controls how often Photoshop looks at the color the crosshair is touching to decide what to erase. If your background has a lot of color variations, leave this set to Continuous so Photoshop keeps a constant watch on what color pixels the crosshair is touching. If the color of background you’re erasing is fairly uniform, change this setting to Once and Photoshop then checks the color the crosshair touches just once and resolves to erase only pixels that closely match it. If you’re dealing with an image with only a small area for you to paint (like a tiny portion of sky showing through a lush tree), you can change this setting to Background Swatch, which instructs Photoshop to erase only the color of your current background color chip. To choose the color, click the background color chip at the bottom of your Tools panel (Foreground and background color chips), mouse over to your image, and then click an area whose color is similar to the color you want to erase.
Limits. When you first launch Photoshop, you’ll find this field set to Contiguous, which means you can erase only pixels adjacent to those that you touch with the crosshair. If you want to erase similar-colored pixels elsewhere in your image (for example, the background behind a really thick tree or a bunch of flowers), change this setting to Discontiguous. Find Edges also erases adjacent pixels, but it does so while preserving the sharpness of the object’s edge.
Tolerance. This setting works just like the Magic Wand’s Tolerance setting (The Magic Wand): Choosing a lower number makes the tool pickier about the pixels it selects, whereas a higher number makes it less picky.
Protect Foreground Color. If you can’t seem to get the Tolerance setting high enough and you’re still erasing some of the area you want to keep, turning on this checkbox can help. When it’s on, you can tell Photoshop which area you want to keep (the foreground) by Option-clicking (Alt-clicking on a PC) that area. If the area you want to keep is a different color in different parts of your image, you can turn this setting off or Option-click (Alt-click) to resample the foreground area.
Here’s how to use the Background Eraser to erase the sky behind a dead tree without harming the original pixels, as shown in Figure 4-13:
Open a photo and double-click its Background layer to make it editable (Restacking Layers) and then duplicate the Background by pressing ⌘-J (Ctrl+J on a PC).
Since you’ll add a layer mask to the original layer in the last step of this list, you need to unlock the Background to make it editable. And because you’ll do your erasing on the duplicate layer, you don’t need to see the original layer. Over in the Layers panel, click the little visibility eye to the left of the original layer’s thumbnail to turn it off.
Grab the Background Eraser tool and paint away the background.
The Background Eraser tool is in the same toolset as the Eraser tool (see Figure 4-12). Once you’ve activated it, mouse over to your document and your cursor morphs into a circle with a tiny crosshair in the center. Remember that the trick is to let the crosshair touch only the pixels you want to erase (it doesn’t matter what the circle part of the cursor touches, as Figure 4-13 shows). If you need to, you can increase and decrease your brush size by pressing the left and right bracket keys on your keyboard, respectively.
If the tool is erasing too much or too little of your image, tweak the Tolerance setting in the Options bar (also shown in Figure 4-13).
If an area in your image is almost the same color as the background, lower the tolerance to make the tool pickier about the colors it’s erasing; that way, it erases only pixels that closely match the ones you touch with the crosshair. Likewise, if it’s not erasing enough of the background, raise the tolerance to make it less picky about the pixels it zaps.
Tip
It’s better to erase small sections at a time instead of painting around the entire object in one continuous stroke. Hold your mouse button to erase a bit of the area around the object, let go of the button, click again to erase a little more, and so on. That way, if you need to undo your erasing using the History panel (Changing How Far Back You Can Go) or the Undo command (⌘-Z; Ctrl+Z on a PC), you won’t have to watch all that erasing unravel before your eyes.
Once you get a clean outline around the object, switch to the regular Eraser tool (Fading Images Together) or the Lasso tool (Using the Lasso Tools) to get rid of the remaining background.
After you erase the hard part—the area around the edges—with the Background Eraser, you can use the regular Eraser tool, set to a large brush, to get rid of the remaining background quickly. You can also use the Lasso tool to select the remaining areas and then press the Delete key (Backspace on a PC) to get rid of them.
Load the erased layer as a selection and turn off its visibility.
Over in the Layers panel, ⌘-click (Ctrl-click on a PC) the thumbnail of the layer you did the erasing work on to create a selection around the tree. When you see the marching ants, click the layer’s visibility eye to turn it off.
Select the original layer, turn on its visibility, and then put a layer mask over it.
In the Layers panel, click once to select the original layer (the unlocked Background) and then click the area to the left of its thumbnail to make it visible again. While you have marching ants running around the newly erased area, add a layer mask (Layer Masks: Digital Masking Tape) to the original layer by clicking the circle-within-a-square icon at the bottom of the Layers panel.
You’re basically done at this point, but if you need to do any cleanup work (if the Background Eraser didn’t do a perfect job getting around the edges, say), now’s the time to edit the layer mask. To edit the mask, click its layer thumbnail over in the Layers panel. Then press B to grab the Brush tool and set your foreground color chip to black (Foreground and background color chips). Now, when you brush across your image, you’ll hide more of the sky. If you need to reveal more of the tree, set your foreground color chip to white, and then paint the area you want to reveal. (See Layer Masks: Digital Masking Tape for a detailed discussion of creating and editing layer masks.)
Sure, duplicating the layer you’re erasing takes an extra step, but that way you’re not deleting any pixels—you’re just hiding them with a layer mask, so you can get them back if you want to. How cool is that?
Note
Ever heard the expression, “Out with the old and in with the new”? Well, that’s sort of what happened to the Extract filter. Honestly, you’re better off learning to use Photoshop CS5’s enhanced Refine Edge dialog box (Creating Selections with Channels), but you can wrestle the old Extract filter back into the 32-bit version of the program if you can’t live without it. Visit this book’s Missing CD page at www.missingmanuals.com/cds to learn how.
The Magic Eraser
This tool works just like the Background Eraser except that, instead of a brush cursor that you paint with, you get a cursor that looks like a cross between the Eraser tool and the Magic Wand. Just as the Magic Wand can select color with a single click, the Magic Eraser can zap color with a single click, so it’s great for erasing big areas of solid color instantly. Since this tool is an eraser, it really will delete pixels, so you’ll want to duplicate your Background layer before using it.
You can alter the Magic Eraser’s behavior by adjusting these Options bar settings:
Anti-alias. Turning this checkbox on makes Photoshop slightly soften the edges of your selection.
Contiguous. If you want to erase pixels that touch each other, leave this checkbox turned on. If you want to erase similar-colored pixels no matter where they are in your image, turn it off.
Sample All Layers. If you have a multilayer document, you can turn on this checkbox to make Photoshop look at the pixels on all the layers instead of just the active layer.
Opacity. If you want to control how strong the Magic Eraser is, you can enter a value (as a percent) here. For example, entering 50 makes it wipe away 50 percent of the image’s opacity, entering 100 removes the image entirely, and so on.
Selecting Irregular Areas
As you might imagine, areas that aren’t uniform in shape or color can be a real bear to select. Luckily, Photoshop has a few tools in its arsenal to help you get the job done as easily as possible. In this section, you’ll learn about the three lassos and the Pen tool, as well as a few ways to use these tools together to select hard-to-grab areas.
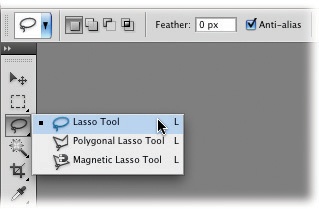
Using the Lasso Tools
The Lasso toolset contains three freeform tools that let you draw an outline around the area you want to select. If you’ve got an amazingly steady mouse hand or if you use a graphics tablet (see the box on The Joy of Painter), you may fall in love with the plain ol’ Lasso tool. If you’re trying to select an object with a lot of straight edges, the Polygonal Lasso tool will do you proud. And the Magnetic Lasso tries to create the selection for you by examining the color of the pixels your cursor is hovering above. The following sections explain all three lassos, which share a toolset at the top of the Tools panel (see Figure 4-14).
Lasso tool
The regular Lasso tool lets you draw a selection completely freeform as if you were drawing with a pencil. To activate this tool, simply click it in the Tools panel (its icon looks like a tiny lasso—no surprise there) or press the L key. Then just click your document where you want the selection to start and drag to create a selection. Once you stop drawing and release your mouse button, Photoshop automatically completes the selection with a straight line (that is, if you don’t complete it yourself by mousing over your starting point) and you see marching ants.
Tip
It’s nearly impossible to draw a straight line with the Lasso tool, unless you’ve got the steady hand of a surgeon. But if you press and hold the Option key (Alt on a PC) and then release your mouse button, you’ll temporarily switch to the Polygonal Lasso tool so you can draw a straight line (see the next section). When you release the Option (Alt) key, Photoshop completes your selection with a straight line.
The Options bar (shown in Figure 4-14) sports the same settings whether you have the Lasso tool or the Polygonal Lasso tool active. Here’s what it offers:
Mode. These four buttons (whose icons look like pieces of paper) let you choose among the same modes you get for most of the selection tools: New, “Add to selection”, “Subtract from selection”, and “Intersect with selection”. They’re discussed in detail back on pages 139–140.
Feather. If you want Photoshop to blur the edges of your selection, enter a pixel value in this field. Otherwise, Photoshop won’t do any feathering. (See the box on The Softer Side of Selections for more on feathering.)
Anti-alias. If you leave this setting turned on, Photoshop slightly softens the edges of your selection, making them less jagged—The Rectangular and Elliptical Marquee Tools has the details.
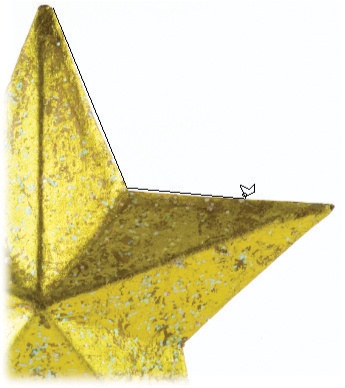
Polygonal Lasso tool
If your image has a lot of straight lines in it (like the star in Figure 4-15), the Polygonal Lasso tool is your ticket. Instead of letting you draw a selection that’s any shape at all, the Polygonal Lasso draws only straight lines. To use it, click once to set the starting point and move your cursor along the shape of the item you want to select; click again where the angle changes. Simply repeat this process until you’ve outlined the whole shape. It’s super simple to use, as Figure 4-15 illustrates. To close your selection, hover above the first point you created. When a tiny circle appears below your cursor (it looks like a degree symbol), click once to close the selection and summon the marching ants.
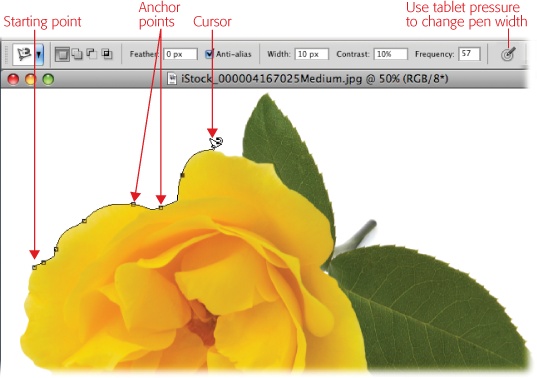
Magnetic Lasso tool
This tool has all the power of the other Lasso tools, except that it’s smart—or at least it tries to be! Click once to set a starting point, and from there the Magnetic Lasso tries to guess what you want to select by examining the colors of the pixels your cursor is hovering above (you don’t even need to hold your mouse button down). As you move your cursor over the edges you want to select, it sets additional anchor points for you (think of anchor points as fastening points that latch onto the path you’re tracing; they look like tiny, see-through squares). To close the selection, hover above your starting point. When a tiny circle appears below your cursor, click once to close the selection and summon the marching ants (or you can close the selection with a straight line by triple-clicking).
As you might imagine, the Magnetic Lasso tool works best when there’s good contrast between the item you want to select and the area around it (see Figure 4-16). However, if you reach an area that doesn’t have much contrast—or if you reach a sharp corner—you can give the tool a little nudge by clicking to set a few anchor points of your own. If it goes astray and sets an erroneous anchor point, just hover over the bad point with your mouse and press the Delete key (Backspace on a PC). Then move back to the troubled area of your selection and click to set more anchor points until you reach an area of greater contrast where the tool can be trusted to set its own points.
Tip
If you’re not crazy about the Magnetic Lasso’s cursor (which looks like a triangle and a horseshoe magnet), press the Caps Lock key and it changes to a brush cursor with a crosshair at its center. Press Caps Lock again to switch back to the standard cursor. Alternatively, you can use Photoshop’s preferences to change it to a precise cursor; Cursors shows you how.
You can get better results with this tool by adjusting the Options bar’s settings (see Figure 4-16). Besides the usual suspects like selection modes, feather, and anti-alias settings (all discussed on pages 139–140), the Magnetic Lasso also lets you adjust the following:
Width determines how close your cursor needs to be to an edge for the Magnetic Lasso to select it. Out of the box, this field is set to 10 px, but you can enter a value between 1 and 256. Use a lower number when you’re trying to select an area whose edge has a lot of twists and turns and a higher number for an area with fairly smooth edges. (To select the yellow rose in Figure 4-16, you’d use a higher setting around the petals and a lower setting around the leaves because they’re so jagged.)
Contrast controls how much color difference there needs to be between neighboring pixels before the Magnetic Lasso recognizes it as an edge. You can try increasing this percentage when you want to select an edge that isn’t well defined, but you might have better luck with a different selection tool. If you’re a fan of keyboard shortcuts, you can press > or < to increase or decrease this setting in 1% increments. Press >-Shift or <-Shift to set it to 1% or 100%, respectively.
Frequency determines how many anchor points the tool lays down. If you’re selecting an area with lots of details, you’ll need more anchor points than for a smooth areas. Setting this field to 0 makes Photoshop add very few points, and 100 makes it have a point party. The factory setting—57—usually works just fine. Press the ; or ' key to increase or decrease this setting by 1, respectively; add the Shift key to these keyboard shortcuts to jump between 1 and 100.
Use tablet pressure to change pen width. If you have a pressure-sensitive graphics tablet, turning on this setting—whose button looks like a pen tip with circles around it—lets you override the Width setting by pressing harder or softer on your tablet with the stylus. (The box on The Joy of Painter has more about graphics tablets.)
Selecting with the Pen Tool
Another great way to select an irregular object or area is to trace its outline with the Pen tool. Technically, you don’t draw a selection with this method; you draw a path (Installing New Brushes), which you can then load as a selection (Making Selections and Masks with Paths) or use to create a vector mask (Using Vector Masks). This technique requires quite a bit of skill because the Pen tool isn’t your average, everyday, well…pen, but it’ll produce the smoothest-edged selections this side of the Rio Grande. Head on over to Chapter 13 to read all about it.
Creating Selections with Channels
As you’ll learn in Chapter 5, the images you see onscreen are made up of various colors. In Photoshop, each color is stored in its own channel (which is kind of like a layer) that you can view and manipulate. If the object or area you’re trying to select is one that you can isolate in a channel, you can load that channel as a selection with a click of your mouse. Chapter 5 discusses this incredibly useful technique in detail, starting on Deleting Alpha Channels.
Note
You can also paint selections by using Quick Mask Mode, which is discussed in this chapter starting on Using Quick Mask Mode.
Using the Tools Together
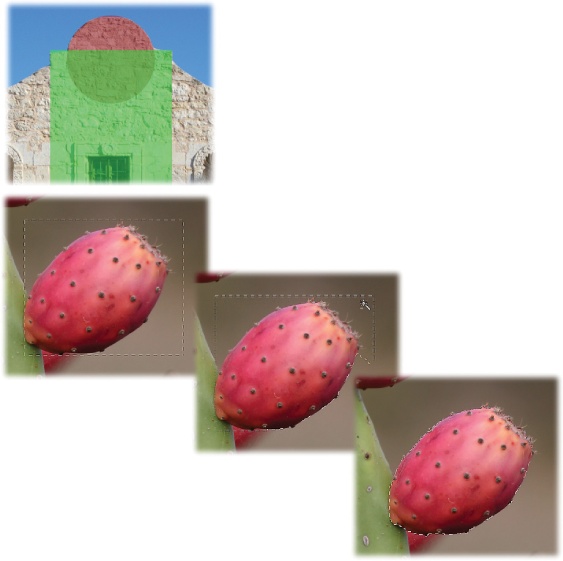
As wonderful as the aforementioned selection tools are individually, they’re much more powerful if you use them together.
Remember how every tool discussed so far has an “Add to selection” and “Subtract from selection” mode? This means that, no matter which tool you start with, you can add to—or take away from—the active selection with a completely different tool. Check out Figure 4-17, which gives you a couple of ideas for using the selection tools together. And thanks to the spring-loaded tools feature (see the tip on Tip), switching between tools is a snap.
Modifying Selections
As you’ve learned in this chapter, some tools are better at making certain types of selections than others. However, no matter which tool(s) you use, your selection will probably need some fine-tuning. Photoshop gives you lots of ways to modify, reshape, and even save your selections, all explained in the following pages. But before you do any of those things, you’ll likely want to fine-tune your selection’s edges. The difference between a pretty-good-around-the-edges selection and a perfect one is what separates Photoshop pros from mere dabblers. Read on to learn some simple edge-polishing techniques.
Refining Edges
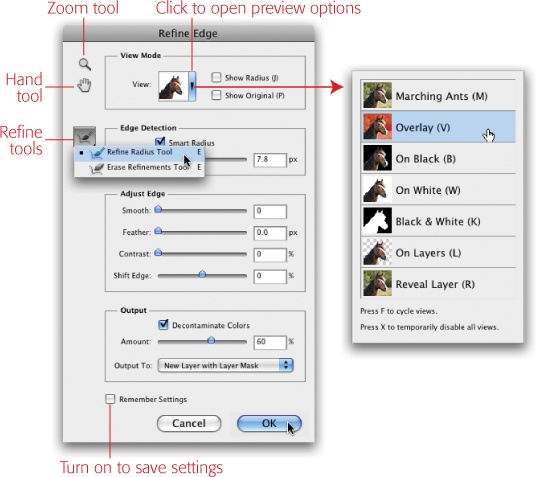
The best selection modifier in town is the Refine Edge dialog box (Figure 4-18), which got a complete overhaul in Photoshop CS5, making it easier than ever to select the tough stuff like hair and fur. It combines several edge-adjustment tools that used to be scattered around on different menus into one spot and includes an extremely useful preview option. Anytime you have a selection tool active and some marching ants on your screen, you’ll see the Refine Edge button sitting pretty up in the Options bar; simply click it to open the dialog box. You can also open it by choosing Select→Refine Edge, pressing ⌘-Option-R (Ctrl+Alt+R on a PC), or clicking the Mask panel’s Mask Edge button (see Figure 3-28 on Editing a Mask).
The Refine Edge dialog box now gives you seven different ways to preview your selection (compared to five in CS4). Because the preview appears in the main document window, you’ll want to move the Refine Edge dialog box aside so it’s not covering your image. Depending on the colors in your image, one of these backgrounds will let you see the selection better than the rest:
Tip
You can cycle through the preview modes by pressing the F key repeatedly when you have the Refine Edge dialog box open. To see your original image temporarily, press the X key.
Marching Ants. This option just shows the selection on the image itself. Keyboard shortcut: M.
Overlay. As the name indicates, this option displays your selection overlaid with the Quick Mask (see Using Quick Mask Mode). Unless you’ve changed its color, the overlay is light red; to change that color, see the box on Changing Quick Mask’s Color. Keyboard shortcut: V.
Figure 4-18. The Refine Edge dialog box is much improved in Photoshop CS5. Not only does it let you see a live, continuously updated preview of what your selection will look like after fine-tuning, you also get seven different views to choose from, along with two new tools you can use to refine your selection before you click OK. If you forget what the dialog box’s various settings do, never fear: Just hover above each setting and a tooltip appears explaining what each item does.On Black. This option displays the selection on a black background, which is helpful if your image is light colored and doesn’t have a lot of black in it. Keyboard shortcut: B.
On White. Choose this option if your image is mostly dark. The stark white background makes it easy to see your selection and the object you’re selecting while you’re fine-tuning it using the dialog box’s tools. Keyboard shortcut: W.
Black & White. This option displays your selection as an alpha channel (pages The Channels Panel and You and Creating an Alpha Channel). Photoshop shows your selection in white and the mask in black; transitions between the two areas are subtle shades of gray. The gray areas let you see how detailed your mask has become, so you’ll spend a fair amount of time in this mode. Keyboard shortcut: K.
On Layers. To see your selection atop the gray-and-white transparency checker-board, choose this mode. Keyboard shortcut: L.
Reveal Layer. This mode displays your image without a selection, as it appears in your document. Keyboard shortcut: R.
Once you’ve chosen a View Mode, you can tweak the following settings (and for best results, Adobe suggests you adjust them in this order):
Smart Radius. Turn this checkbox on to make Photoshop look closely at the edges of your selection to determine if they’re hard (like the outline of your subject’s body) or soft (like your subject’s hair or fur). It’s a good idea to turn it on each time you open this dialog box; if you turn on the Remember Settings option at the bottom of the dialog box, Smart Radius will stay on until you turn it off.
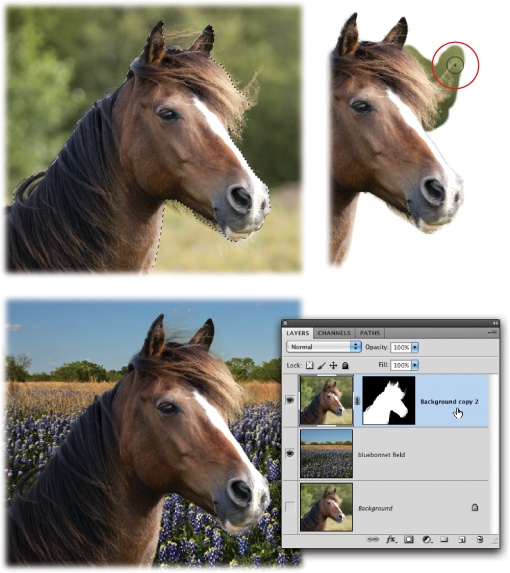
Radius. This setting controls the size of the area affected by the settings in this dialog box, or rather how far beyond the edge of your selection Photoshop analyzes. You might find it helpful to think of this setting as the selection’s degree of difficulty. For example, if your selection is really complex, like the horse’s mane in Figure 4-19, increase this setting to make Photoshop look beyond the selection boundary for the really wispy stuff (which also makes the program slightly soften the selection’s edge). If your selection is fairly simple, lower this setting so Photoshop analyzes just the selection’s boundary, which creates a harder edge. There’s no magic numbers for this setting; it’ll vary from image to image, so you’ll need to experiment in order to get your selection just right.
Figure 4-19. Top: After creating a rough selection with the Quick Selection tool (left), you can use the Refine Edge dialog box’s Refine Radius tool to brush across the areas you want to add to your selection (right). Bottom: Within minutes, you can settle this mare onto a new background, as shown here. What horse wouldn’t be happier hanging out on a field of bluebonnets? To follow along, trot on over to this book’s Missing CD page at www.missingmanuals.com/cds and download the files Horse.jpg and Field.jpg.Refine Radius. Once you’ve adjusted the Radius setting, you can use this tool to paint over the edges of your selection to make Photoshop fine-tune them even more. This is where the Refine Edge dialog box really works its magic: As you drag with the brush, you can extend your selection beyond the boundaries Photoshop can see, creating a more precise selection of fine details. This tool is also intuitive: as you brush across the edges of your selection, it pays attention and tries to learn how you want it to behave. Wow, indeed!
Erase Refinements. If Photoshop gets a little overzealous and includes too much of the background in your selection, you can use this tool to let it know you don’t want to include those areas.
Smooth. Increasing this setting makes Photoshop smooth the selection’s edges so they’re less jagged. But if you increase it too much, you risk losing details (especially on selections of hair and the like). To bring back some details without decreasing this setting, try increasing the Radius and Contrast settings.
Feather. This setting controls how much Photoshop blurs the edges of your selection, which is useful when you’re combining images, as discussed in the box The Single Row and Column Marquee Tools.
Contrast. This setting sharpens your selection’s edge, even if you softened it by increasing the Radius setting as mentioned above. A higher number creates a sharper edge and can actually reduce the noisy or grainy look that sometimes comes from a high Radius setting. (If you spend some quality time with Smart Radius and its refinement tools, you probably won’t use this slider much, if at all.)
Shift Edge. You can tighten your selection (make it smaller) by dragging this slider to the left, which is a good idea if you’re dealing with hair or fur. To expand it your selection and grab pixels you missed when you made your initial selection, drag this slider to the right.
Decontaminate Colors. This option helps reduce edge halos: leftover colored pixels around the edges of your selection that you see only after you put the object on a new background (as shown on Creating a Border Selection). Once you turn it on, Photoshop tries to replace the color of selected pixels with the color of pixels nearby (whether they’re selected or not). Drag the Amount slider to the right to change the color of more edge pixels, or to the left for fewer. To see the color changes for yourself, choose Reveal Layer from the View Mode (or just press R).
Output To. This is Photoshop’s way of asking what you’d like it to do with your new and improved selection. Here are your options:
Selection adjusts your original selection, leaving you with marching ants on your original layer just like you started with.
Layer Mask adds a layer mask to the current layer according to the selection you just made. You’ll use this option most of the time.
New Layer deletes the background and creates a new layer containing only the selected item; no marching ants.
New Layer with Layer Mask adds a new layer complete with layer mask.
New Document deletes the background and sends only the selected item to a brand-new document.
New Document with Layer Mask sends the selected item to a new document complete with editable layer mask.
Whew! Those settings probably won’t make a whole lot of sense until you start using ‘em. To get you off and running, here’s how to select a subject with wispy hair:
Open an image and select the item using the Quick Select tool.
Press W to grab the Quick Select tool and paint across the object you want to select (Figure 4-19, top left). Don’t worry about the quality of the selection because you’ll tweak it in a moment.
Open the Refine Edge dialog box.
Hop up to the Options bar and click the Refine Edge button.
Choose the On White View Mode.
To see the horse’s mane a little better—in all its wispy goodness—press W to view it atop a white background.
Turn on the Smart Radius checkbox and drag the slider to the right.
How far should you drag the Radius slider, you ask? It depends on your image. Your goal is to drag the slider as far to the right as you can get away with, while still maintaining some hardness in your selection’s edges. The amount varies with every single image because there’s no magic Radius setting that’ll work on every selection (a setting of 3.2 was used here).
Use the Refine Radius tool to brush across the soft edges of your selection (Figure 4-19, top right).
Press E to grab the Refine Radius tool, or click its icon near the top left of the Refine Edge dialog box (it looks like a tiny brush atop a curved, dotted line). Then mouse over to your image and brush across the soft areas you want to add to your selection, like the wispy bits of the horse’s mane. Try to avoid any areas that are correctly selected (such as the horse’s nose), as Photoshop tends to over-analyze them and exclude parts it shouldn’t. If you end up adding too much to the selection, press Option (Alt) to switch to the Eraser Refinement tool and brush across the areas you don’t want included in your selection.
Turn on the Decontaminate Colors checkbox and adjust its slider accordingly.
Once you turn this option on, drag the slider slightly to the right to shift the color of partially selected edge pixels so they more closely match pixels that are fully selected. Once again, this value varies from image to image (15% was used for this image).
From the Output To pop-up menu, choose Layer Mask.
Photoshop adds a layer mask to the active layer reflecting your selection, as shown in Figure 4-19 (bottom).
Exhausted yet? This kind of thing isn’t easy, but once you master using Refine Edges, you’ll be able to create precise selections of darn near anything!
Note
You can also use the new Refine Edge dialog box to add creative edges to photos. For example, grab the Rectangular Marquee tool and draw a box around your image about half an inch inside your document’s edge. Then click the Options bar’s Refine Edge button and, in the resulting dialog box, drag the Radius slider to about 40 pixels for a cool painterly effect. Be sure to choose Layer Mask from the Output To menu to keep from harming your original image.
Fixing Edge Halos
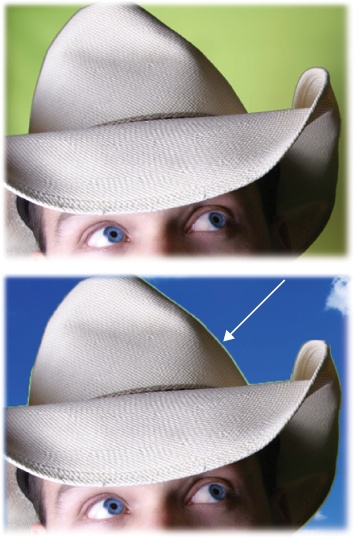
When you’re making selections, you may encounter edge halos (also called fringing or matting). An edge halo is a tiny portion of the background that stubbornly remains even after you try to delete it (or hide it with a layer mask, Layer Masks: Digital Masking Tape). They usually show up after you replace the old background with something new (see Figure 4-20).
Here are a few ways to fix edge halos:
Contract your selection. Use the Refine Edge dialog box (Creating Selections with Channels) or choose Select→Modify→Contract (though the latter method won’t give you a preview) to contract your selection. Use this technique while you still have marching ants—before you delete the old background (or, better yet, hide the background with a layer mask [Layer Masks: Digital Masking Tape]).
Run the Minimum filter on a layer mask. Once you’ve hidden an image’s background with a layer mask, you can run the Minimum filter on the mask to tighten it around the object. Video explains this super-useful trick.
Figure 4-20. Here you can see the intrepid cowboy on his original green background (top) and on the new background (bottom). The green pixels stubbornly clinging to his hat are an edge halo. This aggravatingly tiny rim of color—a sure sign that an image has done time in Photoshop—can be your undoing when it comes to creating realistic images. Edge halos make a new sky look fake and don’t help convince anyone that Elvis actually came to your cookout.Use the Defringe command. Run this command after you delete the background (alas, it doesn’t work on layer masks or while a selection is active). Choose Layer→Matting→Defringe and then enter a value in pixels. Photoshop analyzes the active layer and replaces the color of the pixels around the object’s edge with the color of nearby pixels. For example, if you enter 2 px, it’ll replace a 2-pixel rim of color all the way around the object.
Remove Black/White Matting. If Photoshop has blessed you with a halo that’s either black or white, you can make the program try to remove it automatically. After you’ve deleted the background, select the offending layer and then choose Layer→Matting→Remove Black Matte or Remove White Matte. (Like Defringe, this command doesn’t work on layer masks or while you have an active selection.)
Creating a Border Selection
If you peek at the Select→Modify menu, you’ll find the same options as in the Refine Edge dialog box (but without a preview). There is, however, one addition: the Border option, which lets you turn a solid selection into a hollow one. Let’s say you drew a circular selection with the Elliptical Marquee tool (The Rectangular and Elliptical Marquee Tools). You can turn that selection into a ring by choosing the Border option (which is handy if you want to make a neon sign or select the outer rim of an object). Just enter a pixel width, press OK, and poof! Your formerly solid selection is now as hollow as can be.
Transforming a Selection
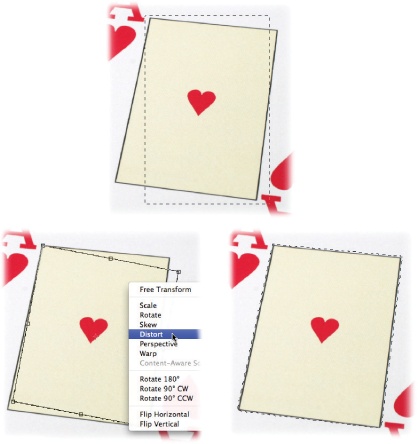
Have you ever tried to make a slanted rectangular selection like the one shown in Figure 4-21? If so, you may have found the experience a little frustrating. Sure, you can try using one of the Lasso tools, but it’s quicker to transform—meaning reshape—a rectangular selection instead. (The Transformers in Chapter 6 has more on the Transform tools.)
Note
When you transform a selection (as opposed to part of your image), Photoshop won’t mess with any of your image’s pixels. Instead, the program simply changes the shape of the selection—in other words, the shape of the marching ants.
Once you’ve made a selection, choose Select→Transform Selection or Ctrl-click (right-click on a PC) inside the selection and, from the shortcut menu that appears, choose Transform Selection. Photoshop puts a rectangular box with little, square resizing handles on its four sides around your selection (it’s called a bounding box). You can move the selection around by clicking inside the bounding box and dragging in any direction. (If you want to exit the bounding box without making any changes, press the Esc key.) The resizing handles let you:
Scale (resize). Drag any handle to change the size and shape of your selection. Drag inward to make it smaller and outward to make it bigger.
Rotate. If you position your cursor outside one of the bounding box’s corners, your cursor turns into a curved, double-headed arrow. That’s your cue that you can drag to rotate your selection (just drag up or down in the direction you want to rotate).
If you need to change the shape of your selection, just Ctrl-click (right-click on a PC) inside the bounding box and you’ll get yet another shortcut menu with the following options (see Figure 4-21, bottom left):
Free Transform lets you apply any of the transformations listed below freely and in one action (instead of having to choose and apply them one at a time).
Scale and Rotate work as described in the previous list.
Skew lets you slant your selection by dragging one of the bounding box’s side handles.
Perspective lets you drag any corner handle to give your selection a one-point perspective—that is, a vanishing point where it seems to disappear into the distance.
Warp makes Photoshop place a grid over your selection that lets you reshape it in any way you want. Drag any control point (the two evenly spaced points on all four sides of the selection) or line on the grid to twist your selection however you like, or choose a ready-made preset from the Options bar’s Warp pop-up menu.
Tip
Using the Warp option is your ticket to a quick page-curl effect. Visit this book’s Missing CD page at www.missingmanuals.com/cds to learn how.
Content-Aware Scale can intelligently resize the unimportant background areas of your image while the subject of your image remains unchanged. You can learn all about it on The Content-Aware Scale Tool.
Rotate 180°, Rotate 90° CW, and Rotate 90° CCW turn your selection 180 degrees, 90 degrees clockwise, or 90 degrees counterclockwise, respectively.
Flip Horizontal and Flip Vertical flip your selection either horizontally (like it’s reflected in a mirror) or vertically (like it’s reflected in a puddle).
When you’re finished transforming your selection, press Return (Enter on a PC) to accept the changes.
Using Quick Mask Mode
If you’d rather fine-tune—or even create—selections by painting with a brush (see Chapter 12), no problem; in fact, you can create a selection from scratch using this method. Just enter Quick Mask mode and you’ll find all of Photoshop’s painting tools (even filters!) waiting to help you tweak your selection. Quick Mask mode gives you the freedom to work on selections with almost any tool you want.
You can enter Quick Mask mode by clicking the button at the bottom of the Tools panel that looks like a circle within a square or by pressing the Q key. When you do, Photoshop looks to see whether you have an active selection. If you do, it puts a red overlay over everything but the selection. (If you don’t, you won’t see any change but you can still use the directions in this section to create a selection.) This color-coding makes it easy to edit your selection visually by painting.
While you’re in Quick Mask mode, you can use the Brush tool ((Re)Introducing the Brush Tool) to:
Deselect a portion of your selection—in other words, to add an area to the mask—by making black your foreground color chip (Foreground and background color chips) and then paint the area.
Extend the area covered by your selection by painting the area you want to add white (you may need to press X to flip-flop your color chips).
Create a soft-edged selection or semi-transparent area by painting with gray. For example, by painting with 50 percent gray—lower a black brush’s opacity in the Options bar to 50 percent—you’ll create a selection that’s half see-through. You can create a similar effect by painting with a soft-edge brush.
All the usual tools and document tricks work while you’re in Quick Mask mode: You can zoom in or out by pressing ⌘ and the + or – key (Ctrl and + or – on a PC), press and hold the space bar to move around within the document once you’re zoomed in, and use any of the selection tools covered in this chapter. Even the Marquee and Lasso tools work in this mode. You can also fill the entire mask, or your selection, with black or white (see Filling a Selection with Color), which is helpful when you have a large area to paint or when you want to paint the entire selection by hand. You can run filters in this mode to create interesting edges (Brush Strokes) or use the Gradient tool, set to a black-to-white gradient, to create a fade (Fading Color to Black and White).
Once you finish fine-tuning your selection, press the Q key to exit Quick Mask mode and the marching ants come rushing back, as shown in Figure 4-22, so you can see your newly edited selection.
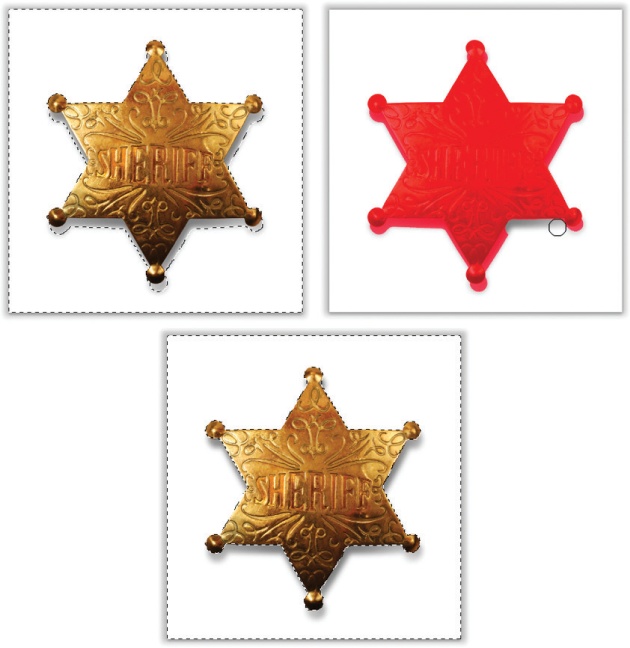
Moving Selections
If you create a selection that’s not exactly in the right spot or you’ve got several objects of the same shape to alter, you may need to move the selection itself. Or maybe you need to move the pixels underneath the selection, or onto their own layer. In any of those cases, you’ve got plenty of options, including:
Moving the selection (the marching ants) within the same layer. Make sure you have a selection tool active (it doesn’t matter which one), and then, click inside the selection and drag to move it to another part of the document. You can also nudge the selection into place with the arrow keys on your keyboard.
Moving the selected object (the actual pixels) within the same document. Press V to select the Move tool and then drag with your mouse to reposition the object. Be aware that a big, gaping hole will appear where the object used to be! (If you’re on a Background layer, the hole will be filled with the color your foreground color chip is set to.)
Moving the selected object onto its own new layer within the same document. Press ⌘-J (Ctrl+J on a PC) to “jump” the selected pixels onto their very own layer, just above the current layer. That way, whatever you do to the selected area won’t harm the original image. If you don’t like your changes, you can throw the extra layer away. Or, if you create an effect that’s a little too strong—maybe you overwhitened a set of teeth—you can reduce the layer’s opacity (Tweaking a Layer’s Opacity and Fill) to lessen the effect. (Flip back to Chapter 3 for more on using layers.)
Moving the selected object to another document. Press ⌘-C (Ctrl+C on a PC) to copy the pixels and then open the other document and press ⌘-V (Ctrl+V) to paste the pixels in. The object appears on its very own layer that you can reposition with the Move tool. This technique is essential for performing the classic head swap, shown in Figure 4-23. A less memory-intensive (RAM-intensive) method is to ⌘-drag (Ctrl-drag) the selection from your document window onto another open document’s tab.
Moving the selected object to a new document. Copy it as described above and then choose File→New. Photoshop opens a new document, sized to match the object on your Clipboard, into which you can paste the object.
![Here’s a fun little prank to pull on your family, friends, and exes. Open a photo of someone and select their head using any of the selection tools discussed in this chapter (the Quick Selection tool was used here). Be sure to feather the selection so it doesn’t have a hard edge (page 145) and then copy it (press ⌘-C [Ctrl+C on a PC]). Open the document that contains the new body and paste your selection into that document (⌘-V [Ctrl+V]). You can use the Move tool to reposition it onto the new body and, if you need to, use the Clone Stamp tool (see page 311) to hide parts of the original head. Good times!](/api/v2/epubs/9781449381691/files/httpatomoreillycomsourceoreillyimages761230.png.jpg)
Saving a Selection
If you’d like Photoshop to remember your selection so you can use it again later, it’s happy to do so. After you create the selection, choose Select→Save Selection. In the resulting dialog box, give your selection a meaningful name (like handsome devil) and then press OK (see Figure 4-24). When you’re finished working with that document, be sure to save it as a native Photoshop file (Opening an Existing Document).
When you’re ready to use the selection again, pop open the document and choose Select→Load Selection. In the resulting dialog box, click the Channel pop-up menu and pick your selection from the list (if you’ve saved only one selection in this particular document, Photoshop chooses it automatically). Leave the Operation section of the dialog box set to New Selection to bring back the saved selection as a whole (instead of adding to or subtracting from another selection). Press OK and the marching ants reappear, just like you saved them.
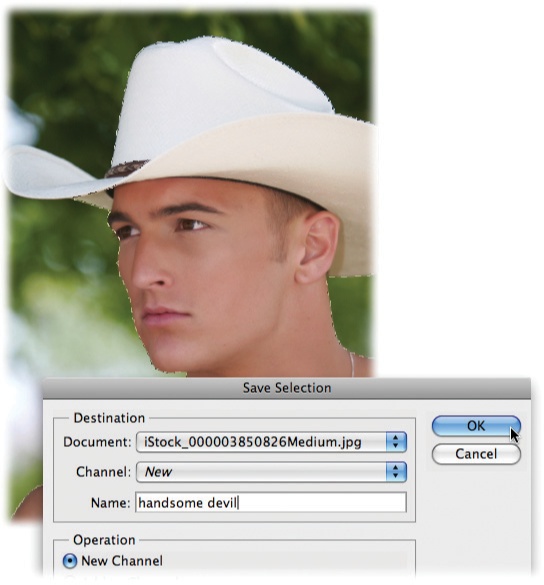
Although the radio buttons in the Operation section of the Load Selection dialog box let you add, subtract, or intersect with your saved selection, it’s easier just to load the selection, close the dialog box, and edit it using the selection tools discussed in this chapter.
Filling a Selection with Color
Filling selections with color is a great way to create shapes and add colorful photo borders to images. After you’ve created the selection of your dreams, you can fill it with color in a couple of ways. One option is to choose Edit→Fill and, from the Use pop-up menu, choose Color. Pick something nice from the resulting Color Picker and then press OK twice to dismiss the dialog boxes. Photoshop fills your selection with the color you picked. Your other option is explained in Figure 4-25.
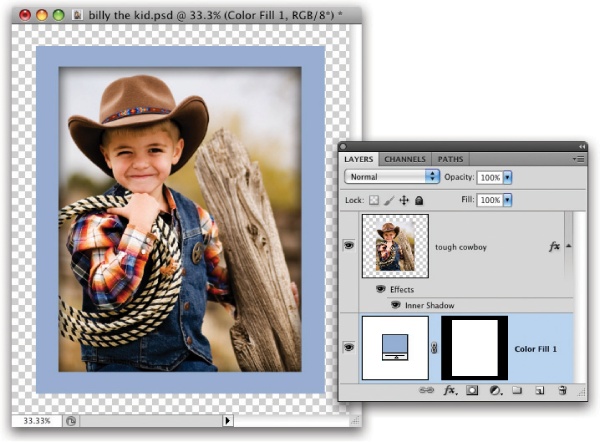
Using Content-Aware Fill
In Photoshop CS5, you have another option for filling selections called Content-Aware Fill. It works with the Fill command and the Spot Healing brush (The Spot Healing Brush) by comparing your selection, or brushstroke, to nearby pixels. Photoshop then fills the area so it blends seamlessly with the background.
Which option should you use when, you ask? If you’ve got plenty of good pixels on either side of the pixels you want to delete, try the Spot Healing brush. If you want to be more precise with your pixel zapping—say, if the item you want to delete is super close to something you want to keep—create a selection first and then use Content-Aware Fill (if possible, it’s best to include some of the background in your selection). For example, you can follow these steps to break up a perfectly good boy band, as shown in Figure 4-26.
![Once you’ve created a selection (left), you can use the new Content-Aware Fill option to fill the selected pixels with those nearby. As you can see here, it does an amazing job! With a few quick clicks of the Spot Healing Brush (set to Content-Aware [page 427]), this band member is history.The voodoo Photoshop uses to fill your selection is random and changes each time you use the command. In other words, if at first you don’t succeed, try choosing Edit→Fill again—you’ll likely get different results!](/api/v2/epubs/9781449381691/files/httpatomoreillycomsourceoreillyimages761236.png.jpg)
Note
Want to follow along? Visit this book’s Missing CD page at www.missingmanuals.com/cds and download the image BoyBand.jpg.
Open your image and duplicate the Background layer by pressing ⌘-J (Ctrl+J).
Since there’s no way to tell the Fill command to sample all layers (bummer!), it won’t work on an empty layer.
Use the selection tool of your choice to select the band member on the left.
Because there’s a decent amount of contrast between the boy and the grassy meadow, the Magnetic Lasso (Magnetic Lasso tool) does a great job. Grab it from the Tools panel by pressing Shift-L repeatedly until you see it appear. Mouse over to your image and click once to set a starting point, and then drag around the boy, clicking to add anchor points here and there. (For more on using the Lasso tools, flip back to Using the Lasso Tools.)
Choose Edit→Fill and, from the Use pop-up menu, choose Content Aware.
As soon as you press OK, Photoshop fills your selection with pixels from the surrounding area.
To fix the remaining outline of the missing bandmate, just switch back to the Spot Healing Brush by pressing K (in the Options bar, make sure Content Aware is turned on). With a quick brushstroke here and there, you can clean up the final image quite nicely and it won’t take hours like it did in previous versions of the program. Until you can actually wish an object out of a photo, this new tool ought to suit you just fine.
Stroking (Outlining) a Selection
Sometimes you’ll want to give your selection a stroke (as in outline, not the medical condition). While you can stroke selections of any shape, this technique comes in really handy when you use it in conjunction with the marquee tools. For example, you can combine a stroke with the Rectangular Marquee tool to add a thin black outline to your photo or with the Elliptical Marquee to circle yourself in a group picture.
When it comes to adding a bit of class to a photo, few effects beat a thin black outline. Whether you’re floating the image within text or posting it in your blog, adding an outline gives the edge a little definition, making the design look nicely finished. Here’s how to add an outline around the edge of your image:
Open your image and select it.
If your image is the same size as the document, choose Select→Select All. If it’s smaller than the document and lives on its own layer, ⌘-click (Ctrl-click on a PC) the layer’s thumbnail in the Layers panel instead.
Choose Edit→Stroke and tell Photoshop how thick, which color, and where you want the stroke to be.
In the Stroke dialog box, enter a pixel dimension in the Width box and then click the little color swatch. Choose a color from the resulting Color Picker and then press OK. Back in the Stroke dialog box’s Location section, choose Inside to make the outline appear just inside the image’s border.
Click OK to see your new outline.
To circle someone in a photo, as shown in Figure 4-27, you follow basically the same steps:
Open a photo and select the Elliptical Marquee tool (The Rectangular and Elliptical Marquee Tools) from the Tools panel.
Drag to draw an oval around the person’s head. Remember that you can press the Shift key while you drag to draw a perfect circle, or press the Option key (Alt on a PC) to draw the oval from the inside out. Move the selection if you need to by clicking inside it and dragging with your mouse.
Figure 4-27. Once you’ve created a selection, you can outline it by choosing Edit→Stroke. In the resulting dialog box (shown here), pick a width, color, and location for the outline and then press OK. If you want to play it safe, you can add the stroke on its own layer. Just add a new layer to your document (page 81) before choosing Stroke from the Edit menu and then make sure that layer is active. That way, when you add the stroke, it’ll appear on the new layer instead of the original image.Choose Edit→Stroke, enter the stroke width, and pick a color.
In the Stroke dialog box, tell Photoshop how thick you want the stroke to be. You want it to be at least 2 pixels wide so the circle is thick enough to see. Click the color swatch, choose a color from the resulting Color Picker, and then click OK. In the Location section, turn on the Center option so Photoshop will center the stroke over the marching ants. If you’ve entered a width of 2 pixels, for example, the program will put one pixel of the stroke on the outside of the selection and one on the inside (in other words, the stroke will straddle your selection).
Press OK to see your newly circled head.
At this point you can get rid of the marching ants by pressing ⌘-D (Ctrl+D on a PC) to deselect.
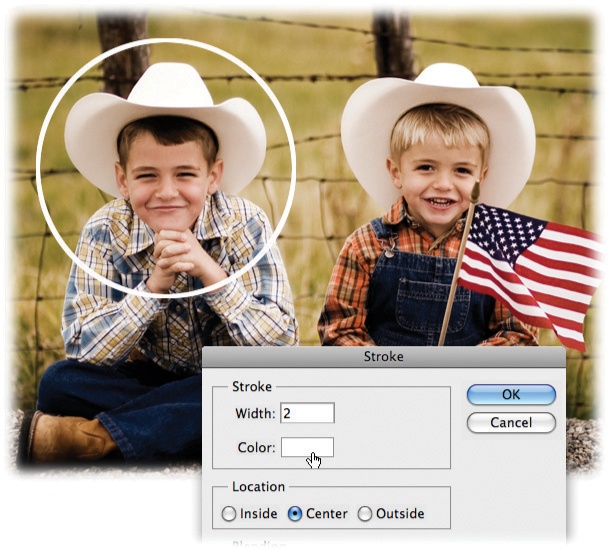
Get Photoshop CS5: The Missing Manual now with the O’Reilly learning platform.
O’Reilly members experience books, live events, courses curated by job role, and more from O’Reilly and nearly 200 top publishers.

