Photoshop also has several tools that let you select areas by color. They’re helpful when you want to select a chunk of an image that’s fairly uniform in color, like someone’s skin, the sky, or the paint job on a car. Photoshop has lots of color-selecting tools to choose from, and in this section, you’ll learn how to pick the one that best suits your needs.
The Quick Selection tool is shockingly easy to use and lets you create complex selections with just a few brushstrokes. As you paint with this tool, your selection expands to encompass pixels similar in color to the ones you’re brushing across. It works insanely well if there’s a fair amount of contrast between what you want to select and everything else. This tool lives in the same toolset as the Magic Wand, as you can see in Figure 4-7.
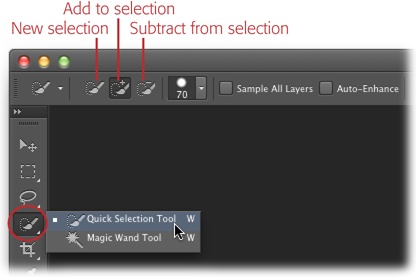
Figure 4-7. You can press the W key to activate the Quick Selection tool. (To switch between it and the Magic Wand, press Shift-W.) When you activate the Quick Selection tool, the Options bar sports icons that let you create a new selection as well as add to—or subtract from—the current selection.
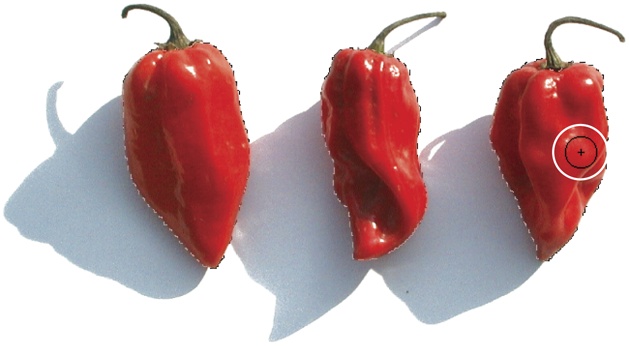
To use this friendly tool, click anywhere in the area you want to select or drag the brush cursor across it, as shown in Figure 4-8. When you do that, Photoshop thinks for a second and then creates a selection based on the color of the pixels you clicked or brushed across.
The size of the area it selects is proportional to the size of the brush you’re using: A larger brush creates a larger selection. You adjust the Quick Selection tool’s brush size just like any other brush: by choosing a new size from the Options bar’s Brush picker, or by using the left and right bracket keys ([ and ]) to decrease and increase brush size (respectively). (Chapter 12 covers brushes in detail.) For the best results, use a hard-edged brush to produce well-defined edges (soft-edged brushes produce slightly transparent edges) and turn on the Auto-Enhance setting shown in Figure 4-7 and discussed in the box on Smart Auto-Enhancing.
When the Quick Selection tool is active, the Options bar includes these settings (see Figure 4-7):
New selection. When you first grab the Quick Selection tool, it’s set to this mode, which creates a brand-new selection when you click or drag. After you do that, the tool automatically switches to “Add to selection” mode (explained next). You’ll only want to switch back to “New selection” mode if you’ve made a selection and then decide to start over with a new one. (The old selection disappears as soon as you start a new one.)
Figure 4-8. When using the Quick Selection tool, you can either click the area you want to select or drag your cursor (circled) across the area as if you were painting. When you start painting with this tool, you see a tiny + sign inside the cursor (as shown here) and Photoshop puts the tool in “Add to selection” mode, which lets you add to an existing selection.
Add to selection. This mode, which Photoshop automatically switches to once you create an initial selection with the Quick Selection tool, lets you add any areas you brush over or click to the current selection. If you don’t like the selection Photoshop has created and want to start over, press ⌘-Z (Ctrl+Z) to undo it, or click the Options bar’s “New selection” icon and then brush across the area again. To get rid of the marching ants altogether, choose Select→Deselect.
Subtract from selection. If Photoshop selected more than you wanted it to, click the “Subtract from selection” icon (a tiny – sign appears in your cursor), and then paint across the area you don’t want selected to make Photoshop exclude it. You can also press and hold the Option key (Alt on a PC) to enter this mode.
Note
To get the most out of the Quick Selection tool, you’ll probably need to do a fair amount of adding to and subtracting from your selections (unless there’s a ton of contrast between the item you want to select and its background). That said, you can change how picky this tool is by adjusting the Magic Wand’s Tolerance setting, which—strangely—affects how the Quick Selection tool behaves, too. Flip to Expanding Your Selection to learn how.
Brush Size/Hardness. Use this unlabeled drop-down menu to pick a brush. Pick a larger brush to select big areas and a smaller brush to select small or hard-to-reach areas. As explained earlier, you’ll get better results with this tool by using a hard-edged brush instead of a soft-edged one.
Tip
You can change a brush cursor’s size by Control-Option-dragging left or right (Alt+right-click+dragging on a PC); to adjust hardness, press the same keys but drag up or down instead. Alternatively, you can press the left bracket key ([) to decrease brush size or the right bracket key (]) to increase it.
Sample All Layers. This setting is initially turned off, which means Photoshop selects only the pixels on the active layer (the one that’s highlighted in the Layers panel). If you turn this setting on, Photoshop examines the whole enchilada—all the layers in your document—and grabs every pixel you paint across no matter which layer it’s on.
Auto-Enhance. Because the Quick Selection tool makes selections extremely quickly, their edges can end up looking blocky and imperfect. Turn on this checkbox to tell Photoshop to take its time and think more carefully about the selections it makes. This feature gives your selections smoother edges, but if you’re working with a really big file, you could do your taxes while it’s processing. The box below has tips for using this feature.
Tip
If you’re using the Quick Selection tool on really big images and it seems to create selections at a snail’s pace, try upping the Cache Levels in Photoshop’s Performance preferences (Performance).
The Magic Wand lets you select areas of color by clicking rather than dragging. It’s in the same toolset as the Quick Selection tool, and you can grab it by pressing Shift-W (it looks like a wizard’s wand, as shown back in Figure 4-7). The Magic Wand is great for selecting solid-colored backgrounds or large bodies of similar color, like a cloudless sky, with just a couple of clicks. (The Quick Selection tool is better at selecting objects.)
When you click once with the Magic Wand in the area you want to select, Photoshop magically (hence the name) selects all the pixels on the currently active layer that are both similar in color and touching one another (see Expanding Your Selection to learn how to tweak this behavior). If the color in the area you want to select varies a bit, Photoshop may not select all of it. In that case, you can add to the selection either by pressing the Shift key as you click nearby areas or by modifying the Magic Wand’s tolerance in the Options bar as described in a sec and shown in Figure 4-9. To subtract from the selection, press and hold the Option key (Alt on a PC) while you click the area you don’t want included.
Tip
Give this selection technique a shot by downloading the practice file Dallas.jpg from this book’s Missing CD page at www.missingmanuals.com/cds.
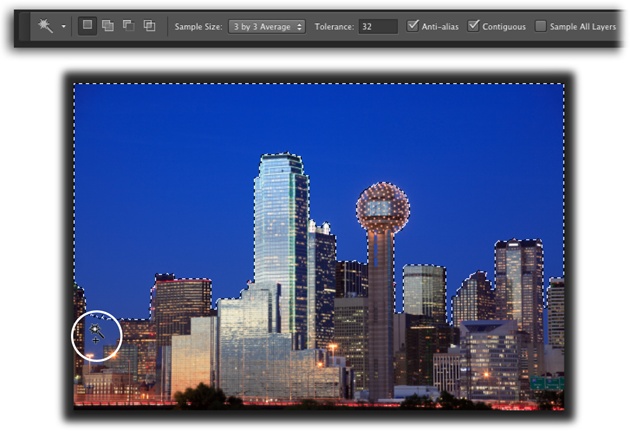
Figure 4-9. With its tolerance set to 32, the Magic Wand did a good job of selecting the sky behind downtown Dallas. You’ve got several ways to select the spots it missed, like the area circled at bottom left: You can add to the selection by pressing the Shift key while you click that area; increase the tool’s Tolerance setting, and then click the sky again to create a brand-new selection; or flip to page 164 to learn how to expand the selection with the Grow and Similar commands.
When you activate the Magic Wand, the Options bar includes these settings:
Sample Size. This menu lets you change the way the Magic Wand calculates which pixels to select (prior to CS6, you had to switch to the Eyedropper tool to see this menu). From the factory, it’s set to Point Sample, which makes the tool determine its selection based only on the color of the specific pixel you clicked. However, the menu’s other options cause it to look at the original pixel and average it with the colors of surrounding pixels. For example, you can make the Magic Wand average the pixel you clicked plus the eight surrounding pixels by choosing “3 by 3 Average,” or as many as 10,200 surrounding pixels by choosing “101 by 101 Average.” The “3 by 3 Average” setting works well for most images. If you need to select a really big area, you can experiment with one of the higher settings, like “31 by 31 Average.”
Tolerance. This setting controls both the Magic Wand’s and the Quick Selection tool’s sensitivity—how picky each tool is about which pixels it considers similar in color. If you increase this setting, the tools get less picky (in other words, more tolerant) and selects every pixel that could possibly be described as similar to the one you clicked. If you decrease this setting, the tools get pickier and select only pixels that closely match the one you clicked.
The tolerance is initially set to 32, but it can go all the way up to 255. (If you set it to 0, Photoshop selects only pixels that exactly match the one you clicked; if you set it to 255, the program selects every color in the image.) It’s usually a good idea to keep the tolerance fairly low (somewhere between 12 and 32); you can always click an area to see what kind of selection you get, increase the tolerance if necessary, and then click that area again (or add to the selection using the Shift key, as described earlier).
Anti-alias. Leave this setting turned on to make Photoshop soften the edges of the selection ever so slightly. If you want a super-crisp edge, turn it off.
Contiguous. You’ll probably want to leave this setting turned on; it makes the Magic Wand select pixels that are adjacent to one another. If you turn it off, Photoshop goes hog wild and selects all similar-colored pixels no matter where they are.
Sample All Layers. If your document has multiple layers and you leave this checkbox turned off, Photoshop examines only pixels on the active layer and ignores the other layers. If you turn this setting on, Photoshop examines the whole image and selects all pixels that are similar in color, no matter which layer they’re on.
Note
The Magic Wand is rather notorious for making the edges of selections jagged (that’s why some folks refer to this tool as the Tragic Wand!). That’s because it concentrates on selecting whole pixels rather than partially transparent ones (this doesn’t happen as much with the Quick Selection tool). The fix is to click Refine Edge in the Options bar after you make a selection, and then adjust the Smooth slider in the resulting dialog box. Skip ahead to Creating Selections with Channels to learn all about the Refine Edge dialog box.
Sometimes the Magic Wand makes a nearly perfect selection, leaving you with precious few pixels to add to it. If this happens, it simply means that the elusive pixels are just a little bit lighter or darker in color than what the Magic Wand’s tolerance setting allows for.
You could Shift-click the elusive areas to add them to your selection, but the Select menu has a couple of options that can quickly expand the selection for you:
Choose Select→Grow to make Photoshop expand the selection to all similar-colored pixels adjacent to it (see Figure 4-10, top).
Choose Select→Similar to make Photoshop select similar-colored pixels throughout the whole image, even if they’re not touching the original selection (see Figure 4-10, bottom).

Figure 4-10. Top: Say you’re trying to select the red part of this Texas flag. After clicking once with the Magic Wand (with a Tolerance setting of 32), you still need to select a bit more of the red (left). Since the red pixels are all touching one another, you can run the Grow command a couple of times to make Photoshop expand your selection to include all the red (right). Bottom: If you want to select the red in these playing cards, the Grow command won’t help because the red pixels aren’t touching each other. In that case, click once with the Magic Wand to select one of the red areas (left) and then use the Similar command to grab the rest of them (right). Read ’em and weep, boys!
Note
Because both of these commands base their calculations on the Magic Wand’s Tolerance setting (Expanding Your Selection), you can adjust their sensitivity by adjusting that setting in the Options bar. You can also run these commands more than once to get the selection you want.
The Color Range command is similar to the tools in this section in that it makes selections based on colors, but it’s much better at selecting areas that contain lots of details (such as the flowers in Figure 4-11). The Magic Wand tends to select solid pixels, whereas Color Range tends to select more transparent pixels than solid ones, resulting in softer edges. This fine-tuning lets Color Range produce selections with smoother edges (less blocky and jagged than the ones you get with the Magic Wand) and get in more tightly around areas with lots of details. As a bonus, you also get a handy preview in the Color Range dialog box, showing you which pixels it’ll select before you commit to the selection (unlike the Grow and Similar commands discussed in the previous section).

Figure 4-11. The Color Range command is good at selecting areas with lots of details, like the red and blue petals of these flowers. The dialog box’s preview area shows which parts of the image Photoshop will select when you click OK (they’re displayed in white). If you want to save your settings to use again later, click Save and give the preset a meaningful name. (Color Range presets are stored in the same spot as the rest of your presets.) As the box on page 167 explains, it’s sometimes easier to select what you don’t want in order to get the selection you need. To use the Color Range dialog box to select what you don’t want, turn on its Invert checkbox.
Tip
You can also use the Color Range command’s Skin Tones option to select people. The box on Selecting Skin Tones and Faces has the details.
Open the Color Range dialog box by choosing Select→Color Range, either before or after you make a selection. If you haven’t yet made a selection, Photoshop examines the entire image. If you already have a selection, Photoshop looks only at the pixels in the selected area, which is helpful if you want to isolate a certain area. For example, you could throw a quick selection around the red flower in the center of Figure 4-11, and then use Color Range’s subtract-from-selection capability (explained in a moment) to carve out just the red petals. By contrast, if you want to use Color Range to help expand your current selection, press and hold the Shift key while you choose Select→Color Range.
Use the Select menu at the top of the Color Range dialog box to tell Photoshop which colors to include in the selection. The menu is automatically set to Sampled Colors, which lets you mouse over to the image and click the color you want to select (your cursor turns into a tiny eyedropper as shown in Figure 4-11). If you change the Select menu’s setting to Reds, Blues, Greens, or whatever, Color Range will examine your image and grab that range of colors all by itself once you click OK.
Tip
The Select menu also includes Highlights, Midtones, and Shadows, which can help you create selections based on those parts of a photo. Nice!
If you’re trying to select adjacent pixels, turn on Localized Color Clusters. When you do, the dialog box’s Range slider becomes active so you can tweak the range of colors Photoshop includes in the selection. Increase this setting and Photoshop includes more colors and makes larger selections; lower it and Photoshop gets pickier about matching colors and creates smaller selections.
You can tweak the point at which Photoshop partially selects pixels by adjusting the Fuzziness setting. Its factory setting is 40, but you can set it to anything between 0 and 200. As you move this slider (or type a number in the text box), keep an eye on the dialog box’s preview area—the parts of the image that Photoshop will fully include in the selection appear in white, and any pixels that are partially selected appear in gray (see Figure 4-11).
Tip
The Color Range dialog box remembers the settings and sample colors you used the last time you opened it. This is different from previous versions of the program, in which it remembered nothing and automatically used your foreground color chip as the sample color. If you want to use your foreground color chip as the sample color, press and hold the space bar when you choose the Color Range command from the Select menu. When the Color Range dialog box opens, the Select menu reads “Selected Colors” and any areas in your image that are the same color as your foreground color chip are automatically selected and shown in white.
Use the eyedroppers on the dialog box’s right side to add or subtract colors from your selection; the eyedropper with the tiny + sign adds to the selection, and the one with the – sign subtracts from it. (Use the plain eyedropper to make your initial selection.) When you click one of these eyedroppers, mouse over to your image, and then click the color you want to add or subtract, Photoshop updates the dialog box’s preview to show what the new selection looks like. It sometimes helps to keep the Fuzziness setting fairly low (around 50 or so) while you click repeatedly with the eyedroppers.
Tip
You can use the radio buttons beneath the Color Range dialog box’s preview area to see either the selected area (displayed in white) or the image itself. But there’s a better, faster way to switch between the two views: With the Selection radio button turned on, press the ⌘ key (Ctrl on a PC) to temporarily switch to the image preview. When you let go of the key, you’re back to selection preview.
The Selection Preview menu at the bottom of the dialog box lets you display a selection preview on the image itself so that, instead of using the dialog box’s dinky preview, you can see the proposed selection right on your image. But you’ll probably want to leave this menu set to None because the preview options that Photoshop offers (Grayscale, Black Matte, and so on) get really distracting!
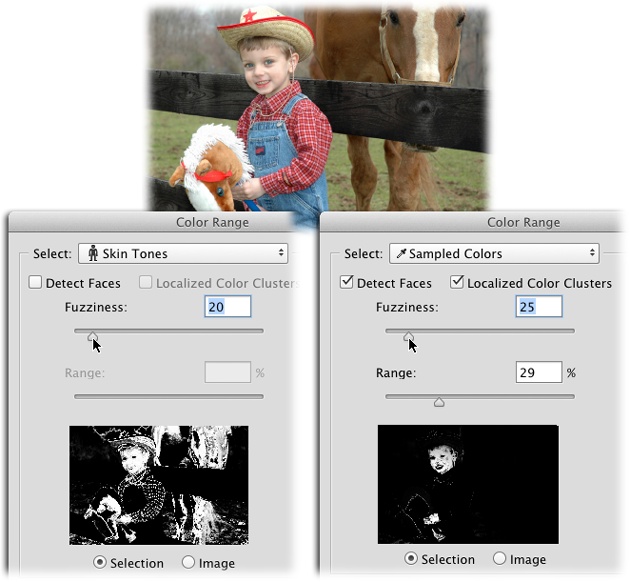
GEM IN THE ROUGH: Selecting Skin Tones and Faces
The Color Range dialog box can help you to select skin tones, which can come in really handy. For example, say you need to make a quick selection of skin tones in order to correct just that part of an image, or to create a layer mask that protects skin tones when you’re sharpening, blurring, and so on.
To do so, head to the dialog box’s Select menu and choose Skin Tones. Photoshop immediately hunts down all the colors in the image that are similar to those found in a wide variety of human skin (though don’t expect it to work well on all ethnicities). Then use the Fuzziness slider to fine-tune the selection: drag it left to include less skin or right to include more.
If you’re specifically after faces, turn on the Detect Faces checkbox, and Photoshop looks for faces and includes ’em in your selection. (This checkbox becomes active when you choose Skin Tones from the Select menu; if you choose Sampled Colors instead, you have to turn on Localized Color Clusters before you can turn on Detect Faces.) Selections made with Detect Faces turned on include partially transparent pixels around the faces’ edges so the changes you make will blend better with surrounding pixels (partially transparent pixels look gray in the preview area).
When Adobe introduced these features in CS6, it worked on only a handful of images, though Adobe has since beefed up its abilities. That said, if your image includes a face that’s turned in profile or the image includes skin-like colors—think light-colored hair, a nude-colored shirt, and so on—you’re better off using the Quick Selection tool first and then having a go with Color Range.
These two tools let you erase parts of an image based on the color under your cursor without having to create a selection first. You’re probably thinking, “Hey, I want to create a selection, not go around erasing stuff!” And you have a valid point except that, after you’ve done a little erasing, you can always load the erased area (or what’s left) as a selection. All you have to do is think ahead and create a duplicate layer before you start erasing, as this section explains.
Say you have an image with a strong contrast between the item you want to select and its background, like a dead tree against the sky (Figure 4-13). The Background Eraser and Magic Eraser tools (Figure 4-12) can help you quickly erase the sky in order to select the tree. Sure, you could use the Magic Wand or Quick Selection tool to do the opposite—select the sky and then delete or mask it (Layer Blending)—but the Background Eraser lets you erase more carefully around the edges of the tree.
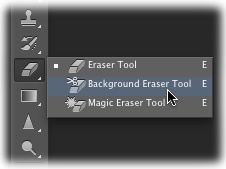
Figure 4-12. You may never see these tools because they’re hidden inside the same toolset as the regular Eraser tool. Just click and hold the Eraser tool’s icon until this little menu appears. Pick an eraser based on how you want to use it: You drag with the Background Eraser (as if you were painting, which is great for getting around the edges of an object), whereas you simply click with the Magic Eraser.
Tip
The Eraser tool’s keyboard shortcut is the E key. To switch among the various eraser tools in its toolset, press Shift-E repeatedly.
This tool lets you delete an image’s background by painting (dragging) across the pixels you want to delete. When you activate the Background Eraser, your cursor turns into a circle with tiny crosshairs in its center. The crosshairs control which pixels Photoshop deletes, so be extra careful that they touch only pixels you want to erase. The size of the brush cursor controls how far into the image Photoshop hunts for pixels to erase. Up in the Options bar, you can tweak the following settings (see Figure 4-13):
Brush Preset picker. This is where you choose the shape and size of your brush cursor. For best results, stick with a soft-edged brush. Just click the down-pointing triangle next to this menu, and then lower the Hardness setting slightly.
Sampling. This setting is made up of three icons that include eyedroppers (they’re labeled in Figure 4-13). Sampling controls how often Photoshop looks at the color the crosshairs are touching to decide what to erase. If your image’s background has a lot of color variation, leave this set to Continuous so Photoshop keeps a constant watch on what color pixels the crosshairs are touching. But if the background’s color is fairly uniform, change this setting to Once; Photoshop then checks the color the crosshairs touch just once and resolves to erase only pixels that closely match it. If you’re dealing with an image where there’s only a small area for you to paint (like a tiny portion of sky showing through a lush tree), change this setting to Background Swatch, which tells Photoshop to erase only colors that are similar to your current background color chip (how similar they have to be is controlled by the tool’s Tolerance setting, which is described in a sec). To choose the color, click the background color chip at the bottom of the Tools panel, mouse over to your image, and then click an area that’s the color you want to erase.
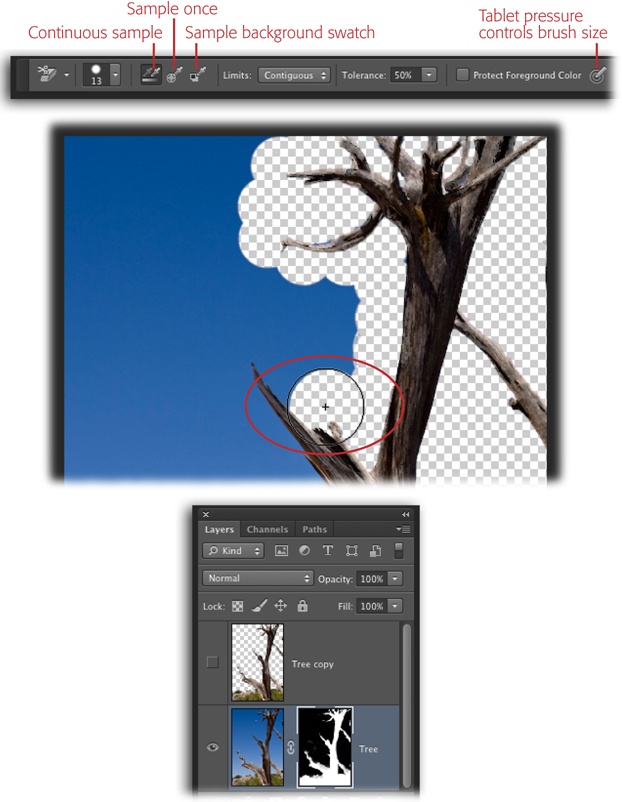
Figure 4-13. Even though the Background Eraser is destructive (it erases pixels), you can use it in a nondestructive way by duplicating the soon-to-be-erased layer. After you do your erasing on the duplicate layer, load the erased layer as a selection and use it as a layer mask on the original layer. As you can see here, Photoshop pays attention only to the color you touch with the crosshairs in the center of the Background Eraser’s cursor; even though the tree’s branches are within the brush area (circled), Photoshop deletes only the blue pixels. To practice erasing this background, download DeadTree.jpg from this book’s Missing CD page at www.missingmanuals.com/cds.
Limits. From the factory, this field is set to Contiguous, which means the tool erases only pixels adjacent to those you touch with the crosshairs. If you want to erase similar-colored pixels elsewhere in the image (for example, the background behind a really thick tree or a bunch of flowers), change this setting to Discontiguous. Find Edges erases only adjacent pixels, but preserves the sharpness of the object’s edge.
Tolerance. This setting works just like the Magic Wand’s Tolerance setting (Expanding Your Selection): A lower number makes the tool pickier about the pixels it erases, and a higher number makes it less picky.
Protect Foreground Color. If you’ve cranked down the Tolerance setting and you’re still erasing some of the area you want to keep, turning on this setting can help. When it’s on, you can tell Photoshop which area you want to keep (the foreground) by Option-clicking (Alt-clicking on a PC) that area. When the area you’re erasing around changes to a different color, be sure to Option-click (Alt-click) to update the protected color (you’ll do this often when erasing pixels around hair or fur).
Tip
To use the Background Eraser on a uniformly colored background around fine details like hair or fur, try setting the Sampling method to Once, the Limits menu to Discontiguous, and turning on Protect Foreground Color. Next, mouse over to the image and Option-click (Alt-click on a PC) one of the strands of hair. Then, when you paint across the image, Photoshop should protect anything that’s the same color as the hair, keeping it from being erased. Increase your brush size to erase bits of the background that are peeking through strands of hair. For the best results, perfect your erasing on the duplicate layer and skip adding a layer mask, as the following steps describe, because the fine edges around hair or fur won’t look as good after you load ’em as a selection and add a mask. There’s a tutorial on this technique on your author’s website; just visit www.photolesa.com and enter background eraser into the search field at upper right.
Here’s how to use the Background Eraser to remove the sky behind a dead tree without harming the original pixels, as shown in Figure 4-13:
Open a photo, duplicate the image layer (or background layer) by pressing ⌘-J (Ctrl+J), and then hide the original layer.
Because you’ll do your erasing on the duplicate layer, you don’t need to see the original layer. Over in the Layers panel, click the visibility eye to the left of the original layer’s thumbnail to turn it off.
Grab the Background Eraser tool and paint away the background.
This tool is in the same toolset as the Eraser tool (see Figure 4-12). Once you’ve activated it, mouse over to your document, and your cursor morphs into a circle with tiny crosshairs in the center. Remember that the trick is to let the crosshairs touch only the pixels you want to erase; adjust the size of the brush cursor to control how far into your image Photoshop looks for pixels to delete. If you need to, increase or decrease the brush cursor’s size by pressing the left or right bracket keys on your keyboard, respectively.
If the tool is erasing too much or too little of the image, tweak the Options bar’s Tolerance setting.
If an area in the image is almost the same color as the background, lower the tolerance to make the tool pickier about what it’s erasing so that it erases only pixels that closely match the ones you touch with the crosshairs. Likewise, if it’s not erasing enough of the background, raise the tolerance to make it zap more pixels.
Tip
It’s better to erase small sections at a time instead of painting around the entire object in one continuous stroke. Drag to erase some of the area around the object, let go of the button, drag again to erase a little more, and so on. That way, if you need to undo your erasing with the History panel or the Undo command (⌘-Z or Ctrl+Z), you won’t have to watch all that erasing unravel before your eyes. This technique also lets you be very precise with your erasing, as you can undo small sections and adjust the tool’s settings to do a better job around tough areas such as hair and fur.
Once you get a clean outline around the object, switch to the regular Eraser tool or the Lasso tool (The Magic Eraser) to get rid of the remaining big chunks of background.
After you erase the hard part—the area around the edges—with the Background Eraser, use the regular Eraser tool, set to a large brush, to get rid of the remaining background quickly. Or use the Lasso tool to select the remaining areas, and then press the Delete key (Backspace on a PC) to get rid of ’em.
Load the erased layer as a selection, and then turn off its visibility.
Over in the Layers panel, ⌘-click (Ctrl-click) the thumbnail of the layer you did the erasing work on to create a selection around the tree. When you see the marching ants, click the layer’s visibility eye to hide it. (As the Tip at the beginning of this list explains, if you’re erasing around hair or fur, skip this step and the next one.)
Activate the original layer, turn on its visibility, and then add a layer mask to it.
In the Layers panel, click once to activate the original image layer (or background layer), and then click the area to the left of its thumbnail to make it visible again. While you have marching ants running around the newly erased area, add a layer mask to the original layer by clicking the circle-within-a-square icon at the bottom of the Layers panel.
You’re basically done at this point, but if you need to do any cleanup work (if the Background Eraser didn’t do a perfect job getting around the edges, say), now’s the time to edit the layer mask. To do so, click the mask’s thumbnail over in the Layers panel, press B to grab the Brush tool, and then set your foreground color chip to black. Now, when you brush across the image, you’ll hide more of the sky. If you need to reveal more of the tree, set your foreground color chip to white instead, and then paint the area you want to reveal. (See Layer Blending for a detailed discussion of creating and editing layer masks.) Alternatively, you can use the Refine Edge dialog box to fine-tune your selection before adding the mask; Creating Selections with Channels tells you how.
Sure, duplicating the layer you’re erasing adds an extra step, but it means you’re not deleting any pixels—you’re just hiding them with a layer mask, so you can get ’em back if you want to. How cool is that?
This tool works just like the Background Eraser except that, instead of a brush cursor that you paint with, its cursor looks like a cross between the Eraser tool and the Magic Wand. Just as the Magic Wand can select color with a single click, the Magic Eraser can zap color with a single click, so it’s great for instantly erasing areas of solid color. Since this tool is an eraser, it really will delete pixels, so you’ll want to duplicate your background layer before using it.
You can alter the Magic Eraser’s behavior by adjusting these Options bar settings:
Tolerance. This setting works just like the Magic Wand’s Tolerance setting (Expanding Your Selection). A lower number makes the tool pickier about the pixels it erases, and a higher number makes it less picky.
Anti-alias. Turning on this checkbox makes Photoshop slightly soften the edges of what it erases.
Contiguous. To erase pixels that touch one another, leave this checkbox turned on. To erase similar-colored pixels no matter where they are in the image, turn it off.
Sample All Layers. If you have a multilayer document, turn on this checkbox to make Photoshop look at the pixels on all the layers instead of just the active one.
Opacity. To control how strong the Magic Eraser’s effect is, enter a value here. Initially, this option is set to 100, which removes 100 percent of the image, but you can enter 50 to make it wipe away 50 percent of the image’s color, for example.
Get Photoshop CC: The Missing Manual, 2nd Edition now with the O’Reilly learning platform.
O’Reilly members experience books, live events, courses curated by job role, and more from O’Reilly and nearly 200 top publishers.

