When you launch Photoshop CC for the first time, you’re greeted by the Application Frame shown in Figure 1-1. This frame confines all things Photoshop to a single resizable, movable window. You can grab the whole mess—documents, panels, and all—and drag it to one side of your screen (or better yet, to another monitor) so it’s out of the way. And if you open more than one document, they’re displayed in handy tabs that you can rearrange by dragging.
Chances are, you’ll either love the Application Frame or hate it. If you’re on a computer running Windows, you’re used to programs looking and behaving this way. But if you’re on a Mac and you’re coming from an older version of Photoshop (like CS3), this arrangement may feel odd; in that case, you can turn off the frame by choosing Window→Application Frame to make Photoshop switch to the floating-window view used in older versions of the program. (PC folks are stuck with the frame.)
Note
In Photoshop CC, you’ll spot a special button at the bottom of each document window that looks like a rectangle with a curved arrow inside it. Clicking it uploads the current document to Adobe’s portfolio-sharing community site Behance—a great way to get critical feedback on projects. To learn more about Behance, see the box on Sharing Images on Behance and check out your author’s ebook “The Skinny on Behance” at www.theskinnybooks.com.
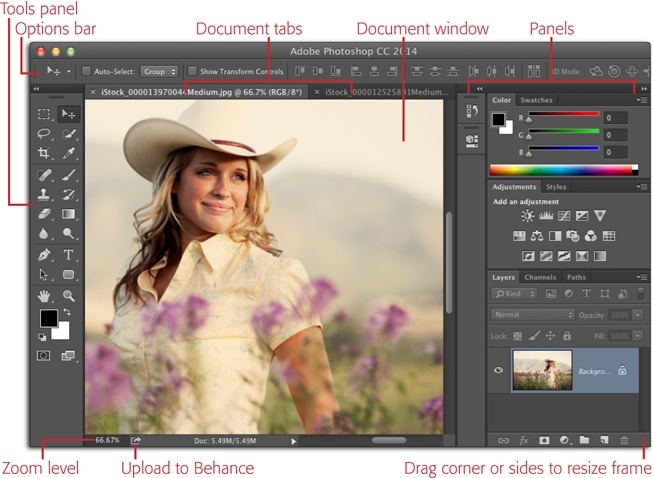
Figure 1-1. You can open several images at once; just click a document’s tab to summon it for editing. Photoshop stores the tools and adjustments you’ll use most in the panels on the sides of the Application Frame; a full introduction to panels starts on page 3. (Figure 1-9 on page 14 explains how to make your Tools panel have two columns like the one shown here.)
Note
Adobe reduced clutter back in Photoshop CS6 by removing the Application bar, which used to house extras like guides, grids, and rulers, as well as several menus. As you learn in the next few pages, those items are now sprinkled throughout the Tools panel, the View menu, and the Window menu.
Also, if you use Photoshop alongside other programs, the box on Hiding vs. Quitting explains how to get Photoshop out of the way without quitting it.
Lording over the document window is the Options bar (Figure 1-2, top), which lets you customize the behavior of nearly every item in the Tools panel. This bar automatically changes to include settings related to the tool you’re currently using. The Options bar also includes the workspace menu, which lets you change the way your Photoshop environment is set up (you learn about workspaces on Customizing Your Workspace).
Unfortunately, the Options bar’s labels are fairly cryptic, so it can be hard to figure out what the heck all those settings do. Luckily, you can point your cursor at any setting to see a little yellow pop-up description called a tooltip (you don’t need to click—just don’t move your mouse for a couple seconds).
Tip
If the tooltips drive you crazy, you can hide ’em by choosing Photoshop→Preferences→Interface (Edit→Preferences→Interface on a PC) and turning off Show Tool Tips.
When you first install Photoshop, the Options bar is perched at the top of your screen, but it doesn’t have to stay there. If you’d rather put it somewhere else, grab its left end and drag it wherever you want, as shown in Figure 1-2, middle. If you decide to put it back later (also called docking), just drag it to the top of the screen and, when you see a thin blue line appear (Figure 1-2, bottom), release your mouse button.

Figure 1-2. Top: The Options bar is customization central for whatever tool you’re currently using. But it doesn’t have to live at the top of the screen; you can undock it by dragging the tiny dotted lines circled here. Middle: Once you’ve freed the Options bar, you can drag it anywhere you want by grabbing the dark gray bar on its far left. Bottom: To redock the Options bar, drag it to the top of your screen. Once you see a thin blue line like the one visible here, release your mouse button.
Tip
If a tool seems to be misbehaving, it’s likely because you changed one of the Options bar’s settings and forgot to change it back. These settings are sticky: Once you change them, they stay that way until you change them back. Figure 1-17 explains how to reset a tool to its factory-fresh settings.
Note
Adobe recently added the ability to shrink the Options bar to a narrower version, which is handy if you’ve got a small screen. Skip to Changing Photoshop’s Appearance for the scoop.
Photoshop includes three different screen modes for your document-viewing pleasure. Depending on what you’re doing, one will suit you better than the others. For example, you can make an image take up your whole screen (with or without the menus and Options bar), hide Photoshop’s panels, and so on (see Figure 1-3). To give each mode a spin, you first need to open an image: Choose File→Open, navigate to where an image lives, and then click Open.
Tip
You can free up precious screen real estate by pressing the Tab key to hide the Options bar and panels (pressing Shift-Tab hides all the panels except the Tools panel). This trick is a great way to get rid of distractions when you’re editing images, especially if you have a small monitor. To bring the panels back, press Tab again or mouse over to the edge of the Photoshop window where the panels should be; when you move your cursor away from the panels, they’ll disappear again.
It’s a snap to jump between modes. Just press the F key repeatedly—unless you’re in the middle of cropping an image or using the Type tool (if you are, you’ll type a bunch of Fs)—or use the Screen Modes menu at the bottom of the Tools panel (circled in Figure 1-3, top). These are your choices:
Standard Screen Mode is the view you see when you launch Photoshop for the first time. This mode includes menus, the Application Frame, the Options bar, panels, and document windows. Use this mode when the Application Frame is active and you need to scoot the whole of Photoshop—windows and all—around on your monitor (except for undocked panels or free-floating windows).
Full Screen Mode With Menu Bar completely takes over your screen, puts your document in the center on a dark gray canvas or frame, and attaches any open panels to the left and right edges of your screen. This mode is great for day-to-day editing because you can see all of Photoshop’s tools and menus without being distracted by the files and folders on your desktop. The dark gray background is also easy on the eyes and a great choice when color-correcting images (a brightly colored desktop can affect your color perception).
Tip
You can change Photoshop’s canvas color anytime by Control-clicking (right-clicking on a PC) the canvas itself. From the shortcut menu that appears, choose from Default (the dark, charcoal gray you see now), Black, Dark Gray, Medium Gray, or Light Gray. If none of those colors float your boat, you can pick your own by choosing Select Custom Color to open the Color Picker, which is explained on Choosing Individual Colors.
Full Screen Mode hides all of Photoshop’s menus and panels, centers the document on your screen, and puts it on a black background. (If you’ve got rulers turned on, they’ll still appear, though you can turn ’em off by pressing ⌘-R [Ctrl+R]). This mode is great for displaying and evaluating your work or for distraction-free editing. And the black background really makes images pop off the screen (though the next section shows you how to change it to another color).
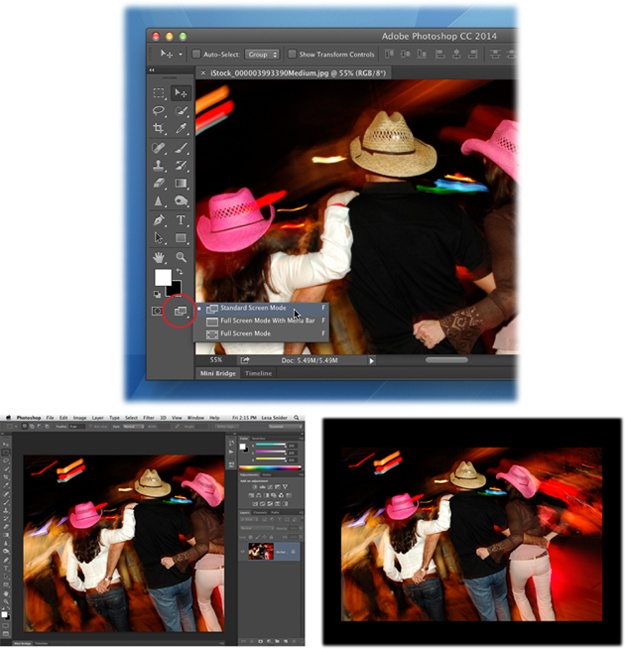
Figure 1-3. The many faces of Photoshop: Standard Screen Mode (top), Full Screen With Menu Bar (bottom left), and Full Screen (bottom right). You can edit images in any of these modes, though some give you more screen real estate than others. The Screen Modes menu (circled) lives at the bottom of the Tools panel. Figure 1-9 on page 14 tells you how to switch to a two-column Tools panel like the one shown here.
While the dark gray interface colors introduced in CS6 are supposed to be easier on the eyes and help you see the colors in images more accurately, you may disagree. You may also want to increase the size of the text labels in the Options bar and panels. Fortunately, you can change several aspects of the program’s appearance by choosing Photoshop→Preferences→Interface (Edit→Preferences→Interface on a PC), as Figure 1-4 shows.
The next section tells you how to customize Photoshop’s look and feel even more by opening, closing, rearranging, and resizing panels. Read on!
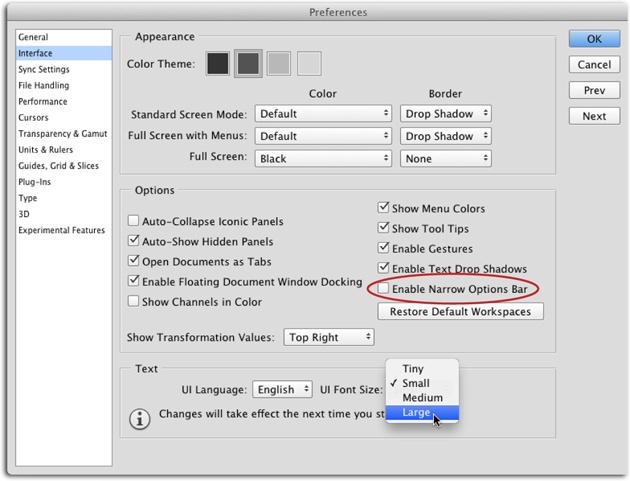
Figure 1-4. Not a fan of the dark gray color theme? Use these settings to pick something lighter (the light gray square reverts to CS5’s color theme). To change Full Screen Mode’s background color to something other than black, use the Full Screen drop-down menu. Photoshop also sports a narrow Options bar (circled), which is nice for small screens. If the text labels throughout the program have you squinting, make ’em bigger by using the UI Font Size menu shown here (then quit and restart Photoshop to make your change take effect).
Get Photoshop CC: The Missing Manual, 2nd Edition now with the O’Reilly learning platform.
O’Reilly members experience books, live events, courses curated by job role, and more from O’Reilly and nearly 200 top publishers.

