Photoshop gives you two ways to edit files: destructively and nondestructively. Destructive editing means you’re changing the original image—once you exceed the History panel’s limit (Changing How Far Back You Can Go) and save your document, those changes are (gulp) permanent. Nondestructive editing means you’re not changing the original file and you can go back to it at any time. Folks new to image editing tend to use the first method and experienced pixel-jockeys the second—and you’ll likely see a tiny cloud of smugness floating above the latter.
When you’re working in Photoshop, it’s best to keep your documents as flexible as possible. People (even you!) change their minds hourly about what looks good, what they want, and where they want it—all of which is no big deal if you’re prepared for that. But if you’re not, you’ll spend a ton of time redoing what you’ve already done from scratch. To avoid that kind of suffering, you can use layers, a set of stackable transparencies that together form a whole image (see Figure 4-1). Layers are your ticket to nondestructive and therefore safer, non-committal editing (if only we had layers in real life!).
Note
Another argument for using layers is that they let you easily apply the same effect you’re creating in one image to other images (by dragging and dropping the relevant layers into another open document), as well as reverse-engineer a technique or effect that you created years ago in order to apply it to a new image today.
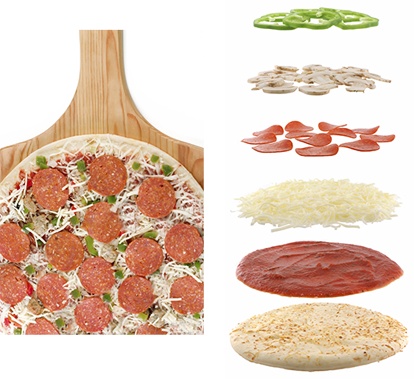
Figure 4-1. You can think of layers like the ingredients on this pizza (really!). Left: In the Photoshop workspace, most folks keep their document window on the left and Layers panel on the right. So by looking straight down at this pizza, you get a bird’s-eye view of it, which represents what you see in your document window. Even though the pizza is made up of many layers (the different toppings, sauces, and dough), you see a single image. Right: However, the Layers panel shows you an exploded view. If some of the toppings don’t cover the pizza’s entire surface—like the bell peppers and mushrooms shown here—you can see through that layer to what’s on the other layers below. In this example, that’s the pepperoni, cheese, sauce, and dough. This kind of image is called a composite: a seemingly single image that’s made from many. The act of creating an image like this is called compositing.
With layers, you can make all kinds of changes to an image without altering the original. For example, you can use one layer to color-correct your family reunion photo (Chapter 10), another to whiten Aunt Bessie’s teeth (Whitening Teeth), and yet another to add a photo of the Great Pyramid to make it look like the reunion was held in Egypt instead of at the local park (Sky Swapping). Using layers also lets you:
Resize an object independently of everything else in the document, without changing the document’s size (Resizing and Rotating Layers).
Move an object or text around within the document without moving anything else (Moving and Aligning Layers).
Combine several images into one document to make a collage (Chapter 8).
Make most of an image black and white while leaving a small part of it in color (see Partial-Color Effect).
Fix the color and lighting of a photo (or just parts of it) without harming the original (see Figure 4-31 on page 115).
Remove blemishes and other objects without harming the original (Chapter 11).
Add editable text on top of an image (Previewing Fonts).
The best part about using layers is that once you save a document as a PSD file (File Formats), you can close it, forget about it, and open it next week to find your layers—and all your changes—intact. Learning to love layers is the key to a successful Photoshop career because they let you edit with maximum flexibility.
In this chapter, you’ll learn about the different kinds of layers, when to use them, and how to create them. You’ll also find out about the fun and useful features that tag along with layers, like layer styles and layer masks. By the time you’re done, you’ll be shouting the praises of nondestructive editing from the highest rooftop! (Whether you do it smugly or not is up to you.)
Get Photoshop CC: The Missing Manual now with the O’Reilly learning platform.
O’Reilly members experience books, live events, courses curated by job role, and more from O’Reilly and nearly 200 top publishers.

