Of all the frameworks presented in this book, Sencha Touch is probably the most complex and daunting of all. It is an amazing piece of JavaScript code, providing application developers with a fertile playground ready to be explored.
This chapter will provide an introduction to Sencha Touch, and will later explore its characteristics by creating three small applications from scratch.
Note
At the time of this writing, the current stable version of Sencha Touch is version 2.0.1.
Sencha Touch is a fully fledged UI framework, in the same tradition as Cocoa Touch, Swing, or .NET. It is completely written in JavaScript, and it is a direct spin-off of the famous Ext.js framework, initially created in 2006 by Jack Slocum as an extension (hence the name) of the YUI framework from Yahoo!.
Sencha Touch provides a set of very complex widgets, reacting to the most complex gestures, geared towards the creation of extremely complex web applications. In this sense, Sencha Touch (and Ext.js) can be compared to Cappuccino, SproutCore, or other large-scale, enterprise-y frameworks.
And enterprise-y it is. Or at least that is how Sencha (the company behind Sencha Touch) is aggressively marketing it. Frameworks falling into this category usually have the following characteristics:
(Relatively) Large code footprint
Complex object hierarchy
Long list of widgets, with complex customizations, ready to be used out-of-the-box
Opinionated approaches to common tasks
Cross-browser support
Detailed documentation and a fanatical user base
Commercial support
Sencha Touch largely fills all of the requirements above, including the availability of an advanced designer tool: the Sencha Architect 2. This tool can be used to visually design user interfaces, using a tool similar to Interface Builder or Visual Studio, allowing developers to quickly create prototypes or complex user interfaces without having to write a single line of code. We are going to learn abut Sencha Architect at the end of this chapter.
Sencha Touch is a product of Sencha, which was formed after popular JavaScript library projects Ext.JS, jQTouch and Raphaël were combined. The first release of Sencha Touch was version 0.90 beta on July 17, 2010. This beta release supported iOS devices like iPhone, iPod touch, the iPad, and Android devices.
Subsequently, the first stable version 1.0 was released in November 2010. The latest stable version 2.0.1 adds support to BlackBerry devices running OS version 6. Version 2.0 has been released as Beta during SenchaCon 2011, held in Austin, Texas in October 2011, and in final version during the writing of this book, in March 2012.
Webkit Only!
It is very important to note that Sencha Touch is primarily based on Webkit, so it can support only webkit-based browsers like Chrome and Safari. This fact has a direct implication in the development process, because it means that you cannot use Firefox or Firebug to debug the application, and instead you have to use the equivalent tools provided by Safari or Chrome.
Sencha Touch has several features that set it apart from other similar frameworks; in this section we are going to see some of them in detail.
Sencha Touch includes a set of GUI-based controls or components for use within mobile web applications. These components are highly optimized for touch input.
Some GUI components available in the library:
Buttons with device specific themes and effects
Form elements like text fields (for email, date picker, address, etc.), sliders, selectors, and comboboxes
List component, which has momentum scrolling along with index
Minimalistic icon set
Toolbars/Menus
Movable tabs
Bottom toolbars
Map component with support to multi-touch input like pinch and zoom
All the components can be themed according to the target device (this is done using SASS, a stylesheet language built over CSS)
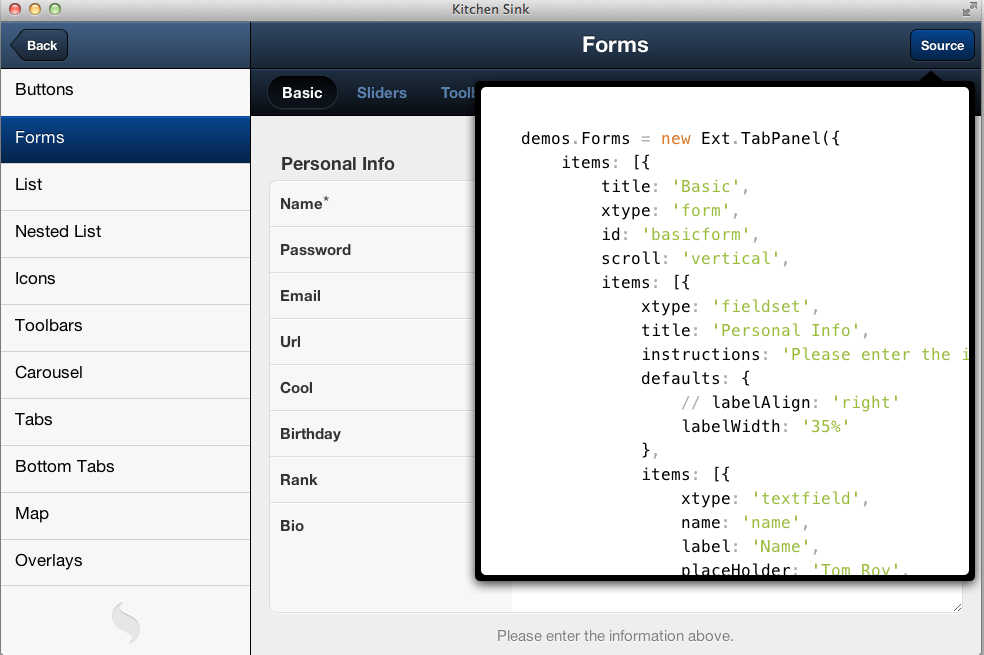
To demonstrate the large choice of GUI components available in Sencha Touch, the development team has built the Kitchen Sink, a rather extensive demo showcasing almost every possible control available in the library; you can take a look at the Figure 4-1.
Sencha Touch has certain built-in transition effects, based on the powerful CSS3 support that newer Webkit browsers have:
Slide over or under current element
Pop
Flips
Cube
Sencha Touch supports common touch gestures basically built from Touch events that are web standard but are supported only by iOS, Android OS, and some touch-enabled devices:
Tap
Double Tap
Swipe
Scroll
Pinch
However, care must be taken when handling many events in the same panel; for example, when handling single and double taps, the single tap event should trigger the creation of a delayed task, that should be removed if the user taps twice. It is somewhat unfortunate that the framework does not handle this situation by itself.
Sencha Touch consists of both UI libraries and also data libraries. With the use of data libraries the mobile web application can get data from any remote server. Sencha Touch has a data package to support web standards for data interchange with server like AJAX and JSONP. It also supports YQL. Using these technologies, data can be bound to visual components like lists to reflect data from server.
One of the most interesting aspects of Sencha Touch regarding data management is the fact that lists (and other DataView panels) can be bound to data stores in such a way that they will be notified automatically of any change in the data store. Developers do not have to manually reload the list to reflect the changes in the data!
Sencha Touch has inherited from Ext.js a standardized (and opinionated) way of writing JavaScript; this has the advantage of simplifying the reading of code using these frameworks, but it also sometimes represents a slightly steep curve for developers new to the platform.
We are then going to spend a bit of time learning the classic Ext.js JavaScript idiom, which will make things easier to understand later on. Developers who have prior experience with Ext.js can jump or skim this section altogether, and start writing their first Sencha Touch application right away.
The idioms used by Sencha Touch are two:
Dictionaries for widgets
Method-based definition of classes and creation of instances
This section will describe these two patterns in detail.
The first, most common idiom used by Sencha Touch is what I call the Descriptive Dictionary Pattern. Whenever you create a new instance of any Sencha Touch class, you are going to pass a dictionary of options to the function. For example, when you create your application, you write code like the following:
Ext.application({});
The Ext.application function
takes a single parameter, a dictionary with options that are used to
modify the behavior and look and feel of the application. Among those
parameters, there are two very important ones that we are going to
add:
nameA simple string without spaces used to generate a master namespace where all the objects of our application will be stored. This is similar to creating a global
applicationJavaScript object, but instead Sencha Touch takes care of its creation automatically for us.launchThis parameter takes a function and for all practical purposes, it is the entry point of the execution of our application.
Having said that, let me introduce to you a reasonable “Hello world” application in Sencha Touch 2:
Ext.application({name:'SampleApp',launch:function(){Ext.Msg.alert('Hello, World!');}});
Our objective is of course to create complex user interfaces; for
that, we are going to use the singleton Ext.Viewport object, which serves a similar
purpose as the default UIWindow
instance used in iOS applications. The basic canvas where any other
widgets can be drawn.
Just call the add() function of
the singleton Ext.Viewport object to
add any required subviews:
Ext.application({name:'SampleApp',launch:function(){Ext.Viewport.add({});}});
Just like when calling the Ext.application() method, the Ext.Viewport.add() function also takes a
literal object as parameter; you just specify a dictionary with the
proper types, and let Sencha Touch do the rest:
Ext.application({
    name: 'SampleApp',
    launch: function() {
        Ext.Viewport.add({
            xtype: 'tabpanel'
        });
    }
});
xtype: 'tabpanel'
});
}
});-
The object defined in this dictionary has the
xtypeproperty, which is very common in Sencha Touch.
We are going to learn more about the xtype property later in this chapter; for the
moment, suffice to say that this parameter is used to determine the
class of the object that will be created by Sencha Touch inside our
Viewport object.
Sencha Touch provides an abstraction around JavaScript’s own
object orientation system, allowing developers to manage, in a small set
of functions, the definition of classes and the creation of instances
from those classes. In short, you use the Ext.define() function to… well, define a new
class, and you use the Ext.create()
function to create a new instance from any class.
For example, let’s see how to define a new Sencha Touch class:
Ext.define('ToDoListApp.model.Task',{extend:'Ext.data.Model',config:{fields:[{name:'id',type:'int'},{name:'completed',type:'boolean'},{name:'dueDate',type:'date'},{name:'title',type:'string'},{name:'description',type:'string'}],idProperty:'id'}constructor:function(title){if(title){this.title=title;}returnthis;},markAsCompleted:function(){console.log(this.title+" is done!");this.completed=true;}});
Now let’s see how we create a new instance from the class we have previously defined:
vartask=Ext.create('ToDoListApp.model.Task',{title:'Buy milk'});task.markAsCompleted();// logs "Buy milk: is done!" in the console
In the preceding code, we are not using the new keyword provided
by JavaScript: new
ToDoListApp.model.Task(). Instead, it is recommended to use
Ext.create, since it allows you to
take advantage of dynamic loading, which is a core feature of Sencha
Touch.
Learn About the Sencha Touch Class System
It is strongly recommended to read the Class System Guide to learn more about the idioms used by Ext.js and Sencha Touch for defining and using classes.
The first application we are going to create with Sencha Touch is a very simple To Do List that allows users to:
Browse a list of tasks
Mark a task as completed (or not) by double tapping the task
Tasks are grouped by due date, so that it is easier to see what has to be done in each day
Add, edit, and remove tasks from the list
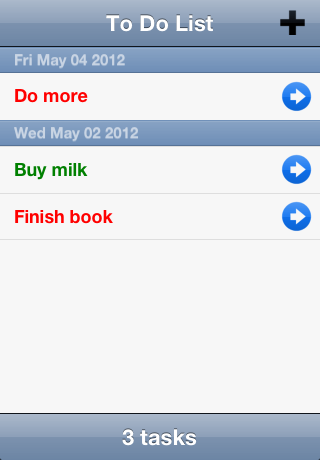
Finally, we are going to build this application as a single JavaScript file to begin with. We are going to break it into a proper MVC application after we have a working app. (See Figure 4-2.)
The first thing to do is to create the HTML file that will hold the different pieces of the application. In our case, it will look like this:
<!DOCTYPE html><html><head><metacharset="utf-8"/><title>Hello World</title><scriptsrc="sencha/sencha-touch.js"></script><linkhref="sencha/resources/css/sencha-touch.css"rel="stylesheet"/><scriptsrc="app.js"></script></head><body></body></html>
At this point you might ask yourself, but wasn’t Sencha supposed to be a JavaScript-only framework? Well, yes, but we need at least one HTML file for the browser to load all the different pieces of our application.
The HTML code itself is extremely simple; it just loads the two
main files of the Sencha Touch framework: the JavaScript and the CSS
stylesheet. The <body> tag, in
particular, is completely empty, as Sencha Touch takes care of the
complete initialization of any application built with it.
The biggest downside of Sencha Touch can be easily seen right now: the huge size of the library means that, in slow hardware, loading a Sencha Touch application can take up to a couple of seconds, which might or might not be acceptable for your users. Of course, as per Moore’s law, as mobile devices grow more powerful, this is becoming less and less of a problem (however, as this happens, these libraries keep growing, so it is a continuous fight between ease of development and performance, as a matter of fact).
The code of the application is located in the app.js file. Remember that Sencha Touch is a pure JavaScript framework, and as such you create, manipulate, and destroy HTML elements through JavaScript, without ever writing a single line of HTML.
The first thing we are going to do is to create the basic skeleton of our application. This skeleton is constituted by the following elements:
An instance of Ext.Application, which is the base class for Sencha Touch applications. When a Sencha Touch application starts, the entry point is always the
launch()method of this instance.A master viewport panel, created by the application instance, which plays the same role as the UIWindow in an iPhone app, or the default activity in an Android application.
Inside the viewport, we are going to embed all the other screens, each stored in a separate variable (later, we will see how to embed these elements in separate files to create a more manageable application structure).
Let’s see the code that represents what we have just described:
Ext.Loader.setConfig({enabled:true});Ext.application({models:['Task'],controllers:['TaskController'],stores:['TaskStore'],views:['TaskList','TaskForm'],name:'ToDoListApp',launch:function(){Ext.Viewport.add([Ext.create('ToDoListApp.view.TaskList'),Ext.create('ToDoListApp.view.TaskForm')]);}});
If you remember our discussion about JavaScript at the beginning of this book, you will remember that it is important to scope the variables of a JavaScript application, so that the global namespace is not cluttered. This is what we are doing here: the ToDoListApp name is automatically converted by Sencha Touch in a variable, which works both as a pointer to the application instance and as a namespace in itself, where all the different widgets of the application will reside.
We can also see that the launch() method calls
the Ext.Viewport.add() method of the
Viewport singleton, which holds two instances of custom panels. You can
think of a Container as an UIView in iOS or a View in Android;
Containers are the basic building visual block of Sencha Touch
applications.
And, similarly to other UI frameworks, you can embed Containers into Containers; the particularity in Sencha Touch is the use of the items property, which takes an array of Containers. This property simply adds the containers as children of the current one, and if you pass more than one container, the first is shown while the others are hidden.
Another important element of the definition above is the fact that
Sencha Touch Viewports automatically use the layout: "card" instruction. This tells the
container to use an instance of Ext.layout.CardLayout to display its children
items, and it makes the parent only display a child container at a time.
The CardLayout class also provides a
setActiveItem() method that we are
going to use in this application, in order to jump from container to
container, using animations.
One interesting property of the items property is that you can add several children panels to a parent panel, and then you can navigate from screen to screen, using similar animations as if you were using an UINavigationController in iOS. However, there is a greater flexibility to specify the types of animations, all powered using WebKit’s own CSS animations.
Sencha Touch elements can be created both by using the
Ext.create function, which requires the class name of
the object, or by using dictionaries with the xtype keyword, which takes
a special code as a parameter. When reading this parameter, Sencha Touch
will automatically create the object of the corresponding class.
The following table shows the correspondence of the different classes available in Sencha Touch.
Table 4-1. Equivalence between instance creation syntaxes
| Category | xtype | Class |
|---|---|---|
Basic | button | Ext.Button |
component | Ext.Component | |
container | Ext.Container | |
dataview | Ext.DataView | |
panel | Ext.Panel | |
toolbar | Ext.Toolbar | |
spacer | Ext.Spacer | |
tabpanel | Ext.TabPanel | |
Form | form | Ext.form.FormPanel |
checkbox | Ext.form.Checkbox | |
select | Ext.form.Select | |
field | Ext.form.Field | |
fieldset | Ext.form.FieldSet | |
hidden | Ext.form.Hidden | |
numberfield | Ext.form.NumberField | |
radio | Ext.form.Radio | |
slider | Ext.form.Slider | |
textarea | Ext.form.TextArea | |
textfield | Ext.form.TextField | |
Data | store | Ext.data.Store |
arraystore | Ext.data.ArrayStore | |
jsonstore | Ext.data.JsonStore | |
xmlstore | Ext.data.XmlStore |
To use the xtype syntax, just create a standard JavaScript dictionary and use it in the items or dockeditems property of your panel, just as if you would use any other instance:
Ext.define('ToDoListApp.view.TaskList',{extend:'Ext.dataview.List',config:{items:[{xtype:'toolbar',title:'To Do List',items:[{xtype:'spacer'},{xtype:'button',iconCls:'add',ui:'plain'}]}]}});
The diagram in Figure 4-3 shows the typical organization of a Sencha Touch 2 application. In this organization, the MVC standard is complemented by a series of supplementary objects, which serve as an abstraction layer for the underlying storage and communication mechanisms used by the application.
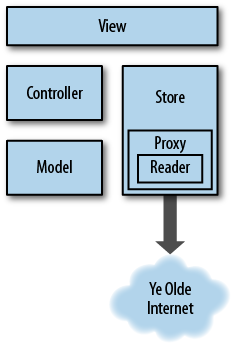
The first element in this mechanism is the Store. A Store represents an abstraction around data.
Views use stores directly (hence the direct connection between views and stores in Figure 4-3). One of the coolest features of this direct relationship is that views are 100% aware and dependent on the state of a store; this means that if you want to update a UI element attached to a store, you just update the store data, and the UI element will be updated automatically. This is a common mechanism in ASP.NET, for example, where it is known as data binding.
There are several different kinds of stores available:
Ext.data.Storeis the base class used to represent stores; usually applications just create a raw instance of this class and use it as a store.Ext.data.TreeStoreis used to represent hierarchical data, and it is used with components such as theExt.dataview.NestedList, used in the framework to represent nested sets of information.
Stores depend, in turn, of Proxies. These are
instances of the Ext.data.proxy.Proxy
class (or its subclasses), and they encapsulate the logic required for a
particular storage technology. For example, there are proxies for the
following types of storage:
Ext.data.proxy.AjaxAllows the application to talk to a backend server, using the common CRUD methods. This is one of the most important proxies available; developers can customize them in many ways, like specifying the URLs for each of the API operations, and to pass parameters for each of those operations. A subclass of this proxy,
Ext.data.proxy.Restis specifically tailored for connecting to REST services.Ext.data.proxy.JsonPAnother type of server-bound proxy, like the
Ext.data.proxy.Ajaxclass; in this case, this proxy is able to read data from domains other than that of the original web application.Ext.data.proxy.MemoryStores data in an in-memory array, lost when the page is refreshed or when the user navigates away from the page.
Ext.data.proxy.LocalStorageandExt.data.proxy.SessionStorageAllow developers to store data in, you guessed it, the new HTML5 standard storage mechanisms.
Finally, server-bound proxies depend in turn on
writers and readers. These
classes, respectively located in the Ext.data.writer and Ext.data.reader namespaces, provide
serialization and deserialization mechanisms for creating and reading
XML, JSON payloads. Readers and writers are usually tied to server-bound
proxies.
In our sample application, we are going to use a simple local storage proxy, which does not require a reader or a writer.
Sencha Touch uses the MVC architecture throughout its system. It allows developers to separate clearly the model classes from the view logic. It also allows developers to create adhoc stores, local or remote, to read and write those model instances.
In this sample, we are first going to write the application all in the same JavaScript file, and then we are going to separate the different elements in different files.
The first thing we are going to do in our app is to describe the model and the store where the model instances will be stored. This is the definition of a model class:
Ext.define('ToDoListApp.model.Task',{extend:'Ext.data.Model',config:{fields:[{name:'id',type:'int'},{name:'completed',type:'boolean'},{name:'dueDate',type:'date'},{name:'title',type:'string'},{name:'description',type:'string'}],idProperty:'id'}});
As you can see, you can define all the characteristics of a Task, including the type and default values of each of its properties. In our case, a Task is defined by a numeric ID, a name, a description (both textual), a boolean value (stating whether the task has been done or not), and a due date.
Finally, we are specifying a proxy for our model, which provides
the information of the location of the data. In this case we will be
using the localStorage proxy, which means that the
data will be stored as JSON objects in the HTML5 localStorage container of the browser.
Then we will specify a store for the model. A Sencha Touch store creates an intermediate object between your application controllers and the data they manage, allowing to provide information used to display the data in a meaningful way, such as its order or its grouping. In the case of our application, we are going to define the following Store:
Ext.define('ToDoListApp.store.TaskStore',{extend:'Ext.data.Store',requires:['ToDoListApp.model.Task'],config:{model:'ToDoListApp.model.Task',sorters:[{property:"dueDate",direction:"ASC"}],autoLoad:true,autoSync:true,singleton:true,storeId:'TaskStore',proxy:{type:'localstorage',id:"senchatasks"},grouper:function(record){if(record&&record.get("dueDate")){returnrecord.get("dueDate").toDateString();}}}});
The first screen of our application is, of course, the list of tasks. In this screen we will display all the current tasks available, and whenever the application launches, it will synchronize the items available in the local database and display them:
Ext.define('ToDoListApp.view.TaskList',{extend:'Ext.dataview.List',requires:['ToDoListApp.store.TaskStore'],config:{displayField:'title',id:'taskList',store:Ext.create('ToDoListApp.store.TaskStore'),itemTpl:'<div class="task completed_{completed}">{title}</div>',onItemDisclosure:true,emptyText:'<p align="center" class="instructions">No tasks here yet.<br/>Tap the "+" button to create one.</p>',grouped:true,items:[{xtype:'toolbar',title:'To Do List',docked:'top',ui:'light',items:[{xtype:'spacer'},{xtype:'button',ui:'plain',iconCls:'add',iconMask:true,text:'',action:'createTask'}]}]}});
This is a very simple Ext.dataview.List that we
are defining here; it will use the data store defined above as source of
its data, and we are defining some useful properties, such as the fact
that it will be grouped, and that every item shown will use a
template.
Item templates are a very useful feature of Sencha Touch lists; they allow us to define the internal structure of each cell, and they are very similar to templates created using the jQuery Template plug-in.
One of the most interesting parts of the cell template is the fact that we can specify the data fields of each task, and how they are shown, just by encapsulating them between curly brackets.
The list is the first screen of our application. We also want to be able to create, edit, and delete To Do items, and for that we are going to create a form:
Ext.define('ToDoListApp.view.TaskForm',{extend:'Ext.form.Panel',config:{id:'taskForm',items:[]}});
The Ext.form.Panel class is
there to help us. As usual, it takes a dictionary object with
configuration options, and in particular, it uses a titlebar and two
fieldsets; each one of these fieldsets will be rendered as its own
group; the first fieldset contains all the data fields required to
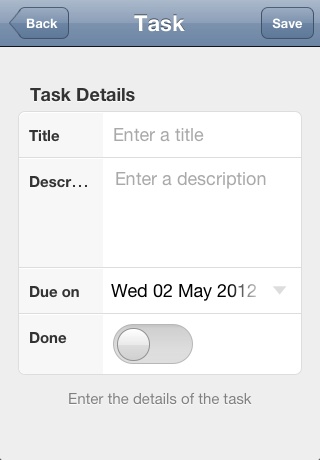
define a To Do item (see Figure 4-4):
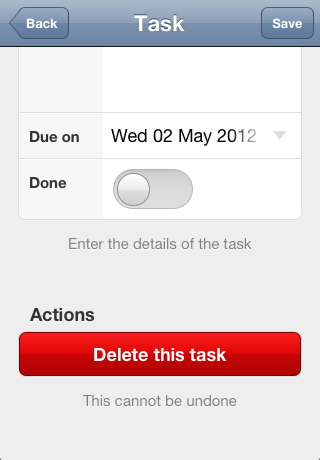
{xtype:'fieldset',id:'mainFieldSet',instructions:'Enter the details of the task',title:'Task Details',items:[{xtype:'textfield',id:'titleField',label:'Title',name:'title',autoCapitalize:true,placeHolder:'Enter a title'},{xtype:'textareafield',id:'descriptionField',label:'Description',name:'description',autoCapitalize:true,placeHolder:'Enter a description'},{xtype:'datepickerfield',id:'dateField',label:'Due on',name:'dueDate',placeHolder:'dd/mm/yyyy',dateFormat:'D d M Y',picker:{slotOrder:['day','month','year'],yearFrom:(newDate()).getFullYear(),yearTo:(newDate()).getFullYear()+10}},{xtype:'togglefield',id:'completedField',label:'Done',name:'completed'}]}
The second fieldset is shown only when the form is used to edit an item, and contains a single Delete button (shown in Figure 4-5):
{xtype:'fieldset',id:'taskFormDeleteFieldset',instructions:'This cannot be undone',title:'Actions',items:[{xtype:'button',height:44,id:'deleteButton',ui:'decline',text:'Delete this task',action:'deleteTask'}
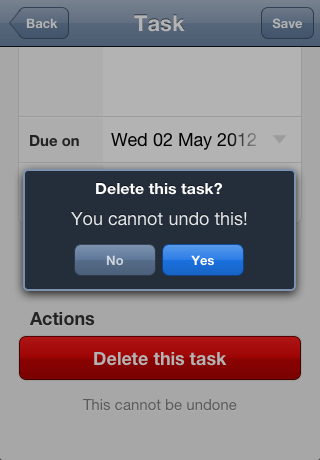
The confirmAndDelete method
asks the user for a confirmation before deleting the file, as shown in
Figure 4-6.
The missing piece in our discussion of the MVC paradigm is, as you
might have guessed, the controller. In Sencha Touch, controllers are
defined as subclasses of the Ext.app.Controller class. They serve as the
glue that ties models, stores and views together, and they provide a
handy mechanism allowing developers to centralize all their application
logic in a single place.
This is a very basic definition of a controller:
Ext.define('ToDoListApp.controller.TaskController',{extend:'Ext.app.Controller',config:{id:'taskController',refs:{saveButton:'button[action=saveTask]',taskForm:'#taskForm',},control:{saveButton:{tap:'saveTask'}}},launch:function(){this.updateTaskCount();},saveTask:function(button,e,eOpts){// ... the code to save a task ...varform=this.getTaskForm();// ...}});
A typical Sencha Touch controller is composed of three main sections:
A
configobject, itself containing two dictionaries:refsContain references to individual UI widgets anywhere in the application
controlDefines, for each control, the event handlers that will be assigned.
A
launchfunction, which is called after the main application launch function, and which serves as a good initialization point for the applicationOne or more event handling functions
Let’s analyze in detail how controllers work:
The
refscollection mentions the existence of a button, whoseactionparameter is the stringsaveTask. There is also a reference to the task edition form, whose ID istaskForm. Sencha Touch controllers can reference widgets and controls using either of these syntaxes, making it very easy for developers to pinpoint individual components all over the application.Later, in the
controldictionary, we attach an event handler for thetapevent on the button specified by thesaveButtonentry; the value of this event handler is a string, which is exactly the name of the method in the controller that will be fired when the user touches the button.Finally, the
saveTaskfunction contains the code that actually performs the requested action.
Another handy feature of the refs collection is that the controller will
generate, automatically, getter methods that can be used to access
individual components. For example, in the code above, the developer
will be able to use the getTaskForm()
method at any moment to retrieve a reference to that particular
component.
Although nothing prevents developers from adding the event handling code directly in their views, controllers provide a handy and simple way to organize applications from the very beginning, allowing them to grow bigger and more complex as time passes.
There are many different event listeners that we can attach ourselves to, and the Sencha Touch documentation describes in great detail what is required for each one of them.
The most important listeners that you are going to use as a Sencha Touch developer are:
renderCalled when the panel is drawn on screen for the first time. There are similar
beforerenderandafterrenderlisteners that are useful for the developer.activateExecuted whenever the panel is active through the
setActiveItemmethod.itemtapExecuted whenever an item in the list is tapped.
orientationchangeAs the name implies, this callback is executed after the device changes its orientation.
Each event requires a function with a particular signature; the Sencha Touch documentation describes in detail their structures.
Note
The saveTask event handler in
our controller has exactly the same parameters specified in the Sencha
Touch documentation; you can find all of these parameters in their
corresponding documentation, and it is strongly suggested to specify
them all, even if the dynamic nature of JavaScript makes this an
optional feature.
How does the application navigate from one screen to the other? As you can see by yourself, the application allows you to follow a navigation pattern very similar to that of the UINavigationController class in iOS, where one screen is pushed after the other, and a Back button allows you to return to where you were.
However, in Sencha Touch there is no such thing as a navigation controller, and thus you must handle the navigation manually. In the case of the To Do List application, there are basically two transitions:
From the list to the form
Back from the form to the list
The first animation is triggered every time you touch the +
button, or every time you select an item in the list. In both cases, the
magic is created by using the setActiveItem() method of the Panel class.
This method accepts parameters that define the kind and direction of the
transition to be used.
This method is called in the Viewport instance, which has two items: the list and the form. Our controller triggers the navigation, passing some parameters, as required by the user:
showForm:function(){Ext.Viewport.getLayout().setAnimation({type:'slide',direction:'left'});Ext.Viewport.setActiveItem(this.getTaskForm());},showList:function(){Ext.Viewport.getLayout().setAnimation({type:'slide',direction:'right'});Ext.Viewport.setActiveItem(this.getTaskList());},
The viewport is just a panel, containing the list of to do items
and a toolbar, and the second one is the task form. The setActiveItem() function is used to jump from
panel to panel, creating the illusion of a transition between
both.
The concept of the viewport is central to Sencha Touch, and this singleton object is a standard way to designate the root view that is visible at all times in the application. iOS developers can think of the viewport as the UIWindow instance where all the application is drawn and displayed.
As you have seen in this chapter, the creation of a Sencha Touch application uses a fairly descriptive, JSON-like structure of code. Developers use this to literally describe each and every detail of the user interface, and Sencha Touch allows them to organize this code in separate files for convenience.
The fact that most of the UI of a Sencha Touch application can be described with literal objects is one of the keys behind the success of the Sencha Architect 2[19], a commercial tool provided by the creators of Sencha Touch. Sencha Architect is very similar in nature to the visual builders found in products like Visual Basic or Xcode, allowing developers to create user interfaces with a mouse.
Sencha Architect 2 provides developers and designers for a common tool, integrated with a code generator, that can be used to create fully fledged applications in a very short amount of time. It uses the common canvas UI paradigm, with a widget palette on the left pane, a central editor canvas, and a project browser plus a properties pane on the left. The properties pane displays all the editable properties of the currently selected object on the canvas or on the project browser.
Figure 4-7 shows the tool running on OS X.
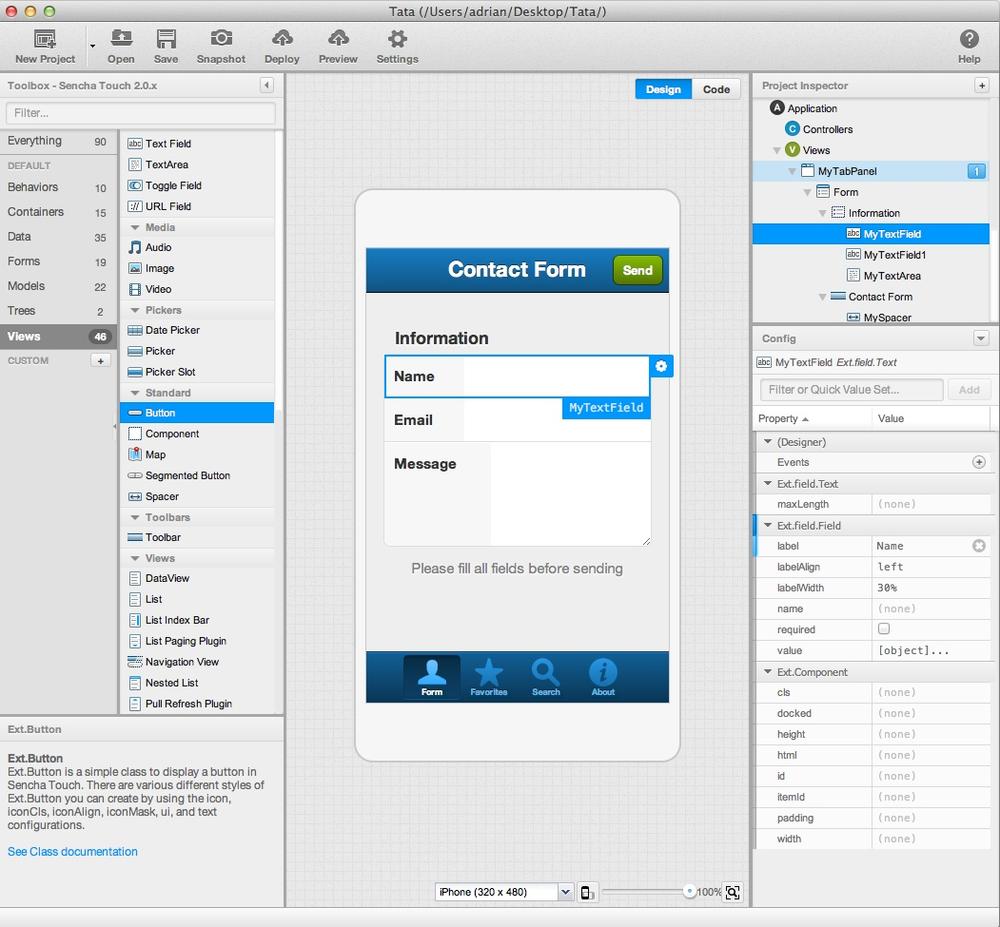
Sencha Architect 2 is a commercial application.
Sencha Architect 2[20] is available for Mac, Windows and Linux, with a commercial license; a preview version, valid for 90 days, can be downloaded for free. It can be used not only to create and edit Sencha Touch applications, but also Ext.js ones.
Sencha Touch is a very complex framework, and of course this chapter scratches only the surface of what can be done with it. Currently it is available in version 2.0, bringing several new features over 1.0, like a brazenly fast rendering engine (based in CSS, and thus, hardware-accelerated in iOS devices), and a new class system, which is 100% similar to the one available in ExtJS 4, much faster and easier to use.
However, Sencha Touch has the major drawback of not being available for non WebKit-based mobile browsers, which dramatically limits its cross-platform support. It compensates this fact by a tremendously polished UI, one that truly sets it apart from other mobile frameworks, and by a solid architecture, which makes it a serious alternative for enterprise software users.
Get Mobile JavaScript Application Development now with the O’Reilly learning platform.
O’Reilly members experience books, live events, courses curated by job role, and more from O’Reilly and nearly 200 top publishers.

