Icon view and list view should certainly be familiar to anyone who's used a personal computer before. But for many computer fans, column view is something new—and welcome.
The goal is simple: to create a means of burrowing down through nested folders without leaving a trail of messy, overlapping windows in your wake.
The solution is shown in Figure 1-21. It's a list view that's divided into several vertical panes. The first pane (not counting the Sidebar) shows all the icons of your disks, including your main hard drive.
When you click a disk (once), the second pane shows a list of all the folders in it. Each time you click a folder in one pane, the pane to its right shows what's inside. The other panes slide to the left, sometimes out of view. (Use the horizontal scroll bar to bring them back.) You can keep clicking until you're actually looking at the file icons inside the most deeply nested folder.
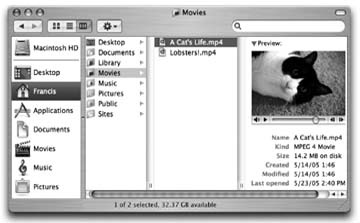
Figure 1-21. If the rightmost folder contains pictures, sounds, or movies, Mac OS X even lets you look at them or play them, right there in the Finder. If it's a certain kind of text document (AppleWorks or PDF, for example), you actually see a tiny image of the first page. If it's any other kind of document, you see a blowup of its icon and a few file statistics. You can drag this jumbo icon anywhere—into another folder, for example.
If you discover that your hunt for a particular file has taken you down a blind alley, it's not a big deal to backtrack, since the trail of folders you've followed to get here is still sitting before you on the screen. As soon as you click a different folder in one of the earlier panes, the panes to its right suddenly change, so that you can burrow down a different rabbit hole.
Furthermore, the Sidebar is always at the ready to help you jump to a new track; just click any disk or folder icon there to select a new first-column listing for column view.
The beauty of column view is, first of all, that it keeps your screen tidy. It effectively shows you several simultaneous folder levels, but contains them within a single window. With a quick ⌘-W, you can close the entire window, panes and all. Second, column view provides an excellent sense of where you are. Because your trail is visible at all times, it's much harder to get lost—wondering what folder you're in and how you got there—than in any other window view.
Note
Column view is always alphabetical. There's no way to sort the lists by date, for example, as you can in list view.
Efficiency fans can operate this entire process by keyboard alone. For example:
You can jump from one pane to the next by pressing the right or left arrow keys. Each press highlights the first icon in the next or previous pane.
You can use any of the commands in the Go menu, or their keyboard equivalents, or the icons in the Sidebar, to fill your columns with the contents of the corresponding folder—Home, Favorites, Applications, and so on.
The Back command (clicking the Back button on the toolbar, pressing ⌘-[, or choosing Go → Back) works as it does in a Web browser: It retraces your steps backward. You can repeat this command until you return to the column setup that first appeared when you switched to column view. Once you've gone back, in fact, you can then go forward again (choose Go → Forward, or press ⌘-]).
Within a highlighted pane, press the up or down arrow keys to highlight successive icons in the list. Or type the first couple of letters of an icon's name to jump directly to it.
NOSTALGIA CORNER: Everything Old Is New Again
To many observers, Mac OS X's column view was one of the most radical new features of the operating system. The truth is, however, that it's not new at all.
In fact, column view's most recent ancestor appeared in the NeXT operating system, which Apple bought (along with Steve Jobs, its CEO) in 1997. But column view is even older than that.
As you can see in this sketch from May 1980, the idea of a single-window, multiple-column view has been kicking around at Apple long before the Macintosh debuted.
In the end, this view was deemed too complex for the original Mac, which finally appeared (with only list and icon views) in 1984. It took 17 more years to find its way into the standard Mac OS.
When you finally highlight the icon you've been looking for, press ⌘-O or ⌘-down arrow to open it (or double-click it, of course). You can open anything in any column; you don't have to wait until you've reached the rightmost column.

The number of columns you can see without scrolling depends on the width of the window. In no other view are the zoom and resize controls as important as they are here.
That's not to say, however, that you're limited to four columns (or whatever fits on your monitor). You can make the columns wider or narrower—either individually or all at once—to suit the situation, according to this scheme:
To make a single column wider or narrower, drag its right-side handle (circled in Figure 1-22).
To make all the columns wider or narrower simultaneously, hold down the Option key as you drag that right-side handle.
And here's the tip of the week: Double-click one of the right-side handles to make the column precisely as wide as necessary to reveal all the names of its contents.
Option-double-click any column's right-side handle to make all columns just as wide as necessary.
Just as in icon and list view, you can choose View → Show View Options to open a dialog box—a Spartan one, in this case—offering additional control over your column views.
Note
Oddly enough, there's no "This window only" or "All windows" option here. Any changes you make here affect all column views.
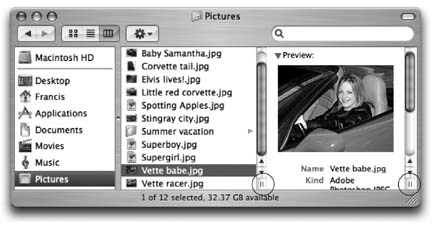
Figure 1-22. In Mac OS X 10.3 and 10.4, the functions of dragging and Option-dragging have been reversed from Mac OS X 10.2. It finally dawned on Apple that what you want to do most of the time is adjust one column. The special keystroke override should apply to the less frequent case: adjusting all columns at once.
Text size. Whatever point size you choose here affects the type used for icons in all column views.
Show icons. For maximum speed, turn off this option. Now you see only file names—not the tiny icons next to them—in all column views.
Show preview column. The far-right Preview column can be handy when you're browsing graphics, sounds, or movie files. The rest of the time, it can get in the way, slightly slowing down the works and pushing other, more useful columns off to the left side of the window. If you turn off this checkbox, the Preview column doesn't appear.
Get Mac OS X: The Missing Manual, Tiger Edition now with the O’Reilly learning platform.
O’Reilly members experience books, live events, courses curated by job role, and more from O’Reilly and nearly 200 top publishers.

