In windows that contain a lot of icons, the list view is a powerful weapon in the battle against chaos. It shows you a tidy table of your files' names, dates, sizes, and so on.
You have complete control over your columns, in that you get to decide how wide they should be, which of them should appear, and in what order (except that Name is always the first column). Here's how to master these columns.
Most of the world's list-view fans like their files listed alphabetically. It's occasionally useful, however, to view the newest files first, largest first, or whatever.
When a desktop window displays its icons in a list view, a convenient new strip of column headings appears (Figure 1-17). These column headings aren't just signposts; they're buttons, too. Click Name for alphabetical order, Date Modified to view newest first, Size to view largest files at the top, and so on.
It's especially important to note the tiny, dark gray triangle that appears in the column you've most recently clicked. It shows you which way the list is being sorted.
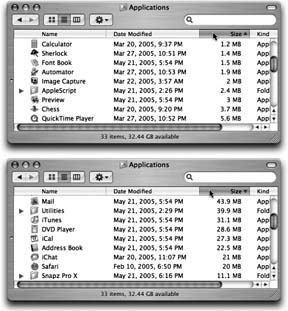
Figure 1-17. You control the sorting order of a list view by clicking the column headings (top). Click a second time to reverse the sorting order (bottom). You'll find the identical triangle—indicating the identical information—in email programs, in iTunes, and anywhere else where reversing the sorting order of the list can be useful.
When the triangle points upward, the oldest files, smallest files, or files beginning with numbers (or the letter A) appear at the top of the list, depending on which sorting criterion you have selected.
Tip
It may help you to remember that when the smallest portion of the triangle is at the top, the smallest files are listed first when viewed in size order.
To reverse the sorting order, just click the column heading a second time. Now the newest files, largest files, or files beginning with the letter Z appear at the top of the list. The tiny triangle turns upside-down.
One of the Mac's most attractive features is the tiny triangle that appears to the left of a folder's name in a list view. In its official documents, Apple calls these buttons disclosure triangles; internally, the programmers call them flippy triangles.
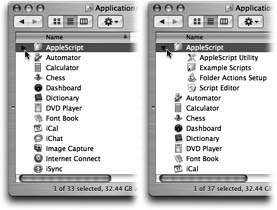
Either way, these triangles are very useful: When you click one, the list view turns into an outline, which displays the contents of the folder in an indented list, as shown in Figure 1-18. Click the triangle again to collapse the folder listing. You're saved the trouble and clutter of opening a new window just to view the folder's contents.
By selectively clicking flippy triangles, you can, in effect, peer inside two or more folders simultaneously, all within a single list view window. You can move files around by dragging them onto the tiny folder icons.
Tip
Once you've expanded a folder by clicking its flippy triangle, you can even drag a file icon out of its folder so that it's loose in the list view window. To do so, drag it directly upward onto the column headings area (where it says Name, for example). When you release the mouse, you see that the file is no longer inside the expanded folder.
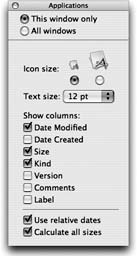
Choose View → Show View Options. In the palette that appears, you're offered on/off checkboxes for the different columns of information Mac OS X can show you, as illustrated in Figure 1-19.
Date Modified. This date-and-time stamp indicates when a document was last saved. Its accuracy, of course, depends on the accuracy of your Mac's built-in clock (see Section 9.9.2).
Note
Many an up-to-date file has been lost because a Mac user spotted a very old date on a folder and assumed that the files inside were equally old. That's because the modification date shown for a folder doesn't reflect the age of its contents. Instead, the date on a folder indicates only when items were last moved into or out of that folder. The actual files inside may be much older, or much more recent.
Figure 1-19. The checkboxes you turn on in the View Options dialog box determine which columns of information appear in a list view window. Most people live full and satisfying lives with only the three default columns—Date Modified, Kind, and Size—turned on. But the other columns can be helpful in special circumstances; the trick is knowing what information appears there.
Date Created. This date-and-time stamp shows you when a document was first saved.
Size. With a glance, you can tell from this column how much disk space each of your files and folders is taking up in kilobytes, megabytes, or gigabytes—whichever the Mac thinks you'll find most helpful.
Tip
For disks and folders, you see only a dash—at first. You can, however, instruct the Mac to reveal their sizes, as described on Section 1.5.5.
Kind. In this column, you can read what kind of icon each item represents. You may see, for example, Folder, JPEG Image, Application, and so on.
Version. This column displays the version numbers of your programs. For folders and documents, you just see a dash.
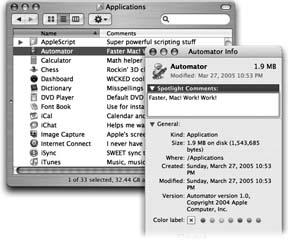
Comments. This rarely seen column can actually be among the most useful. Suppose that you're a person who uses the Comments feature (highlight an icon, choose File → Get Info, type notes about that item into the Spotlight Comments box). The option to view the first line of comments about each icon can be very helpful, especially when tracking multiple versions of your documents, as shown in Figure 1-20.
Note
The systems for storing comments are different in Mac OS 9 and Mac OS X. When you run Mac OS X, you won't see the icon comments you added in Mac OS 9, and vice versa.
Figure 1-20. Left: The Comments column is often worth turning on. If your monitor is big enough, you can make the Comments column wide enough to show several paragraphs of text, all in a single line—enough to reveal the full life history of each icon. Right: You enter these comments in the Get Info window for each file. Any notes you enter here also become instantly searchable by Spotlight (Chapter 3). (Yes, "Spotlight Comments" are the same thing as "Comments.")
Label. Labels are colors and identifying phrases that you can slap onto icons, wherever they appear, to help you categorize and group them. For details, see Section 2.6.
Even with this column turned off, you can still see an icon's color, of course. But only by turning on this column do you get to see the text phrase that you've associated with each label.
The View Options for a list view include several other useful settings (choose View → Show View Options, or press ⌘-J). As always, be sure to click either "All windows" or "This window only" before making any changes, so that your changes have the scope of effect that you intended.
Icon size. These two buttons offer you a choice of icon size for the current window: either standard or tiny. Unlike icon view, list view doesn't give you a size slider.
Thanks to Mac OS X's powerful graphics software, even the tiny icons aren't so small that they show up blank. You still get a general idea of what they're supposed to look like.
Text size. As described on Section 1.4.1.3, you can change the type size for your icon labels, either globally or one window at a time.
Show columns. Turn on the columns you'd like to appear in the current window's list view, as described in the previous section.
Use relative dates. In a list view, the Date Modified and Date Created columns generally display information in a format like this: "Tuesday, November 1, 2005." (As noted below, the Mac uses shorter date formats as the column gets narrower.) But when the "Use relative dates" option is turned on, the Mac substitutes the word "Yesterday" or "Today" where appropriate, making recent files easier to spot.
You're stuck with the Name column at the far left of a window. However, you can rearrange the other columns just by dragging their gray column headers horizontally. If the Mac thinks you intend to drop a column to, say, the left of the column it overlaps, you'll actually see an animated movement—indicating a column reshuffling—even before you release the mouse button.
If you place your cursor carefully on the dividing line between two column headings, you'll find that you can drag the divider line horizontally. Doing so makes the column to the left of your cursor wider or narrower. (Unlike previous Mac OS X versions, the cursor doesn't sprout horizontal arrows from each side until you start dragging.)
What's delightful about this activity is watching Mac OS X scramble to rewrite its information to fit the space you give it. For example, as you make the Date Modified (or Created) column narrower, "Tuesday, November 1, 2005, 2:22 PM" shrinks first to "Tue, Nov 1, 2005, 2:22 PM," then to "11/1/05, 2:22 PM," and finally to a terse "11/1/05."
If you make a column too narrow, Mac OS X shortens the file names, dates, or whatever by removing text from the middle. An ellipsis (…) appears to show you where the missing text would have appeared. (Apple reasoned that truncating the ends of file names, as in previous versions of the Mac OS, would hide useful information like the number at the end of "Letter to Marge 1," "Letter to Marge 2," and so on. It would also hide the three-letter extensions, such as Thesis .doc, that may appear on file names in Mac OS X.)
For example, suppose you've named a Word document "Madonna— A Major Force for Humanization and Cure for Depression, Acne, and Migraine Headache." (Yes, file names can really be that long.) If the Name column is too narrow, you might see only "Madonna—A Major…Migraine Headache."
Tip
You don't have to make the column mega-wide just to read the full text of a file whose name has been shortened. Just point to the icon's name without clicking. After a moment, a yellow, floating balloon appears—something like a tooltip in Microsoft programs—to identify the full name.
And if you don't feel like waiting, hold down the Option key. As you whip your mouse over truncated file names, their tooltip balloons appear instantaneously. (Both of these tricks work in either list or column view—and in Save and Open dialog boxes, for that matter.)
Get Mac OS X: The Missing Manual, Tiger Edition now with the O’Reilly learning platform.
O’Reilly members experience books, live events, courses curated by job role, and more from O’Reilly and nearly 200 top publishers.

