Chapter 1. Linux Authentication
Hacks 1–9: Introduction
Security is a primary concern of any sysadmin, especially in today’s completely connected network environments. After locking down networks and systems to minimize the number of opportunities intruders have to access your machines (as discussed elsewhere in this book), providing secure mechanisms to enable users to log in on your machines is critical to their security. Let’s face it—by design, anyone with physical or network access to a login prompt on one of your machines usually has a few chances to try to crack someone’s login and password in order to gain access.
Many organizations try to secure logins simply by assigning passwords that look like line noise or TECO commands. Unfortunately, this strategy addresses only one aspect of authentication and has the nasty side effect of causing most people to write down their passwords, since only The Amazing Kreskin could remember them. So what are the alternatives? As explained in this chapter, flexible authentication mechanisms such as Pluggable Authentication Modules (PAMs) enable the login sequence to invoke multiple security checks, beyond just a password, to help minimize the chances of unauthorized logins. Similarly, networked authentication mechanisms can enhance login security by centralizing authentication checks on secure servers and can provide other organizational benefits, such as encrypted network communications and providing login information for different operating systems, not just your Linux machines. Networked authentication mechanisms inherently benefit sysadmins by providing one true location for creating and managing information about your users. Of course, you still have to convince your users not to use their birthdays, their license plate numbers, or the names of their significant others as passwords—but we can’t really help you there.
The hacks in this chapter discuss various ways of dealing with the whole spectrum of user authentication issues, ranging from ways that a sysadmin can use to quickly disable all logins or specific accounts, through some cool tweaks you can do to your local password file, to networked mechanisms you can use for centralized authentication of different types of systems. Providing secure authentication mechanisms for your systems doesn’t have to be a nightmare—let the hacks in this chapter teach you a few tricks and choose the authentication mechanism that’s right for the computing environment for which you’re responsible.
Disable User Accounts Instantly
In a crisis, here’s how to quickly disable a user account, using only a text editor.
Sooner or later every system administrator gets the call to disable a user’s account. Regardless of whether this is due to termination or for general security reasons, you have to move quickly to satisfy the Human Resources department or layer of management that’s on the other end of the line. If you’re used to graphical tools for user management, this can take a little while, but luckily there’s a quick and easy solution to this request that just involves a text editor.
Disabling Accounts on Systems That Use Local Authentication
On older Unix systems passwords were stored in the /etc/password file, but they were moved to the /etc/shadow file (which is readable only by the root user) on more recent systems to prevent non-root users from having access to the encrypted form of a user’s password, for security reasons. Most Linux systems that use local authentication store passwords in the /etc/shadow file, though some still use /etc/passwd as an artifact or for compliance with aging applications. If the second colon-separated field in each entry in /etc/passwd contains an x, your system is using the /etc/shadow file to hold password information. If you see other characters between the first and second colons, your system is still storing its password information in the /etc/passwd file.
To quickly disable accounts on a Linux file server or on a user’s desktop machine, bring up /etc/shadow in a text editor and insert an asterisk (*) as the first character in the second field of the file (after the first colon), which is where the password is stored. This prevents subsequent logins but leaves the existing password intact. If circumstances reverse themselves and you’re asked to re-enable the user’s account, you can simply remove the asterisk to re-enable logins with the existing password. This is similar to the approach taken by the usermod -L
user command, which inserts an exclamation mark (!) at the beginning of a user’s password entry to lock out that user. Actually, if your system provides the usermod command, you can just as easily use this command to disable an account, as long as /usr/sbin is in your PATH—it’s good to know how the command really works, though.
You never want to remove a user’s data until it has been safely backed up, so
userdel -r
user is the wrong command to use when you simply need to lock out a user. Removing an existing user account with the
userdel command also often leaves you open to reusing the old user ID (UID) the next time you create an account, which should be against IT policy for security and privacy reasons.
Reusing UIDs is a bad idea because if a new account is created with a UID that previously existed on your system, the new user will own any files still on the system that were owned by the previous user. This most commonly occurs with email stored in system directories outside the user’s home directory, but such files can exist anywhere the previous user had write privileges. This can also cause a problem if files or directories owned by the previous user are restored from backups for some reason. Adopting a policy of not reusing UIDs prevents users from “accidentally” getting rights to files to which they shouldn’t really have access.
Disabling Accounts on Systems That Use Distributed Authentication
If your site uses a distributed authentication mechanism such as LDAP (the Lightweight Directory Access protocol) or NIS (the Network Information Service, originally designed by Sun Microsystems for use with the Network File System), quickly disabling an account is slightly more difficult, but it’s even more important that you be able to do so. If you are using distributed authentication, until the account is disabled, a user has access to all the machines at your site that share this authentication mechanism.
Systems that use NIS for authentication rely on centralized password and shadow files that are distributed to NIS clients by an NIS server. Many NIS systems store password information directly in the NIS password file (/var/yp/ypetc/passwd), because using NIS to share shadow password files (/var/yp/ypetc/shadow) largely defeats the security implied by the shadow file. On systems using local authentication, only the root user can read the /etc/shadow file—but on NIS systems, any user who can listen to the NIS server can see the shadow file.
To quickly disable a user’s account on systems that use NIS, you can directly edit the NIS master of the password or shadow file in exactly the same way that you edited the local copy in the previous section of this hack, putting an asterisk in front of the password entry for the specified user. The NIS masters of these files are stored in the directory /var/yp/ypetc on your NIS server. If the second colon-separated field in each entry in /var/yp/ypetc/passwd contains an x, your system is using the /var/yp/ypetc/shadow file to store password information. If you see other characters between the first and second colons, your system is still storing password information in /var/yp/ypetc/passwd.
Once you’ve modified the /var/yp/ypetc/passwd or /var/yp/ypetc/shadow file, you must push it to all NIS clients by changing directory to the /var/yp directory and using the make command:
# cd /var/yp;makeYou can, of course, always change an NIS user’s password by executing the yppasswd
user command, but if you need to re-enable the account you will have to work with the user to reset the password.
LDAP is a much more powerful distributed technology than NIS, because it provides a central source from which many different applications can retrieve many different types of information. As discussed in “Centralize Logins with LDAP” [Hack #6] , LDAP information directories, also known as databases, provide a great solution for a central, enterprise-wide source for login, password, and other per-user account information. However, because sites that use LDAP for authentication do not use the standard password or shadow files to hold password information, you can only disable LDAP accounts by changing the information in the LDAP database. You can disable a user account either by changing information about a specific account record (known as “attributes”) in the database, by changing the access control list (ACL) on the information about the account so that the user no longer has access to it, or by directly changing the user’s password in the database.
Unless you are completely familiar with the schemas used in your LDAP database, disabling an account by changing its password is the fastest and easiest method. This doesn’t require that you remember every characteristic of your LDAP user/account scheme, and it can be done using the ldappasswd command. To change a user’s password when you are using LDAP authentication, become the root user, run this command, and supply a new password when prompted to do so:
# ldappasswd–luser
Edit Your Password File for Greater Access Control
With just a few one-line text file edits, you can control who can access your servers.
I can’t cite statistics, but my experience in lending a hand to friends and clients has led me to the conclusion that most sites have an “all or nothing” approach to creating and managing user accounts on their machines. If the site uses NIS, their nsswitch.conf file says to use NIS for user account information. If the site uses LDAP, they use LDAP for user account information. The problem here is that this implies that every single account in the directory is actually a valid account on any machine, whether those users belong there or not.
Of course, there are firewalls, router ACLs, and all manner of security appliances and software between servers and users who shouldn’t have access to them—but data centers are run by humans, and humans make mistakes, especially in large, complex networks. Mistype the VLAN tag on a switch port, for example, and all of a sudden anyone from Engineering can SSH to your production application server. This hack shows you how a few simple text edits will allow you to limit which users in an NIS directory can access the local machine.
The entries in the /etc/nsswitch.conf file on a Linux system determine how it resolves requests for information about users, groups, and other host information. Let’s concentrate on just the passwd line. If you’re using NIS, it might look something like this:
passwd files nis
This means that when the system is trying to find information about a user account, such as the user’s login shell or what name a numeric UID maps to, it’ll first look in /etc/passwd, and then fall back on NIS. If a user is listed in either of these resources, it’s a valid account and (barring any other protections) the operation succeeds.
But suppose you want only a handful of people to have valid accounts on the machines, instead of everyone in the entire NIS domain. We can do that! As an example, let’s add two lines to the bottom of the /etc/passwd file:
	+@admins
	+jonesy
The first line makes all the users in the admins netgroup valid accounts on this machine. The second line makes jonesy a valid account on this machine. All other accounts will be invalid when we complete the configuration. The only thing left for us to do is to edit the /etc/nsswitch.conf file to make it look something like this:
	passwd: compat
	passwd_compat: nis
The first line says to call the nss_compat module, and the second line tells the nss_compat module to use NIS for the lookup (other valid values here are nisplus or ldap). Now, to test, run the following command:
$ getent passwd jonesyThis will consult the /etc/nsswitch.conf file to figure out where to get the information. When it sees compat, it will go to the /etc/passwd file to see if jonesy is listed there. If the account is not listed, it will not display any output. If it is listed, it will query the NIS server and retrieve the account record, which will look something like this:
jonesy:x:1001:100:Brian Jones:/home/jonesy:/bin/bash
In addition, running getent passwd without arguments will return records for every valid account on the system, which in our example will include all of the users in the admins netgroup, the jonesy account, and (of course) all of the system accounts that were in the /etc/passwd file before we ever touched it.
It’s often desirable to be able to access user information for accounts that are not valid on the machine, though—and in other circumstances, accounts that should be valid on a particular machine shouldn’t actually be able to log into that machine. For example, I don’t want users logging onto my mail server, but my mail server needs to be able to map inbound mail to account names in order to accept mail. In cases such as these, you can add this line at the bottom of your /etc/passwd file:
+::::::/sbin/nologin
Now, running the getent passwd command will show you all the system accounts, then the accounts you added earlier, and then every other account. It will show full records for all accounts, but the login shell for the accounts at the end will be /sbin/nologin, which will keep those users from logging into the machine and getting a shell. Note that this line needs to be the last line in the password file, since lines are read and resolved in order. If the line above came before the +jonesy line, for example, it would find a record for me with the /sbin/nologin shell first, and I would not be able to log onto the machine, even though the +jonesy line appears later in the file.
Note that in addition to using the + sign to add valid users, you can use the–sign to exclude users. If you want all but a handful of accounts to be valid, it’s easy to do. For example, if you wanted all accounts to be valid login accounts except for those accounts in the badguys netgroup, you could add a line like this to the /etc/passwd file:
-@badguys
Those accounts would no longer be able to log in on the machine in question.
Deny All Access in One Second or Less
Here’s a safe way to keep out all users while doing temporary maintenance or troubleshooting.
All administrators eventually need to have a machine running in full multiuser mode, with all services running, but at the same time completely deny login access to the machine. This is usually for the purpose of troubleshooting a problem, testing a new software installation, or performing maintenance or software upgrades. There are a couple of really quick ways to do this.
The first method is by far the quickest. Just run the following command (as root):
# touch /etc/nologinThis will deny access to anyone trying to log in to the machine. You’ll want to be sure to keep an active login session on the machine after you create this file or make sure that root is allowed to log in on the local console or via SSH, since a root login will bypass this mechanism. You’ll know it’s working because the logs for some services will tell you that access was denied because of the presence of the nologin file. Others will just say “failed password.”
This method can be improved through the use of a nologin.txt file, where you can put some text that users will see when they try to log in. If you have a scheduled downtime, for instance, you can put the details into this file so that users will get a friendly reminder that the machine is unavailable during the downtime window.
The second method works only if the services you’re running are linked against libwrap, in which case you can very quickly cut off all access to the machine. To check that a service is linked against libwrap, use the ldd command on the binary for the service. For example, to make sure my SSH service is linked against libwrap, I’ve done the following:
	# ldd /usr/sbin/sshd
			linux-gate.so.1 => (0x004ab000)
			libwrap.so.0 => /usr/lib/libwrap.so.0 (0x0072f000)
	…(lots deleted)
The above output shows all the libraries sshd is linked against, and the path to the library file being used. Clearly, libwrap is linked here. Once you’ve confirmed that this is the case for the other services you’re running, you’re ready for the next step.
Create a file called /etc/hosts.deny.ALL, which should consist of only one line:
	##### /etc/hosts.deny.ALL
	ALL:ALL@ALL
Now, whenever you need to shut down access to the machine, you simply move your /etc/hosts.allow and hosts.deny files out of the way and move your hosts.deny.ALL file into place. Here’s a command line that’ll handle it nicely:
# cd /etc; mv hosts.allow hosts.allow.bak; mv hosts.deny hosts.deny.bak# mv hosts.deny.ALL hosts.deny
Now you’re left with only a single hosts.deny file, which denies access to everything. Note that it would not help you to just move both files out of the way, because tcpwrappers treats the absence of a file just like an empty file. If there are no files, tcpwrappers acts as though you have two files that have not addressed access controls for a given service, and by default it will grant access to the service!
See Also
“Allow or Deny Access by IP Address” [Hack #64]
Customize Authentication with PAMs
Modern Linux systems use Pluggable Authentication Modules (PAMs) to provide flexible authentication for services and applications. Here are the gory details you’ll need in order to use PAMs to quickly and flexibly secure your systems.
Many Linux applications require authentication of one type or another. In days gone by, each authentication-aware application was compiled with hardwired information about the authentication mechanism used by the system on which it was running. Changing or enhancing a system’s authentication mechanism therefore required all such applications to be updated and recompiled, which is tedious even when you have the source code for all of the relevant applications on your system.
Enter PAMs, which provide a flexible and dynamic mechanism for authenticating any application or service that uses them. Applications or services compiled with the Linux-PAM library use text-format configuration files to identify their authentication requirements. Using PAMs on your system lets you modify authentication requirements or integrate new authentication mechanisms by simply adding entries to the PAM configuration file that is used by a specific application or service.
Though the information contained here may seem like overkill at first glance, knowing about PAMs and how PAM configuration files work is necessary background for the next four hacks, which explain how to integrate specific types of modern authentication into your Linux system without rewriting or recompiling the wheel. Read on, sysadmins!
PAM Overview
PAMs are shared library modules that are automatically loaded by applications that were compiled with the primary Linux-PAM authentication library. Applications that use PAMs (or PAM modules, are they’re sometimes called) are typically referred to as PAM-aware applications.
PAMs satisfy different parts of the authentication requirements for PAM-aware applications, much like reusable code and libraries do for applications in general. For example, a PAM-aware version of the login program can invoke a variety of PAMs that check things such as whether the user logging in as root is on a terminal listed as a secure terminal, whether users are allowed to log in on the system at the moment, and other similar authentication requirements. Because PAMs are shared library modules, a PAM-aware version of the rsh program can reuse the same “are users allowed to log in on the system now?” PAM as the PAM-aware version of login, but then apply other rules that are more relevant to rsh than to login. PAM modules themselves are now typically stored in the directory /lib/security, though some older Linux distributions stored PAMs in /usr/lib/security.
The PAMs used by different PAM-aware applications are defined in one of two ways. In modern PAM implementations, they are controlled by application-specific configuration files found in the directory /etc/pam.d. In older PAM implementations, all PAM modules used by the applications on a system were defined in a single central configuration file, /etc/pam.conf. The older approach is still supported, but it’s deprecated—to maintain backward compatibility while encouraging the modern approach, the contents of the directory /etc/pam.d are used instead of the /etc/pam.conf file if both exist on your system. This hack focuses on PAM configuration files in /etc/pam.d, since that’s the way PAMs are used on most modern systems.
Per-Application/Service PAM Configuration Files
Each PAM configuration file in /etc/pam.d has the same name as the PAM-aware application or service it is associated with and contains the PAM rules used during its authentication process. The name of the configuration file to use is derived from the first parameter passed to the Linux-PAM library’s pam_start() function, which is the name of the service that is being authenticated (often the same as the name of the application, for convenience’s sake). These files can also contain comments—any characters on a line that follow the traditional hash mark (#) are interpreted as a comment.
Each non-comment line in one of the files in /etc/pam.d defines how a single PAM module is used as part of the authentication process for the associated application or service. Each of these files can contain four fields separated by whitespace, the first three of which are mandatory. These fields have the following meaning and content:
-
module-type The type of PAM module defined on the line. A PAM module’s type defines how it is used during the authentication process. Valid values are:
-
auth Identifies an authentication check to verify the user’s identity or that system requirements have been met. Common system requirements are that a service can be started at the current time (for example, that /etc/nologin does not exist when a user is trying to log in), that an acceptable device is being used (i.e., the device is listed in /etc/securetty), whether the user is already the root user, and so on.
-
account Verifies whether the user can authenticate based on system requirements such as whether the user has a valid account, the maximum number of users on the system, the device being used to access the system, whether the user has access to the requested application or service, and so on.
-
password Verifies a user’s ability to update authentication mechanisms. There is usually one module of type
passwordfor eachauthentry that is tied to an authentication mechanism that can be updated.-
session Identifies modules associated with tasks that must be done before the associated service or application is activated, or just before the termination of that service or application. Modules of this type typically perform system functions such as mounting directories, logging audit trail information, or guaranteeing that system resources are available.
-
-
control-flag The implications of the return value from the specified PAM module. Valid values are:
-
required Indicates that success of the PAM module is mandatory for the specified module type. The failure of any PAM marked as required for a specific module-type (such as all labeled as
auth) is reported to the associated application or service only after allrequiredPAMs for that module type have been executed.-
requisite Indicates that failure of the PAM module will immediately be reported to the associated application or service.
-
sufficient Indicates that success of the PAM module satisfies the authentication requirements of this module type. If no previous
requiredPAM has failed, no other PAMs for the associated module type are executed. Failure of a PAM identified assufficientis ignored as long as subsequentrequiredmodules for that module type return success. If a previousrequiredPAM has failed, the success of a PAM marked assufficientis ignored.-
optional Indicates that success of the PAM module is not critical to the application or service unless it is the only PAM for a specified module type. If it is, its success or failure determines the success or failure of the specified module type.
-
-
module-path The name of the PAM module associated with this entry. By default, PAM modules are located in /lib/security, but this field can also identify modules located in other directories by specifying the absolute path and filename of a PAM module.
-
arguments Optional, module-specific arguments.
Well, that was mind-numbing but necessary reference information. To see all this in action, let’s look at an example.
PAMs Used by the login Process
The configuration file for the PAMs used by the login program is the file /etc/pam.d/login. On a Red Hat system of recent vintage, this file contains the following entries:
	#%PAM-1.0
	auth		required	pam_securetty.so
	auth		required	pam_stack.so service=system-auth
	auth		required	pam_nologin.so
	account		required	pam_stack.so service=system-auth
	password	required	pam_stack.so service=system-auth
	session		required	pam_stack.so service=system-auth
	session		optional	pam_console.so
The first line is a comment that identifies this PAM as conforming to the PAM 1.0 specification.
The second, third, and fourth lines define the auth (authentication) requirements for system logins, all of which must succeed because they are identified as required. The second line invokes the PAM module pam_securetty.so to check whether the user is logged in on a secure terminal, as defined in the file /etc/securetty. The third line invokes the pam_stack.so PAM module, a clever module used primarily on Red Hat–inspired systems that enables you to call the entire set of PAM requirements defined for a different service or application (and thus described in a separate file by that name in /etc/pam.d). In this case it calls the set (stack) of requirements defined for the system-auth service. We’ll look at that later—for now, it’s sufficient to know that the authentication requirements specified in that file must be satisfied. Finally, to wrap up the auth module-type entries for the login program, the fourth line invokes the pam_nologin.so PAM module to check whether logins are allowed on the system at the current time.
The fifth line in this file identifies the requirements for the account module-type, which in this case uses the pam_stack.so PAM module to verify that the set of requirements for the system-auth service have been satisfied.
Similarly, the sixth line in this file identifies the requirements for the password module-type, which also uses the pam_stack.so PAM module to verify that the set of requirements for the system-auth service have been satisfied.
Finally, the seventh and eighth lines in this file identify session requirements for the login program. The seventh line uses the familiar pam_stack.so PAM module to verify that the set of requirements for the system-auth service were satisfied. The eighth line in this file defines an optional requirement that the user be running on the console. If this module succeeds, the user is granted any additional privileges associated with this PAM module. If this module fails, authentication succeeds as long as the previous required modules have completed successfully, but the user doesn’t get the bonus privileges.
Now let’s look at the /etc/pam.d/system-auth file on the same system, which contains the following:
	#%PAM-1.0
	# This file is auto-generated.
	# User changes will be destroyed the next time authconfig is run.
	auth		required	/lib/security/pam_env.so
	auth		sufficient /lib/security/pam_unix.so likeauth nullok
	auth		required   /lib/security/pam_deny.so
	account		required   /lib/security/pam_unix.so
	password	required   /lib/security/pam_cracklib.so retry=3 type=
	password	sufficient /lib/security/pam_unix.so nullok use_authtok md5
				shadow
	password	required   /lib/security/pam_deny.so
	session		required   /lib/security/pam_limits.so
	session		required   /lib/security/pam_unix.so
Now that you grok PAM configuration files, you can see that the auth module-type first requires that the pam_env.so module succeed, then tries the pam_unix.so module, which is a generic module that can perform auth, account, password, and session functions (depending on how it is called). When called for the auth module-type, it verifies a user’s identity, sets credentials if successful, and so on. If this module succeeds, the following required entry for the pam_deny.so module isn’t executed. If the pam_unix.so module fails, pam_deny.so executes, which returns a failure code to ensure that the specified module-type will fail. In our login example, where another auth request (for pam_nologin.so) follows the invocation of the contents of the system-auth PAM stack, that auth request is executed, but its value isn’t important because pam_deny.so is required and has already indicated failure.
Next, the account module-type requires that the pam_unix.so module succeed—in this case, pam_unix.so provides default account checks.
Following the account check, the first password module-type line specifies that pam_cracklib.so be used when setting passwords to select a password that isn’t easily cracked, based on the contents of a database of easily cracked passwords (/usr/lib/cracklib_dict.pwd on Red Hat systems). Arguments to this module give the user three chances to select a password (by passing the argument retry=3) and specify that this password isn’t for any specific type of authentication, such as LDAP or NIS (by passing a null name using the type= argument). If this module succeeds, the second password module-type line invokes the standard pam_unix.so module, with arguments specifying that null passwords are acceptable but can’t be set by users (nullok), not to prompt for a password but to use any password that succeeded in a previous PAM of module-type password (use_authtok), that passwords use md5 hashing by default (md5), and that the system uses the /etc/shadow file to hold passwords (shadow). If this module fails, the user is denied access to the application or service that invoked the system-auth service through the next line, which invokes the pam_deny.so module to ensure failure of the password auth-type.
Finally, the session checks set system limits using the pam_limits.so module, which provides functions to initiate and terminate sessions.
If you need to take a few aspirin after parsing each entry in these files, join the club. But even though it’s a pain, security is one of any sysadmin’s most important responsibilities. If it’s any consolation, think how complex the code to implement all of this would have been without the flexibility that PAMs provide!
Configuration and More Configuration
The text-format files in /etc/pam.d control the PAMs associated with each authentication-aware application or service. Some of these PAMs themselves use optional configuration files to further refine their behavior. The configuration files for individual PAMs are located in the directory /etc/security. Though these files must exist, they do not need to contain any useful information—they are there in case you want to take advantage of the advanced configuration options that they provide. Here is a list of the files in this directory that are found on a variety of Linux systems:
- access.conf
Provides fine-grained access control for logins. Used by the pam_access.so module.
- console.apps
A directory that contains a file for each privileged application that a user can use from the console. The name of each file is the same as the base-name of the application with which it is associated. These files must exist but can be empty. When they have contents, these files typically contain environment variables associated with the applications that match their names. Used by the pam_console.so module on Red Hat–inspired Linux systems.
- console.perms
Defines the device permissions granted to privileged users when logged in on the console, and the permissions to which those devices revert when the user logs out. Used by the pam_console.so module on Red Hat–inspired Linux systems.
- group.conf
Provides per-session group membership control. Used by the pam_group.so module.
- limits.conf
Provides a per-user mechanism for setting system resource limits. Used by the pam_limits.so module.
- pam_env.conf
Provides a mechanism for setting environment variables to specific values. Used by the pam_env.so module.
- pam_pwcheck.conf
Provides options for identifying the mechanism used when evaluating password strength. Used by the pam_pwcheck.so module on SUSE-inspired Linux systems.
- pam_unix2.conf
Provides options for advanced configuration of traditional password checking. Used by the pam_unix2.so module on SUSE-inspired systems.
- time.conf
Provides a mechanism for imposing general or user-specific time restrictions for system services and applications. Used by the pam_time.so module.
What if PAM Configuration Files Are Missing?
Applications that use PAMs are very powerful, and correct configuration is very important. However, the Linux-PAM library does provide a default configuration file for any applications and services that do not have their own configuration files. This is the file /etc/pam.d/other. Since a missing configuration file generally indicates a misconfigured system (or that someone has imported a PAM-aware binary without thinking things through), the /etc/pam.d/other file implements extremely paranoid security, as in the following example:
	#%PAM-1.0
	auth	 required	pam_deny.so
	account	 required	pam_deny.so
	password required	pam_deny.so
	session	 required	pam_deny.so
In this example, any request for any module-type that falls through to this PAM configuration file will return a failure code. A slightly more useful version of this file is the following:
	#%PAM-1.0
	auth	 required	pam_deny.so
	auth	 required	pam_warn.so
	account	 required	pam_deny.so
	account	 required	pam_warn.so
	password required	pam_deny.so
	password required	pam_warn.so
	session	 required	pam_deny.so
	session	 required	pam_warn.so
Because subsequent required entries for a given module-type are still executed, each module-type entry first executes the pam_deny.so PAM, which denies access to the requested service, and then also executes the pam_warn.so PAM, which logs a warning message to the system log.
See Also
manpam(wherepamis the name of a PAM module without the .so extension)
Authenticate Linux Users with a Windows Domain Controller
To a busy sysadmin, centralization is usually more important than philosophy.
Much has been made in the Linux press about using Samba to bridge the gap between Linux/Unix and SMB/CIFS environments. Samba is not just one of the most impressive pieces of open source software ever—it’s also as impressive a job of reverse engineering as “Hacking the Xbox.”
However, using Samba for authentication is often more of a philosophical point than an organizational need. Frankly, if you already have a huge, well-designed, functional Windows environment that supports authentication, groups, ACLs, and Exchange (to name a few “popular” Windows services), converting all that to Linux can be more work than it’s worth. If you’re just starting to integrate Linux boxes into your user desktops in a coherent fashion, why not swim against the standard Linux tide and configure the login mechanisms on your Linux boxes to use the authentication provided by your existing Windows domain controllers? You can always convert them later, when your yearly ransom demand from Microsoft arrives.
Software Requirements
To integrate Windows domain and Linux authentication, you’ll need to have the PAM, samba-winbind, and smb-client packages installed on your system. The core pieces of software that you’ll need are the daemon that enables you to communicate with a Windows domain controller, known as the winbindd daemon (usually installed as /usr/sbin/winbindd), a correctly configured /etc/samba/smb.conf file (used by the winbind daemon to obtain information about your domain and domain controller), and the PAM for domain authentication through this daemon (/lib/security/pam_winbind.so). The winbindd daemon and the pam-winbind.so module are both provided in the samba-winbind package, though to use the PAM you must have the PAM package installed and working on your system. The current versions of these packages at the time this book was written were pam-0.78-8, samba-winbind-3.0.13-1.1, and samba-client-3.0.13-1.1.
Of course, if your environment has enough Windows dependencies to make you want to authenticate your Linux boxes using Windows, you’re probably already using Samba to access your Windows shares from your Linux system or your Linux filesystems from your Windows systems. Nowadays, most Linux systems come with Samba installed. To get complete support for Windows domain authentication, you’ll want to make sure your system is running Samba 3.x or better. If you’re using a package manager, you can run the command rpm -q
packagename to find out which version of each of these is installed on your system.
If you’re missing any of the packages that you need or want, you can either consult your favorite package repository (RPMBone and RPMFind.net come to mind) to find a prebuilt package for your system, or download the complete Samba source code from http://www.samba.org and build the whole thing yourself. It’s quite easy.
Critical Samba Configuration for Using Windows Authentication
As mentioned in the previous section, the winbindd daemon obtains the information that it needs to communication with your primary domain controller from the standard Samba configuration file (usually /etc/samba/smb.conf, unless you installed Samba elsewhere). The following are the critical entries used by the winbindd daemon, all from the [global] section of the Samba configuration file:
-
workgroup The name of the Windows domain to which you want the Linux system to authenticate.
-
winbind uid A range of integer user IDs (UIDs) for the users that you want to be able to authenticate using Windows authentication. An example range is
1000–9999, which is the typical range of UIDs for non-system Linux user accounts nowadays.-
winbind gid A range of integer group IDs (GIDs) for the groups you want to be able to authenticate using Windows authentication. An example range is
100–999, which is the typical range of GIDs for non-systems Linux groups nowadays.-
security The type of security you want your system to use. When using Windows domain authentication, this should always be set to
domain.-
username map The name of a file that contains mappings between Windows user-names and Linux usernames. This is typically the file /etc/samba/smbusers. In general, if you’re going to be authenticating Linux users against a domain controller running on Windows, it’s easiest to simply use the same login names on your Windows and Linux systems (even though bill.vonhagen is uglier and requires more typing than more traditional logins such as wvh).
-
obey pam restrictions If you are using the Linux PAM mechanism to authenticate your Linux users, this should always be set to
yesto force Samba to use all of the bells and whistles of PAM authentication.
Updating /etc/nsswitch.conf
To cause your system to consult the winbindd daemon for password and group authentication, you will also have to modify your system’s name service switch to integrate Windows domain authentication. To do this, modify your /etc/nsswitch.conf file to specify that the system obtains password and group information from the Windows domain controller. Correct entries would be the following:
	passwd: files winbind
	group: files winbind
This tells the name service switch to first check the local password and group files on the client system for authentication information and then check the winbindd daemon. This enables you to create local accounts when necessary, giving these local accounts priority while still using Windows domain authentication for most accounts.
Integrating the pam_winbind.so PAM into System Authentication
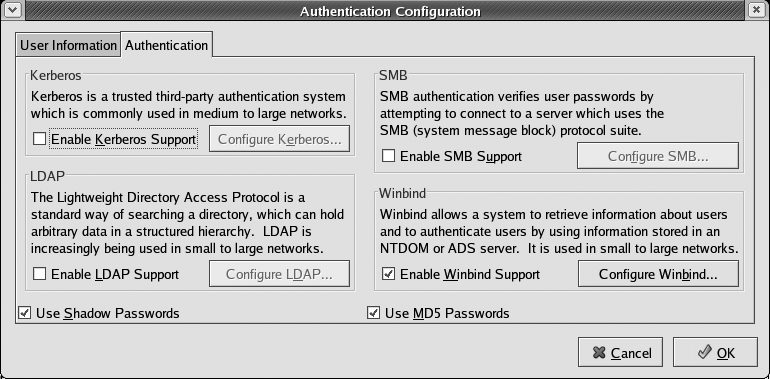
Unless you’re using a Linux distribution such as Red Hat, which provides a graphical tool for configuring system authentication (system-config-auth, shown in Figure 1-1), you’ll need to manually modify the PAM configuration files for services that will authenticate using your Windows domain controller. At a minimum, this is the login configuration file (/etc/pam.d/login), and probably also the PAM configuration file for SSH logins (/etc/pam.d/sshd).
Here’s a sample PAM configuration file that uses Windows authentication to enable logins:
	#%PAM-1.0
	auth		sufficient	/lib/security/pam_winbind.so
	auth		required	/lib/security/pam_securetty.so
	auth		required	/lib/security/pam_stack.so service=system-auth debug
				 use_first_pass
	auth		required	/lib/security/pam_nologin.so
	account		required	/lib/security/pam_stack.so service=system-auth
	password	required	/lib/security/pam_stack.so service=system-auth
	session		required	/lib/security/pam_stack.so service=system-auth
	session		optional	/lib/security/pam_console.so
Note that this PAM configuration file accepts Windows authentication as being sufficient to enable a login, but then falls through to the standard Linux authentication sequence if this fails. This enables you to use a mixture of central authentication (through the Windows domain controller) and local authentication (using the traditional Linux/Unix password and group files).
Starting the winbindd Daemon
One of the last steps in integrating Linux systems with Windows authentication is to make sure the
winbindd daemon starts automatically whenever you boot your system. To do this, make sure a symbolic link to the /etc/init.d/winbind startup script exists for your system’s default runlevel. To start the winbindd daemon manually (i.e., the first time), you can simply run this script with the start argument, as in:
# /etc/init.d/winbind startJoining the Domain
The final step is to actually join the domain from your Linux system. You can do this using the net command, which is part of the Samba suite and is found in the samba-client package mentioned earlier in this hack:
$ net join member -U AdministratorYou’ll be prompted for the Administrator password for the target domain. You do not have to join as the user Administrator—any user with sufficient privileges to join the domain will do.
Testing Windows Authentication
You should always test any fundamental change to your system’s core authentication sequence before logging out of your system. The easiest way to do this is to enable a service that requires login authentication and then use this to log in via a network connection to your system while you are still actually logged in on the machine. My favorite service for this is the telnet service, but ssh is just as easy (though you will have to modify the /etc/pam.d/sshd PAM configuration file in order to test ssh authentication via your Windows domain controller).
Debugging Windows Authentication Problems
Both Samba and the pam_winbind.so PAM provide excellent debugging options. To put the winbindd daemon in debug mode, log in as root using a local account, add the debug keyword to the pam_winbind entry in the PAM service configuration file that you are using for debugging, and restart the winbindd daemon manually with the -d
debug-level option, which displays tons of useful information. I prefer to use debug level 5, which shows each byte in every packet exchanged by the winbind daemon and the domain controller that it is talking to. If this doesn’t provide you with enough information to identify and resolve your problem and you suspect Samba misconfiguration, you can increase the logging level in the Samba configuration file (/etc/samba/smb.conf) by adding the log level winbind:NN command and restarting Samba. This enables you to specify the logging level for Samba activities related to winbind authentication. If you are using an older version of Samba or want coarser logging, you can remove the winbind restriction and simply increase the general Samba logging level by using the command log level
NN in your Samba configuration file and restarting Samba. A log level of 5 is sufficient for most debugging. (Remember to disable logging when you’ve resolved your authentication problems, as this creates a huge logfile and has a negative impact on Samba performance.)
Another useful command when analyzing or debugging problems with using Windows domain authentication to authenticate Linux users is the wbinfo command. You can use this command to make sure you’re actually talking to the domain controller and to query the domain controller for various types of information. The following output example shows both the options available to the wbinfo command and a sample command that retrieves the names of known users from the domain controller:
$ wbinfoUsage: wbinfo -ug | -n name | -sSY sid | -UG uid/gid | -tm | -[aA] user%password Version: 2.2.7-security-rollup-fix -u lists all domain users -g lists all domain groups -n name converts name to sid -s sid converts sid to name -N name converts NetBIOS name to IP (WINS) -I IP converts IP address to NetBIOS name (WINS) -U uid converts uid to sid -G gid converts gid to sid -S sid converts sid to uid -Y sid converts sid to gid -t check shared secret -m list trusted domains -r user get user groups -a user%password authenticate user -A user%password store user and password used by winbindd (root only) -p 'ping' winbindd to see if it is alive --sequence show sequence numbers of all domains --set-auth-user DOMAIN\user%password set password for restrict anonymous$ wbinfo -u_Template Administrator bill.vonhagen build [additional output deleted]
Centralize Logins with LDAP
Creating individual accounts on individual machines is a thing of the past: centralize authentication information and more by using a directory server.
The Lightweight Directory Access Protocol (LDAP) provides a hierarchical collection of information that can be accessed over a network. LDAP is an example of a directory service. In this context, the term directory refers to a central information resource (such as a telephone directory or network-accessible address book) but also leverages the idea of hierarchical directory structures. LDAP directories are essentially simple, hierarchical databases that are accessed using keys that identify the portions of the directory hierarchy to traverse to locate a specific unit of information.
The core idea of hierarchical elements and attributes is easy to understand and work with, and it should be familiar to users of similar information models, such as XML. The LDAP protocol is also independent of the underlying storage model used, making it easy to map LDAP data into existing databases or migrate to new, smaller database models.
Like all directory services, LDAP is a client/server technology. Clients can either query or upload information to an LDAP server. In the case of a query, the LDAP server either responds directly or forwards the query to another LDAP server, which repeats the “respond or forward” process. The OpenLDAP project (http://www.openldap.org ), where most Linux LDAP development now takes place, is the source of the software discussed in this hack.
Installing LDAP Clients and Servers
Using LDAP in your environment requires that you have a few basic packages installed on your systems, or that you build and install the OpenLDAP software from scratch. If you need to build it yourself, you can download the latest version of the full OpenLDAP package from http://www.openldap.org/software/download. If your Linux systems use a package management system, you’ll need to install:
An OpenLDAP client on all your systems (including the server, for debugging purposes). These packages usually have names like openldapclient or openldap2-client.
An OpenLDAP server on your server system. Some Linux distributions, such as SUSE, provide these in openldap or operldap2 packages, while others provide explicit servers in packages with names like openldap-servers.
OpenLDAP libraries on all clients and servers. Some Linux distributions, such as Red Hat Enterprise Linux and Fedora, split these into separate packages that are simply named openldap, while others integrate them into the OpenLDAP client and server packages.
These packages will give you basic LDAP functionality. However, to integrate them with user lookups and authentication on your client systems, you’ll also need the following:
The name service module, nss_ldap, for integrating user and group lookup requests with an OpenLDAP server.
The PAM module, pam_ldap, for integrating LDAP authentication into your client’s authentication process.
If you’re building these yourself, their source code is available from PADL Software Pty Ltd, the folks who wrote them, at the URL http://www.padl.com/Contents/OpenSourceSoftware.html.
Finally, you’ll need some useful utilities for migrating existing password, shadow, and group information into your OpenLDAP directory. These are also available from PADL Software Pty Ltd, at the URL http://www.padl.com/download/MigrationTools.tgz.
Many Linux distributions provide graphical utilities for configuring LDAP and LDAP authentication, such as Red Hat’s authconfig application and the LDAP client configuration applet in SUSE’s YaST tool. This hack explains how to do everything from the command line, in case you don’t have access to such utilities. If you’re using either of these systems, the graphical utilities simplify the installation and configuration processes, but it’s always nice to know what’s really required under the covers. You will still have to migrate your user, password, and group data into your LDAP server manually, in any case.
Tip
In the rest of this hack, I’ll assume that you installed all this software in standard system locations and can therefore find the OpenLDAP configuration files in /etc/openldap. If you built them yourself, you may have installed them relative to /usr/local, and thus you may need to look for the configuration files in locations such as /usr/local/etc/openldap.
Configuring an OpenLDAP Server
The configuration files for OpenLDAP clients and servers, which are traditionally located in the directory /etc/openldap, are:
- ldap.conf
Sets the default values used by OpenLDAP clients on your system.
- slapd.conf
Contains configuration information for the OpenLDAP slapd server running on the current system. This file should never be readable by non-privileged users, because it contains password and other security information for your OpenLDAP server.
Configuring an OpenLDAP server is a fairly simple process. First, you change the suffix entry so that it correctly identifies your domain. For example, the default entry in /etc/openldap/slapd.conf is usually:
suffix "dc=my-domain,dc=com"
Change this to reflect your domain. For example, to set up an OpenLDAP server for the domain vonhagen.org, change this line to the following:
suffix "dc=vonhagen,dc=org"
Next, change the rootdn entry to reflect the name of a privileged user who has unrestricted access to your OpenLDAP directory. For example, the default entry in /etc/openldap/slapd.conf is usually:
rootdn "cn=Manager,dc=my-domain,dc=com"
Continuing with the previous example, you would change this to something like the following for the vonhagen.org domain:
rootdn "cn=ldapadmin,dc=vonhagen,dc=org"
Though this user is the equivalent of the root user as far as OpenLDAP is concerned, the name does not have to be that of a real user on your system.
Finally, though optional in some sense, you may want to set a unique password for your OpenLDAP server by modifying the rootpw entry in your /etc/openldap/slapd.conf configuration file. This enables you to configure, test, and correct your OpenLDAP system over your local network, if necessary. For example, the default entry in /etc/openldap/slapd.conf uses the clear-text password secret, as shown here:
rootpw secret
You can provide a clear-text or encrypted password as the value for this entry. You can use the slappasswd command to generate an encrypted password that you can paste into the /etc/openldap/slapd.conf file, as in the following example:
	# slappasswd
	New password:
	Re-enter new password:
	{SSHA}x0uopfqDBaylPdv3zfjLqOSkrAUh5GgY
The slappasswd command prompts you for a new password, asks for confirmation, and then displays the encrypted password string preceded by the encryption mechanism used in the password. You then simply replace the value of the existing rootpw option with the generated string, as in the following example:
rootpw {SSHA}x0uopfqDBaylPdv3zfjLqOSkrAUh5GgYYou should enable the rootpw option only when initially configuring your OpenLDAP server, and it is necessary to do so only if you must configure your OpenLDAP server over a network. It’s always a good idea to set a unique, encrypted password for your OpenLDAP server that differs from your standard root password, even though the /etc/openldap/slapd.conf file should not be readable by nonprivileged users on your system. Once you have completed your configuration, you should disable this entry by commenting it out. To do so, put a hash mark (#) at the beginning of the line containing the rootpw entry.
Tip
OpenLDAP passwords are sent in the clear over the network unless you enable Secure Socket Layer/Transaction Layer Security (SSL/TLS) encryption in your /etc/openldap/slapd.conf file. Discussing SSL/TLS encryption for OpenLDAP is outside the scope of this hack. For additional information, see a reference such as Gerald Carter’s LDAP System Administration (O’Reilly).
Once you have modified your /etc/openldap/slapd.conf file and saved your changes, you can start the OpenLDAP server using the /etc/init.d/ldap script, as in the following example:
# /etc/init.d/ldap startAs with all startup scripts on Linux systems, you should symlink this file to start up and kill files in the directories associated with your system’s default runlevel to ensure that it starts automatically when you reboot your system.
Migrating User, Password, and Group Entries to an LDAP Server
To configure your LDAP server to provide authentication information, you must first migrate your existing authentication information to the LDAP server. You do this by preparing LDAP Data Interchange Format (LDIF) files that hold the contents of your /etc/passwd,/etc/shadow, and /etc/group files, and then importing those files into the LDAP server.
Creating LDIF files from your existing /etc/passwd, /etc/shadow, and /etc/group files is most easily done by using the migrate_passwd.pl and migrate_group.pl scripts found in the migration tools available at http://www.padl.com/download/MigrationTools.tgz. If you’ve installed OpenLDAP from packages, these scripts may be located on your system in the directory /usr/share/openldap/migration.
Tip
If you have multiple password, shadow, and group files on different systems that you want to merge into a single LDAP repository, you can copy them all to your LDAP server system, concatenate them, and sort them to produce single files. You can then edit these files so that they have only single entries for each user and group and install them as the master password, shadow, and group files on your server before running the migration scripts. Verify that these files work correctly after installation and before migrating them to LDAP!
To migrate user, password, and group information into your LDAP server so you can use it as a basis for client system authentication, do the following:
Become the root user, and change directory to the directory where you unpacked the migration scripts or where they are already installed.
Edit the file migrate_common.ph, which sets variables used by all of the migration scripts. Set the value for the
DEFAULT_BASEvariable to the correct value for your environment. As an example, the correct value for migrating information to the LDAP server used as an example throughout this hack would be:$DEFAULT_BASE = "dc=
vonhagen,dc=org";Use the migrate_passwd.pl script to generate an LDIF file for your user and password information, as in the following example:
./migrate_passwd.pl /etc/passwd passwd.LDIF
The migrate_passwd.pl script also extracts the necessary password information from your /etc/shadow file.
Generate an LDIF file for your group information using the migrate_group.pl script, as in the following example:
./migrate_group.pl /etc/group group.LDIF
Import the files that you just created into your LDAP directory using commands like the following:
# ldapadd -x -hhostname-D "cn=ldapadmin,dc=vonhagen,dc=org" \ -wpassword-f passwd.LDIF # ldapadd -x -hhostname-D "cn=ldapadmin,dc=vonhagen,dc=org" \ -wpassword-f group.LDIFIn these commands, replace
hostnamewith the hostname of the system on which your LDAP server is running, make sure that the credentials specified following the-Doption match those of the root user for your LDAP server, and replacepasswordwith the password you set in therootpwentry—both as defined in your OpenLDAP server configuration file (/etc/openldap/slapd.conf).
After following these steps, you are ready to update your client systems to use LDAP authentication (and test them, of course).
Updating Client Systems to Use LDAP Authentication
On each system that you want to use the new LDAP authentication server, you must do the following:
Modify the configuration file /etc/pam_ldap.conf, used by the pam_ldap.so PAM module, to contain the correct information about your LDAP server. This usually simply requires correctly setting the values of the
hostandbasestatements in this file, as in the following example:host
ldap.vonhagen.orgbase dc=vonhagen,dc=orgModify the configuration file /etc/lib-nss-ldap.conf, used to integrate LDAP with the name service on your system, to contain the correct information about your LDAP server. Again, this usually simply requires correctly setting the values of the
hostandbasestatements in this file, as in the following example:host
ldap.vonhagen.orgbase dc=vonhagen,dc=orgAdd entries for LDAP to the appropriate PAM configuration files on your system. As explained in “Customize Authentication with PAMs” [Hack #4] , some Linux systems use individual files to configure authentication for specific services, while others (such as Red Hat/Fedora) create a centralized file for system authentication, called /etc/pam.d/system-auth. If you are using individual files, you must add the appropriate entries for LDAP authentication to login-related services such as login and sshd. You should insert
authandaccountentries for the pam_ldap.so module before your system’s generic Linux authentication checks, which are usually handled by pam_unix2.so (SUSE) or pam_pwdb.so (most other Linuxes). An example PAM file for the sshd service would look something like the following:auth required /lib/security/pam_nologin.so auth sufficient /lib/security/pam_ldap.so auth required /lib/security/pam_pwdb.so shadow nodelay account sufficient /lib/security/pam_ldap.so account required /lib/security/pam_pwdb.so password required /lib/security/pam_cracklib.so password required /lib/security/pam_pwdb.so shadow nullok use_authtok session required /lib/security/pam_mkhomedir.so skel=/etc/skel/ umask=0022 session required /lib/security/pam_pwdb.so
If you are using a Red Hat or Fedora system, modify /etc/pam.d/system-auth to look like the following:
	auth		required	/lib/security/pam_env.so
	auth		sufficient  /lib/security/pam_unix.so likeauth nullok
	auth		sufficient  /lib/security/pam_ldap.so use_first_pass
	auth		required	/lib/security/pam_deny.so
	account		required	/lib/security/pam_unix.so broken_shadow
	account		sufficient  /lib/security/pam_succeed_if.so uid < 100 quiet
	account		[default=bad success=ok user_unknown=ignore] /lib/security
				/pam_ldap.so
	account		required	/lib/security/pam_permit.so
	password	requisite   /lib/security/pam_cracklib.so retry=3
	password	sufficient  /lib/security/pam_unix.so nullok use_authtok md5
				 shadow
	password	sufficient /lib/security/pam_ldap.so use_authtok
	password	required   /lib/security/pam_deny.so
	session		required   /lib/security/pam_limits.so
	session		required   /lib/security/pam_unix.so
	session		optional   /lib/security/pam_ldap.so
Modify your /etc/nsswitch.conf file to specify that the system looks for password, shadow, and group information in LDAP. Correct entries would be the following:
	passwd: files ldap
	shadow: files ldap
	group: files ldap
This tells the name service switch to first check the local password, shadow, and group files on the client system for authentication information and then check LDAP. This enables you to create local accounts when necessary, giving those local accounts priority while still using LDAP for most accounts.
Back up your local /etc/passwd, /etc/shadow, and /etc/group files and edit the primary copies on the client system to remove all user accounts, so that they contain only system accounts.
The next time you log in on your client system, it will contact your LDAP server for authentication information. When creating new user and group accounts, you will need to use a command-line interface to OpenLDAP (http://quark.humbug.org.au/publications/scripts/ldap/cli/) to create the necessary account information. There are also a number of graphical tools for creating and managing LDAP accounts, but I’m more comfortable with the command line.
Tip
Before logging out of this client system and configuring another, open a new login session to this host using telnet or ssh to ensure that you can correctly log in using LDAP. If you encounter any problems, do not log out of this system until you have resolved them.
Congratulations! You’re now making the most of your network and will rarely, if ever, have to manage local password and group information on individual systems again. Combining this hack with other hacks (such as “Centralize Resources Using NFS” [Hack #56] and “Automount NFS Home Directories with autofs” [Hack #57] ) further liberates individual systems from user-specific data.
See Also
“Customize Authentication with PAMs” [Hack #4]
LDAP System Administration, by Gerald Carter (O’Reilly)
LDAP HOWTO: http://en.tldp.org/HOWTO/LDAP-HOWTO/
Secure Your System with Kerberos
You can heighten the security of any network by using Kerberos for secure network authentication and encrypted communications.
Kerberos is a distributed authentication and communication service originally developed at the Massachusetts Institute of Technology (MIT). Kerberos provides secure authentication and communication for client/server applications by using strong cryptography to enable clients to prove their identities to servers over the network.
Kerberos works by exchanging encrypted security information between clients (which can be users or machines), the Kerberos authentication server, and the resource you are trying to access. The information that is initially exchanged when attempting to prove one’s identity is known as a ticket. The information used to encrypt tickets and subsequent communications is known as a key. Once the identity of a client is verified, that client is granted a Kerberos token that can be used to verify its identity to any Kerberos-aware service. For security reasons, Kerberos tokens are time-stamped so that they automatically expire unless renewed by a user or service. The primary system for granting tickets (which houses the master copy of the Kerberos database) is known as the Kerberos Key Distribution Center (KDC).
The timestamps contained within Kerberos tokens (and tickets) can be verified only if the time and date are synchronized across Kerberos clients and servers. Kerberos authentication will fail if client and server clocks become skewed by more than five minutes. You should always run NTP (Network Time Protocol) daemons on all Kerberos clients and servers to guarantee that their clocks remain in sync [Hack #22] .
Kerberos uses the term realm to differentiate between authentication and Internet domains. A Kerberos realm is a set of machines that rely on a specific Kerberos server for authentication and therefore trust that server. In Kerberos configuration files, your realm is typically identified in uppercase characters in order to differentiate it from any similar DNS domain with which it is associated.
Tip
MIT’s Kerberos implementation is only one of several. Many alternate Kerberos implementations have been created over the years, usually to get around United States export restrictions that have since been lifted. For example, SUSE systems use an alternate Kerberos client/server implementation known as Heimdal (http://www.pdc.kth.se/heimdal/). This hack focuses on vanilla Kerberos from MIT, which I prefer to use because I find it to be the best supported and most easily used on a variety of Unix and Linux systems.
Installing Kerberos
Using Kerberos requires that you have a few basic packages installed on your systems, or that you build and install it yourself from scratch. If you need to build it yourself, you can download the latest version from MIT at http://web.mit.edu/kerberos/www/. If your Linux systems use a package management system and you want to use a vanilla Kerberos, you’ll need to install:
krb5-workstation on all client systems. This contains basic Kerberos programs (kinit, klist, kdestroy, kpasswd) as well as Kerberized versions of the telnet and ftp applications.
krb5-server on all server and slave server systems. This provides the programs that must be installed on a Kerberos 5 server or server replica.
krb5-libs on all client and server systems. This contains the shared libraries used by Kerberos clients and servers.
pam_krb5 on all client systems. This provides a PAM that enables Kerberos authentication.
Installing and Configuring a Kerberos Server
After building and installing Kerberos or installing the krb5-workstation, krb5-server, and krb5-libs packages on your the host that will serve as your master KDC, the first step in configuring your Kerberos environment is to set up your master KDC. The process for doing this is the following:
Edit the general Kerberos configuration file for your environment (/etc/krb5.conf). This file identifies the KDCs and admin servers in your Kerberos realm and provides default values for your realm and Kerberos applications and for how your existing hostnames map into your Kerberos realm. Here’s a sample /etc/krb5.conf file for the realm
VONHAGEN.ORG(replace the italicized items with the correct values for your system):[logging] default = FILE:/var/log/krb5libs.log kdc = FILE:/var/log/krb5kdc.log admin_server = FILE:/var/log/kadmind.log [libdefaults] default_realm =
VONHAGEN.ORGdns_lookup_realm = false dns_lookup_kdc = false ticket_lifetime = 24h forwardable = yes [realms]VONHAGEN.ORG= { kdc =kerberos.vonhagen.org:88 admin_server =kerberos.vonhagen.org:749 default_domain =vonhagen.org} [domain_realm].vonhagen.org = VONHAGEN.ORGvonhagen.org = VONHAGEN.ORG[kdc] profile = /var/kerberos/krb5kdc/kdc.conf [appdefaults] pam = { debug = false ticket_lifetime = 36000 renew_lifetime = 36000 forwardable = true krb4_convert = false }The defaults provided in the generic /etc/krb5.conf file are reasonable, except that you must change all instances of
EXAMPLE.COMto the name of your realm and all instances ofexample.comto the name of your domain (VONHAGEN.ORG and vonhagen.org, respectively, in the previous example). You must also make sure that DNS or /etc/hosts entries exist on all clients for the systems that you identify as your default KDC andadmin_serversystems in the[realms]section.Edit the KDC configuration file (/var/kerberos/krb5kdc/kdc.conf). The location of this file is provided in the
[kdc]section of the /etc/krb5.conf file. As with the /etc/krb5.conf file, the primary change that you must make to this file is to change the instance ofEXAMPLE.COMto the name of your realm, which isVONHAGEN.ORGin the following example:[kdcdefaults] acl_file = /var/kerberos/krb5kdc/kadm5.acl dict_file = /usr/share/dict/words admin_keytab = /var/kerberos/krb5kdc/kadm5.keytab v4_mode = nopreauth [realms]
VONHAGEN.ORG= { master_key_type = des-cbc-crc supported_enctypes = des3-hmac-sha1:normal arcfour-hmac:normal \ des-hmac-sha1:normal des-cbc-md5:normal des-cbc-crc:normal \ des-cbc-crc:v4 des-cbc-crc:afs3 }Next, use the kdb5_util utility on the master KDC to create the Kerberos database and your stash file. You will have to enter the master database password twice, for verification purposes. The stash file is a local, encrypted copy of the master key that is used to automatically authenticate the KDC as part of your system’s startup sequence. For example:
# /usr/kerberos/sbin/kdb5_util create -rVONHAGEN.ORG-sLoading random data Initializing database '/var/kerberos/krb5kdc/principal' for realm 'vonhagen.org', master key name 'K/M@vonhagen.org' You will be prompted for the database Master Password. It is important that you NOT FORGET this password. Enter KDC database master key: Re-enter KDC database master key to verify:This command creates various files in the directory specified in the
kdcdefaultssection of your kdc.conf file: two Kerberos database files (principal.db and principal.ok), the Kerberos administrative database file (principal.kadm5), the database lock file (principal.kadm5.lock), and the stash file (.k5stash).Next, edit the ACL definition file (/var/kerberos/krb5kdc/kadm5.acl), changing the default realm (
EXAMPLE.COM) to the name of the realm that you are creating (VONHAGEN.ORG, in this example). The default entry in this file, which begins with*/admin, gives any user with an admin instance (such as wvh/admin, which we’ll create in the next step) complete access to and control over the realm’s Kerberos database. After we update this file for our example realm, it will look like this:*/admin@VONHAGEN.ORG *
Next, use the kadmin.local utility to add each of your system administrators to the Kerberos database. kadmin.local is a Kerberos-aware version of the standard kadmin utility that does not first authenticate to a Kerberos database and is therefore used for bootstrapping Kerberos on a KDC. Entries in the Kerberos database are known as principals. The following example adds an admin instance for the user wvh:
# /usr/kerberos/sbin/kadmin.localkadmin.local:addprinc wvh/adminWARNING: no policy specified for wvh/admin@VONHAGEN.ORG; defaulting to no policy Enter password for principal "wvh/admin@VONHAGEN.ORG": Re-enter password for principal "wvh/admin@VONHAGEN.ORG": Principal "wvh/admin@VONHAGEN.ORG" createdNext, add a standard user entry for the non-admin version of the principal that you just created and then exit the kadmin.local utility, as in the following example:
kadmin.local:
addprinc wvhWARNING: no policy specified for wvh@VONHAGEN.ORG; defaulting to no policy Enter password for principal "wvh@VONHAGEN.ORG": Re-enter password for principal "wvh@VONHAGEN.ORG": Principal "wvh@VONHAGEN.ORG" created. kadmin.local:quitAdding a standard principal enables default authentication by the associated entity. You will eventually need to create a principal for each user that you want to be able to authenticate using Kerberos. (Most sites do this by writing a script that also creates Kerberos principals when creating standard user accounts.)
Now, the fun begins! Start the various Kerberos-related services using the following commands:
	# /sbin/service krb5kdc start
	# /sbin/service kadmin start
	# /sbin/service krb524 start
At this point, you’re ready to install and start a Kerberos client. However, before doing anything else, you should verify that your server can hand out tickets by using the kinit command to explicitly request one for the administrative principal that you created earlier. You can then use the klist command to verify its contents, and then destroy the ticket (just to clean up) using the kdestroy command. The following example shows this sequence:
$ kinit wvhPassword for wvh@VONHAGEN.ORG:$ klistTicket cache: FILE:/tmp/krb5cc_0 Default principal: wvh@VONHAGEN.ORG Valid starting Expires Service principal 05/03/05 22:09:04 05/04/05 22:09:04 krbtgt/VONHAGEN.ORG/VONHAGEN.ORG Kerberos 4 ticket cache: /tmp/tkt0 klist: You have no tickets cached$ kdestroy
Installing and Configuring Kerberos Clients and Applications
Many Linux distributions provide graphical utilities for configuring Kerberos clients, such as Red Hat’s authconfig application and the Kerberos client configuration applets in SUSE’s YaST tool. This hack explains how to do everything from the command line, in case you don’t have access to such utilities. If you’re using either of these systems, the graphical utilities simplify the installation and configuration processes, but it’s always nice to know what’s really required under the covers. You will still have to migrate your user, password, and group data into your Kerberos server manually, in any case.
To install and test the Kerberos client software, do the following:
Build and install Kerberos on the system, or install the krb5-libs and krb5-workstation packages on all client systems.
Copy the /etc/krb5.conf file from your KDC to the client’s /etc directory.
Enable a sample application. I tend to use krb-telnet, a Kerberos-aware version of the classic telnet application, as a test application. The krb-telnet server is managed by your system’s xinet daemon. To enable krb-telnet, modify the file /etc/xinetd.d, changing the
disableentry fromyestono, as in the following example:# default: off # description: The Kerberized telnet server accepts normal telnet, # but can also use Kerberos 5 authentication. service telnet { flags = REUSE socket_type = stream wait = no user = root server = /usr/kerberos/sbin/telnetd log_on_failure += USERID disable =
no}Restart your system’s xinet daemon using the following command:
# /etc/init.d/xinetd.d restartTelnet to your system and make sure that you can log in successfully. Once you have logged in, you can use the
klistcommand to verify that you’ve automatically been granted the appropriate Kerberos tokens, as in the following example:$
klistTicket cache: FILE:/tmp/krb5cc_p4979 Default principal: wvh@VONHAGEN.ORG Valid starting Expires Service principal 05/07/05 10:00:46 05/08/05 10:00:46 krbtgt/VONHAGEN.ORG@VONHAGEN.ORG Kerberos 4 ticket cache: /tmp/tkt500 klist: You have no tickets cached
Congratulations—Kerberos is working! The next step in this hack is to integrate Kerberos into your system’s login authentication process.
Using Kerberos for Login Authentication
To enable Kerberos authentication on a client system, do the following:
Make sure you’ve built or installed the pam_krb5.so PAM module on all your client systems. If you are not using a package management system, you can obtain the latest version of the pam_krb5.so PAM at http://sourceforge.net/projects/pam-krb5/.
Verify that the /etc/krb5.conf file contains valid settings for PAM authentication, in the
[appdefaults]section’spamsubsection. Valid settings for Kerberos authentication via PAMs that match the examples used throughout this section are:[appdefaults] pam = { debug = false ticket_lifetime = 36000 renew_lifetime = 36000 forwardable = true hosts =kerberos.vonhagen.orgmax_timeout = 30 timeout_shift = 2 initial_timeout = 1 }Add entries for krb5 authentication to the appropriate PAM configuration files on your system. As explained in [Hack #4] , some Linux systems use individual files to configure authentication for specific services, while others (such as Red Hat/Fedora) create a centralized file for system authentication called /etc/pam.d/system-auth. If you are using individual files, you must add the appropriate entries for LDAP authentication to login-related services such as login and Kerberized services such as rlogin and telnet. You should insert
authandaccountentries for the pam_krb5.so module before your system’s generic Linux authentication checks, which are usually handled by pam_unix2.so (SUSE) or pam_pwdb.so (most other Linuxes). An example PAM file for the telnet service would look something like the following:auth required /lib/security/pam_nologin.so auth sufficient /lib/security/pam_krb5.so auth required /lib/security/pam_pwdb.so shadow nodelay account sufficient /lib/security/pam_krb5.so account required /lib/security/pam_pwdb.so password required /lib/security/pam_cracklib.so password required /lib/security/pam_pwdb.so shadow nullok use_authtok session required /lib/security/pam_mkhomedir.so skel=/etc/skel/ umask=0022 session required /lib/security/pam_pwdb.so
If you are using a Red Hat or Fedora system, modify /etc/pam.d/system-auth to look like the following:
	auth		required	/lib/security/pam_env.so
	auth		sufficient  /lib/security/pam_unix.so likeauth nullok
	auth		sufficient  /lib/security/pam_krb5.so use_first_pass
	auth		required    /lib/security/pam_deny.so
	account		required    /lib/security/pam_unix.so broken_shadow
	account		sufficient  /lib/security/pam_succeed_if.so uid < 100 quiet
	account		[default=bad success=ok user_unknown=ignore] /lib/security/
				pam_krb5.so
	account		required   /lib/security/pam_permit.so
	password	requisite  /lib/security/pam_cracklib.so retry=3
	password	sufficient /lib/security/pam_unix.so nullok use_authtok
				md5 shadow
	password	sufficient /lib/security/pam_krb5.so use_authtok
	password	required   /lib/security/pam_deny.so
	session		required   /lib/security/pam_limits.so
	session		required   /lib/security/pam_unix.so
	session		optional  /lib/security/pam_krb5.so
That’s all you should have to do. Before logging out of the client, telnet or SSH to it and attempt to log in. If you have any problems with Kerberos login authentication, you can enable PAM debugging in your /etc/krb5.conf file so that you can quickly identify and resolve authentication-related problems with login and other system applications that use PAMs. To do this, simply set the debug entry to true in the PAM section of the [appdefaults] stanza and restart your Kerberos server.
Unfortunately, there is no automated mechanism for migrating existing user and password information to a Kerberos database. You will have to manually add principals for all of your groups and users to the Kerberos database on your KDC, and assign them default passwords. Users can subsequently change their passwords using the kpasswd command found in /usr/kerberos/bin.
See Also
Kerberos: The Definitive Guide, by Jason Garman (O’Reilly)
“Customize Authentication with PAMs” [Hack #4]
Authenticate NFS-Lovers with NIS
If you’re using NFS, using its companion authentication mechanism may be the right way to go.
The Network Information System (NIS) is a distributed authentication mechanism that was originally developed by Sun Microsystems and is most commonly used in conjunction with the file-sharing protocol NFS [Hack #56] . NIS enables all of the machines in a computing environment to share access to a centralized collection of authentication-related files and service configuration information, known as “maps.” Each NIS map is typically provided in several different ways, each organized to optimize a specific type of access to that information, such as lookups by name or by some unique numeric component (such as being able to access a group map by group ID, a host’s map by address, and so on).
Tip
NIS+, also from Sun Microsystems, is the successor to NIS. Much like LDAP, it organizes information hierarchically. Unfortunately, NIS+ never really caught on outside of Sun systems, and therefore few Unix and Unix-like operating systems (such as, for example, Linux) bother to support NIS+.
Installing NIS Clients and Servers
Most Linux distributions provide packages that include NIS client and server software, but if yours doesn’t, or you simply want to install the latest and greatest, you’ll need to build and install the following packages from ftp://ftp.kernel.org/pub/linux/utils/net/NIS:
- ypbind-mt
The client NIS daemon
- ypserv
The NIS server
- yp-tools
The standard NIS utilities for displaying NIS files, changing your NIS password, changing the full name or shell in your NIS password file entry, and querying various aspects of an NIS server or NIS maps
The names of these packages will also include version numbers and an extension based on the archive format that you download (gzip or bzip2).
Setting Up an NIS Server
As mentioned earlier, NIS is the most commonly used distributed authentication mechanism today, largely because it is shipped free with almost all Unix and Unix-like systems. Another reason for the prevalence of NIS is that it’s incredibly easy to set up. This section walks you through the process of setting up an NIS server. Setting up an NIS client is explained in the next section.
Tip
This section shows how to quickly set up an NIS server for use with an NFS server. This NIS server exports the default password, group, host, and other maps (files) found on the NIS server system. In a production environment, you would want to do substantially more customization before initiating NIS throughout your computing environment. For example, you would also want to customize the NIS configuration files /var/yp/securenets, /etc/yp.conf, and /etc/ypserv.conf. For more complete information about setting up NIS, see the NIS HOWTO listed at the end of this hack.
To set up an NIS server, log in as or su to root on the system you will be configuring as an NIS server, and do the following:
Make sure that the NIS software is installed on your Linux system. At a minimum, you will need the /bin/domainname, /usr/sbin/ypserv, and /usr/lib/yp/ypinit programs.
Next, make sure that the /etc/passwd file has an entry for your personal account, which should also be found in the password file on the system you will be configuring as an NIS client. In the next section, you’ll use this entry to verify that NIS is working correctly.
Set the domain name of your new NIS domain. This should not be the same as the name of your TCP/IP domain, to avoid confusing DNS and potentially compromising security in your domain. To set the NIS domain name, issue a command like the following:
# /bin/domainnamefoo.comStart the NIS server process using the following command:
# /usr/sbin/ypservInitialize the NIS databases using the following command:
# /usr/lib/yp/ypinit -mYou will see output like the following:
	At this point, we have to construct a list of the hosts which will run
	NIS servers.
	 64bit.vonhagen.org is in the list of NIS server hosts.
	Please continue to add the names for the other hosts, one per line.
	When you are done with the list, type a <control D>.
	next host to add: 64bit.vonhagen.org
	next host to add:
	6. When prompted for the name of any other NIS servers in your domain,
	press <Ctrl-D>. You will see output like the following:
	The current list of NIS servers looks like this:
	64bit.vonhagen.org
	Is this correct? [y/n: y]
	7. Press return to respond yes. You will then see output listing the
	files that have been generated and added to the NIS database. This
	output looks like the following, where the domain name you specified
	will appear instead of the word "yourdomain":
	We need some minutes to build the databases…
	Building /var/yp/ws.com/ypservers…
	Running /var/yp/Makefile…
	gmake[1]: Entering directory '/var/yp/yourdomain'
	Updating passwd.byname…
	Updating passwd.byuid…
	Updating group.byname…
	Updating group.bygid…
	Updating hosts.byname…
	Updating hosts.byaddr…
	Updating rpc.byname…
	Updating rpc.bynumber…
	Updating services.byname…
	Updating services.byservicename…
	Updating netid.byname…
	Updating protocols.bynumber…
	Updating protocols.byname…
	Updating mail.aliases…
	gmake[1]: Leaving directory '/var/yp/yourdomain'
That’s all there is to it! Your new NIS server is up and running. You can now test that it is working correctly by following the instructions in the next section.
Setting Up an NIS Client
A good sysadmin Zen quote is “If a server is running and it has no clients, is it really working?” This section explains how to set up an NIS client of the server set up in the previous section, after doing some initial configuration so that you can verify that the server is actually doing “the right thing.”
To do some preconfiguration to verify that NIS is actually working, log in as or su to root and edit the /etc/nsswitch.conf file on the system you are using as an NIS client. Find the line that tells your system how to locate password entries and modify that line to look like the following:
passwd: files nis [NOTFOUND=return]
This tells your system to look for password information in the local password file and then consult NIS. If the password is not found in either of these locations, the [NOTFOUND=return] command tells your system to give up rather than pursuing any of the other authentication sources that may appear in this nsswitch.conf entry.
Next, save a copy of your system’s /etc/passwd file and then remove all user entries from the existing password file. Leave the root and system service accounts in the file—typically, it’s safe to remove accounts with UIDs greater than 200. As the last line of the newly abbreviated password file, add the following:
+::::::
This tells NIS to append the contents of the password map (file) retrieved from the NIS server whenever password information is requested.
Notice that the entries for any individual accounts (including your own) have been removed from the abbreviated password file. This enables you to do a fairly simple test to determine whether NIS is working: if you can log in using an account that is not present in the password file on your client system but is present in the password file on your NIS server system, NIS is working correctly.
To set up an NIS client, log in as or su to root on the system you are using as an NIS client and do the following:
Make sure the NIS client software is installed on your Linux system. At a minimum, you will need the /bin/domainname and /sbin/ypbind programs.
Check whether the directory /var/yp exists and create it if it does not.
Set the domain name of the NIS domain to which this new client will belong. This should be the same name as the domain name set in the previous section of this hack. To set the NIS domain name, issue a command like the following:
# /bin/domainnamefoo.comEdit the ypbind configuration file /etc/yp.conf, adding an entry for your NIS server. Continuing with the previous example, you’d add the following line:
domain
vonhagen.orgserver 64bitStart the NIS client process using the following command:
# /sbin/ypbindTo verify that NIS is working correctly, telnet from the NIS client system back to itself and attempt to log in as yourself. Remember that your password file entry is present in the password file on the NIS server but not in the password file on the NIS client.
You should be able to log in successfully. Congratulations—you’re running NIS! Remember to add setting the domain name and starting the NIS server and client to the startup procedures for each of your NIS client systems.
See Also
NIS HOWTO: http://www.linux-nis.org/nis-howto/
“Centralize Resources Using NFS” [Hack #56]
“Clean Up NIS After Users Depart” [Hack #77]
Sync LDAP Data with NIS
Run a script out of cron to help with a graceful transformation to LDAP.
An NIS-to-LDAP migration is a nontrivial event in any environment. If the switch were as simple as moving data from one place to another, most organizations would’ve done it by now. The reality in many production environments, large and small, is that some applications (and even appliances) do not yet support LDAP or don’t support LDAP to the extent that we would like. Eventually, most places come to terms with LDAP’s limitations and implement a “phase in” approach, which involves using LDAP where it is fully supported but keeping NIS around for those things that require it.
In those environments where the authentication source will be NIS for some legacy systems and LDAP for those newer systems that support it, the challenge becomes keeping the data synchronized between NIS and LDAP. Over the past couple of years, I have found several tools that attempt to solve this problem. One is a C program that, though it is amazingly generic, requires a whole bunch of flags that will look quite cryptic to some system administrators. Another solution consisted of a suite of tools that attempted to do too much and weren’t very configurable. I was unable to make friends with these tools, as they seemed to make assumptions about my environment that would never be true.
In the end, I did find a Perl script online that had a very elementary structure that anyone could understand. It was clearly written and well commented, but unfortunately it wasn’t actually written to complete the job it claimed to do. Rather than continuing my search, I broke down and decided that, by using this Perl script as a “good enough” skeleton, I could get it to work for my needs. Here is my Perl hack for taking data residing in LDAP and creating NIS maps.
The Code
	#!/usr/bin/perl
	use Net::LDAP;

	## CONFIG
	my $server = "ldap-server";
	my $base = "dc=example,dc=com";
	my $bind = "uid=ldap2nis,ou=People,dc=example,dc=com";
	my $bindpw = 'password';
	my $groupf = "group";
	my $passwf = "passwd";
	my $buildyp = "false";
	## CONNECT
	my $ldap = Net::LDAP->new($server, onerror => 'die' );
	$ldaps = $ldap->start_tls(verify=>'none') or die "Couldn't start tls: $@\n";
	$ldap->bind( dn => $bind, password => $bindpw) or die "Bind failed: $@\n";

	## PRINT PASSWORD FILE[1]

	my $res = $ldap->search(
				base => $base,
				scope => 'sub', # entire tree
				timelimit => 600,
				filter => '(&(objectClass=posixAccount))',
				attrs => ['uid', 'uidNumber', 'gidNumber', 'gecos',
	'homeDirectory', 'loginShell', 'userPassword'],
	);

	open(PASSWORD, ">$passwf");
	while (my $entry = $res->shift_entry) {
		  (my $uid = $entry->get_value('uid')) =~ s/:/./g;
		  (my $uidnum = $entry->get_value('uidNumber')) =~ s/:/./g;
		  (my $gidnum = $entry->get_value('gidNumber')) =~ s/:/./g;
		  (my $gecos = $entry->get_value('gecos')) =~ s/:/./g;
		  (my $homedir = $entry->get_value('homeDirectory')) =~ s/:/./g;
		  (my $shell = $entry->get_value('loginShell')) =~ s/:/./g;
		  (my $up = $entry->get_value('userPassword')) =~ s/:/./g;
		  if (index($up, "{crypt}") != -1) {
			  $up = substr($up, 7);
		  }else{
		  	  $up = crypt($up, "bR");
		  }
		  $passrecord = join(':',$uid,$up,$uidnum,$gidnum,$gecos,$homedir,$shell);
		  print PASSWORD "$passrecord\n";
	}
	close(PASSWORD);
	chmod(0600, $passwf);

	## PRINT GROUP FILE
	my $res = $ldap->search(
		base => $base,
		scope => 'sub', # entire tree
		timelimit => 600,
		filter => '(&(objectClass=posixGroup))',
		attrs => ['cn', 'gidNumber', 'memberuid'],

	);

	open(GROUP, ">$groupf");
	while (my $entry = $res->shift_entry) {
	(my $grname = $entry->get_value('cn')) =~ s/:/./g;
	my $grpass = "*";
	(my $grnum = $entry->get_value('gidNumber')) =~ s/:/./g;
	(@members = $entry->get_value('memberuid')) =~ s/:/./g;

	if($#members >= 0) {
		$memusers = join(',',@members);
	}else{
		$memusers = "";
	}

	$grprecord = join(':', $grname,$grpass,$grnum,$memusers);
	print GROUP "$grprecord\n";
  }
  close(GROUP);
  chmod(0600, $groupf);
Running the Code
Assuming you’re storing encrypted password strings in your NIS passwd map, this script, which I call dap2nis, should be configured using the variables near the top to bind as an account that has read access to the userPassword attribute for the user entries. Otherwise, you’ll get nothing back for that attribute, and your resulting NIS maps won’t be useful as authentication sources when they’re pushed out.
You can test the code by first making a test directory and making the script executable. Next, be sure to configure it to talk to your LDAP server using the config variables near the top of the script. Once that’s all done, running the program should produce passwd and group files in the test directory. These should be valid NIS maps, ready to be pushed out. However, before taking that step, you should run a diff against the current NIS maps to check for any anomalies that reflect errors in the map generation rather than simple changes that have occurred in LDAP but are not yet reflected in NIS. Here are a few commands from a hypothetical test session:
	# ./dap2nis
	# ypcat passwd > yppass.out
	# ypcat group > ypgrp.out
	# diff yppass.out passwd
	# diff ypgrp.out group
The only output you should see from the diff commands should be valid changes that have not yet been propagated to NIS. Once you’ve tested thoroughly, you can put the script in root’s crontab file, with an entry like this:
*/7 * * * * /var/adm/bin/dap2nis
This entry says to run the script every seven minutes, all the time, every day.
The only thing the dap2nis script does not do in its current incarnation is actually perform a cd var/yp/; make, which would normally push out the NIS maps. Depending on your environment, you may not want this in this particular script. Instead, you might put in another cron job that pushes out NIS maps every four minutes, which would allow for changes to be pushed out automatically to reflect changes that were made to maps not covered by this script. Creating a separate cron job to push out the NIS maps also ensures that if this script is ever retired or pulled out of production, your maps will still get pushed out in an automated fashion.
See Also
“Centralize Logins with LDAP” [Hack #6]
“Authenticate NFS-Lovers with NIS” [Hack #8]
“Clean Up NIS After Users Depart” [Hack #77]
[1] Deep Thought, the computer that determined that the meaning of life, the universe, and everything else is indeed 42, was at the top at the top of the Galactic Supercomputer Rankings for seven million years and may have run Linux.
Get Linux Server Hacks, Volume Two now with the O’Reilly learning platform.
O’Reilly members experience books, live events, courses curated by job role, and more from O’Reilly and nearly 200 top publishers.

