Use the GIMP to crop, scale, and otherwise edit your photos.
[Hack #6] discusses different ways under Linux to access the photos from a digital camera, but what tools do you use once the photos are on your computer? Sometimes you might be fine with a picture, but other times you may want to crop out something, resize the photo, or rotate it so it has the right orientation. While there are a number of programs that can do all these things—even some that run from the command line—the GIMP is the de facto standard when you want to edit images graphically. In this hack, I cover how to perform some of the common changes you might want to make to a photo or other image. The GIMP can do a number of pretty advanced things, but this hack sticks to the basics.
The first step is to install the GIMP. Installation is made easy by the fact that this is a very popular program that has been around for a long time. Any major Linux distribution should offer the GIMP in its packages, and some even install it by default, so check your application menu. If it isn’t installed, just use your standard packaging tool to install it.
To start the GIMP, select it from your desktop’s menu or,
alternatively, type gimp in a
terminal. The first time the GIMP runs, it goes through a basic
configuration wizard; the defaults should be suitable for most users.
The default interface might seem daunting at first if you aren’t
experienced with image editing tools, but for basic editing you only need to be
concerned with a few of the widgets you see. After the GIMP has loaded,
click File → Open and select the image you want to edit.
The GIMP will open the image into its own window and depending on the size of the image, the GIMP might scale down the image to fit on the screen. To zoom in, hit the + key on the keyboard or click the magnifying glass button on the toolbar and then click on the image. To zoom out, hit the–key or click the magnifying glass button, and then hold Ctrl when you click on the image.
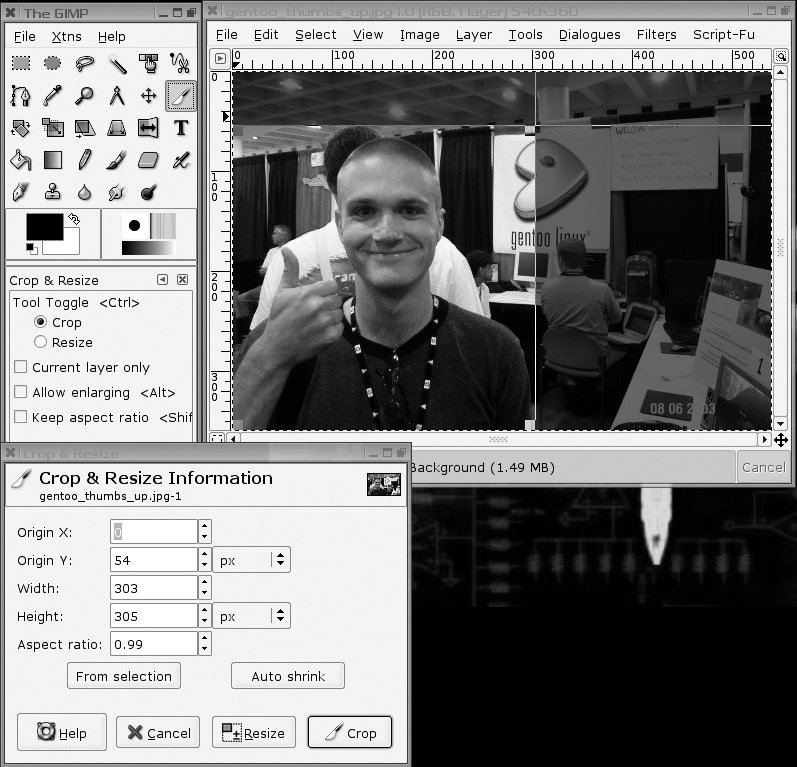
One common image-editing function is image cropping. Cropping lets you select the part of the image that you want to keep and removes everything else. This can be useful if a picture is a bit off-center, or if you want to focus on a particular subject in a photo. To crop an image, first click the crop tool on the toolbar (it’s the one with the knife icon), right-click on your image and select Tools → Transform Tools → Crop & Resize, or press Shift-C. Next move your mouse to the top corner of the area you want to crop; then click and drag the cursor down to the opposite corner. As you move the cursor, use the location of the cursor shown at the bottom left-hand corner of the window to gauge the cursor location. Use the Crop & Resize window that appears to fine-tune the coordinates (Figure 1-3). Then click the Crop button in the Crop & Resize window to complete the crop.
Tip
If you want to undo a change, just press Ctrl-Z or right-click on the image and select Edit → Undo.
When dealing with photos, another common need is to rotate them to the correct orientation. The GIMP can do this for you without any quality loss, provided the images are rotated 90, 180, or 270 degrees. To rotate a photo 90 degrees clockwise, right-click the image, and select Image → Transform → Rotate 90 degrees CW. The menu also provides options to rotate the image 90 degrees counterclockwise, 180 degrees, and even to flip the image horizontally or vertically.
You can also use the GIMP to scale images, so they are smaller or larger than normal. [Hack #3] covers creating thumbnails from the command line, but you can also use the GIMP to make thumbnails. To scale an image, right-click on the image and select Image → Scale Image. Enter the new dimensions in the Width and Height fields. Click the widget just to the right of the Width and Height fields to change the proportion of width to height. Then click the Scale button to finish the operation.
Get Linux Multimedia Hacks now with the O’Reilly learning platform.
O’Reilly members experience books, live events, courses curated by job role, and more from O’Reilly and nearly 200 top publishers.

