Install f-spot and get an iPhoto-like photo organization tool under Linux.
Digital cameras have become so cheap and ubiquitous that every moment is a picture opportunity because there is always a camera—or camera phone—within reach. And with the ever-declining cost of flash storage media, the expense of taking just one more picture is so close to free that it hardly counts. These days, even casual photographers have thousands of images they need to keep track of and, because the photos are digital, they need to keep track of them on their computer. f-spot is a tool that aims to bring ease of use and power to photo management in Linux. It has a tag-based system of classifying groups of photos, as well as an integrated timeline feature that lets the user manage large collections by the date the picture was taken. f-spot also features good “touch up” tools that allow you to resize, crop, adjust color, and rotate groups of photos quickly without having to resort to larger tools such as the GIMP. f-spot is currently maintained by Larry Ewing, who, coincidentally, designed Tux the Penguin.
f-spot is built on the Mono platform and, as such, requires the runtime to be installed. This is usually handled by your Linux distributor, but might require the installation of Mono and GTK# by the end user. You can find Mono and GTK# at http://www.go-mono.com. The latest source code to f-spot can be found at its homepage at http://www.gnome.org/projects/f-spot. f-spot is still relatively young, so updates are common. But even at its young age, f-spot already has some powerful features.
When you first launch f-spot, you are met by an import dialog box. From here you can choose a folder to import your pictures from. (You can also search recursively inside folders and assign tags to the pictures. I’ll go into tagging later.) After selecting the folder and clicking OK, f-spot begins importing your photos. The graphical thumbnails in the progress screen let you monitor your photos as they’re being imported. When importing is complete, your photos will be thumbnailed in the main f-spot window, ready to be managed.
f-spot starts out in Browse mode, which allows you to scroll through your pictures visually. At the top of the browse window is a timeline. Many digital cameras attach EXIF metadata to the photos they take. To view this data, click on a picture and press Ctrl-I. Some of this data (such as when the date the photo was taken) is extremely useful for organizing photos. f-spot parses this information and allows you to browse your collection by date. Click on the box in the timeline and drag it to different points in the timeline. When you release the box, the focus switches to the first picture taken on that date, and the thumbnail “throbs” just a little to get your attention.
To view a picture in fullscreen mode, click on it to select it, and then click on the fullscreen button on the toolbar. A slideshow view is also available on the toolbar.
Some of the newer, more expensive cameras keep track of their orientation and adjust automatically, but those of us with older, cheaper cameras still need to manually rotate our pictures so they look right. Click on a picture, and then click on Rotate Left or Rotate Right to correct the picture’s orientation. To select multiple pictures hold down Ctrl while clicking. This allows you to select a group of pictures and rotate them all at once.
Double clicking on a photo puts f-spot into edit mode; this is useful for cropping pictures or applying other touch-ups. In this mode you can press Ctrl-M to zoom in, and Ctrl-Shift-M to zoom out. Scrolling the mouse wheel up or down also zooms in and out, respectively. When you’re in this mode, a new toolbar appears on the bottom. From this toolbar you’ll be able to do more advanced editing such as cropping, red-eye reduction, and color adjustment. The dropdown list is used in conjunction with the crop tool. Clicking and dragging on the image draws a box on the image. This is how you’ll measure a crop. Once you’ve drawn a box around the area you want to crop, click on the crop icon. This crops the image according to the box you just drew. The dropdown list has a selection of pre-made crop adjustments—for example 8 x 10. Selecting 8 x 10 in this dropdown list will restrict your crop to that ratio. This allows you, for example, to edit an entire batch of shots to be 8 x 10 portraits.
Before you go too crazy with the crop tool, you should familiarize yourself with f-spot’s undo function. f-spot doesn’t have an “undo” function like typical programs; instead it keeps track of each version of a photo you edit and allows you to select which version to view. This information is available at the bottom of the sidebar. Since f-spot keeps track of the versions of the photo, if you are overzealous with the crop tool, you can always click back to the original and start again. f-spot is also smart enough to put this modified version as a separate file on disk so that modifications you make won’t affect the original.
f-spot also has some rudimentary red-eye correction. You can select the “red area” via the selection tool, but instead of using the crop button, click on the red eye button and f-spot will correct the picture the best it can. For best results, select each eye separately, because applying this effect to a large area can have unintended results.
The last editing button in the bottom toolbar is the color adjustment, which enables you to edit the exposure and color temperature of the photo. At the bottom right in this mode are also left and right arrows that allow you to move throughout your collection to do mass cropping without having to switch back to browse mode.
Small touchups are easy in f-spot, but the real killer feature is the tag functionality. f-spot comes out of the box with some individual pre-made tags, such as Favorites, and some tag categories, such as People, Places, and Events. You can assign any number of tags to any of your photos, as well as make your own tags and tag categories (see Figure 1-2).
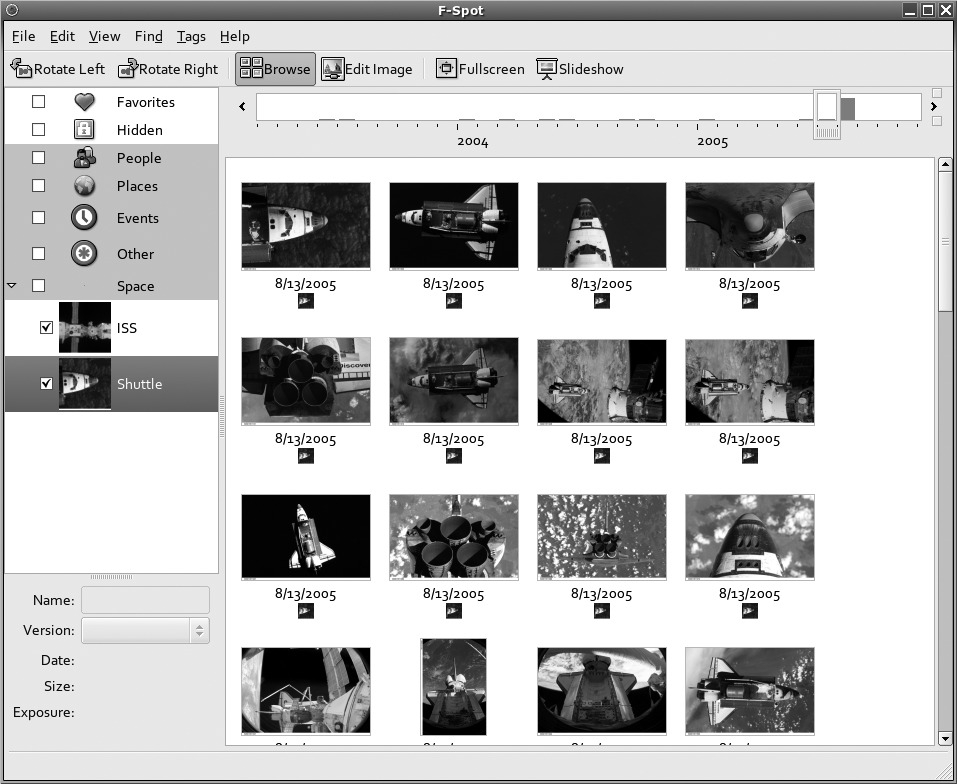
Tagging photos is easy. Select the photo you want to tag and then drag it to proper tag and drop. Ctrl-click on multiple pictures to select more than one, and then drag and drop them onto tags. You can also drag and drop the tag onto a group of pictures or right-click on an individual picture and select the tag via the context menu. Right-clicking on a blank area in the sidebar will give you an opportunity to create your own tags and categories. Checking the box next to a tag or tag group will make f-spot show only pictures tagged with those tags.
So why use tags? They allow you to group your pictures in whatever kind of album you want. For example, I can tag a set of pictures as Beagles, a tag in the category of Dogs. I can then classify my other dog pictures according to breeds. A picture of a beagle can be tagged as both Dogs and as Beagles, whereas a picture of a boxer would be tagged Dogs and Boxers. To view all my pictures of dogs, I check just the box next to the category Dogs; to view pictures of only beagles, I check only the Beagles tag. Of course, making a bunch of tags can create clutter, which is why f-spot automatically thumbnails your tags in the sidebar with a picture from its group, allowing you to visually browse your tags. When you first import your pictures into f-spot, you have the option of tagging a set of photos. This allows you to mass tag a bunch of photos that you might want classified under one event or place.
Tags are extremely flexible and are limited only by the resourcefulness of the user. When combined with the timeline feature, tags allow you to view your groups of pictures in entirely new ways—for example “pictures of our beagle that were taken in 2005.” Tags become even more useful as your photo collection grows.
Now that you’ve categorized and meticulously tagged your photos, it’s time to share them with the world. f-spot’s export capabilities make this very easy. First, select a set of pictures to export. Tags help in the selection, as you can just click on the tag for the album you want to see and then individually select the pictures from there. In the File menu you’ll notice an entry for Send Mail. This will launch your mail client and automatically attach the selected pictures to an email message. Although this is sufficient for one or two pictures, it doesn’t scale very well.
In the File menu, under export, you’ll notice options to export to Flickr, VFS, Web Gallery, Original, and CD. The simplest is CD. This allows you to burn any group of selected pictures right to CD-R/RW from within f-spot. When the CD-burning option is selected, a dialog pops up showing you which pictures will be burnt onto CD. Click OK to launch your CD-burning tool.
f-spot also has support for the popular flickr (http://www.flickr.com) photo hosting service. Select flickr and fill in your flickr account information to export your photos directly into your flickr account. There is also an option for exporting the tags and categories from f-spot right into flickr, which means that your collection will retain its classification. The Web Gallery option is similar to the flickr export, except it allows you to export to the popular Gallery software that is common on the Web [Hack #100] . Both the flickr and Web Gallery options allow for resizing your photos before upload if you have bandwidth limitations. flickr exports your selected pictures into a static HTML album, suitable for uploading to any web host.
Get Linux Multimedia Hacks now with the O’Reilly learning platform.
O’Reilly members experience books, live events, courses curated by job role, and more from O’Reilly and nearly 200 top publishers.

