Chapter 4. File Management
The previous chapter introduced the Unix filesystem, including an extensive discussion of the directory structure, the ls command for seeing what files are on your system, and how to move around using cd and pwd. This chapter focuses on Unix filenaming schemes—which aren’t the same as names you’d see in the Finder, as you’ll see—and how to view, edit, rename, copy, and move files.
File and Directory Names
As Chapter 3 explained, both files and directories are identified by their names. A directory is really just a special kind of file, so the rules for naming directories are the same as the rules for naming files.
Filenames may contain any character except /, which is reserved as the separator between files and directories in a pathname. Filenames are usually made of upper- and lowercase letters, numbers, dots (.), and underscores (_). Other characters (including spaces) are legal in a filename, but they can be hard to use because the shell gives them special meanings or otherwise forces you to constantly be changing how you work with these filenames on the command line.
Spaces are a standard part of Macintosh file and folder names, so while I recommend using only letters, numbers, dots, and underscores for filenames, the reality is that you have to work with spaces in file and directory names, because that’s what Mac people do. Rather than naming a file myFile.txt as a Unix person would, most Mac folks are used to adding spaces to filenames, such as my file.txt. The Finder, by contrast, dislikes colons (which older versions of Mac OS used as a directory separator, just as Unix uses the forward slash). If you display a file called test:me in the Finder, the name is shown as test/me instead. (The reverse is also true: if you create a file in the Finder whose name contains a slash, it will appear as a colon in the Terminal.)
Tip
Though it’s tempting to include spaces in filenames as you do in the Finder, if you’re planning on doing any substantial amount of work on the Unix side, get used to using dashes or underscores in place of spaces in your filenames. It’s 99 percent as legible, but considerably easier to work with.
Further, in the interest of having files correctly identified in both the Finder and Unix, you’d be wise to get into the habit of using the appropriate file extensions, too (i.e., .doc for Microsoft Word documents, .txt for text files, .xls for Excel spreadsheets, and so on). As an added bonus, this makes life easier for your less-fortunate (Windows-using) friends when you send them files.
If you have a file with a space in its name, that space confuses the shell if you enter it as part of the filename. That’s because the shell breaks commands into separate words with spaces as delimiters, just as we do in English. To tell the shell not to break an argument at spaces, either put quotation marks around the filename that includes spaces (for example, "my file.txt"), or preface each space with a backslash (\).
For example, the rm program, covered later in this chapter, removes Unix files. To remove a file named a confusing name, the first rm command in the following snippet doesn’t work, but the second does. Also note that you can escape spaces (that is, avoid having the shell interpret them inappropriately) by placing a backslash character before the space, as shown in the third example:
$ls -ltotal 2 -rw-r--r-- 1 taylor staff 324 Feb 4 23:07 a confusing name -rw-r--r-- 1 taylor staff 64 Feb 4 23:07 another odd name $rm a confusing namerm: a: no such file or directory rm: confusing: no such file or directory rm: name: no such file or directory $rm "a confusing name"$rm another\ odd\ name$
You also need to escape any of the following characters with a backslash (\), because they have special meaning to the shell:
* # ` " ' \ $ | & ? ; ~ ( ) < > ! ^
Open a Terminal window and change directories to your Library directory. You’ll see files that contain spaces, though the other punctuation characters are more unusual components of filenames:
$cd Library$lsApplication Support Documentation Keychains Snapz Pro X Assistants Favorites Logs Sounds Audio FontCollections Mail Syndication Autosave Information Fonts Metadata iMovie Caches Icons Preferences iTunes Classic Indexes Printers ColorPickers Internet Plug-Ins Recent Servers Cookies Keyboard Layouts Safari $cd App<TAB>$cd Application\ Support/$
The last example shows a useful trick: hitting the Tab key after entering a few characters of the filename invokes the shell’s file completion feature. When you hit the Tab key, the shell automatically includes the backslash required to escape any spaces in file or directory names.
One place where you can find all sorts of peculiar filenames is within your iTunes library, because iTunes uses the song title as the filename for the corresponding MP3- or ACC-encoded file. Here are a few examples of filenames from my own library that would be incredibly difficult to work with on the command line:
The Beatles/Sgt. Pepper's /Being For The Benefit of Mr. Kite!.mp3
The Art of Noise/In No Sense? Nonsense!/How Rapid?.mp3
Joe Jackson/Look Sharp!/(Do The) Instant Mash.mp3
True Unix diehards are undoubtedly cringing at those filenames, which include specific wildcard characters and other elements that are important to the shell, all of which would have to be escaped. For example, you see how those filenames look now, just imagine them like this:
The\ Beatles/Sgt\.\ Pepper\'s\ /Being\ For\ The\ Benefit\ of\ Mr\.\ Kite\!\.mp3
The\ Art\ of\ Noise/In\ No\ Sense\?\ Nonsense\!/How\ Rapid\?\.mp3
Joe\ Jackson/Look\ Sharp\!/\(Do\ The\)\ Instant\ Mash\.mp3
Not pretty.
One more thing: a filename must be unique inside its directory, but other directories can have files with the same name. For example, you may have files called chap1.doc and chap2.doc in the directory /Users/carol/Documents and also have different files with the same names in /Users/carol/Desktop.
This often causes great confusion for people who are used to just having all their files on their Desktop or in the topmost level of the Documents directory. In that situation, an attempt to save a file as chap1.doc would just generate a warning that the file already exists, but if you create different directories for different projects, it’s quite feasible that you’ll end up with a dozen or more files with the exact same name.
File and Directory Wildcards
When you have a number of files named in series (for example, chap1.doc to chap12.doc) or filenames with common characters (such as aegis, aeon, and aerie), you can use wildcards to save yourself lots of typing and match multiple files at the same time. These special characters are the asterisk (*), question mark (?), and square brackets ([ ]). When used in a file or directory name given as an argument on a command line, the characteristics detailed in Table 4-1 are true.
|
Notation |
Definition |
|
|
An asterisk stands for any number of characters in a filename. For example, ae* matches any filename that begins with “ae” (such as aegis, aerie, aeon, etc.) if those files are in the same directory. You can use this to save typing for a single filename (for example, al* for alphabet.txt) or to choose many files at once (as in ae*). A * by itself matches all file and subdirectory names in a directory, with the exception of any starting with a period. To match all your dot files, try .??*. |
|
|
A question mark stands for any single character (so h?p matches hop and hip, but not hp or help). |
|
|
Square brackets can surround a choice of single characters (i.e., one digit or one letter) you’d like to match. For example, [Cc]hapter would match either Chapter or chapter, but chap[12] would match chap1 or chap2. Use a hyphen (-) to separate a range of consecutive characters. For example, chap[1-3] matches chap1, chap2, or chap3. |
|
|
A list of two or more subpatterns that are matched consecutively. The pattern a{b,c,d}e would match abe, ace, and ade, but not aee because the middle e isn’t inside the curly braces. This is most commonly used to reference multiple files within a subdirectory, as in Mail/{drafts,inbox} which is functionally identical to typing both Mail/drafts and Mail/inbox. |
The following examples show how to use wildcards. The first command lists all the entries in a directory, and the rest use wildcards to list just some of the entries. The second-to-last one is a little tricky; it matches files whose names contain two (or more) a’s.
$lschap0.txt chap2.txt chap5.txt cold.txt chap1a.old.txt chap3.old.txt chap6.txt haha.txt chap1b.txt chap4.txt chap7.txt oldjunk $ls chap?.txtchap0.txt chap4.txt chap6.txt chap2.txt chap5.txt chap7.txt $ls chap[3-7]*chat3.old.txt chap4.txt chap5.txt chap6.txt chap7.txt $ls chap??.txtchap1b.txt $ls *old*chap1a.old.txt chap3.old.txt cold.txt oldjunk $ls *a*a*chap1a.old.txt haha.txt $ls chap{3,6}.txtchap3.txt chap6.txt $
Wildcards are useful for more than listing files. Most Unix programs accept more than one filename, and you can use wildcards to name multiple files on the command line. For example, both the cat and less programs display files on the screen. cat streams a file’s contents until end of file, while less shows the file one screen at a time. By screen, I’m referring to what the less command actually shows inside the Terminal window. (This term stems from the early days of Unix when you didn’t have any windows and had only one screen.) Let’s say you want to display files chap3.old.txt and chap1a.old.txt. Instead of specifying these files individually, you could enter the command as:
$ less *.old.txtWhich is equivalent to:
$ less chap1a.old.txt chap3.old.txtWildcards match directory names, too. You can use them anywhere in a pathname—absolute or relative—though you still need to remember to separate directory levels with forward slashes (/). For example, let’s say you have subdirectories named Jan, Feb, Mar, and so on. Each has a file named summary. You could read all the summary files by typing less */summary. That’s almost equivalent to less Jan/summary Feb/summary. However, there’s one important difference when you use less */summary: the names will be alphabetized, so Apr/summary would be first in the list, not January.
This can also be useful if you’ve got lots of files to match. A classic example of where the shell is way more powerful than the Finder is when it comes to moving a subset of files in a directory that match a specific pattern. If all the JPEG image files in a directory should be moved to a new subdirectory called JPEG Images, while the TIFF and PNG format images should remain in the current directory, the fast command-line solution is:
$ mv *.{jpg,JPG} JPEG\ ImagesVersus a tedious one-by-one selection process in the Finder!
Looking Inside Files
By now, you’re probably tired of looking at files from the outside. It’s like visiting a bookstore and never getting to open the book and read what’s inside. Fortunately, it doesn’t have to be this way, so let’s look at three different programs for looking inside text files.
Tip
Why the caveat “text files” rather than “all files”? Because since Unix treats everything as a file, it’ll let you “look at” image data, executable programs, even the actual bits of the directory structure itself. None of those are useful, and while there’s a program called strings that helps you snoop around in these datafiles, it’s not at all commonly used in the world of Mac OS X and Terminal.
cat
The most rudimentary of the programs that let you look inside a file is called cat, not for any sort of feline, but because that’s short for concatenate, a fancy word for “put a bunch of stuff together.” The cat command is useful for peeking at short files, but because it doesn’t care how long the file is or how big your Terminal window is set, using cat to view a long file results in the top lines scrolling right off before you can even read them.
At its most basic form, you list one or more files, and cat displays their contents to the screen:
$cd /etc$cat notify.conf# # Notification Center configuration file # reserve com.apple.system. 0 0 rwr-r- monitor com.apple.system.timezone /etc/localtime $
In this case, I’ve moved to the /etc administrative directory and used cat to display the contents of the notify.conf configuration file.
Using a wildcard pattern (shown earlier), I can look at a couple of different configuration files with a single invocation of cat:
$ cat {notify,ntp,xinetd}.conf
#
# Notification Center configuration file
#

reserve com.apple.system. 0 0 rwr-r-
monitor com.apple.system.timezone /etc/localtime
server time.apple.com minpoll 12 maxpoll 17
# man xinetd.conf for more information

defaults
{
        instances               = 60
        log_type                = SYSLOG daemon
        log_on_success          = HOST PID
        log_on_failure          = HOST
        cps                     = 25 30
}

includedir /etc/xinetd.d
$
One serious drawback with using cat to view more than one file in this manner should be obvious: there’s no indication of where one file ends and the next begins. The listing above is actually three different files all just dumped to the screen.
There are a couple of useful options for the cat command, most notably -n to add line numbers and -v, which ensures that everything displayed is printable (though not necessarily readable).
The split between files is more obvious when the -n option adds line numbers to the output, for example:
$ cat -n {notify,ntp,xinetd}.conf
     1  #
     2  # Notification Center configuration file
     3  #
     4
     5  reserve com.apple.system. 0 0 rwr-r-
     6  monitor com.apple.system.timezone /etc/localtime
     1  server time.apple.com minpoll 12 maxpoll 17
     1  # man xinetd.conf for more information
     2
     3  defaults
     4  {
     5          instances               = 60
     6          log_type                = SYSLOG daemon
     7          log_on_success          = HOST PID
     8          log_on_failure          = HOST
     9          cps                     = 25 30
    10  }
    11
    12  includedir /etc/xinetd.d
Here, you can see that the line numbers for each file are printed to the left of the file’s contents. So, to find out where a file begins, just look for the number 1, as that’s the first line of a file. This output shows us that notify.conf is six lines long, ntp.conf only has one line, and xinetd.conf is 12 lines long.
less
If you want to “read” a long plain-text file in a Terminal window, you can use the less command to display one “page” (a Terminal window filled from top to bottom) of text at a time.
If you don’t like less, you can use a program named more. In fact, the name less is a play on the name of more, which came first (but less has more features than more). Here’s a Mac OS X secret, though: more is less. Really. The more utility is actually the very same program—just with a different name—which gives it a different default behavior. The ls command shows the truth:
$ ls -l /usr/bin/more /usr/bin/less
-rwxr-xr-x   2 root  wheel  119128 Dec  2 16:26 /usr/bin/less
-rwxr-xr-x   2 root  wheel  119128 Dec  2 16:26 /usr/bin/more
Rather than get confused between the two, I’ll just stick with less. The syntax for less is:
less options filesless lets you move forward or backward in the files that you’re viewing by any number of pages or lines; you can also move back and forth between two or more files specified on the command line. When you invoke less, the first “page” of the file appears. A prompt appears at the bottom of the Terminal window, as in the following example:
$ less ch03
A file is the unit of storage in Unix, as in most other systems.
A file can hold anything: text (a report you're writing,
 .
 .
 .
:
The basic less prompt is a colon (:); although, for the first screen, less displays the file’s name as a prompt. The cursor sits to the right of this prompt as a signal for you to enter a less command to tell less what to do. To quit, type q.
Like almost everything about less, the prompt can be customized. For example, using the -M starting flag on the less command line makes the prompt show the filename and your position in the file (as a percentage) at the end of each page.
Tip
If you want this to happen every time you use less, you can set the LESS environment variable to M (without a dash) in your shell setup file. See Chapter 2 for details.
You can set or unset most options temporarily from the less prompt. For instance, if you have the short less prompt (a colon), you can enter -M while less is running. less responds Long prompt (press Return), and for the rest of the session, less prompts with the filename, line number, and percentage of the file viewed.
To display the less commands and options available on your system, press h
(for “help”) while less is running. Table 4-2 lists some simple (but quite useful) commands.
|
Command |
Description |
Command |
Description |
|
Spacebar |
Display next page |
v |
Starts the vi editor |
|
Return |
Display next line |
Control-L |
Redisplay current page |
|
|
Move forward n lines |
h |
Help |
|
b |
Move backward one page |
:n |
Go to next file on command line |
|
|
Move backward n lines |
:p |
Go back to previous file on command line |
|
|
Search forward for |
q |
Quit less |
|
|
Search backward for |
I quite commonly use the /
word search notation, for instance, when using the man command, which uses less behind the scenes to display information one page at a time. For example, instead of flipping through bash’s manpage for information on file completion, typing /file completion at the colon prompt while reading the bash manpage lets you skip straight to what you seek. Gone too far? Use b
to go back to the previous page.
grep
Instead of having the entire contents of the file dumped to your screen or having to step through a file one line at a time, you will undoubtedly find it useful to be able to search for specific patterns within a file or set of files. This is done with the oddly named grep command.
Tip
grep gains its name from an old line-editor command, global/regular expression/print, which was used to list only the lines in the file being edited that matched a specified pattern. With the name g/re/p, it wasn’t much of a stretch to end up with grep, and the programmer who created the command actually imagined it’d be mnemonic for his user community. Imagine!
grep uses a different pattern language than the filename patterns shown earlier in this chapter; it uses a more sophisticated pattern language, called regular expressions . Regular expressions are discussed in the next chapter, but for now, let’s just use grep to find word fragments or specific words in a set of files.
Since we’re already in the /etc directory, let’s look to see if there’s any mention of firewalls by using grep:
$ grep firewall *conf
named.conf:      * If there is a firewall between you and nameservers you want
Within the set of configuration files, there was one match, as shown. In the output, the matching filename is shown, followed by a colon, followed by the actual matching line in the file.
You can search a lot more than just the configuration files, however, by changing the filename pattern. If you broaden this search, you’ll inevitably have error messages about grep trying to search directory entries rather than files, “operation not permitted” errors. To sidestep this problem, grep’s -s option causes it to be quieter in its operation:
$ grep -s firewall *
grep: master.passwd: Permission denied
named.conf:      * If there is a firewall between you and nameservers you want
named.conf.applesaved:   * If there is a firewall between you and nameservers you want
named.conf.applesaved2:  * If there is a firewall between you and nameservers you want
rc:if [ -f /Library/Preferences/com.apple.sharing.firewall.plist ]; then
services:csccfirewall    40843/udp    # CSCCFIREWALL
services:csccfirewall    40843/tcp    # CSCCFIREWALL
We’ll look at grep in much greater detail in Chapter 5.
Creating and Editing Files
There are lots of ways to create and edit files when you’re working on a Macintosh. You can use TextEdit, BBEdit, Microsoft Word, and any number of other applications within the Aqua graphical environment. If you’d like to stick to the command line, it turns out that there are a bunch of text-only, Terminal-friendly editors included with Mac OS X.
Chief among these options is an editor called vi that can be a bit tricky to learn but is powerful, fast, and available on a wide range of Unix and Linux systems, too. And because vi is so powerful, that’s what we’ll focus on in this section.
Text Editors and Word Processors
A text editor lets you add, change, and rearrange text easily. Three popular Unix editors included with Mac OS X are vi (pronounced “vee-eye”), Pico, (“pea-co”), and Emacs (“e-max”; no relation to Apple’s eMac, either). By contrast, a word processor has all sorts of fancy layout and presentation capabilities, typically built around a “what you see is what you get” (WYSIWYG, or “wizzy-wig”) model similar to Microsoft Word. They work great for lots of things but are useless for creating files within the Terminal.
You should choose an editor you’re comfortable with. vi is probably the best choice, because all Unix systems have it, but Emacs is also widely available and seems to be preferred by developers because of the features it offers. If you’ll be doing simple editing, though, Pico is a great choice. Although Pico is much less powerful than vi or Emacs, it’s a lot easier to learn. For this book, however, I’ll focus on the rudiments of vi since it’s the most widely available Unix editor, and there’s a terrific version included with Mac OS X called vim.
None of these plain-text editors has the same features as popular word-processing software, but vi and Emacs are sophisticated, extremely flexible editors for all kinds of plain-text files: programs, email messages, and so on. By “plain text,” I mean a file with only letters, numbers, and punctuation characters, and no formatting such as point size, bold and italics, or embedded images. Unix systems use plain-text files in many places: in redirected input and output of Unix programs (see Chapter 6), as shell setup files (see Chapter 2), for shell scripts (see Chapter 11), for system configuration, and more.
Tip
Of course, you can opt to use a graphical text editor such as BBEdit (http://www.barebones.com) or TextEdit (/Applications) with good results, too, if you’d rather just sidestep editing while within the Terminal application. If you do, try using the open command within the Terminal to launch the TextEdit with the proper file already loaded. For example, the following command opens the specified file in TextEdit:
open -e myfile.txt
It’s critical that you select Format → Make Plain Text (Shift-⌘-T) within TextEdit to ensure that no extraneous formatting characters or information is included in the text file.
Text editors edit these plain-text files. When you use a word processor, though, the screen may look as if the file is only plain text, but the file inevitably has some hidden codes, too. That’s often true even if you tell the word processor to “Save as plain text.”
Tip
One easy way to check for nontext characters in a file is by reading the file with less; look for characters in reversed colors, codes such as <36>, and so on.
If you need to do word processing—making documents, envelopes, and so on—your best bet is to work with a program designed for that purpose. While TextEdit is surprisingly powerful (it can read and write Word files), you might want to opt for something more powerful, such as Pages (which comes with Apple’s iWork, http://www.apple.com/iwork); Microsoft Office; or NeoOffice/J (http://www.neooffice.org), an open source suite of applications similar to Microsoft Office.
The vi Text Editor
The vi editor, originally written by Bill Joy at the University of California, Berkeley, is easy to use once you master the fundamental concept of a modal editor . Mac OS X actually includes a version of vi called vim that has many useful new features. In this section, we cover vi’s basic commands, but if you become a vi master, you’ll enjoy vim’s powerful extensions.
Tip
To learn more about vi, I’d recommend picking up a copy of Learning the vi Editor , by Linda Lamb and Arnold Robbins (O’Reilly) or the vi Editor Pocket Reference , by Arnold Robbins (O’Reilly). These books are packed with useful information about vi, and the Learning book includes a handy quick-reference card of commands you can use with vi. Though focused on vi, they offer extensive information about vim as well, and will get you up to speed in no time. Or, if you have a Safari account (http://safari.oreilly.com), you can read the books online.
Before we talk about all the useful additions, however, let’s talk about modality. Modes can be best explained by thinking about your car stereo. When you have a CD in, the “1” button does one task, but if you are listening to the radio, the very same button does something else (perhaps jump to preprogrammed station number 1). The vi editor is exactly the same: in Command mode, pressing the i key on the keyboard switches you into Insert mode, but in Insert mode, the very same keystroke inserts an “i” into the text itself. The handiest key on your keyboard while you’re learning vi is unquestionably the Escape key (Esc), located at the upper-left corner of your keyboard. If you’re in Insert mode, Esc switches you back to Command mode, and if you’re in Command mode, it’ll beep to let you know that all is well. Use Esc often, until you’re completely comfortable keeping track of what mode you’re in.
Tip
Jump start your learning by using Mac OS X’s included vimtutor: just type in vimtutor on the command line for a guided tour of the vi editor.
Start vi by typing its name; the argument is the filename you want to create or edit. For instance, to edit your shell’s .profile setup file, you would cd to your home directory and enter:
$ vi .profileThe Terminal fills with a copy of the file (and, because the file is short, some blank lines, too, as denoted by the ~ at the beginning of the line), as shown in Figure 4-1.
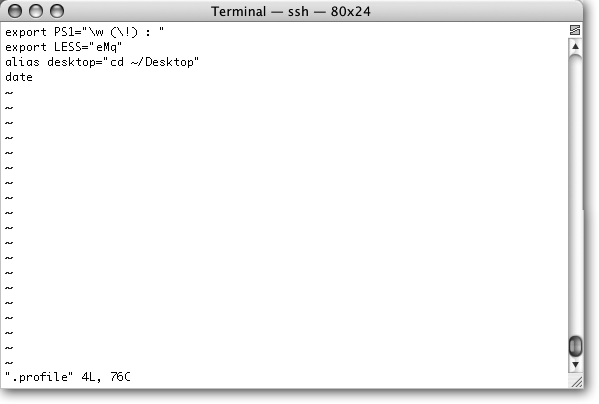
The bottom row of the window is the status line, which indicates what file you’re editing: ".profile" 4L, 76C. This indicates that the file has four lines (4L) with a total of 76 characters (76C). Quit the program by typing :q and pressing Return while in Command mode.
vi Basics
Let’s take a tour through vi. In this example, you’ll create a new text file. You can call the file anything you want, but it’s best to use only letters and numbers in the filename. For instance, to make a file named sample, enter the following command:
$ vi sampleNow, let’s start the tour....
Your screen should look something like Figure 4-1, but the cursor should be on the top line and the rest of the lines will have the tilde character (~) to denote that the line is blank. The bottom status line indicates the following:
"sample" [New File]
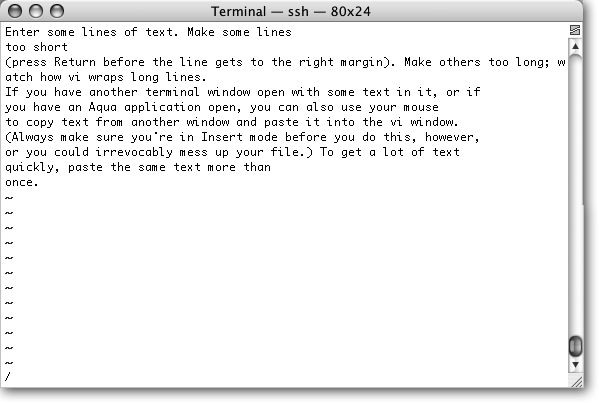
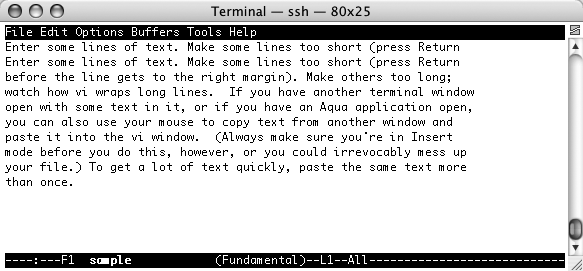
To start entering text in the file, press i to switch from Command mode to Insert mode. Now type something. Make some lines too short (press Return before the line gets to the right margin). Make others too long; watch how vi wraps long lines. If you have another Terminal window open with some text in it, or if you have an application like Word or TextEdit open, you can use your mouse to copy text from another window and paste it into the Terminal window where you’re working with vi. (Always make sure you’re in Insert mode before you do this, however, or you could irrevocably mess up your file.) To get a lot of text quickly, paste the same text more than once.
Figure 4-2 shows how the sample file looks after I copied and pasted the previous paragraph into vi’s buffer.
To move the cursor around in the file, you’ll need to leave Insert mode by pressing Esc once. Press it again and you’ll hear a beep, reminding you that you are already in Command mode.
Tip
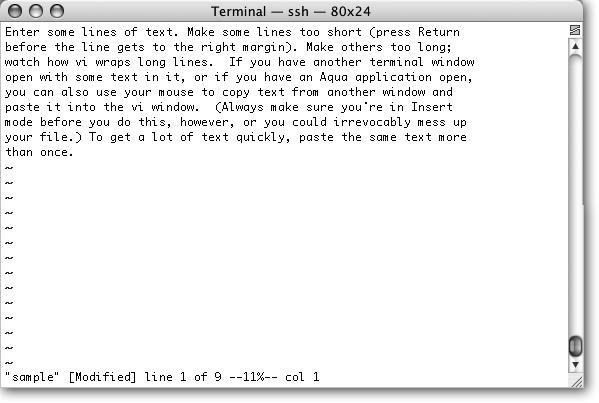
Tip: In Command mode, press Control-G to produce a useful status line that shows the filename, number of lines, and where the cursor is relative to the file buffer, as shown at the very bottom of Figure 4-2.
You can use the arrow keys on your keyboard to move around the file, but most vi users have taught themselves to move around with the h, j, k, and l motion keys (left, down, up, and right, respectively). They may seem unintuitive, but not having to move your hand off the main keyboard area can produce a dramatic increase in editing speed as you get more used to them.
Tip
You can also use the up, down, left, and right arrow keys on your keyboard to move vi’s cursor. Sometimes this is easier to remember than h (left arrow), l (right arrow), k (up arrow), and j (down arrow).
Unless you have enabled “Option click to position cursor” in Terminal’s preferences (see Chapter 2), vi ignores your mouse if you try to use it to move the cursor.
If you’ve entered a lot of text, you can experiment with some additional movement commands: H to jump to the first line on the screen, G to jump to the very last line of the file. You should also try the w and b commands, to move forward and backward one word at a time (for example, to move forward three words, press the w key three times), and 0 (zero) jumps to the beginning of the line, while $ jumps to the end.
Searching in vi
While vi is proving to be a worthy text editor, you’re probably thinking that it’s lacking one feature that many graphical text editors have: the ability to use ⌘-F to search through the file for some text. Ah, but don’t get too far ahead. You can search for text strings in vi; it’s just a little different. vi’s search command is accessed by typing a forward slash (/) while in Command mode, followed by the desired pattern you want to search for. It’s handy even on a short file, where it can be quicker to type / and a word than it is to use the cursor-moving commands. For example, if you wanted to search through a text file for the word “cheese,” you would first press the Esc key twice (just to make sure you’re out of Insert mode and in Command mode) and then type:
/cheese
You’ll see this string appear at the bottom of your Terminal window. When you hit Return, vi searches through the file for the word “cheese,” and if it finds it, vi places the cursor at the beginning of the word. After the search finishes, you can press the n key to repeat the search. If vi finds another occurrence of that word, it moves the cursor to that word.
Invoking external Unix commands
One fabulous feature of vi is that it’s easy to invoke Unix commands and have their output included in the file you’re editing. That said, vi also makes it easy to send some of the text in its buffer to a Unix command, ultimately replacing that text with the output of the command. Sound confusing? It’s really not so bad.
For example, to include the current date in your file, type o in Command mode to open up a blank line immediately below the line that the cursor is sitting on, hit the Esc key to get out of Insert mode, and then enter !!date. As you type this, the cursor drops to the bottom of the screen and shows :.!date there. Press Return, and the blank line is replaced by the output from the date command.
Now justify a paragraph of text by feeding it to the external Unix fmt command. To do this, make sure you’re in Command mode (hit Esc just to be safe), then use the arrow keys to move the cursor to the beginning of the paragraph and type !}fmt. (vi’s status line won’t change until you press the } character.) Now the paragraph’s lines should flow and fit neatly between the margins. Figure 4-3 shows what happened when I moved to the top of the file (using the H command) then typed in !}fmt to reflow the text in the document.
More powerful capabilities
Text can be deleted by using x to delete the character that’s under the cursor, or the powerful d command:
-
dd Deletes lines
-
dw Deletes individual words
-
d$ Deletes to the end of the line
-
d0 Deletes to the beginning of the line
-
dG Deletes to the end of the file (if you’re seeing a pattern and thinking that it’s
d +motion key, you’re absolutely correct)
To undo the deletion, press u.
You can also paste the deleted text with the p command, though truth be told, the copy and paste capability within vim is far weaker and more confusing than Mac OS X’s standard Copy (⌘-C) and Paste (⌘-V) capabilities.
The first step to copying text
is to position your cursor at the beginning of the word or line (or series of lines) you want to copy. In vi, you don’t copy, you “yank” the text. The yw command copies (“yanks”) one word, yy yanks the line, yy
n yanks n lines (for example, yy5 yanks five lines), y1 yanks a single character, and y
n
w yanks n words (y5w yanks five words, for example). Move the cursor to the line you want to copy and press yy. After repositioning your cursor to where you’d like the text copied, press p to paste the text.
Tip
Yank does not cut the text, it only copies it to vi’s paste buffer. If you want to move the text, you’ll have to go back to the lines you’ve yanked (copied) and delete them.
As with any text editor, it’s a good idea to save your work from vi every 5 or 10 minutes. That way, if something goes wrong on the computer or network, you’ll be able to recover the edited buffer from the last time you saved it.
If the editor, Terminal, or the computer does crash, you can recover the saved temporary edit buffer by using the -r option when you next launch the program. If there is a file that can be recovered, vi shows specific information about it:
$ vi -r
Swap files found:
   In current directory:
1.    .sample.swp
          owned by: taylor   dated: Mon Jun  6 23:06:23 2005
         file name: ~taylor/sample
          modified: YES
         user name: taylor   host name: Tiger.local
        process ID: 8085
   In directory ~/tmp:
      -- none --
   In directory /var/tmp:
      -- none --
   In directory /tmp:
      -- none --
$
To recover this file, just type vi -r sample
and you’ll move into the vi editor with the recovered version of the file.
In vi, to save your work to disk, you use the write command by typing :w followed by Return. The bottom of the display shows the filename saved and the number of lines and characters in the file.
For some reason, saving the edited file sometimes confuses vi beginners. It’s really very simple: if you want to save the file with the same name it had when you started, just press :w and Return. That’s all! If you’d rather use a different filename, type :w followed by the new filename. For example, :w new.sample. Press Return and it’s saved.
Finally, if you try to exit with the usual :q command and the program beeps, warning you that the modified file has not been saved. If you want to override the warning and discard the changes that you’ve made since the last time the file was saved, type :q!. If you want to save the changes and don’t need to rename the output file, you can use a shortcut: :wq writes out your changes and quits vi. In fact, there’s a shortcut for that shortcut, too. Type ZZ and you’ll write and quit if the file’s been modified, or just quit without disturbing the file if it hasn’t been changed. That’s it!
There’s a lot more you can learn about. In Table 4-3, you’ll find a handy listing of some of the most common vi commands and their descriptions.
|
Command |
Meaning |
|
|
Search forward for specified pattern. Repeat search with |
|
:q |
Quit the edit session. |
|
:q! |
Quit, discarding any changes. |
|
:w |
Write (save) any changes out to the file. |
|
:wq or ZZ |
Write out any changes, then quit (shortcut). |
|
a |
Move into Append mode (like Insert mode, but you enter information after the cursor, not before). |
|
b |
Move backward one word. |
|
w |
Move forward one word. |
|
d1G |
Delete from the current point back to the beginning of the file. |
|
dd |
Delete the current line. |
|
dG |
Delete through end of file. |
|
dw |
Delete the following word. |
|
Esc |
Move into Command mode. |
|
h |
Move backward one character. |
|
l |
Move forward one character. |
|
i |
Switch to Insert mode (Esc switches you back to Command mode). |
|
j |
Move down one line. |
|
k |
Move up one line. |
|
O |
Open up a line above the current line and switches to Insert mode. |
|
o |
Open up a line below the current line and switches to Insert mode. |
|
P |
Put (paste) deleted text before the cursor. |
|
p |
Put (paste) deleted text after the cursor. |
|
X |
Delete character to the left of the cursor. |
|
x |
Delete the character under the cursor. |
|
yw |
Yank (copy) from the cursor to the end of the current word. You can then paste it with |
|
yy |
Yank (copy) the current line. You can then paste it with |
A Simpler vi Alternative: Pico
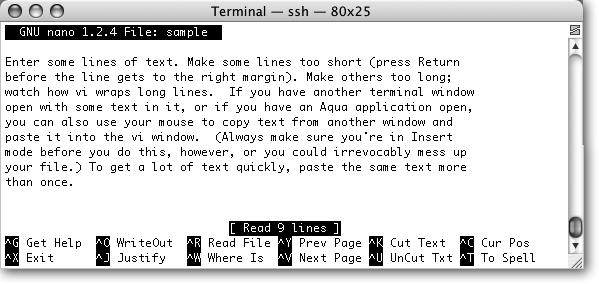
If the section on vi has left you longing for the safety and logic of the graphical world, you might want to explore the simple editing alternative of Pico. Originally written as part of a text-based email system called Pine (which itself was based on an email program called Elm that I wrote in the mid-1980s), Pico has taken on a life of its own and is included in many Unix distributions, including Mac OS X. Figure 4-4 shows the sample file from the earlier example in Pico.
Pico offers a menu-based approach to editing, with onscreen help. It’s a lot friendlier than vi, whose primary way to tell you that you’ve done something wrong is to beep. Pico offers a comfortable middle-ground between text editors such as TextEdit and hardcore Unix text editors such as vi. It’s a friendly editor that you can launch from the command line and never have to take your hands off the keyboard to use. To learn more about Pico, type Control-G while within the editor, or use man pico to read the manpage.
The More Complex Option: Emacs
If Pico is the simpler alternative to vi, then Emacs is the more complex alternative. Originally written as part of an artificial intelligence environment and including its own powerful programming language built atop LISP, Emacs is one of the most powerful editors available on any computer system. Indeed, hardcore Emacs users never leave the editor, and there are Emacs extensions for browsing the Web (albeit in text-only mode), reading and responding to email, chatting via instant message system, and more. Figure 4-5 shows Emacs with the sample file in the edit buffer.
But with great power comes great complexity, and Emacs is not only built upon a completely different paradigm—it’s a nonmodal editor—but it requires you to memorize dozens of different control, meta, and option key sequences.
Tip
If you are interested in trying out the Emacs editor, there’s an X11-based version available at http://mindlube.com/products/emacs/. There’s no better place to start learning more about Emacs than the book Learning GNU Emacs by Debra Cameron, James Elliott, and Marc Loy (O’Reilly).
Managing Files
The tree structure of the Unix filesystem makes it easy to organize your files. After you make and edit some files, you may want to copy or move files from one directory to another, or rename files to distinguish different versions of a file. You may even want to create new directories each time you start a different project. If you copy a file, it’s worth learning about the subtle sophistication of the cp command: if you copy a file to a directory, it automatically reuses the original filename and copies the file to the new location. This can save lots of typing!
More than just saving typing, however, the command line is much more precise, offering greater control than the Finder’s drag-and-drop interface. For example, if you want to create a new folder in the Finder, you need to mouse up to the File menu and choose New Folder or use a non-mnemonic keystroke combination. On the command line, it’s just mkdir to create a new directory. Even more to the point, if you have a folder full of hundreds of files and want to just move those that have temp in their filenames into the Trash, that’s a tedious and error-prone Finder task, while the command-line equivalent is the simple rm *temp*.
A directory tree can get cluttered with old files you don’t need. If you don’t need a file or a directory, delete it to free storage space on the disk. The following sections explain how to make and remove directories and files.
Creating Directories with mkdir
It’s handy to group related files in the same directory. If you were writing a spy novel and reviewed restaurants for a local newspaper, for example, you probably wouldn’t want your intriguing files mixed with restaurant listings. You could create two directories: one for all the chapters in your novel (spy, for example) and another for restaurants (boston.dine).
To create a new directory, use the mkdir program. The syntax is:
mkdir dirname(s)dirname is the name of the new directory. To make several directories, put a space between each directory name. To continue this example, you would enter:
$ mkdir spy boston.dineThis means that if you want to create a directory with a space in the name, you’ll need to escape the space just as you had to earlier when you referenced files with spaces in them. To create the directory My Favorite Music, you’d use:
$ mkdir "My Favorite Music"Another trick is that you can create a new directory and include a bunch of subdirectories within that directory, all from one single command. For example, your spy novel most likely has a few chapters in it, and let’s say that you need separate directories for each chapter for holding the chapter file, any illustrations you want to add, research notes, whatever. You could use the following command to create the spy novel’s main directory and individual subdirectories for the various chapter directories:
$ mkdir -p spy/{ch{01,02,03,04,05,intro,toc,index,bio}}The curly braces ({ }) are used to contain the string that starts out with ch for each directory, and then appends that with the comma-delimited items in the enclosed string, which gives you the chapter numbers. Run the following command to see the list of directories and subdirectories you’ve created:
$ ls -F spy
ch01/           ch03/           ch05/           chindex/        chtoc/
ch02/           ch04/           chbio/          chintro/
Try doing that in the Finder! You can’t. To do that, you’d have to first create a folder named spy, open that, and then create and rename all those subfolders. Talk about time consuming! But here, the power of Unix goes into action and saves the day.
Copying Files
If you’re about to edit a file, you may want to save a copy of it first. That makes it easy to get back the original version should the edit go haywire. To copy files, use the cp program.
The cp program can put a copy of a file into the same directory or into another directory. cp doesn’t affect the original file, so it’s a good way to keep an identical backup of a file.
To copy a file, use the command:
cp old newHere, old is a pathname to the original file and new is the pathname you want for the copy. For example, to copy the /etc/passwd file into a file called password in your home directory, you would enter:
$ cp /etc/passwd ~/password
$
You can also use the form:
cp old olddirThis puts a copy of the original file old into an existing directory olddir. The copy has the same filename as the original.
If there’s already a file with the same name as the copy, cp replaces the old file with your new copy. This is handy when you want to replace an old copy of a file with a newer version, but it can cause trouble if you accidentally overwrite a copy you wanted to keep. To be safe, use ls to list the directory before you make a copy there.
Also, cp has an -i (interactive) option that asks you before overwriting an existing file. It works like this:
$cp -i master existing-file.txtoverwrite existing-file.txt?no$
(You have to either type yes or no to respond to the question; you can also just type y or n and hit Return.)
You can copy more than one file at a time to a single directory by listing the pathname of each file you want copied, with the destination directory at the end of the command line. You can use relative or absolute pathnames (see the sections "Absolute Pathnames" and "Relative Pathnames" in Chapter 3) as well as simple filenames. For example, let’s say your working directory is /Users/carol (from the filesystem diagram in Figure 3-3). To copy three files called ch1, ch2, and ch3 from /Users/john to a subdirectory called Documents (that’s /Users/carol/ Documents), enter:
$ cp ../john/ch1.doc ../john/ch2.doc ../john/ch3.doc DocumentsOr you could use wildcards and let the shell find all the appropriate files. This time, let’s add the -i option for safety:
$cp -i ../john/ch[1-3].doc Documentscp: overwrite work/ch2.doc ?n
This tells you that there is already a file named ch2.doc in the Documents directory. When cp asks, answer n to prevent copying ch2.doc. Answering y overwrites the old ch2doc. As you saw in Chapter 3, the shorthand form . (a single dot or period) refers to the working directory, and .. (dot, dot) refers to the parent directory. For example, the following puts the copies into the working directory:
$ cp ../john/ch[1-3].doc .One more possibility: when you’re working with home directories, you can use a convenient shorthand ~
account
to represent John and Carol’s home directory
(and ~ by itself to represent your own). So here’s yet another way to copy those three files:
$ cp ~john/ch[1-3.doc] Documentscp can also copy entire directory trees with the help of the -R option, for “recursive.” There are two arguments after the option: the pathname of the top-level directory from which you want to copy and the pathname of the place where you want the top level of the copy to be.
As an example, let’s say that a new employee, Asha, has joined John and Carol. She needs a copy of John’s Documents/work directory in her own home directory. (See the filesystem diagram in Figure 3-3.) Her home directory is /Users/asha. If Asha’s own work directory doesn’t exist yet (important!), she could type the following commands:
$cd /Users$cp -R john/Documents/work asha/work
Or, from her home directory, she could have used:
$ cp -R ~john/Documents/work workEither way, Asha now has a new subdirectory /Users/asha/work with a copy of all files and subdirectories from /Users/john/Documents/work.
Tip
If you give cp -R the wrong pathnames, it can copy a directory tree into itself—running forever until your filesystem fills up!
When cp copies a file, the new copy has its ownership changed to the user running the cp command, too, so not only does Asha have the new files, but they’re also owned by her. Here’s an example of how that works:
$ls -l /etc/shells-rw-r--r-- 1 root wheel 179 Nov 14 03:30 /etc/shells $cp /etc/shells ~$ls -l ~/shells-rw-r--r-- 1 taylor taylor 179 Jan 4 07:59 /Users/taylor/shells $
Notice that the ~ shortcut for the home directory can also be used as a target directory with a cp command. Very helpful!
Problem checklist
The following tips should help you diagnose any error messages cp throws your way:
- The system says something like “cp: cannot copy file to itself.”
If the copy is in the same directory as the original, the filenames must be different.
- The system says something like “cp: filename: no such file or directory.”
The system can’t find the file you want to copy. Check for a typing mistake. If a file isn’t in the working directory, be sure to use its pathname.
- The system says something like “cp: permission denied.”
You may not have permission to copy a file created by someone else or to copy it into a directory that does not belong to you. Use ls -l to find the owner and the permissions for the file, or use ls -ld to check the directory. If you feel that you should be able to copy a file, ask the file’s owner or use sudo (see "Superuser Privileges with sudo" in Chapter 3) to change its access modes.
Copying Mac files with resources
The cp program works on plain files and directories, but the Macintosh system stores applications in bundles that include various resources used by the application. These attributes are known as resource forks and are used extensively in Mac OS applications and documents. (You will also find them in various places on the Mac OS X filesystem.) If you’re a Mac OS 9 veteran, you’ll remember that the resources in the resource fork were editable only with ResEdit, and otherwise were hidden in the system. A file’s resource fork, if it exists, can be seen by looking at a special file called filename/rsrc. For example, notice how the Calculator application is actually saved on disk:
$cd /Applications$ls -ld Calculator.appdrwxrwxr-x 3 root admin 102 Jun 22 2004 Calculator.app/
By contrast, look at Figure 4-6, where the applications in Mac OS X are shown in the Finder.
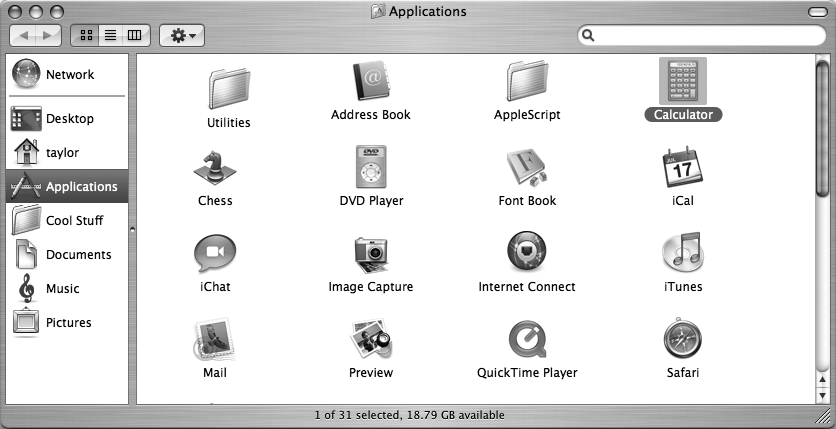
The Unix command output appears rather puzzling, actually. According to the Finder, the Calculator is an application, not a directory, and if you double-click on the icon, the program launches. If it were a directory you’d just move into the directory, right? But the Unix ls command suggests otherwise because in fact it’s not even called Calculator but Calculator.app and it is a directory!
Your might try to use cp -R where you’d otherwise use cp, which, logically, should move the entire directory, including whatever resources are needed:
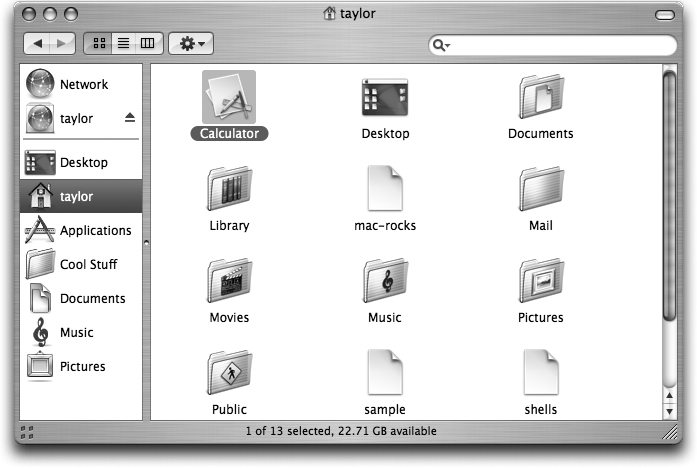
$cp Calculator.app ~cp: Calculator.app is a directory (not copied). $cp -R Calculator.app ~$
A quick glimpse at the Finder in Figure 4-7 shows that it didn’t actually work (the application icon got lost in transit).
There’s a special version of cp that you need to use instead, a program called CpMac which is available on your system only if you installed the Xcode Tools from Tiger’s installation DVD.
With the Xcode Tools installed, you can now copy the application without anything getting lost:
$ /Developer/Tools/CpMac /Applications/Calculator.app ~
$
Notice that the Xcode utilities are in a nonstandard directory path. You will need to either specify the path each time, as shown above, create an alias, or modify your PATH to include the /Developer/Tools directory (Chapter 2 showed how to modify your PATH).
Renaming and Moving Files with mv
To rename a file, use mv (move). The mv program can also move a file from one directory to another.
The mv command has the same syntax as the cp command:
mv old newHere, old is the old name of the file and new is the new name. mv writes over existing files
, which is handy for updating old versions of a file. If you don’t want to overwrite an old file, be sure that the new name is unique. Like cp, mv has an -i option for moving and renaming files interactively:
$mv chap1.doc intro.doc$mv -i chap2.doc intro.docmv: overwrite `intro.doc'?n$
The previous example changed the file named chap1.doc to intro.doc, and then tried to do the same with chap2.doc (answering n cancelled the last operation). If you list your files with ls, you’ll see that the filename chap1.doc has disappeared, but chap2.doc and intro.doc are intact.
The mv command can also move a file from one directory to another. As with the cp command, if you want to keep the same filename, you need only give mv the name of the destination directory. For example, to move the intro.doc file from its present working directory to your Desktop, use the following command:
$ mv intro.doc ~/DesktopIf you need to move a directory (or an application or another Mac OS X file that’s actually a directory with resource elements) you need to use CpMac’s cousin, the MvMac command:
$alias MvMac="/Developer/Tools/MvMac"$MvMac ~/Calculator.app ~/MyApps/MyCalculator.app$
The preceding command set up an alias for MvMac then used the alias to move the Calculator and all its resources into the MyApps subdirectory. To retain the alias on your next login, don’t forget to add it to your .profile or .cshrc file, as appropriate for your login shell.
Removing Files and Directories
You may finish work on a file or directory and see no need to keep it, or the contents may be obsolete. Periodically removing unwanted files and directories frees storage space and saves you from getting confused when there are too many versions of files on your disk.
rm
The rm program removes files. One important thing to point out here, though, is that rm permanently removes the file from the filesystem. It doesn’t move the file to the Trash, from which it can be recovered (at least until you select Empty the Trash from the Finder menu). Once you hit Return, that file is gone, so make darn sure that the file you’re deleting with rm is something you really want to get rid of. Let me say that again: rm does not offer a way to recover deleted files.
The syntax is simple:
rm filename(s)rm removes the named files, as the following example shows:
$lschap10 chap2 chap5 cold chap1a.old chap3.old chap6 haha chap1b chap4 chap7 oldjunk $rm *.old chap10$lschap1b chap4 chap6 cold oldjunk chap2 chap5 chap7 haha $rm c*$lshaha oldjunk $
When you use wildcards with rm, be sure you’re deleting the right files! If you accidentally remove a file you need, you can’t recover it unless you have a copy in another directory or in your backups.
Tip
Do not enter rm * carelessly. It deletes all the files in your working directory.
Here’s another easy mistake to make: you want to enter a command such as rm c* (remove all filenames starting with “c”), but instead enter rm c * (remove the file named c and all the other files in the current directory!)
It’s good practice to list the files with ls before you remove them. Or, if you use rm’s -i (interactive) option, rm asks you whether you want to remove each file.
If you’re security conscious, rm’s -P option might appeal to you: files are overwritten three times, with zeros, ones, and then zeros again, before they’re removed. This makes it impossible for the data to be recovered—even by the most earnest malicious user. The flag doesn’t produce any additional output or confirm that it’s done a safe delete, however:
$lshaha oldjunk $rm -P haha$
rmdir
Just as you can create new directories with mkdir, you can remove them with the rmdir program. As a precaution, rmdir won’t let you delete directories that contain any files or subdirectories; the directory must first be empty. (The rm -r command removes a directory and everything in it, but use the -r flag with caution: it can be dangerous for beginners.)
The syntax is:
rmdir dirname(s)If you try to remove a directory that contains files, you’ll get the following message:
rmdir: dirname not emptyTo delete a directory that contains files or subdirectories:
Enter
cdto get into the directory you want to delete.dirnameEnter
rm *to remove all files in that directory.Enter
cd ..to go to the parent directory.Enter
rmdirto remove the unwanted directory.dirname
One such error you might encounter when using rmdir is that you might still get the dirname
not empty message, even after you’ve deleted all the files inside. If this happens, use ls -a to check that there are no hidden files (names that start with a period) other than . and .. (the working directory and its parent). The following command is good for cleaning up hidden files (which aren’t matched by a simple wildcard such as *). It matches all hidden files except for . (the current directory) and .. (the parent directory):
$ rm -i .[^.]*Working with Links
If you’ve used the Mac for a while, you’re familiar with aliases , empty files that point to other files on the system. A common use of aliases is to have a copy of an application on the Desktop, or to have a shortcut in your home directory. Within the graphical environment, you make aliases by Control-clicking on an item (a file, folder, application, whatever), and then choosing Make Alias from the context menu. This creates a file with a similar name in the same directory. The only difference is that the alias now has the word alias at the end of its filename. For example, if you were to look at this in Unix, you’d see the following:
$ ls -l *3*
-rw-r--r--  1 taylor  taylor  1546099 23 Sep 20:58 fig0403.pdf
-rw-r--r--  1 taylor  taylor        0 24 Sep 08:34 fig0403.pdf alias
In this case, the file fig0403.pdf alias is an alias pointing to the actual file fig0403.pdf in the same directory. But you wouldn’t know it, because it appears to be an empty file: the size is shown as zero bytes.
Tip
If you have a tendency to delete the alias part of a filename, as I do, then one quick technique for identifying if a file is an alias or not is to check out its file size: if it’s size 0 but there’s actually content when you look at it with less, it’s an alias. Failing that, check out that directory in the Finder—use open . as a shortcut—and look for the telltale arrow on the icon.
Unix works with aliases differently; on the Unix side, we talk about links, not aliases. There are two types of links possible in Unix, hard links and symbolic links, and both are created with the ln command.
The syntax is:
ln [-s] source targetThe -s option indicates that you’re creating a symbolic link, so to create a second file that links to the file fig0403.pdf, the command would be:
$ ln -s fig0403.pdf neato-pic.pdfand the results would be:
$ ls -l *pdf
-rw-r--r--  1 taylor  taylor  1532749 23 Sep 20:47 fig0401.pdf
-rw-r--r--  1 taylor  taylor  1539493 23 Sep 20:52 fig0402.pdf
-rw-r--r--  1 taylor  taylor  1546099 23 Sep 20:58 fig0403.pdf
lrwxr-xr-x  1 taylor  taylor       18 24 Sep 08:40 neato-pic.pdf@ ->
     fig0403.pdf
One way to think about symbolic links is that they’re akin to a note saying “the info you want isn’t here, it’s in file X.” This also implies a peculiar behavior of symbolic links (and Aqua aliases): move, rename, or remove the item being pointed to and you have an orphan link. The system doesn’t automatically remove or update symbolic links.
The other type of link is a hard link, which essentially creates a second name entry for the exact same contents. That is, if you create a hard link to fig0403.pdf, you can then delete the original file, and its contents remain accessible through the second filename—even though the original file was deleted. Essentially, they’re different doors into the same room (as opposed to a note taped on a door telling you to go to the second door, as would be the case with a symbolic link). Hard links are created with the ln command, except you omit the -s option:
$ln mypic.pdf copy2.pdf$ls -l mypic.pdf copy2.pdf-rw-r--r-- 2 taylor taylor 1546099 24 Sep 08:45 copy2.pdf -rw-r--r-- 2 taylor taylor 1546099 24 Sep 08:45 mypic.pdf $rm mypic.pdf$ls -l copy2.pdf-rw-r--r-- 1 taylor taylor 1546099 24 Sep 08:45 copy2.pdf
Notice that both files are exactly the same size when the hard link is created. This makes sense because they’re both names to the same underlying set of data, so they should be identical. Then, when the original is deleted, the data survives with the second name now as its only name. The only difference is that the second field, the link count, shows 2 when there are two filenames pointing to the same data, but when the original is deleted, the link count of the second entry, copy2.pdf, goes back to 1.
Compressing and Archiving Files
Aqua users may commonly use StuffIt’s .sit and .hqx formats for file archives or even the ZIP archive capability of Mac OS X itself (Control-click, choose Create Archive from the context menu, and your Mac promptly creates a .zip archive), but Unix users have many other options worth exploring.
Even though Mac OS X is far superior to Windows XP, we unfortunately live in a Windows world, which means you’re going to occasionally send and receive email attachments with Windows users. It’s also not uncommon to download shareware from a web or FTP site that’s been zipped (a file with a .zip extension). Mac OS X gives you many ways to create your own ZIP archives (and to unzip the ones you receive, too). And if you’re interacting with other Unix users (such as Linux, FreeBSD, or even Mac OS X), Mac OS X offers a suite of command-line utilities for batching and unbatching files.
There are three compression programs included with Mac OS X, though the most popular is gzip (the others are compress and bzip2; read their manpages to learn more about how they differ). There’s also a very common Unix archive format called tar that I’ll cover briefly.
gzip
Though it may initially confuse you into thinking that it’s part of the ZIP archive toolset, gzip has nothing to do with the ZIP archive files created by Mac OS X’s Make Archive capability. Instead, gzip is actually a compression program that does a very good job of shrinking down individual files for storage and transmission. If you’re sending a file to someone with a dial-up connection, for example, running the file through gzip can significantly reduce its size and make it much more portable. Just as importantly, it can help save space on your disk by letting you compress files you want to keep but aren’t using currently. gzip works particularly well with tar, too, as you’ll see.
The syntax is:
gzip [-v] file(s)The -v flag offers verbose output, letting the program indicate how much space it saved by compressing the file. Very useful information, as you may expect!
$ls -l ch06.doc-rwxr-xr-x 1 taylor taylor 138240 24 Sep 08:52 ch06.doc $gzip -v ch06.docch06.doc: 75.2% -- replaced with ch06.doc.gz $ls -l ch06.doc.gz-rwxr-xr-x 1 taylor taylor 34206 24 Sep 08:52 ch06.doc.gz
You can see that gzip did a great job compressing the file, saving over 75 percent. Notice that it’s automatically appended a .gz filename suffix to indicate that the file is now compressed. To uncompress the file, just use gunzip:
$gunzip ch06.doc.gz$ls -l ch06.doc-rwxr-xr-x 1 taylor taylor 138240 24 Sep 08:52 ch06.doc
The amount of space saved by compression varies significantly based on the format of the original data in the file. Some file formats lend themselves to compression, but others end up being just as big as the original file:
$ls -l 10*.m4a-rw-r--r-- 1 taylor taylor 4645048 Jan 3 21:29 10 Serpentine Lane.m4a $gzip -v 10*.m4a10 Serpentine Lane.m4a: 0.9% -- replaced with 10 Serpentine Lane.m4a.gz $ls -l 10*-rw-r--r-- 1 taylor taylor 4603044 Jan 3 21:29 10 Serpentine Lane.m4a.gz $
This example resulted in a space savings of less than 1 percent of the file size.
tar
In the old days, Unix system backups were done to streaming tape devices (today you can only see these units in cheesy 60s Sci-Fi films, the huge round tape units that randomly spin as data is accessed). The tool of choice for creating backups from Unix systems onto these streaming tape devices was tar, the tape archiver. Fast-forward to Mac OS X, and tar continues its long tradition as a useful utility, but now it’s used to create files that contain directories and other files within, as an archive. It’s similar to the ZIP format, but differs from gzip because its job is to create a file that contains multiple files and directories. gzip, by contrast, makes an existing file shrink as much as possible through compression.
The tar program is particularly helpful when combined with gzip, actually, because it makes creating archive copies of directories simple and effective. Even better, if you use the -z flag to tar, it automatically invokes gzip to compress its output without any further work. Here’s a fun bit of jargon, too: compressed tar archives are known in the Unix community as tarballs.
The syntax is:
tar [c|t|x] [flags]files and directories to archive
The tar program is too complex to fully explain here, but in a nutshell, tar -c creates archives, tar -t shows what’s in an existing archive, and tar -x extracts files and directories from an archive. The -f
file flag is used to specify the archive name, and the -v flag offers verbose output to let you see what’s going on. As always, man tar produces lots more information about tar’s options.
$du -s Masters\ Thesis6704 Masters Thesis $tar -czvf masters.thesis.tgz "Masters Thesis"Masters Thesis/ Masters Thesis/.DS_Store Masters Thesis/analysis.doc ... Masters Thesis/Web Survey Results.doc Masters Thesis/web usage by section.doc $ls -l masters.thesis.tgz-rw-r--r-- 1 taylor staff 853574 24 Sep 09:20 masters.thesis.tgz
Tip
Notice that we gave tar the directory name, rather than a list of files. This ensures that when the directory is unpacked, the files are placed in a new directory (Masters Thesis), rather than filling the current directory. This is a good habit for people who make lots of archives.
In this example, the directory Masters Thesis is 6.7 MB in size, and hasn’t been accessed in quite a while. This makes it a perfect candidate for a compressed tar archive. This is done by combining the following options: -c (create), -z (compress with gzip), -v (verbose), and -f
file (output file; notice that we added the .gz suffix to avoid later confusion about the file type). In under 10 seconds, a new archive file is created, which is less than 1 MB in size, yet it contains all the files and directories in the original archive. To unpack the archive, use the following command:
$ tar -xvfz masters.thesis.tgzFiles on Other Operating Systems
Chapter 8 explains ways to transfer files across a network—possibly to non-Unix operating systems. Mac OS X has the capability of connecting to a variety of different filesystems remotely, including Microsoft Windows, other Unix systems, and even web-based filesystems.
If the Windows-format filesystem is mounted with your other filesystems, you’ll be able to use its files by typing a Unix-like pathname. If you’ve mounted a remote Windows system’s C: drive over a share named winc, you can access the Windows file C:\WORD\REPORT.DOC through the pathname /Volumes/winc/word/report.doc. Indeed, most external volumes are automatically mounted within the /Volumes directory.
Get Learning Unix for Mac OS X Tiger now with the O’Reilly learning platform.
O’Reilly members experience books, live events, courses curated by job role, and more from O’Reilly and nearly 200 top publishers.

