Straightening
Many a photographer has remarked that it’s harder to keep the horizon straight when composing images on a digital camera’s LCD screen than when looking through an optical (eyepiece) viewfinder. Whether that’s true or not, off-axis, tilted photos are a fact of photography, and especially of scanning—and a new iPhoto 5 feature makes fixing them incredibly easy. Figure 6-12 shows the secrets of the Straighten slider.
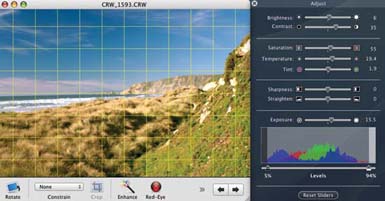
Figure 6-12. The minute you click the Straighten slider, iPhoto superimposes a yellow grid on your picture. By moving the slider in either direction, you rotate the image. Use the yellow grid to help you align the horizontal or vertical lines in the photo, as shown here before (top) and after (bottom).
Now, if you think about it, you can’t rotate a rectangular photo without introducing skinny empty triangles at the corners of its “frame.” Fortunately, iPhoto sneakily eliminates that problem by very slightly magnifying the photo as you straighten it.
Now you’re losing skinny triangles at the corners, but at least you don’t see empty triangular gaps when the straightening is over.
In other words, the straightening tool isn’t a free lunch. Straightening an image decreases the picture quality slightly (by blowing up the picture, thus lowering the resolution) and clips off tiny scraps at the corners. You have to view the before and after pictures side by side at high ...
Get iPhoto 5: The Missing Manual, Fourth Edition now with the O’Reilly learning platform.
O’Reilly members experience books, live events, courses curated by job role, and more from O’Reilly and nearly 200 top publishers.

