The Adjust Panel
For thousands of people, the handful of basic image-fixer tools described on the previous pages offered plenty of power. But many others wound up disappointed with previous iPhoto versions.
Power users were irked at having to trot off to some other program like Photoshop to make more advanced changes to their pictures, like fiddling with the saturation (the intensity of colors) or the sharpness of the image. Meanwhile, Apple clearly detected that the landscape of inexpensive photo editors was changing; even the most basic free digital shoebox program for Windows offered full-blown image controls.
All of which sets the stage for one of iPhoto 5’s most important new features: the Adjust panel (Figure 6-6). It appears whenever you click the Adjust button in editing mode.
Note
Except for the Brightness and Contrast controls, the Adjust palette doesn’t work unless your Mac has at least a G4 processor. And if you want to apply these effects to photos in the RAW format, you’ll need Mac OS X 10.3.6 or later.
Now, before you launch yourself into the following pages and turn yourself into a tweak geek, here are some preliminary words of advice concerning the Adjust panel:
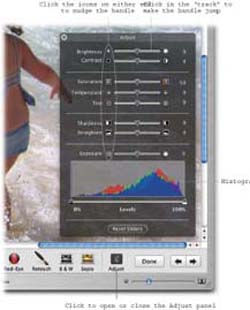
Figure 6-6. You can drag the handle of a slider, of course, but that doesn’t give you much accuracy. Sometimes you may prefer to click directly on the slider, which makes the handle jump to the spot. Finally, you ...
Get iPhoto 5: The Missing Manual, Fourth Edition now with the O’Reilly learning platform.
O’Reilly members experience books, live events, courses curated by job role, and more from O’Reilly and nearly 200 top publishers.

